1. Introducere
This manual provides detailed instructions for the safe and effective use of your KAIWEETS HT118A Digital Multimeter and KET20 Silicone Multimeter Test Leads. The HT118A is a True RMS 6000-count digital multimeter designed for accurate measurement of various electrical parameters. The KET20 test leads are engineered for high safety and durability, complementing the multimeter's capabilities. Please read this manual thoroughly before operation to ensure proper usage and to prevent potential hazards.
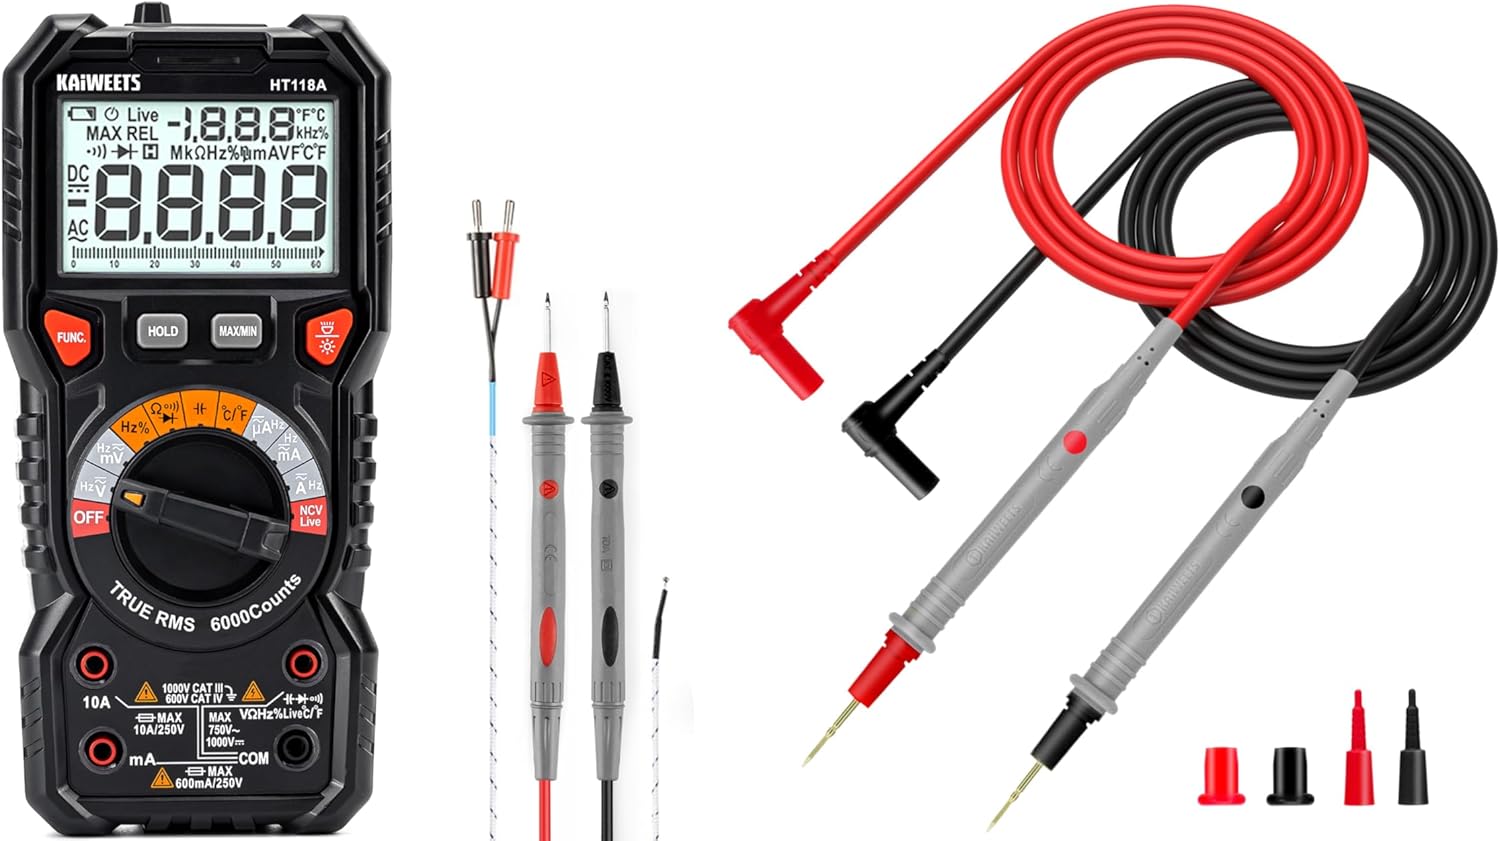
Figure 1: KAIWEETS HT118A Digital Multimeter and KET20 Test Leads. This image displays the HT118A multimeter on the left, featuring its large display and rotary dial, alongside the KET20 silicone test leads on the right, coiled and ready for use.
2. Informații de siguranță
Respectați întotdeauna măsurile de siguranță atunci când utilizați echipamente de testare electrică. Nerespectarea acestei reguli poate duce la electrocutare, vătămări corporale sau deteriorarea contorului sau a echipamentului testat.
- Ensure the multimeter and test leads are in good condition before each use. Inspect for any damage to the casing, insulation, or connectors.
- The KET20 test leads are rated for CAT III 1000V and CAT IV 600V. Always use appropriate safety category leads for the measurement task.
- Nu aplica voltage or current that exceeds the maximum ratings specified for the multimeter.
- Deconectați întotdeauna alimentarea circuitului înainte de a conecta sau deconecta cablurile de testare, în special atunci când măsurați curentul sau rezistența.
- Aveți grijă când lucrați cu voltagpeste 30V AC RMS, 42V peak sau 60V DC, deoarece acestea prezintă un pericol de electrocutare.
- Nu utilizați contorul în medii cu gaze, vapori sau praf exploziv.
- Înlocuiți bateriile imediat ce apare indicatorul de baterie descărcată pentru a asigura citiri precise.
- Refer to the specifications section for detailed safety ratings and measurement limits.
3. Produs terminatview
3.1 KAIWEETS HT118A Digital Multimeter
The HT118A is a versatile digital multimeter featuring True RMS measurement for accurate readings on non-sinusoidal waveforms. It offers a 6000-count resolution on its large 2.9-inch backlit LCD, ensuring clear visibility of measurements.
- Capabilitati de masurare: Măsuri DC/AC voltage up to 1000V/750V, DC/AC current up to 10A, resistance up to 60 MOhms, capacitance, frequency, duty cycle, temperature, diodes, and continuity.
- Auto-Raming: Simplifică operarea prin selectarea automată a intervalului de măsurare corect.
- LED Lightning Jacks: Flashing LED lights guide the user to the correct input jacks for the selected function.
- Vol. Fără contacttagDetectarea e (NCV): For identifying live wires without direct contact.
- Detectarea cablurilor sub tensiune: Specific function to detect live electrical lines.
- Data Hold and MAX/MIN: Functions to freeze readings and record maximum/minimum values.

Figure 2: LED Lightning Jacks. This image highlights the LED indicators around the input jacks of the HT118A multimeter, which illuminate to guide the user to the correct probe connection for the selected function.

Figure 3: 2.9" HTN Backlit Screen and Auto-ranging. This image shows the multimeter's large, orange-backlit display with dual readings, illustrating its auto-ranging capability for accurate AC/DC measurements.

Figure 4: HT118A Multimeter Functions and Battery Compartment. This image provides an overview of the various measurement functions available on the HT118A, including AC/DC voltage, current, frequency, resistance, temperature, capacitance, diodes, continuity, data retention, non-contact voltage, and live line detection. It also shows the battery compartment and kickstand.

Figure 5: Temperature Measurement. This image demonstrates the HT118A multimeter measuring temperature using the included K-Type thermocouple, shown immersed in a glass of water.
3.2 KAIWEETS KET20 Silicone Multimeter Test Leads
The KET20 test leads are designed for enhanced safety and performance, featuring durable silicone insulation and gold-plated probes.
- Evaluări de siguranță: CAT III 1000V and CAT IV 600V, 20A current rating, suitable for professional electrical testing.
- Material: Temperature-resistant soft silicone material ensures flexibility and prevents hardening in various environments. Non-toxic and eco-friendly.
- Sonde: Ultra-sharp 2mm gold-plated probes for precise contact on high-density circuit boards.
- Construcția sârmei: 47 strands of 0.12mm copper wire for excellent tensile strength, flexibility, low resistance, and reliable electrical conductivity.
- Conectori: Universal 4mm banana plugs, compatible with most digital multimeters and clamp metri.
- Lungime: 48 inches (120cm) long for extended reach.

Figure 6: KET20 Test Leads Safety and Features. This image illustrates the key features of the KET20 test leads, including their 0.7mm tip, silicone material, 4mm banana plug, and 120cm length, along with their CAT IV 600V and CAT III 1000V safety ratings.

Figure 7: KET20 Test Leads Higher Safety and Durability. This image emphasizes the robust construction of the KET20 test leads, highlighting their durability, high-temperature resistance, safety, convenience, and universal compatibility.

Figure 8: KET20 Test Leads Silicone Material Properties. This image visually demonstrates the heat and cold resistance of the silicone material used in the KET20 test leads, showing them exposed to flame and ice, indicating suitability for extreme environments.

Figure 9: KET20 Test Leads Probe Details. This image provides a close-up view of the test lead probes, highlighting their flexible silicone construction, high-purity copper wire, and gold-plated tips.
4. Configurare
4.1 Instalarea bateriei
- Asigurați-vă că multimetrul este oprit.
- Localizați capacul compartimentului bateriei pe spatele multimetrului (consultați Figura 4).
- Deșurubați șurubul (șuruburile) de fixare și scoateți capacul.
- Introduceți bateriile necesare, respectând polaritatea corectă (+ și -).
- Puneți la loc capacul compartimentului bateriei și fixați-l cu șurubul (șuruburile).
4.2 Conectarea cablurilor de testare
- Pentru majoritatea măsurătorilor (vol.tage, resistance, continuity, diode, capacitance, frequency, temperature), insert the red test lead into the "VΩHz" jack and the black test lead into the "COM" jack.
- For current measurements (mA/µA), insert the red test lead into the "mAµA" jack and the black test lead into the "COM" jack.
- For high current measurements (10A), insert the red test lead into the "10A" jack and the black test lead into the "COM" jack.
- The LED lightning jacks will illuminate to indicate the correct connection points for the selected function.
5. Instrucțiuni de utilizare
The HT118A features auto-ranging for most functions, simplifying operation. Turn the rotary dial to the desired measurement function.
5.1 Vol. de măsuraretage (AC/DC)
- Rotiți butonul rotativ spre V~ (Volumul AC)tage) sau V- (DC Voltage) poziţia.
- Connect the red test lead to the "VΩHz" jack and the black test lead to the "COM" jack.
- Conectați sondele de testare în paralel pe componenta sau circuitul care urmează să fie măsurat.
- Citiți voltage valoarea pe display.
5.2 Măsurarea curentului (AC/DC)
- AVERTIZARE: Always disconnect power to the circuit before connecting the multimeter for current measurement.
- Rotiți butonul rotativ spre A~ (curent alternativ) sau A- poziția (curent continuu).
- For mA/µA measurements, connect the red test lead to the "mAµA" jack and the black test lead to the "COM" jack.
- For 10A measurements, connect the red test lead to the "10A" jack and the black test lead to the "COM" jack.
- Conectați sondele de testare în serie cu circuitul care urmează să fie măsurat.
- Conectați circuitul la curent și citiți valoarea curentului pe afișaj.
5.3 Măsurarea rezistenței
- AVERTIZARE: Asigurați-vă că circuitul este dezactivat și că toți condensatorii sunt descărcați înainte de a măsura rezistența.
- Rotiți butonul rotativ spre Ω Poziție (de rezistență).
- Connect the red test lead to the "VΩHz" jack and the black test lead to the "COM" jack.
- Conectați sondele de testare la componenta care urmează să fie măsurată.
- Citiți valoarea rezistenței pe afișaj.
5.4 Test de continuitate
- AVERTIZARE: Asigurați-vă că circuitul este dezactivat înainte de a efectua un test de continuitate.
- Rotiți butonul rotativ spre ))) Poziția (Continuitate).
- Connect the red test lead to the "VΩHz" jack and the black test lead to the "COM" jack.
- Touch the test probes to the two points of the circuit to be tested.
- If continuity exists (low resistance), the meter will emit an audible beep.
5.5 Testarea diodei
- AVERTIZARE: Ensure the circuit is de-energized before performing a diode test.
- Rotiți butonul rotativ spre ->| Poziția (diodei).
- Connect the red test lead to the "VΩHz" jack and the black test lead to the "COM" jack.
- Conectați sonda roșie la anod și sonda neagră la catodul diodei. Afișajul va afișa tensiunea directă.tage picătură.
- Inversați sondele. Afișajul ar trebui să afișeze „OL” (Buclă deschisă) pentru o diodă bună.
5.6 Măsurarea capacității
- AVERTIZARE: Asigurați-vă că condensatorul este complet descărcat înainte de măsurare pentru a preveni deteriorarea contorului.
- Rotiți butonul rotativ spre -||- Poziția (Capacitanță).
- Connect the red test lead to the "VΩHz" jack and the black test lead to the "COM" jack.
- Conectați sondele de testare la bornele condensatorului.
- Citiți valoarea capacității pe afișaj.
5.7 Măsurarea frecvenței și a ciclului de funcționare
- Rotiți butonul rotativ spre Hz% Poziția (Frecvență/Ciclu de funcționare).
- Connect the red test lead to the "VΩHz" jack and the black test lead to the "COM" jack.
- Conectați sondele de testare la sursa de semnal.
- Press the "FUNC" button to toggle between frequency (Hz) and duty cycle (%).
5.8 Măsurarea temperaturii
- Rotiți butonul rotativ spre ° C / ° F Poziția (Temperatură).
- Connect the K-Type thermocouple (included) to the appropriate input jacks (usually marked for temperature).
- Plasați sonda termocuplu în punctul unde trebuie măsurată temperatura.
- Read the temperature value on the display. Press "FUNC" to switch between Celsius and Fahrenheit.
5.9 fără contact voltagDetectarea e (NCV) și a cablurilor sub tensiune
- Rotiți butonul rotativ spre NCV Live poziţie.
- Bring the top of the multimeter near the conductor to be tested.
- For NCV, the meter will beep and the NCV indicator will light up if AC voltage este detectat.
- For Live wire detection, press the "FUNC" button to switch to Live mode. Place the red probe into the live wire socket. The meter will indicate if it's a live wire.
5.10 Funcții speciale
- ȚINEȚI: Apăsați butonul „HOLD” pentru a îngheța valoarea curentă de pe afișaj. Apăsați din nou pentru a o elibera.
- MAX / MIN: Press the "MAX/MIN" button to enter MAX/MIN recording mode. The meter will display the maximum or minimum value recorded since activation. Press again to cycle through MAX, MIN, and current readings.
- Iluminare de fundal: Apăsați butonul de iluminare de fundal (adesea indicat de pictograma unui bec) pentru a activa sau dezactiva iluminarea de fundal a afișajului.
6. Întreținere
6.1 Curățare
- Ștergeți contorul casing cu anunțamp cârpă și detergent blând. Nu folosiți abrazivi sau solvenți.
- Keep the test leads clean and free from dirt or grease to ensure good electrical contact.
6.2 Înlocuirea bateriei
When the low battery indicator appears on the display, replace the batteries as described in Section 4.1. Remove batteries if the meter is not used for an extended period to prevent leakage.
6.3 Inspecția cablurilor de testare
Regularly inspect the KET20 test leads for any signs of damage, such as cuts, cracks, or exposed wiring. Damaged leads must be replaced immediately to ensure safety and accurate measurements.
7. Depanare
- Contorul nu pornește: Verificați instalarea bateriilor și asigurați-vă că bateriile nu sunt descărcate.
- Se afișează „OL”: This typically means "Over Limit" or "Open Loop." The measured value is outside the meter's range, or there is an open circuit (e.g., when measuring resistance on an open wire).
- Citiri inexacte:
- Verificați nivelul bateriei.
- Ensure test leads are properly connected to the correct jacks.
- Verify the rotary dial is set to the appropriate function.
- Clean test probes and connection points.
- Fără bip de continuitate: Ensure the circuit is de-energized and the probes are making good contact.
8. Specificații
| Caracteristică | Caietul de sarcini |
|---|---|
| Marca | KAIWEETS |
| Model | HT118A |
| Afişa | 6000 Counts, 2.9" HTN Backlit LCD |
| Tip de măsurare | RMS adevărat |
| DC Voltage Gama | Până la 1000V |
| AC Voltage Gama | Până la 750V |
| Interval de curent DC/AC | Până la 10A |
| Interval de rezistență | Până la 60 MOhmi |
| Capacitate | Da |
| Ciclul de frecvență / funcționare | Da |
| Măsurarea temperaturii | Yes, with K-Type Thermocouple |
| Testul diodei | Da |
| Test de continuitate | Da |
| NCV/Live Detection | Da |
| Safety Rating (Test Leads) | CAT III 1000V, CAT IV 600V (20A) |
| Materialul cablului de testare | Silicon |
| Test Lead Probe Type | 2mm Ultra-Fine Gold-Plated |
| Sursa de alimentare | Alimentat cu baterie |
| Culoare | Negru |
Notă: Specificațiile pot fi modificate fără notificare prealabilă.
9. Garanție și asistență
KAIWEETS products are designed for reliability and performance. For warranty information, technical support, or service inquiries, please refer to the official KAIWEETS website-ul lor web sau contactați departamentul lor de asistență pentru clienți. Păstrați bonul fiscal ca dovadă a achiziției pentru reclamațiile în garanție.
Official KAIWEETS Store: KAIWEETS Store on Amazon


