1. Introducere
This manual provides instructions for the safe and effective use of the KAIWEETS KC604 Digital Clamp Meter Multimeter and the KET12 Soft Silicone Electrician Test Leads Kit. Please read this manual thoroughly before operation and retain it for future reference. This kit is designed for professional and DIY electrical testing, offering a range of measurement capabilities for various applications.
2. Informații de siguranță
Always adhere to safety precautions when using electrical testing equipment. Failure to do so may result in injury or damage to the device. This device is designed for safe operation when used according to these instructions.
- Do not exceed the maximum input values for any function. The KC604 is rated for CAT III 1000V and CAT IV 600V.
- Ensure the test leads are properly connected and the function switch is set to the correct range before making measurements.
- Always use appropriate personal protective equipment (PPE) such as safety glasses and insulated gloves when working with electrical circuits.
- Inspect test leads for damage before each use. Do not use if insulation is compromised or if there are any signs of wear.
- Avoid touching exposed conductors or circuit components when power is applied.
- Do not operate the meter if it appears damaged or is not functioning correctly.
- Înlocuiți bateriile imediat ce apare indicatorul de baterie descărcată pentru a asigura citiri precise și funcționarea corectă a dispozitivului.
- Never attempt to measure current on a circuit with the test leads; use the clamp function for current measurements.

Image: An electrician safely using the KAIWEETS KC604 Digital Clamp Meter to perform measurements within an electrical panel, highlighting its application in a professional setting.
3. Produs terminatview
3.1 KAIWEETS KC604 Digital Clamp Metru
The KAIWEETS KC604 is a versatile digital clamp contor conceput pentru măsurarea curentului AC/DC, a volumului AC/DCtage, resistance, continuity, diode, capacitance, frequency, and temperature. It features a D-shaped jaw for clamping around conductors and a clear digital display with backlight and flashlight functions for improved visibility in various environments.

Image: The KAIWEETS KC604 Digital Clamp Contor, aratăasing its main components including the clamp jaw, function dial, and LCD display.
3.2 KAIWEETS KET12 Soft Silicone Electrician Test Leads Kit
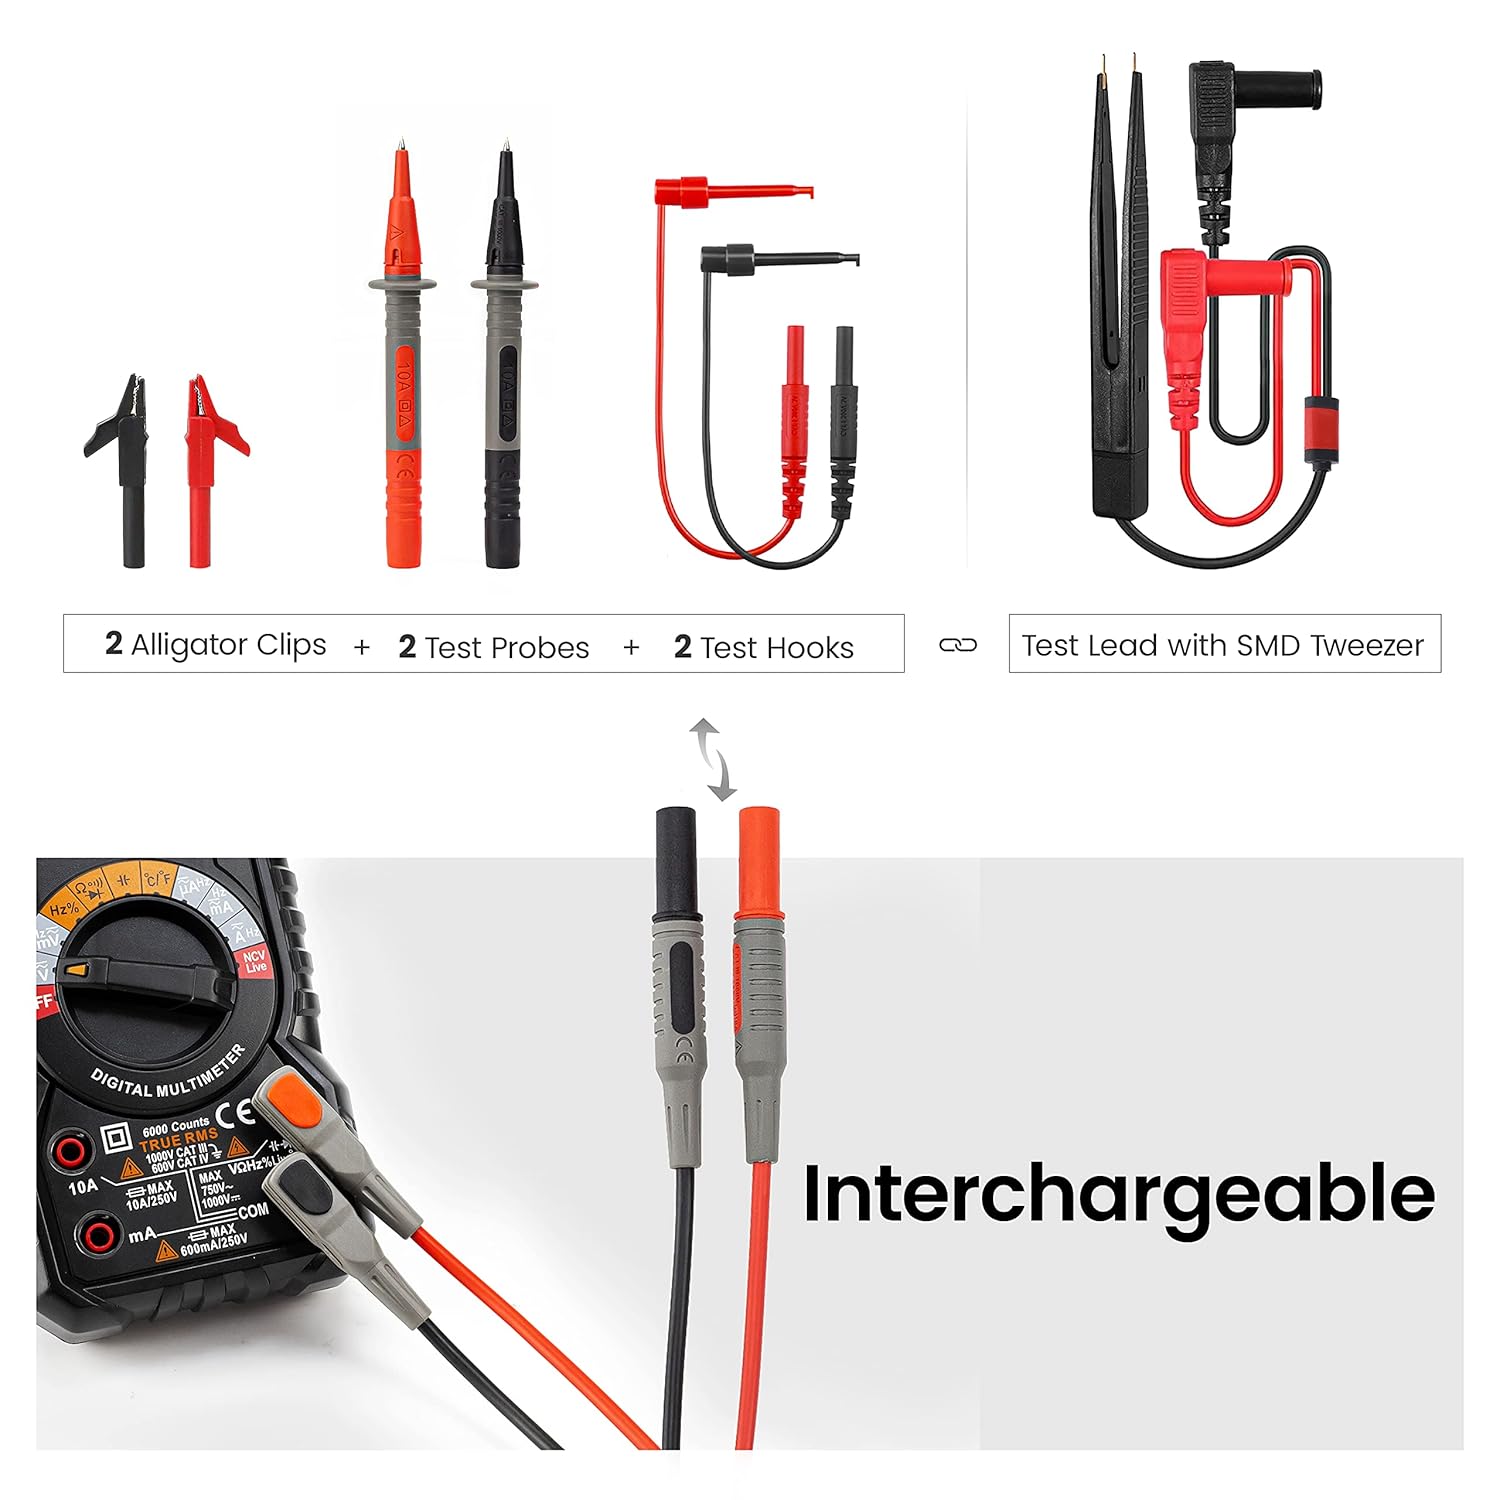
The KET12 kit provides high-quality, flexible silicone test leads with interchangeable connectors, including alligator clips, needle probes, and mini-hooks, for various testing applications. These leads are double-insulated, rated for CAT III 1000V & CAT IV 600V, and can handle a 10A current, ensuring safety and versatility.
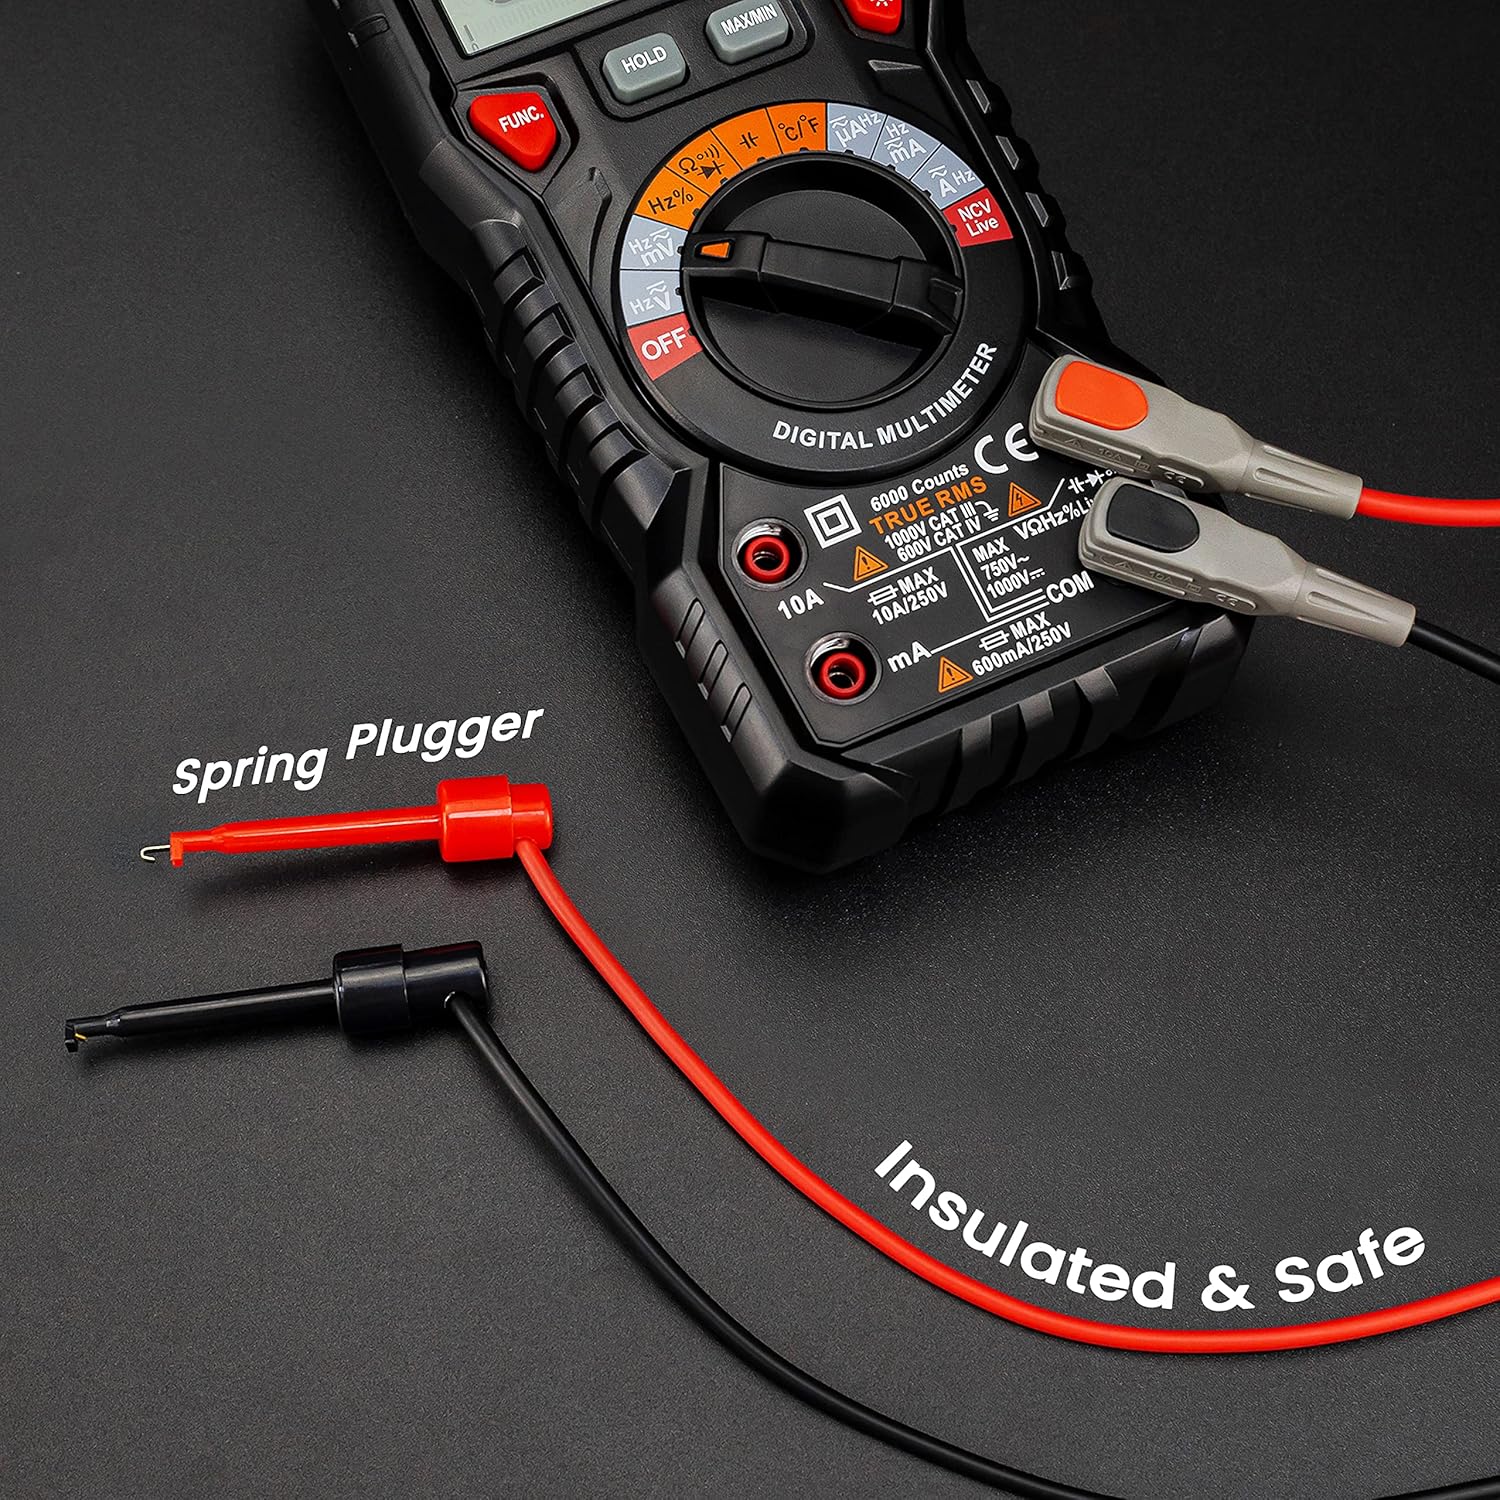
Image: Components of the KET12 Test Leads Kit, including two alligator clips, two test probes, two test hooks, and a test lead with an SMD tweezer, demonstrating the interchangeable nature of the connectors.
4. Configurare
4.1 Instalarea bateriei
The KC604 requires batteries for operation. To install or replace batteries, locate the battery compartment on the back of the device. Use a screwdriver to open the compartment, insert the batteries according to the polarity markings, and then securely close the compartment. Refer to the device markings for the correct battery type (e.g., AAA or 9V).
4.2 Conectarea cablurilor de testare
Pentru majoritatea volumuluitage, resistance, continuity, diode, capacitance, and frequency measurements, insert the red test lead into the "VΩmA" input jack and the black test lead into the "COM" input jack. Ensure the connections are firm. For current measurements using the clamp function, test leads are not required for the main current path.

Image: An illustration showing test leads properly connected to a multimeter's input jacks, demonstrating the correct setup for various electrical measurements.
5. Instrucțiuni de utilizare
5.1 Pornire/Oprire
Rotate the function dial from the "OFF" position to any desired measurement function to power on the device. To power off, rotate the function dial back to "OFF". The device features an auto-shutdown function after a period of inactivity to conserve battery life.
5.2 Measuring AC/DC Current (Clamp Funcţie)
Rotate the function dial to the appropriate AC or DC current range (e.g., 40A, 400A). Open the clamp jaw and carefully enclose a single conductor. Ensure the jaw is fully closed. The current value will be displayed on the LCD. Do not clamp în jurul mai multor conductori, deoarece acest lucru va duce la o citire inexactă.

Image: The KAIWEETS KC604 clamp meter actively measuring AC/DC current by securely clamping around a single electrical wire, displaying the reading on its screen.
5.3 Măsurarea AC/DC Voltage
Rotate the function dial to the AC V or DC V range. Connect the red and black test leads in parallel to the circuit or component where voltage is to be measured. The voltage value will be displayed on the LCD. Always ensure the correct voltage type (AC or DC) is selected.

Image: The KAIWEETS KC604 clamp meter measuring AC/DC voltage using its connected test leads, with the voltage reading visible on the display.
5.4 Măsurarea temperaturii
Rotate the function dial to the temperature function (°C/°F). Connect the temperature probe (typically a K-type thermocouple, if included) to the meter's input jacks. Place the tip of the probe on the object whose temperature is to be measured. The temperature will be displayed in Celsius or Fahrenheit.

Image: The KAIWEETS KC604 clamp meter measuring temperature using a connected temperature probe, showing the temperature reading on its display.
5.5 Other Functions (Resistance, Continuity, Diode, Capacitance, Frequency)
For these functions, rotate the function dial to the corresponding symbol. Connect the test leads to the appropriate input jacks and across the component or circuit being tested. Always ensure the circuit is de-energized before measuring resistance, continuity, diode, or capacitance.
- Rezistență (Ω): Măsoară rezistența electrică în ohmi.
- Continuity (Buzzer): Indicates a complete circuit with an audible tone and low resistance reading.
- Diode (►|--): Tests diode functionality and forward voltage picătură.
- Capacitate (F): Măsoară capacitatea în faradi.
- Frecvență (Hz%): Măsoară frecvența unui semnal de curent alternativ.
5.6 Funcțiile MAX/MIN și HOLD
The MAX/MIN button allows the meter to capture and display the maximum and minimum readings during a measurement session. Pressing it cycles through MAX, MIN, and current readings. The ȚINE button freezes the current reading on the display, which is useful for recording measurements in hard-to-reach areas.
6. Întreținere
6.1 Curățare
Ștergeți contorul și cablurile de testare cu reclamăamp cloth and mild detergent. Do not use abrasive cleaners, solvents, or harsh chemicals, as these can damage the casing or display. Ensure the device is powered off and disconnected from any circuits before cleaning.
6.2 Înlocuirea bateriei
When the low battery indicator appears on the display, replace the batteries immediately to ensure accurate readings and proper device functionality. Refer to the battery compartment cover for the correct battery type and ensure proper polarity during installation.
6.3 Îngrijirea cablurilor de testare
Store test leads properly to prevent kinking, sharp bends, or damage to the insulation. Regularly inspect the test leads for any cuts, cracks, or other signs of wear. Damaged test leads should be replaced immediately to maintain safety and measurement accuracy.
Imagine: Un prim-plan view of the flexible, double-insulated silicone test leads, emphasizing their durable and soft construction for long-lasting use.
7. Depanare
7.1 Probleme comune și soluții
- Fără afișaj/alimentare: Check battery installation and charge. Ensure the function dial is not on the "OFF" position. Replace batteries if necessary.
- Citiri inexacte: Verify correct function selection and test lead connection. Check for damaged test leads. Ensure the clamp jaw is fully closed around a single conductor for current measurements. Ensure the circuit is de-energized for resistance/continuity tests.
- Fără bip de continuitate: Ensure the circuit is de-energized. Check for open circuits or high resistance in the component being tested.
- Afișajul arată „OL” (Suprasarcină): The measured value exceeds the selected range. Select a higher range or ensure the input is within the device's specifications.
8. Specificații
8.1 KAIWEETS KC604 Digital Clamp Metru
- Evaluare de siguranță: CAT III 1000V, CAT IV 600V
- Afişa: 4000 Counts Digital Display
- AC/DC Current Range: Up to 400A (via clamp)
- AC / DC Voltage Gama: Până la 1000V
- Interval de temperatură: -4°F până la 1832°F (-20°C până la 1000°C)
- Caracteristici: Auto-shutdown, Backlight, Flashlight, Low battery indication, NCV (Non-Contact Voltage) detection, MAX/MIN, HOLD functions.
8.2 KAIWEETS KET12 Test Leads Kit
- Evaluare de siguranță: CAT III 1000V, CAT IV 600V
- Evaluare curentă: 10A
- Material: Soft Silicone Double Insulated
- Lungimea firului: Aproximativ 48 inchi (122 cm)
- Wire Core: Composed of 105pcs 0.001mm copper wires and nylon yarn for excellent tensile strength and low resistance.
- Conectori: Interchangeable alligator clips, needle probes, and mini-hooks.
9. Garanție și asistență
9.1 Informații despre garanție
KAIWEETS provides a 36-month after-sale service for this product. This warranty covers manufacturing defects and ensures the product meets its specified performance. Please retain your proof of purchase for warranty claims.
9.2 Informații de contact
For warranty claims, technical support, or any inquiries regarding the KAIWEETS KC604 Digital Clamp Meter and KET12 Test Leads Kit, please contact KAIWEETS customer service through their official website or the retailer where the product was purchased. Detailed contact information can typically be found in your product packaging or on the KAIWEETS official support page.


