1. Introducere
This manual provides detailed instructions for the installation, operation, and maintenance of your MT-VIKI 17-inch 16-Port Rack KVM Switch. This device is designed to manage up to 16 computers or servers from a single console, integrating a 17-inch LCD monitor, keyboard, and touchpad into a compact 1U rack-mountable drawer.

Image 1.1: The MT-VIKI 17-inch 16-Port Rack KVM Switch console, featuring an integrated LCD, keyboard, and touchpad.
2. Informații de siguranță
Please read and follow these safety guidelines to ensure proper operation and prevent damage to the device or injury to yourself.
- Asigurați-vă că dispozitivul este instalat într-o zonă bine ventilată pentru a preveni supraîncălzirea.
- Use only the provided power adapter. Using an incorrect adapter may cause damage.
- Nu expuneți dispozitivul la apă, umezeală sau temperaturi extreme.
- Evitați plasarea obiectelor grele pe dispozitiv.
- Deconectați alimentarea cu energie electrică înainte de curățare sau efectuarea oricărei operațiuni de întreținere.
3. Conținutul pachetului
Verificați dacă toate articolele sunt prezente în colet:
- 1x MT-VIKI 17-inch 16-Port Rack KVM Switch Console (Model: MT-1716UL)
- 16x VGA KVM Cables (various lengths)
- 1x adaptor de alimentare
- 1x Manual de utilizare

Image 3.1: The KVM console and the assortment of included VGA KVM cables.
4. Produs terminatview
The MT-VIKI 17-inch 16-Port Rack KVM Switch integrates essential components for server management into a single unit.
4.1 Componentele panoului frontal
- 17-inch LCD Monitor: Displays video output from connected computers.
- Tastatura: Standard 98-key layout for input.
- Touchpad: Integrated pointing device.
- Panel Switch Buttons: For direct port selection.
- External USB Interface: For connecting additional USB devices.
4.2 Porturi pe panoul din spate
- KVM Control Interface: Connects to the KVM module.
- USB Software Debug Port: For firmware updates or diagnostics.
- Buton comutator de alimentare: Pentru a porni/opri unitatea.
- Ieșire VGA: For connecting an external monitor (if supported).
- External USB Interface: Additional USB connectivity.
- Putere de intrare: For the DC12V power adapter.
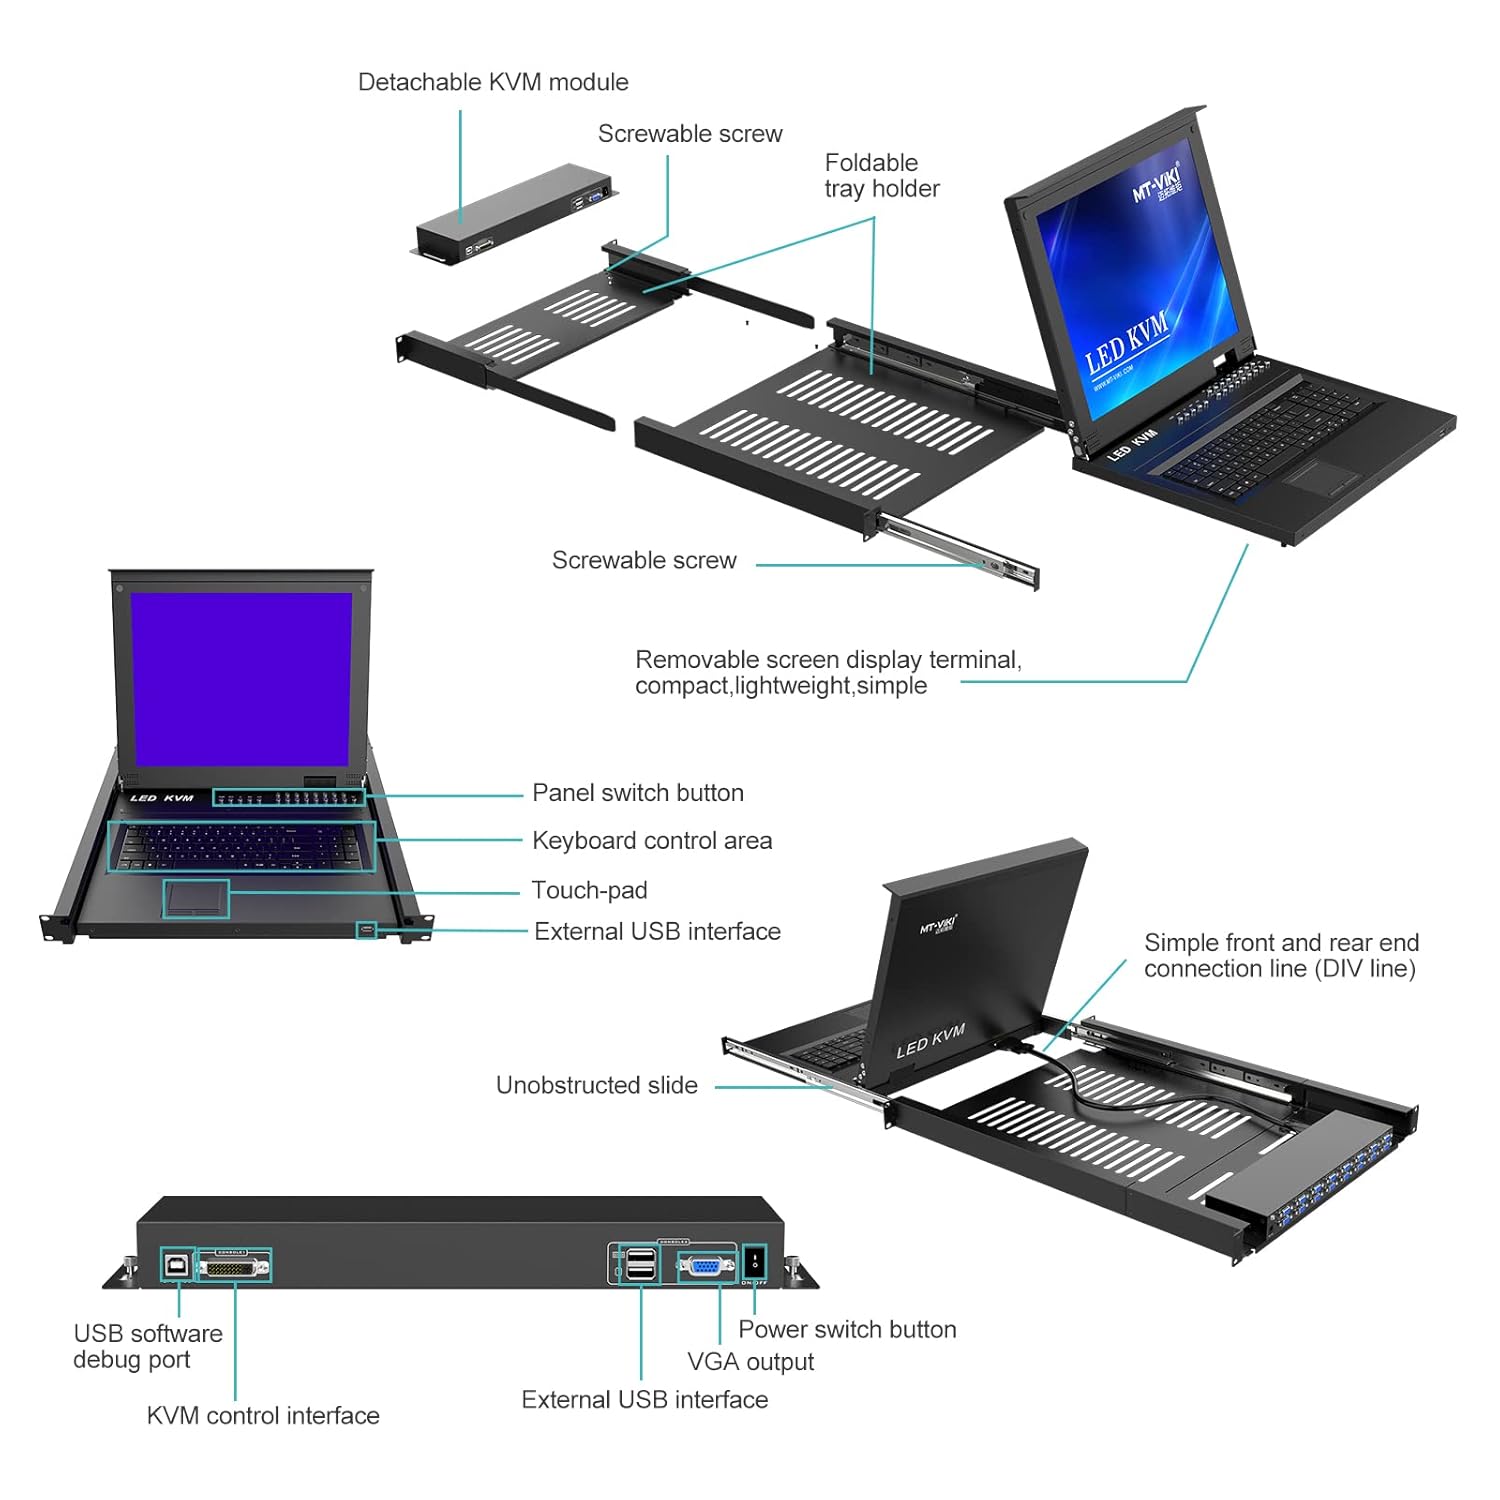
Image 4.1: Detailed diagram illustrating the detachable KVM module, screwable screws, foldable tray holder, panel switch button, keyboard control area, touchpad, external USB interface, unobstructed slide, simple front and rear end connection line, USB software debug port, KVM control interface, power switch button, VGA output, and external USB interface.

Imaginea 4.2: Spate view of the KVM module, highlighting the USB software debug port, KVM control interface, power switch button, VGA output, and external USB interface.
5. Configurare
5.1 Montarea pe rack
The KVM switch is designed for installation in a standard 1U 19-inch rack. The cabinet installation depth should be between 23.6 inches (60cm) and 31.8 inches (81cm).
- Extend the mounting rails from the KVM console.
- Secure the console into the 19-inch rack using appropriate rack screws.
- Ensure the console slides smoothly in and out of the rack.

Image 5.1: The KVM console mounted in a 1U server rack, illustrating the mounting depth range of 23.6 to 31.8 inches and the convenient front USB port.

Image 5.2: The KVM console integrated into a server room setup, demonstrating its application in managing multiple servers.
5.2 Conectarea computerelor
Use the provided VGA KVM cables to connect your computers to the KVM switch.
- Connect the VGA connector of a KVM cable to the VGA output of your computer.
- Connect the USB connector of the same KVM cable to a USB port on your computer.
- Connect the other end of the KVM cable to an available KVM port on the rear of the KVM switch.
- Repeat for all computers you wish to connect.
5.3 Pornire
- Connect the DC12V power adapter to the power input port on the KVM switch.
- Conectați adaptorul de alimentare la o priză adecvată.
- Press the power switch button on the rear panel to turn on the KVM switch.
6. Operating the KVM Switch
The MT-VIKI KVM switch offers multiple methods for switching between connected computers.
6.1 Switching Methods
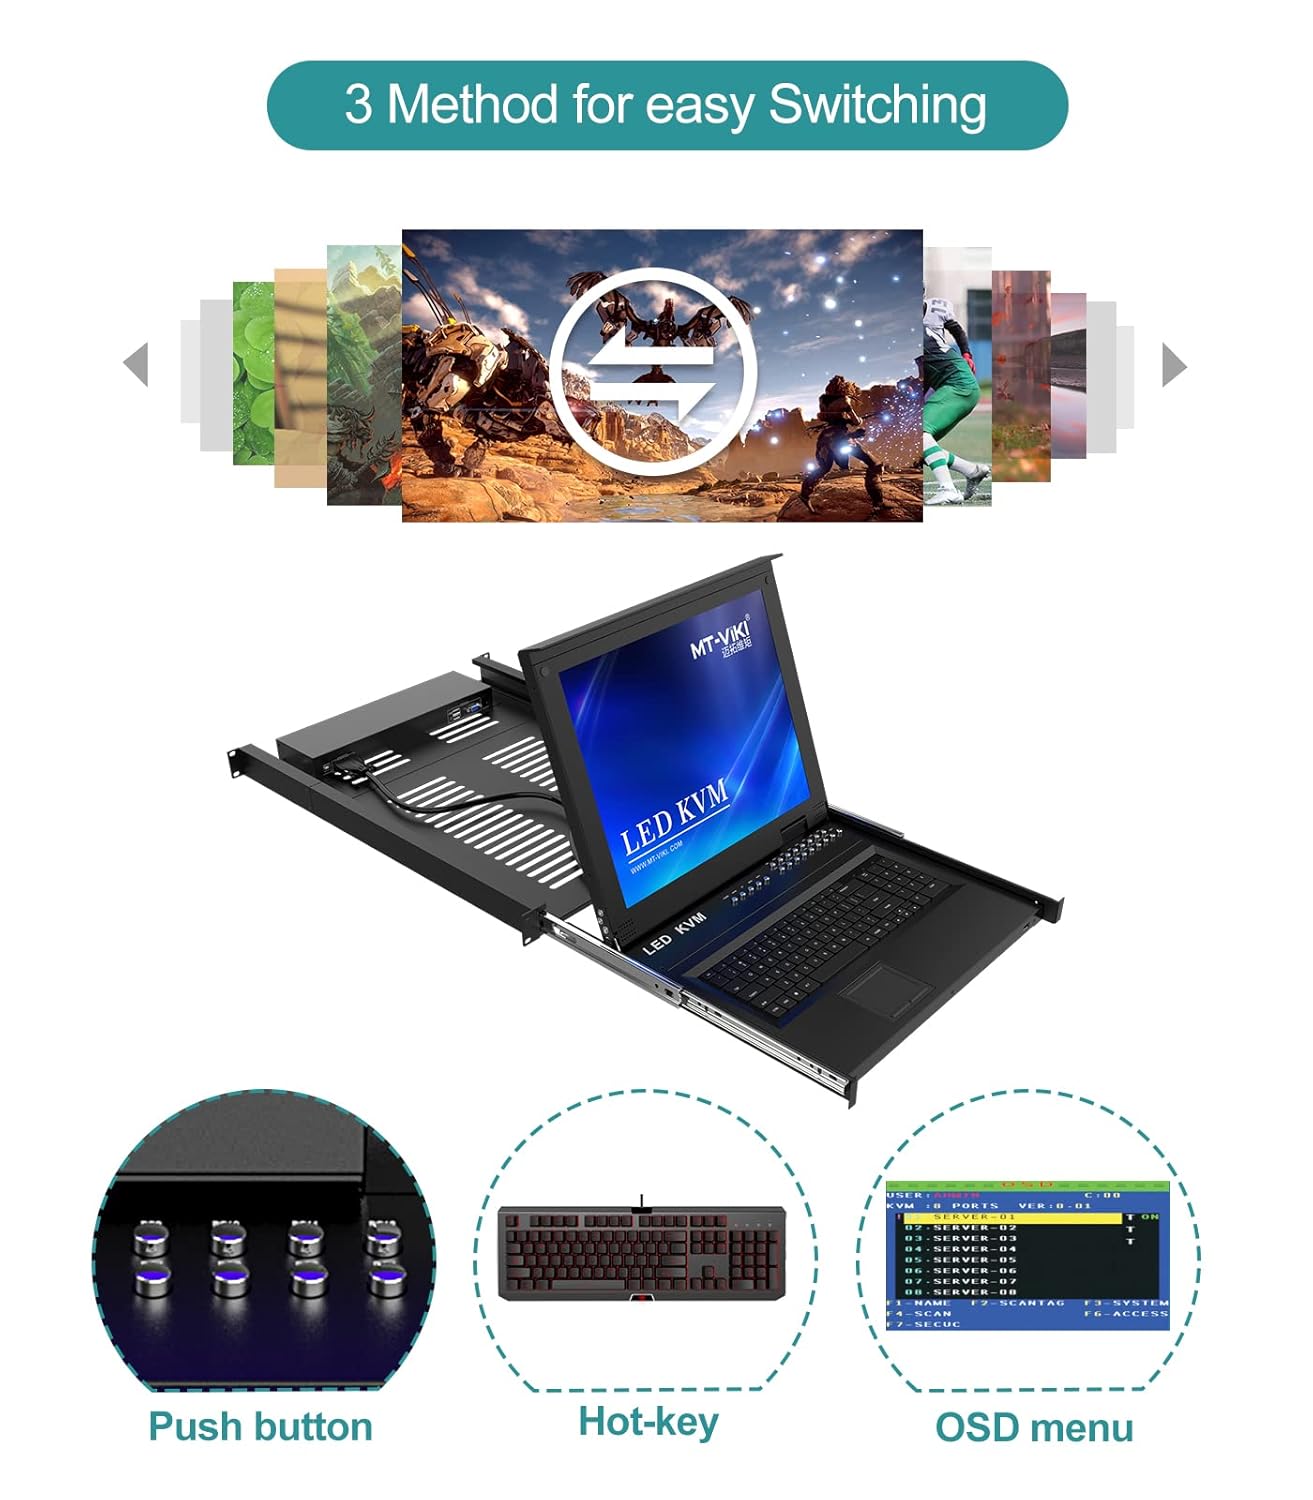
Image 6.1: Illustration of the three available methods for switching between connected computers: Push button, Hot-key commands, and the On-Screen Display (OSD) menu.
- Apasa butonul: Use the physical buttons on the front panel of the KVM console to directly select a port.
- Tasta rapidă: Utilize keyboard hotkey combinations to switch between ports. Refer to the OSD menu for specific hotkey sequences.
- Meniul OSD: Access the On-Screen Display menu to navigate and select ports, configure settings, and manage security.
6.2 Navigare în meniul OSD
The OSD menu provides a graphical interface for managing the KVM switch. Typically, you can activate the OSD menu by pressing a specific hotkey combination (e.g., Scroll Lock + Scroll Lock, or Ctrl + Ctrl). Once activated, use the arrow keys and Enter key on the keyboard to navigate and make selections.
6.3 Caracteristici de securitate
The KVM switch supports 2-level password security, allowing for administrator and user accounts. Up to 8 authorized users and an administrator can view and control the connected computers. Refer to the OSD menu for setting up and managing user accounts and passwords.
6.4 Daisy-Chaining
This KVM switch supports daisy-chaining, allowing you to control up to 256 computers by connecting multiple KVM units. Consult the daisy-chaining diagram and instructions for proper setup.

Image 6.2: Diagram showing the daisy-chaining capability, allowing control of up to 256 computers by connecting multiple 16-port KVM switches.
7. Întreținere
7.1 Curățare
- Before cleaning, ensure the KVM switch is powered off and disconnected from the power source.
- Folosiți o lavetă moale și uscată pentru a șterge suprafețele exterioare.
- For the LCD screen, use a screen-specific cleaning solution and a microfiber cloth. Do not spray liquid directly onto the screen.
- Evitați utilizarea agenților de curățare abrazivi sau a solvenților.
7.2 Considerații de mediu
To ensure longevity and optimal performance, operate the KVM switch within the specified temperature and humidity ranges. Avoid dusty environments.
8. Depanare
Dacă întâmpinați probleme cu switch-ul KVM, consultați următoarele probleme și soluții comune:
| Problemă | Cauza posibila | Soluţie |
|---|---|---|
| Fără afișaj pe LCD | Power cable disconnected; KVM cable loose; Computer not powered on; Incorrect port selected. | Check power connections; Ensure KVM cables are securely connected; Verify computer is on; Select correct port via button/hotkey/OSD. |
| Tastatura/mouse-ul nu răspunde | USB cable loose; KVM cable faulty; Driver issue on computer. | Check USB connections; Try a different KVM cable; Restart the computer; Ensure KVM switch is powered on. |
| Cannot switch between computers | Hotkey conflict; OSD menu frozen; KVM switch malfunction. | Check hotkey settings in OSD; Power cycle the KVM switch; Ensure all KVM cables are properly connected. |
| Calitate video slabă | KVM cable too long or low quality; Resolution mismatch. | Use shorter or higher quality KVM cables; Adjust computer's display resolution to 1280x1024. |
9. Specificații
| Caracteristică | Detaliu |
|---|---|
| Model | MT-1716UL |
| Dimensiune LCD | 17 inches TFT LED |
| Raportul de aspect | 4:3 |
| Rezoluţie | 1280x1024 |
| Afișaj color | 16.7 milioane |
| Luminozitate | 300 cd/m² |
| Durata de viață LCD | Mai mult de 50,000 de ore |
| Consumul de energie | Max 24W |
| Tastatura | 98 keys, internal PS/2 port, external USB port |
| Touchpad Lifespan | de 1,000,000 ori |
| Intrare de putere | DC12V |
| Materialul carcasei | Aluminiu + Metal |
| Dimensiunile produsului (L×A×H) | 600x400x45mm (23.6x15.7x1.78 inches) |
| Adâncimea de instalare a dulapului | 600-810 mm (23.6-31.8 inchi) |
| Temperatura de funcționare | -45°C până la 60°C |
| Temperatura de depozitare | -20°C până la 65°C |
| Tipul circuitului | 16 sensuri |
10. Garanție și asistență
For warranty information, technical support, or service inquiries, please contact MT-VIKI customer support or visit the official MT-VIKI website-ul. Păstrați chitanța de achiziție pentru cererile de garanție.
Manufacturer: MT-VIKI


