Introducere
The Behringer GO CAM Wireless Digital Clip-On Microphone System is designed for content creators seeking high-quality, portable audio solutions. This system offers multi-device compatibility, extended wireless range, and advanced noise reduction, making it ideal for interviews, vlogs, live streams, and more. This manual provides detailed instructions for setting up, operating, and maintaining your GO CAM Wireless system to ensure optimal performance.
Ce este în cutie
Upon unboxing your Behringer GO CAM Wireless system, please verify that all the following components are included:
- Transmițător (Tx)
- Receptor (Rx)
- Cablu de încărcare USB
- TRS to TRS Audio Cable for Camera
- TRRS to TRS Audio Cable for Phones
- USB Type-C Earphones
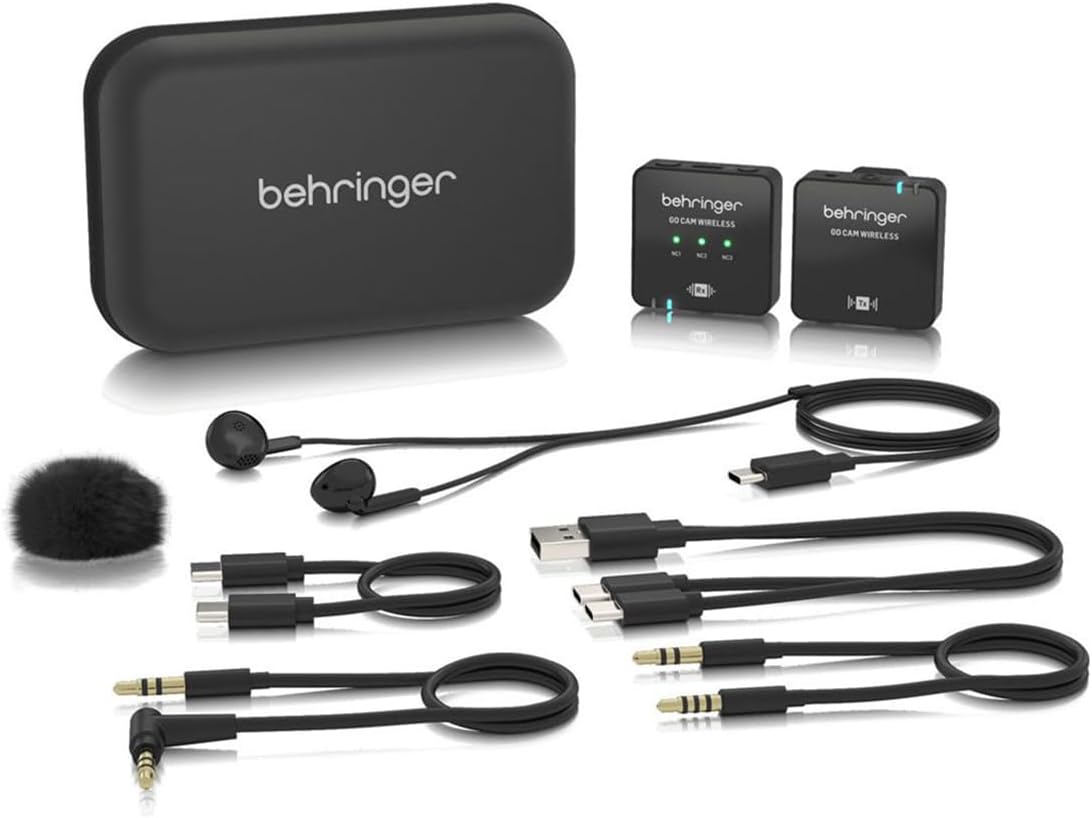
Figure 1: System Components. This image displays all items included in the Behringer GO CAM Wireless package. Visible are the compact transmitter and receiver units, a USB charging cable, two audio cables (one TRS to TRS for cameras, one TRRS to TRS for smartphones), a pair of USB Type-C earphones, and a small furry windscreen for the microphone.
Produs terminatview
Familiarize yourself with the key components and their functions.

Figure 2: Receiver (Left) and Transmitter (Right) Front View. This image shows the front faces of the Behringer GO CAM Wireless receiver and transmitter. The receiver (left) features three green LED indicators for noise reduction levels (NC1, NC2, NC3) and an 'Rx' symbol indicating its receiving function. The transmitter (right) displays an 'Tx' symbol, indicating its transmitting function. Both units are compact and black.

Figure 3: Receiver and Transmitter Angled View. This image provides an angled perspective of both the receiver and transmitter units. The receiver (left) shows its side, revealing a dB level switch and a 3.5mm headphone jack for real-time monitoring. The transmitter (right) displays its USB-C charging port and power button on its side. Both units have a sleek, black design.

Figura 4: Sus și jos View with Clip. This image shows the top and bottom surfaces of the Behringer GO CAM Wireless units. Both units feature an integrated clip for easy attachment to clothing or camera hot shoes. The transmitter's top surface reveals the built-in omnidirectional microphone and a USB-C port. The receiver's top surface shows its audio output and monitoring ports.
Înființat
Încărcare inițială
Before first use, fully charge both the transmitter and receiver units.
- Connect the supplied USB Charging Cable to the USB-C port on both the transmitter and receiver.
- Conectați celălalt capăt al cablului USB la un adaptor de alimentare USB standard (nu este inclus) sau la portul USB al unui computer.
- The charging indicator LED will illuminate during charging and turn off when fully charged. A full charge takes approximately 1.5 hours.
Conectarea la dispozitive
The GO CAM Wireless system is compatible with various devices.
- For Cameras/DSLRs: Use the supplied TRS to TRS audio cable. Connect one end to the receiver's output jack and the other end to your camera's microphone input.
- For Mobile Devices/Tablets: Use the supplied TRRS to TRS audio cable. Connect the TRRS end to your mobile device's headphone/microphone jack and the TRS end to the receiver's output jack.
- For Audio Recorders: Use the appropriate cable (TRS to TRS or TRRS to TRS) depending on your recorder's input type.
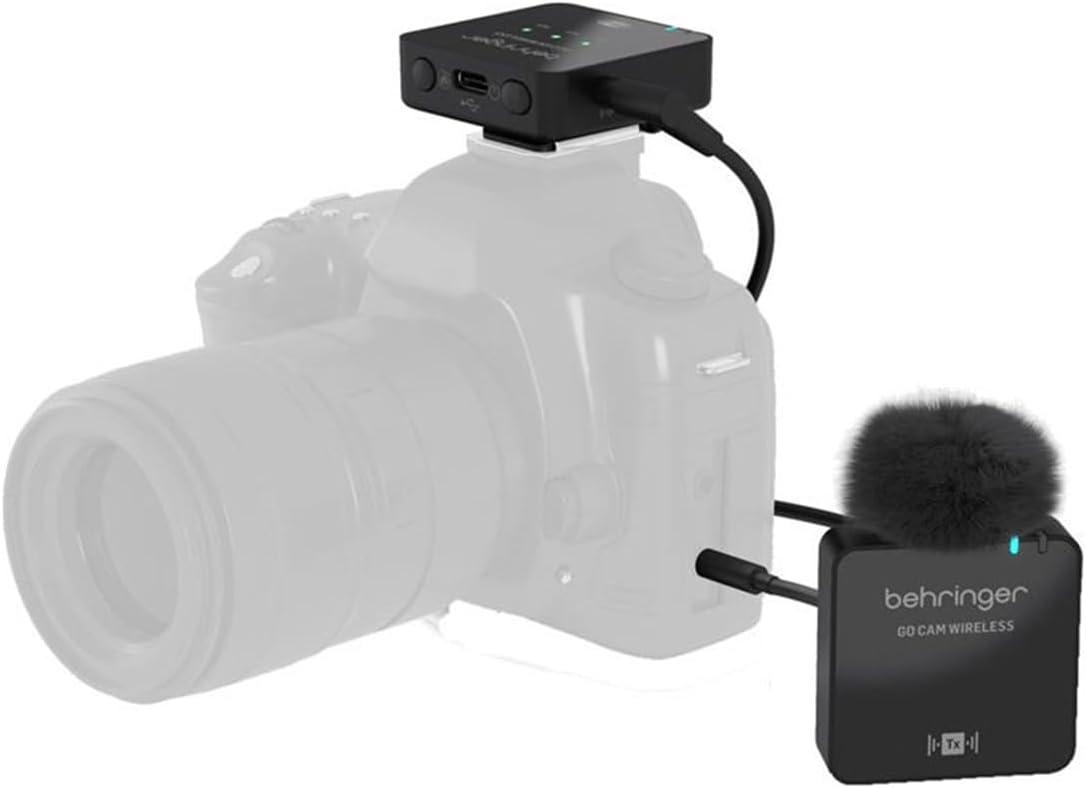
Figure 5: System Connected to a Camera. This image illustrates the Behringer GO CAM Wireless system in use with a camera. The receiver unit is shown mounted on the camera's hot shoe and connected to its microphone input via an audio cable. The transmitter unit, with its furry windscreen attached, is positioned separately, indicating its wireless connection to the receiver.
Instrucțiuni de operare
Pornire/Oprire și împerechere
- Press and hold the power button on both the transmitter (Tx) and receiver (Rx) units until the indicator lights illuminate.
- The units will automatically pair within a few seconds. A solid blue light on both units indicates a successful connection.
- To power off, press and hold the power button on each unit until the lights turn off.
Utilizarea microfonului
- The transmitter features a built-in omnidirectional microphone, designed to capture sound from all directions.
- Clip the transmitter securely to your clothing, ideally near your mouth, for optimal voice capture. The integrated shirt clip allows for hands-free operation.
- For outdoor use or in windy conditions, attach the supplied furry windscreen to the transmitter's microphone to reduce wind noise.
Reducerea zgomotului
The receiver unit features a 3-level noise reduction switch (NC1, NC2, NC3) to minimize background noise.
- NC1: Light noise reduction, suitable for quiet environments.
- NC2: Medium noise reduction, for moderately noisy environments.
- NC3: Strong noise reduction, for very noisy environments.
- Adjust the switch based on your recording environment to achieve the clearest audio.
Monitorizare în timp real
Connect the supplied USB Type-C earphones or your own 3.5mm headphones to the receiver's headphone jack to monitor your audio in real-time. This allows you to check audio levels and clarity during recording.
Durata de viață a bateriei și încărcare
The GO CAM Wireless system is equipped with long-lasting batteries for extended use.
- Durata de viață a bateriei transmițătorului: Până la 30 de ore de funcționare continuă.
- Receiver Battery Life: Până la 8 de ore de funcționare continuă.
- Timp de reîncărcare: Approximately 1.5 hours for a full charge using the USB charging cable.
- It is recommended to fully charge both units before each important recording session.
Întreţinere
Proper care will extend the life and performance of your GO CAM Wireless system.
- curatenie: Folosiți o lavetă moale și uscată pentru curățarea unităților. Nu utilizați agenți de curățare lichizi sau solvenți.
- Depozitare: Depozitați sistemul într-un loc răcoros și uscat, ferit de lumina directă a soarelui și de temperaturi extreme.
- Manipulare: Avoid dropping the units or exposing them to excessive shock or vibration.
- Expunerea la apă: The units are not waterproof. Avoid exposure to water or high humidity.
Depanare
If you encounter issues with your GO CAM Wireless system, refer to the following common problems and solutions:
| Problemă | Cauza posibila | Soluţie |
|---|---|---|
| Fără sunet sau volum redus |
|
|
| Calitate audio slabă / Sens static |
|
|
| Units not powering on |
|
|
Specificații
Detailed technical specifications for the Behringer GO CAM Wireless system:
- Nume model: GO CAM WIRELESS
- Producător: Behringer
- Tehnologie de conectivitate: Bluetooth (Wireless Digital)
- Tip conector: Mufă de 3.5 mm, USB tip C
- Factor de formă a microfonului: Lavalier (Clip-On Transmitter)
- Model polar: Omnidirectional (Built-in Microphone)
- Raza wireless: Până la 30 metri (100 picioare)
- Reducerea zgomotului: 3-level switch (NC1, NC2, NC3)
- Durata de viață a bateriei transmițătorului: Până la 30 ore
- Receiver Battery Life: Până la 8 ore
- Timp de reîncărcare: Aproximativ. 1.5 ore
- Tip baterie: Polimer de litiu
- Greutatea articolului: Approx. 30 grams (each unit)
- Dispozitive compatibile: Camcorder, Camera, PA System, Personal Computer, Smartphone
- UPC: 644216661107
Garanție și suport
Behringer products are designed for reliability and performance. For information regarding warranty coverage, technical support, or service, please visit the official Behringer website-ul lor sau contactați serviciul de asistență pentru clienți. Păstrați dovada achiziției pentru solicitările de garanție.
Resurse online: For the latest manuals, FAQs, and software updates, please refer to the Behringer support page.


