Introducere
This manual provides detailed instructions for the setup, operation, and maintenance of your TONOR TW361 4-Channel UHF Wireless Microphone System. Please read this manual thoroughly before use to ensure optimal performance and longevity of your device.
Ce este în cutie

Image shows the complete TONOR TW361 system, including four grey handheld microphones and one compact black receiver with a 6.35mm jack and antenna.
- 4 x Microfoane portabile
- 1 x Receptor reîncărcabil
- 4 x Anti-slip Rings (various colors)
- 4 x Mic Covers
- 1 x cablu de încărcare USB la tip C
- 1 x Manual de utilizare

This image displays all the accessories: two microphones, the receiver, four anti-slip rings, four mic covers, a charging cable, and the user manual. The microphone dimensions are also indicated as 10.7 inches (27.2 cm).
Produs terminatview
Microfon de mână

The image highlights key features of the handheld microphone: a metal shockproof mic head, a real-time battery indicator on the display, and a mute/power button. Each microphone requires 2 AA batteries (not included).
- Metal Shockproof Mic Head: Designed for durability and sound protection.
- Indicator baterie în timp real: Afișează nivelul actual al bateriei.
- Mute/Power Button: Controls power and mutes the microphone.
- Ecran de afișare: Shows frequency, battery status, and mute status.
- Sursa de alimentare: Each microphone requires 2 AA batteries (not included).
Capsula microfon dinamic
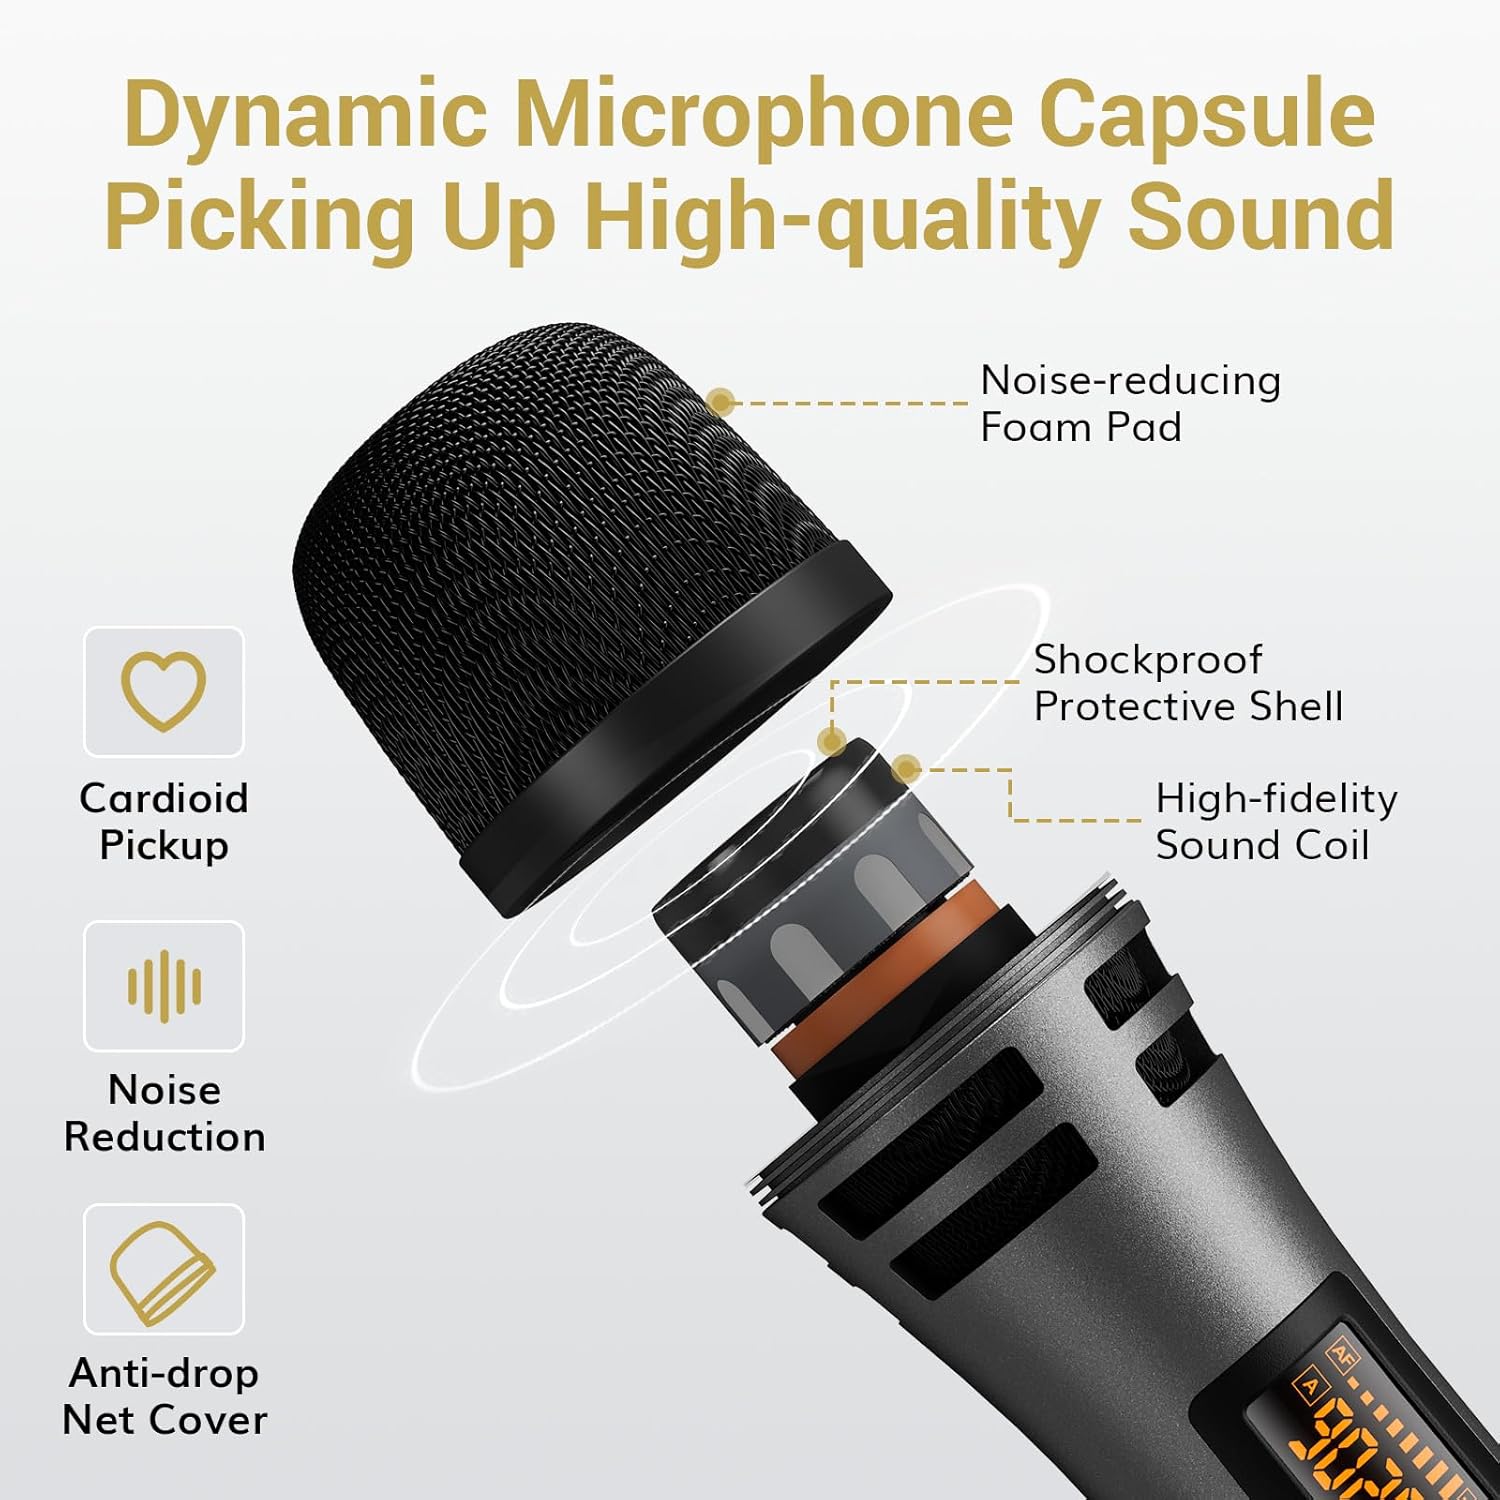
Această imagine oferă o imagine explodată view of the microphone head, showing its internal components: a noise-reducing foam pad, a shockproof protective shell, a high-fidelity sound coil, and an anti-drop net cover. It also indicates cardioid pickup and noise reduction features.
- Model de preluare cardioid: Minimizes background noise, focusing on the sound source.
- Reducerea zgomotului: Integrated features for clear audio.
- Componente: Includes noise-reducing foam pad, shockproof protective shell, high-fidelity sound coil, and anti-drop net cover.
Receptor reîncărcabil

The image details the receiver's features: current frequency display, battery indicator, connection indicator, disconnection indicator, USB-C charging port, antenna, power switch, charging indicator, and a 6.35mm jack. The antenna can be adjusted to 0°, 45°, or 90°.
- Ecran de afișare: Shows current frequency, battery indicator, connection, and disconnection status.
- Port de încărcare USB-C: For recharging the internal 1500mAh battery.
- Mufă de 6.35 mm: For connecting to audio devices.
- Antenă reglabilă: Can be set to 0°, 45°, or 90° for optimal signal reception.
- Durata de viață a bateriei: 7-9 hours of usage time on a full charge.
- Timp de încărcare: Aproximativ 4-5 ore pentru o încărcare completă.
- Notă importantă: Use a 5V charging head. Avoid fast charging heads (e.g., 9V, 12V) to prevent damage.
Instrucțiuni de configurare
1. Install Batteries in Microphones
Unscrew the bottom part of each microphone and insert 2 AA batteries, ensuring correct polarity. Batteries are not included.
Video demonstrating how to insert 2 AA batteries into the handheld microphone. This is the first step in preparing the microphone for use.
2. Pairing the Microphones and Receiver (Plug & Play)
- Porniți microfonul.
- Porniți receptorul.
- The microphone and receiver will automatically synchronize.

This image illustrates the three simple steps for pairing: 1. Turn on the microphone. 2. Turn on the receiver. 3. Plug the receiver into the speaker. A checkmark indicates successful pairing.
3. Conectarea la dispozitive audio
Plug the receiver's 6.35mm jack directly into the MIC IN port of your compatible audio device (e.g., karaoke machine, powered speaker, amplifier, mixer). If your device has a 3.5mm input, use the included 6.35mm to 3.5mm converter.
Video demonstrating the connection of the receiver to an audio device (speaker) and the successful pairing with a microphone. It also briefly shows the wireless range and adjustable features.

This image illustrates the wide compatibility of the system with devices featuring a 1/4" (6.35mm) Mic Input, including outdoor speakers, power amplifiers, sound mixer boards, DJ controllers, karaoke machines, and portable speakers. It also explicitly states that the system is not compatible with mobile phones, computers, or tablets without an additional 3.5mm interface.
Instrucțiuni de operare
Adjusting Channels and Volume
The system offers 10 adjustable channels to minimize interference. Each microphone has a unique channel and frequency number. You can adjust the volume directly on the microphone.

This image shows how to adjust the microphone's channel and volume. It displays the microphone's screen changing from one frequency to another (e.g., 902.8 MHz to 903.4 MHz) and indicates the volume up (VOL+) and volume down (VOL-) buttons.
- Ajustarea canalului: If interference occurs, you can change the microphone's channel. Refer to the troubleshooting section for detailed steps on switching channels.
- Controlul volumului: Use the VOL+ and VOL- buttons on the microphone to adjust the output volume.
- Funcția Mute: The power button also functions as a one-touch mute button.
Încărcarea receptorului
The receiver has a built-in 1500mAh rechargeable battery. Use the provided USB to Type-C charging cable to charge it. A full charge takes approximately 4-5 hours and provides 7-9 hours of usage.

This image shows the receiver being charged via a USB-C cable connected to a wall adapter, indicating 7-9 hours of usage time and 4-5 hours of charging time. It also reminds that each microphone is powered by 2 AA batteries (not included).
Compatibilitate
The TONOR TW361 system is designed for wide compatibility with various audio equipment. However, certain devices require specific connections or are not supported.
Compatible Devices (with 6.35mm MIC IN port):
- Karaoke Machines
- Difuzoare amplificate
- Ampliificatori
- Mixere
- Sisteme PA
- Difuzoare de exterior
- Controlere DJ
- Difuzoare portabile
Incompatible Devices / Special Considerations:
- Mobile Phones, Computers, Tablets: Not directly compatible. An additional 3.5mm interface converter is needed (not included).
- Bluetooth: The system does not support Bluetooth connectivity.
- TV/Soundbar: Requires an intermediary audio device for connection.

This image provides important tips for better usage and connectivity, visually indicating that output devices require XLR and 6.35mm inputs, an adapter is needed for mobile/laptop connections, Bluetooth is not supported, and a TV/Soundbar requires an intermediary audio device.
Întreţinere
- Depozitați microfoanele și receptorul într-un loc uscat și răcoros atunci când nu le utilizați.
- Clean the microphone body and receiver with a soft, dry cloth. Avoid using harsh chemicals or abrasive materials.
- Ensure the receiver is fully charged before each use for optimal performance.
- Replace AA batteries in the microphones when the battery indicator shows low power.
Depanare
Microphone Not Working / Signal Issues
If you encounter a microphone that is not working or experiencing signal issues, follow these steps:
- Check Microphone Channels: Ensure that the microphone channels are not duplicated. If two microphones are on the same channel, they cannot be used normally. You will need to switch channels for one of them.
- Re-pair the Microphone and Receiver: If the signal light on the receiver does not turn steady after turning on the microphone, re-pairing is necessary.
Video illustrating how to connect the receiver and audio devices, showing the pairing process and the wireless range of the system.
Video explaining troubleshooting steps when a microphone is not working, specifically addressing duplicated channels and the need to switch channels or re-pair the microphone and receiver.
How to Switch Microphone Channels (A/B Mic)
- Turn off the microphone with the problem.
- Long press the power button for 10 seconds, waiting for the screen to display from "A" to "B" and then release it. This switches the channel group.
- Each microphone has a unique channel and frequency number that can be used simultaneously.
Video demonstrating the re-pairing process for the microphone and receiver. It shows how to activate pairing mode on the microphone and then confirm successful pairing on the receiver.
How to Re-pair the Microphone and Receiver
- Turn on the mic, and long press the "SET" button until the screen flashes quickly.
- Porniți receptorul.
- Then click the "SET" button on the microphone once.
- When the RF light on the receiver turns steady, the pairing is successful.
Video demonstrating the re-pairing process for the microphone and receiver. It shows how to activate pairing mode on the microphone and then confirm successful pairing on the receiver.
Specificații
| Numele modelului | TW361 |
| Factor de formă a microfonului | De mână |
| Tehnologia de conectivitate | UHF |
| Numărul de canale | 10 |
| wireless Range | Up to 200 ft (60 m) line-of-sight |
| Raspuns in frecventa | 40Hz-18kHz |
| Sensibilitate | 52dB±3dB |
| Deformare | <0.03% |
| Latența | <3 ms |
| Bateria receptorului | 1500mAh Litiu-ion (reîncărcabilă) |
| Receiver Usage Time | 7-9 ore |
| Timp de încărcare a receptorului | 4-5 ore |
| Sursă de alimentare pentru microfon | 2 x baterii AA (nu sunt incluse) |
| Tip conector | 6.35 mm Jack |
| Dimensiunile produsului | 15.16 x 12.2 x 2.36 inci |
| Greutatea articolului | 2.91 lire sterline |
| Material | Plastic |
| Culoare | Gri |
Garanție și suport
TONOR products are designed for reliability and performance. For warranty information, technical support, or any inquiries regarding your product, please refer to the official TONOR website or contact customer service directly. Keep your purchase receipt for warranty claims.
Pentru asistență suplimentară, vizitați TONOR Store on Amazon.


