1. Introducere
The virtavo VistaFlask 2K Security Camera is a wireless, battery-powered outdoor camera designed to enhance your home security. Featuring 2K QHD imaging, AI motion detection, starlight lens for colorful night vision, and weatherproof construction, it provides reliable surveillance in various conditions. This manual provides detailed instructions for setting up, operating, maintaining, and troubleshooting your camera.

Image: Two virtavo VistaFlask 2K security cameras, designed for outdoor use.
2. Informații de siguranță
- Asigurați-vă că camera este instalată în siguranță pentru a preveni căderea.
- Use only the specified charging cable and power adapter to charge the battery.
- Nu expuneți camera la temperaturi extreme în afara intervalului său de funcționare.
- Avoid disassembling or modifying the camera, as this will void the warranty and may cause damage.
- Nu lăsați camera și accesoriile acesteia la îndemâna copiilor.
3. Conținutul pachetului
- virtavo VistaFlask 2K Security Camera(s)
- Suport(e) de montare
- Cablu de încărcare USB
- Manual de utilizare
- Șuruburi și ancore de montare
4. Produs terminatview
The virtavo VistaFlask camera features a compact design with essential components for optimal performance. Key elements include the lens, IR LEDs for night vision, a microphone for audio input, a speaker for two-way communication, and a motion sensor. The power switch, sync button, and charging port are located at the bottom of the camera, alongside the microSD card slot for local storage.

Imagine: Internă view highlighting the battery and electronic components.

Imagine: Jos view of the camera with power switch, charging port, sync button, and microSD card slot.
5. Ghid de instalare
5.1 Configurare inițială
- Încărcați camera: Before first use, fully charge the camera using the provided USB cable. The battery lasts 1-3 months per charge depending on usage.
- Descărcați aplicația: Caută 'HOME V' in your smartphone's app store (iOS or Android) and download the application.
- Creați un cont: Open the 'HOME V' app and follow the on-screen instructions to register a new account or log in if you already have one.
5.2 Camera Pairing and Connection
Follow these steps to pair your virtavo VistaFlask camera with the 'HOME V' app. For a visual guide, please refer to the official installation video below.
Video: Official virtavo VistaFlask Installation Guide Setup. This video demonstrates the step-by-step process of binding the camera to the 'HOME V' app using QR codes, including powering on the camera, confirming the red light flashing, connecting to the camera's hotspot, and connecting to your home Wi-Fi network.
- Adăugați dispozitiv: In the 'HOME V' app, tap the '+' icon to add a new device.
- Scanați codul QR: Grant camera access to the app. Scan the QR code located on the back of your virtavo VistaFlask camera.
- Pornire: Ensure the camera is powered on. The power switch is located at the bottom.
- Confirm Flashing Light: Confirm that the camera's red indicator light is flashing rapidly. If not, press and hold the 'Sync' button for 5-10 seconds until you hear a 'Du' sound or see rapid flashing.
- Connect to Camera Hotspot: The app will prompt you to connect to the camera's Wi-Fi hotspot (e.g., 'IPC365_AP-XXXX'). Confirm and join this network.
- Select Home Wi-Fi: Choose your home 2.4GHz Wi-Fi network from the list and enter the correct password. Note: This device only supports 2.4GHz Wi-Fi.
- Denumește-ți camera: Once connected, name your camera for easy identification (e.g., 'Front Door', 'Living Room').
5.3 Instalare fizică
The virtavo VistaFlask camera is designed for easy installation, both indoors and outdoors. Its weatherproof design ensures durability.

Image: Easy installation on smooth surfaces like glass or tiles, no drilling required.

Image: Wireless connection for remote access.
- Alegeți o locație: Select a location with good Wi-Fi signal strength and a clear view a zonei pe care doriți să o monitorizați.
- Montare: Use the provided mounting bracket, screws, and anchors to securely attach the camera to a wall or other suitable surface. Ensure the camera is positioned to capture the desired field of view.
- Rezistent la intemperii: The camera is designed to withstand various weather conditions, making it suitable for outdoor use.
6. Instrucțiuni de utilizare
6.1 În direct View și Audio bidirecțional
Access real-time video feed and communicate through the camera using the 'HOME V' app.
- Trăi View: Deschide aplicația și selectează camera pentru a view fluxul live.
- Audio bidirecțional: Atingeți pictograma microfonului în transmisiunea live view to speak through the camera's speaker, and listen through its microphone.
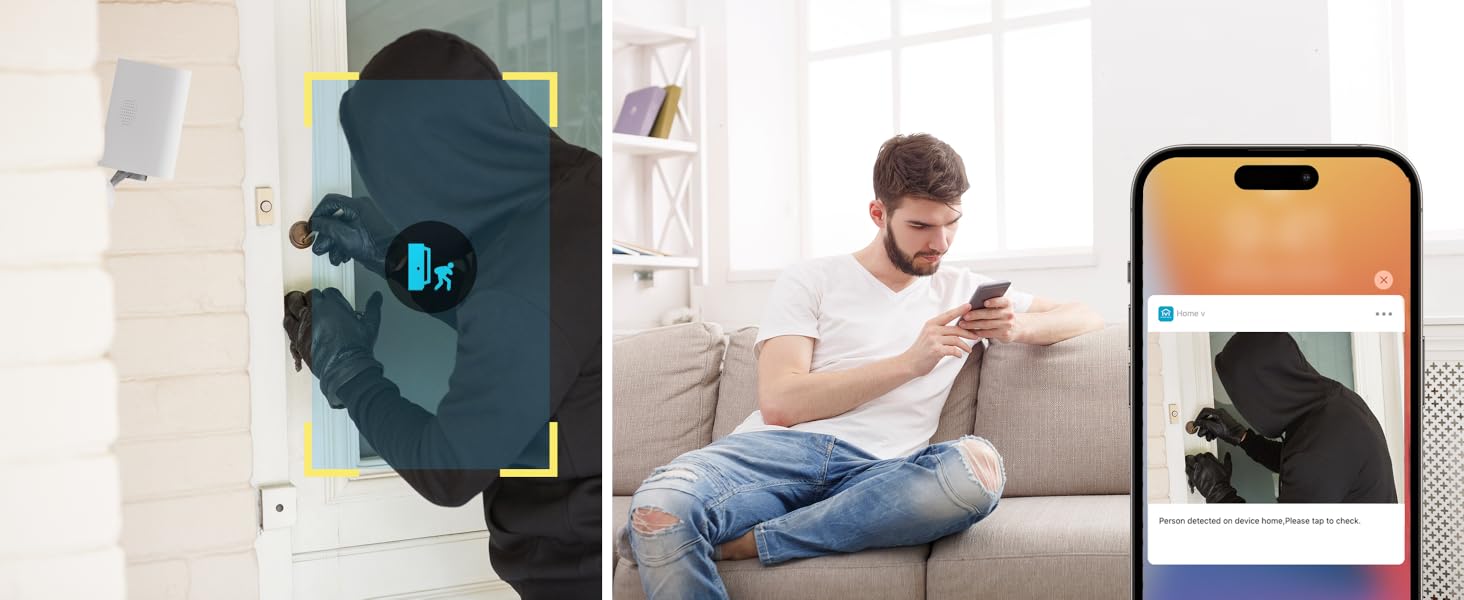
Image: Two-way audio feature for communication.
6.2 Detectarea mișcării și alertele
The camera features advanced PIR motion detection and AI capabilities to minimize false alarms.
- Detectarea mișcării PIR: Detects motion up to 30 feet.
- Alerte inteligente: Primește notificări instantanee pe smartphone atunci când detectează mișcare.
- AI Detection (Cloud Subscription): With an optional cloud subscription, the camera can differentiate between humans, vehicles, and animals, reducing irrelevant alerts.
- Zone de detectare personalizabile: Set specific areas for motion detection to focus on critical zones and ignore others.
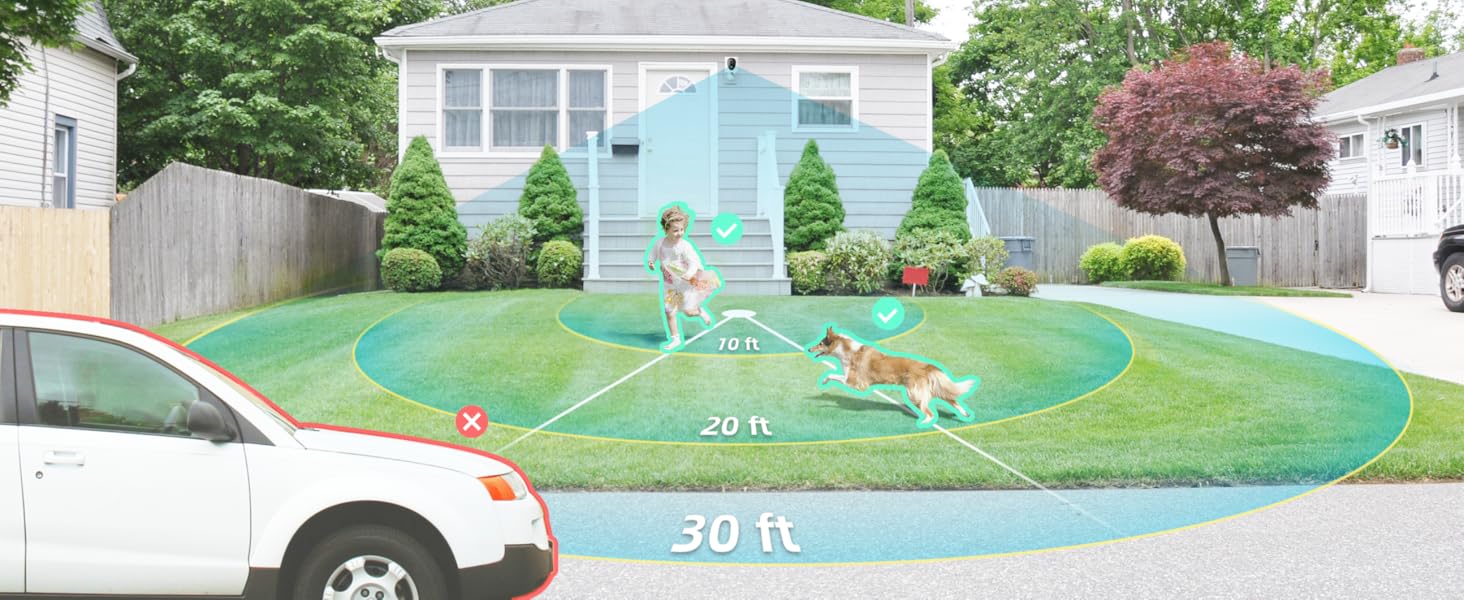
Image: Smart detection distinguishing between people, vehicles, and animals.
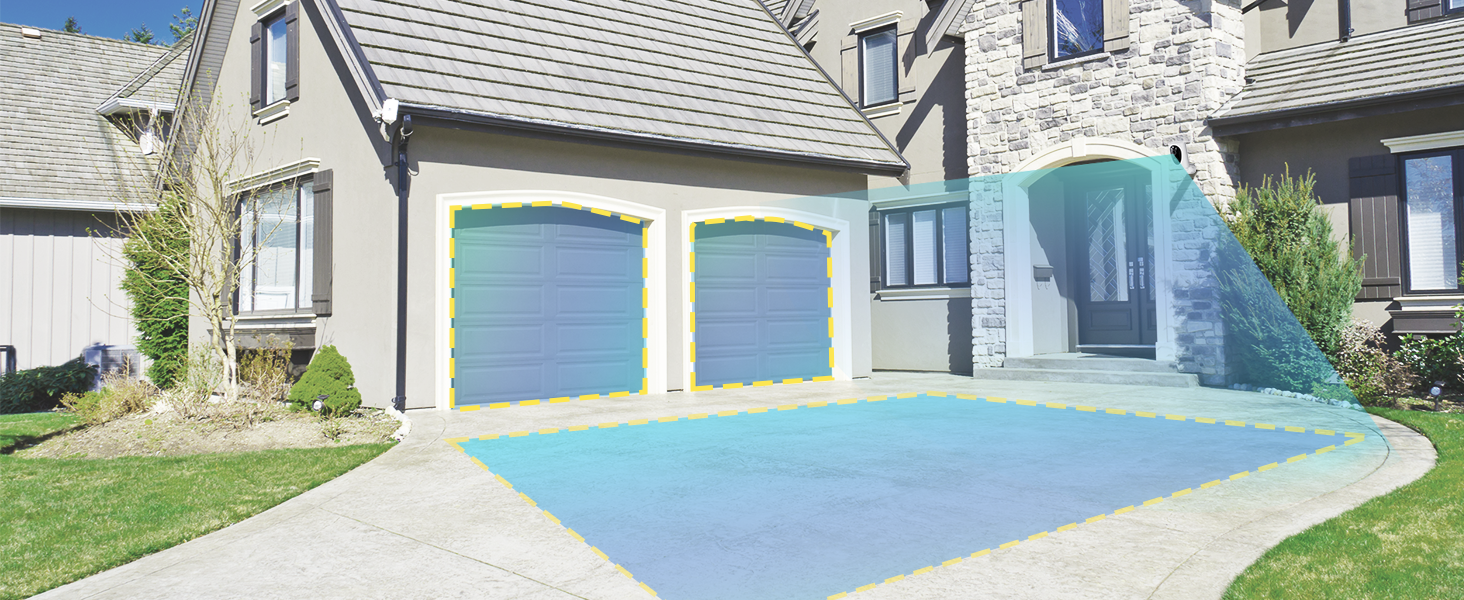
Image: Customizable motion detection zones.

Image: Instant alerts with image previews.
6.3 Vedere nocturnă
Camera oferă o vedere clară chiar și în condiții de lumină slabă.
- Vedere de noapte color: Utilizes Starlight technology and a wide F1.6 aperture for vivid, color-rich images in low light.
- Viziune de noapte IR: Equipped with 2 high-intensity IR LEDs for clear black-and-white viewîn întuneric complet.

Image: Superior 2K QHD imaging and color-rich night vision.
6.4 Înregistrare și stocare
Your data is secured with flexible storage options.
- Stocare locală: Supports microSD cards from 32GB to 256GB for continuous recording, even without network access. (MicroSD card not included).
- Stocare în cloud: Optional cloud storage plans offer additional features like snapshot alerts and advanced AI capabilities. Video encryption ensures privacy.
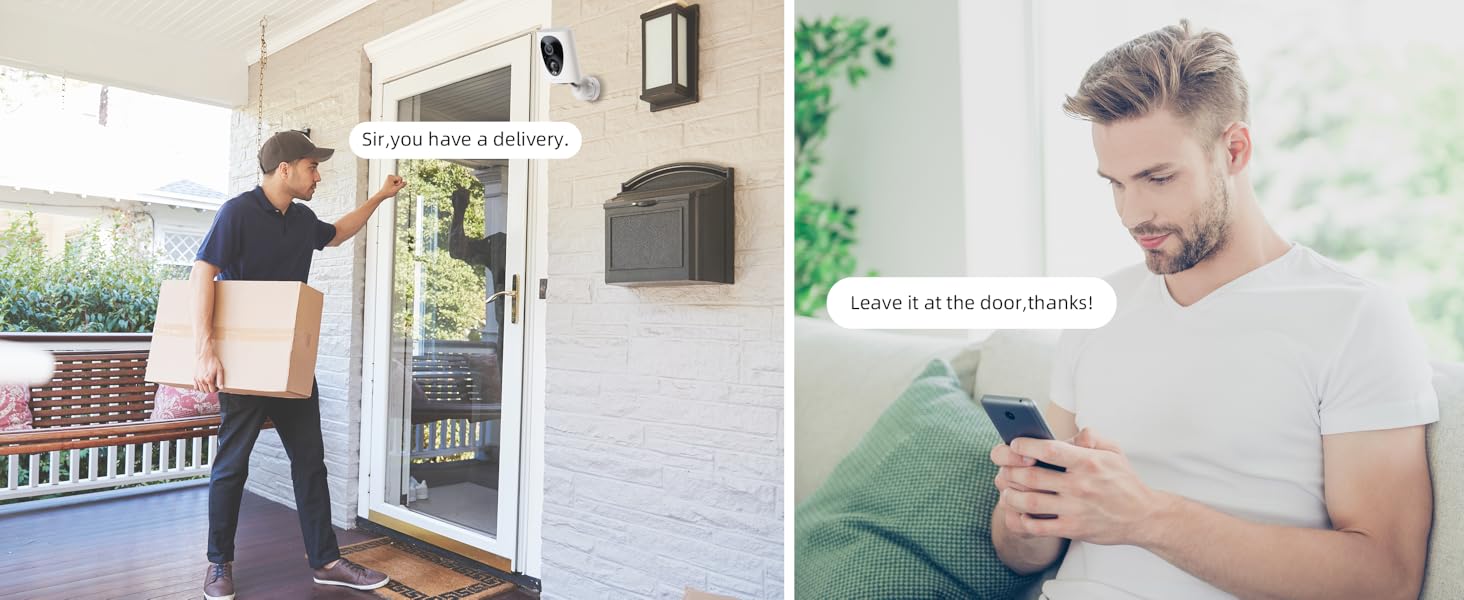
Image: Comparison of no-fee basic storage (SD card) and cloud storage options.
6.5 App Features and Remote Access
Manage and control your security remotely via the 'HOME V' app.
- Monitorizare de la distanță: Monitor your home from anywhere with an internet connection.
- Acces multi-utilizator: Share camera access with family members.
- Programare: Set schedules for recording or alerts.

Image: Remote access and multi-user monitoring via the 'HOME V' app.
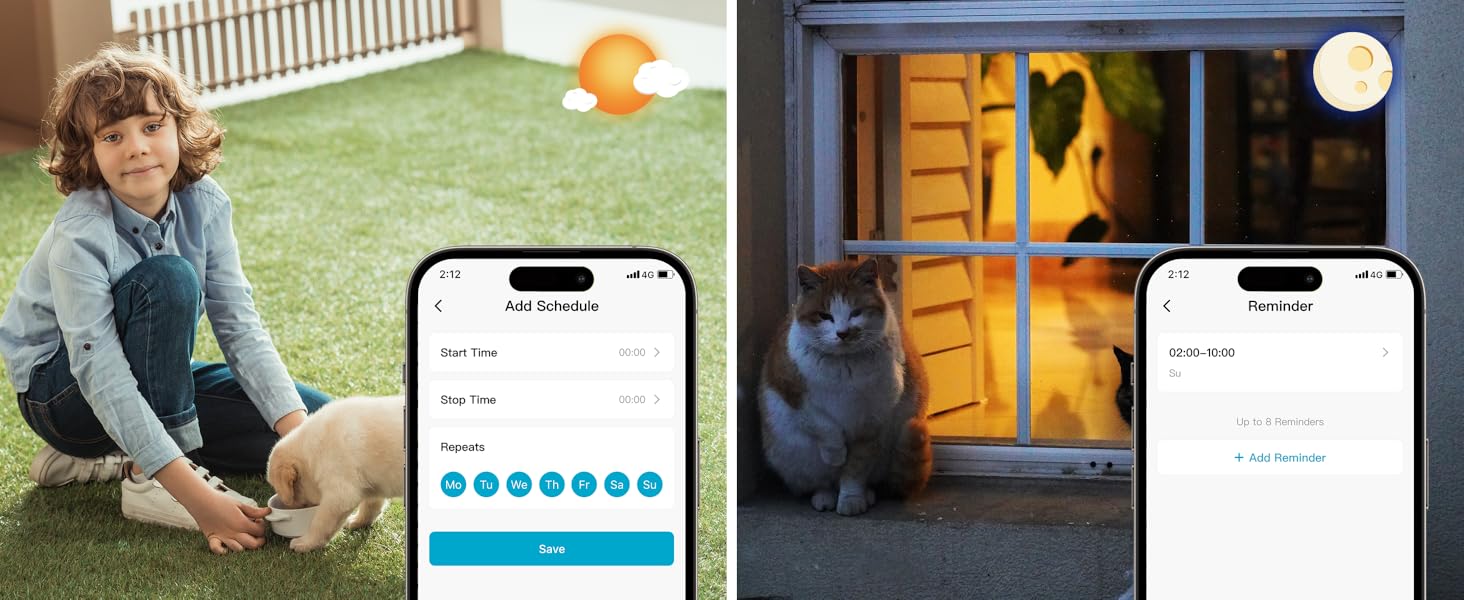
Image: App features including scheduling and reminders.
7. Întreținere
- Încărcarea bateriei: Recharge the camera battery when prompted by the app. A full charge can last 1-3 months depending on activity.
- curatenie: Ștergeți ușor obiectivul și corpul camerei cu o lavetă moale șiamp pânză. Evitați curățarea abrazivă.
- Actualizări firmware: Regularly check the 'HOME V' app for firmware updates to ensure optimal performance and security.
8. Depanare
| Emisiune | Cauza posibila | Soluţie |
|---|---|---|
| Camera nu pornește | Baterie descărcată; Întrerupător oprit | Charge the camera fully; Ensure power switch is in the 'ON' position. |
| Nu se poate conecta la Wi-Fi | Incorrect Wi-Fi password; 5GHz Wi-Fi network; Weak Wi-Fi signal | Verify password; Ensure you are connecting to a 2.4GHz network; Move camera closer to router or use a Wi-Fi extender. |
| Alarme false frecvente | High motion sensitivity; Unfiltered motion sources (e.g., trees, animals) | Adjust motion sensitivity in app; Set up detection zones to exclude irrelevant areas; Consider cloud subscription for AI detection. |
| Poor night vision clarity | Dirty lens; Obstruction in front of camera; Insufficient ambient light for color night vision | Clean the lens; Remove obstructions; Ensure adequate ambient light for color mode or switch to IR night vision. |
| Bateria se descarcă rapid | High activity/recordings; Frequent live view access; Weak Wi-Fi signal | Reduce motion detection sensitivity; Limit live view sessions; Improve Wi-Fi signal strength. |
9. Specificații
| Caracteristică | Detaliu |
|---|---|
| Numele modelului | LJH10 |
| Utilizare în interior/exterior | În interior, în aer liber |
| Sursa de alimentare | Battery Powered (4400mAh rechargeable Lithium battery) |
| Protocol de conectivitate | Wi-Fi (doar 2.4 GHz) |
| Tip controler | Aplicația ACASĂ V |
| Tip de montare | Montare pe perete |
| Rezoluție captură video | 2K QHD |
| Viewunghiul ing | 120 de grade (câmp de View130 grade) |
| Gama de vedere nocturnă | 30 picioare |
| Tehnologie cu lumină scăzută | Starlight (F1.6 aperture, 3.0mm focal length) |
| Număr de LED-uri IR | 2 |
| Nivel de rezistență la apă | Impermeabil |
| Dimensiuni (L x l x H) | 2.7 x 1.3 x 3.2 inci |
| Greutatea articolului | 1.41 lire sterline |
| Opțiuni de stocare | MicroSD (32GB-256GB), Stocare în cloud |
| Caracteristici speciale | 2-Way Audio, Battery Powered, Local Recording, Motion Sensor, Night Vision, AI Motion Detection |
10. Garanție și asistență
virtavo products are designed for reliability and performance. For information regarding product warranty, please refer to the warranty card included in your product packaging or visit the official virtavo website. If you encounter any issues or have questions not covered in this manual, please contact virtavo customer support through the 'HOME V' app or their official support channels for assistance.


