1. Introducere
This manual provides detailed instructions for the installation, operation, and maintenance of your Reobiux D20-1P 2K Outdoor Surveillance Camera. Please read this manual thoroughly before using the product to ensure proper functionality and safety.
2. Conținutul pachetului
Verificați dacă toate articolele enumerate mai jos sunt incluse în colet. Dacă lipsesc sau sunt deteriorate articole, vă rugăm să contactați serviciul de asistență pentru clienți.
- 1x Reobiux D20-1P Solar PTZ Camera
- 1x Solar Collector
- 1x Manual de utilizare
- 1x bază de montare
- 1x Power Supply (for initial charging)
- 1x Screws Bag (for installation)
- 1x Type-C Charging Line
3. Produs terminatview
The Reobiux D20-1P is a 2K outdoor surveillance camera designed for comprehensive home security. It features dual lenses, 360° Pan-Tilt-Zoom (PTZ) capabilities, and operates wirelessly via Wi-Fi. Key features include PIR motion detection, color night vision, two-way audio, and an IP66 weatherproof rating, powered by a solar panel and rechargeable battery.
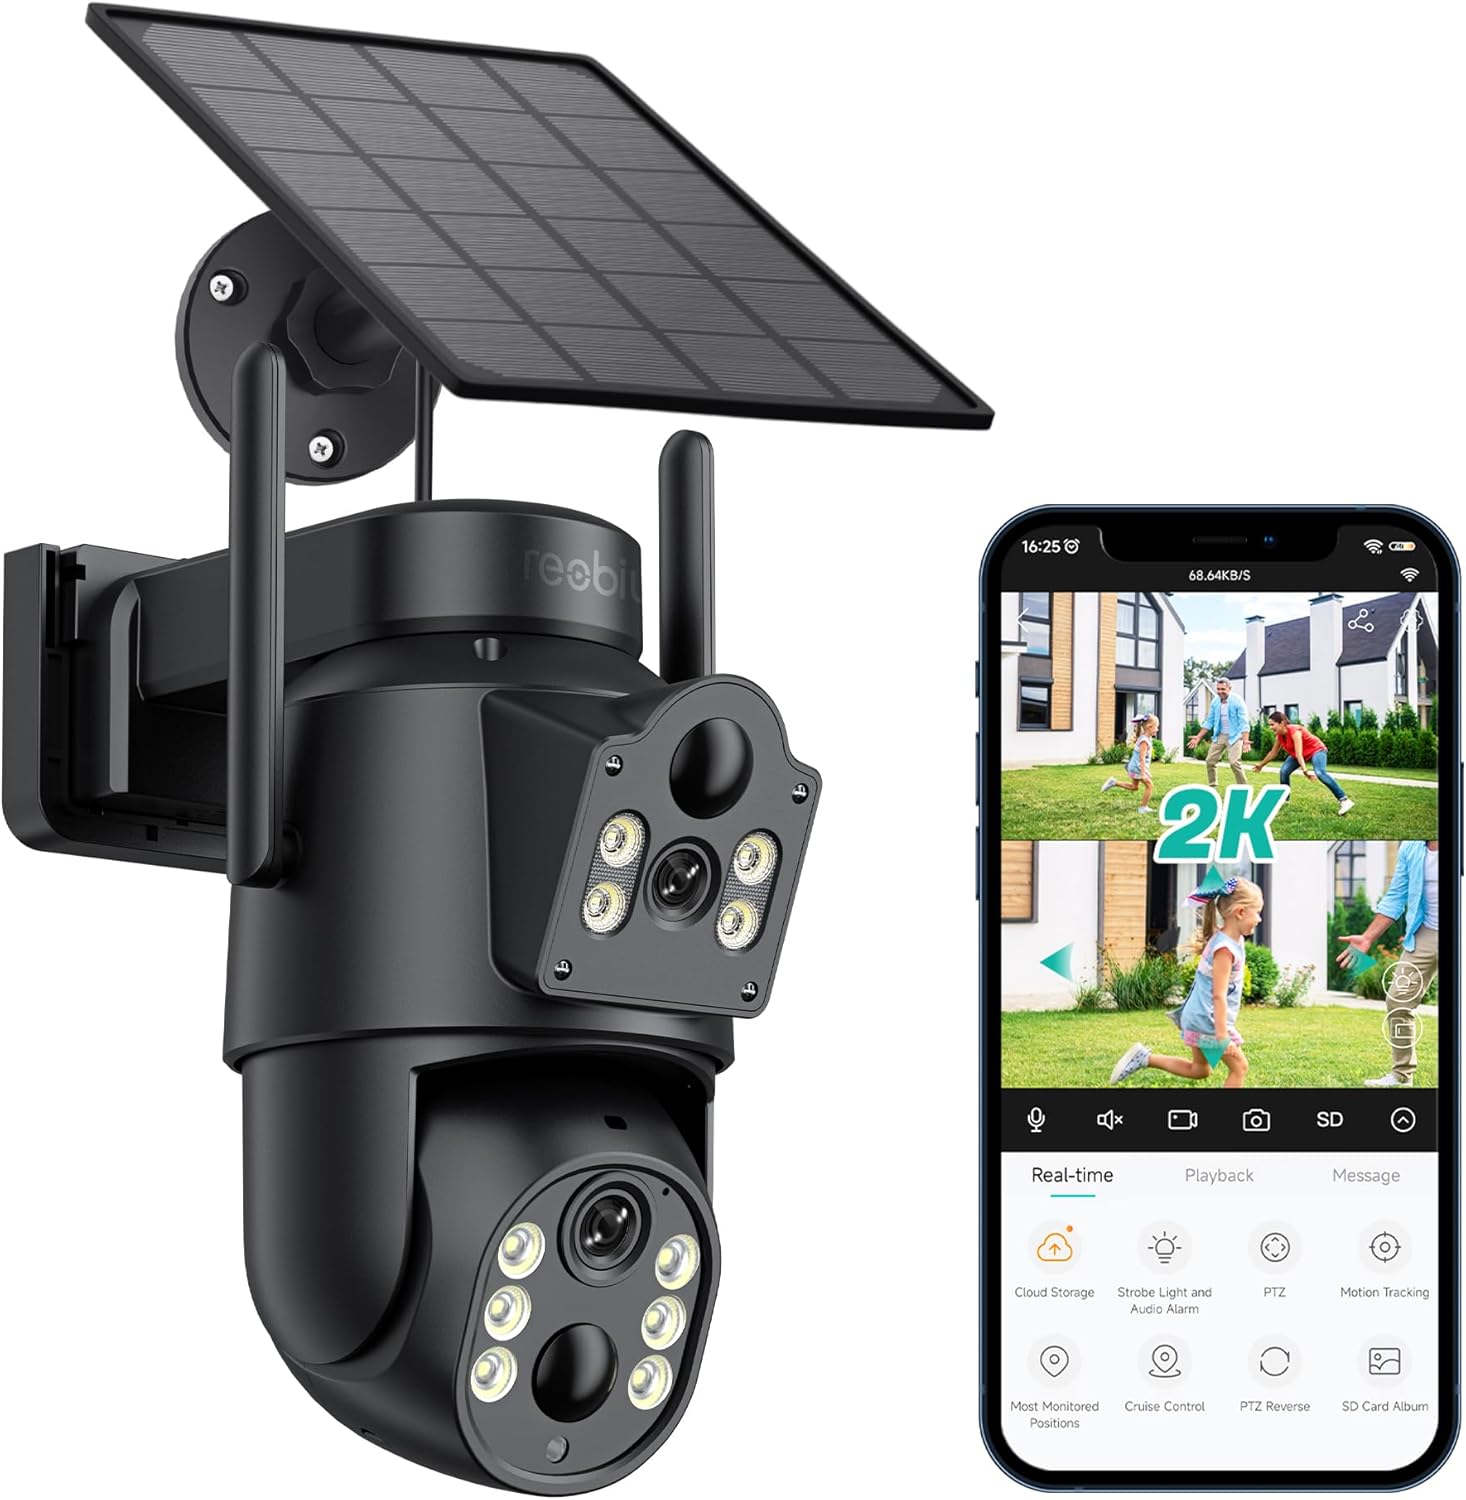
Figura 3.1: Reobiux D20-1P Solar PTZ Camera and its mobile application interface showing real-time monitoring, playback, and various control options.
Caracteristici cheie:
- 2K QHD High Resolution: Oferă un videoclip clar și detaliattage.
- Design cu lentilă dublă: Combines a fixed lens with a rotating lens for comprehensive coverage.
- 360° PTZ Functionality: Allows remote control of pan, tilt, and zoom for flexible viewunghiuri de ing.
- Solar Powered with Rechargeable Battery: Ensures continuous operation with minimal manual charging.
- Detectarea mișcării PIR: Intelligently detects human movement to reduce false alarms.
- Vedere de noapte color: Offers full-color video even in low-light conditions, alongside infrared night vision.
- Audio bidirecțional: Enables communication with visitors or deterrence of intruders.
- Rezistență la intemperii IP66: Conceput pentru a rezista la diverse condiții meteorologice exterioare.
- Wireless Wi-Fi Connectivity: Easy setup and remote access via smartphone.
4. Ghid de instalare
4.1 Încărcare inițială
Before first use, fully charge the camera's internal battery using the provided Type-C charging line and power supply. This ensures the camera has sufficient power for initial setup and operation, especially if solar charging conditions are not optimal immediately after installation.
4.2 Instalarea aplicației și crearea contului
- Descărcați iCSee app from your smartphone's app store (iOS App Store or Google Play Store).
- Instalați aplicația și deschideți-o.
- Urmați instrucțiunile de pe ecran pentru a crea un cont nou sau pentru a vă conecta dacă aveți deja unul.
4.3 Camera Connection to Wi-Fi
- Ensure your camera is powered on.
- In the iCSee app, tap the "+" icon to add a new device.
- Select the option for "Wi-Fi Camera" or "Add Device by AP Hotspot" (refer to app for exact wording).
- Follow the app's instructions to connect the camera to your 2.4GHz Wi-Fi network. You may need to scan a QR code displayed on your phone with the camera, or listen for a sound prompt.
- După conectare, puteți denumi camera și puteți începe monitorizarea.
4.4 Montarea camerei
Choose a location that provides optimal surveillance coverage and receives direct sunlight for the solar panel. Ensure the camera is within range of your Wi-Fi network.
- Selectați locația: Identify a suitable wall or surface for mounting. Consider the camera's viewing angle (355° pan, 90° tilt) and the solar panel's exposure to sunlight.
- Marcați punctele de găurire: Use the mounting base as a template to mark the screw holes on the wall.
- Găuri: Drill pilot holes at the marked positions. Insert wall anchors if necessary.
- Atașați baza de montare: Secure the mounting base to the wall using the provided screws.
- Atașați camera: Mount the camera onto the secured base.
- Reglați panoul solar: Position the solar panel to maximize sunlight exposure throughout the day.

Figura 4.1: Illustration of the camera mounted with its solar panel, highlighting the fixed and rotating lenses and the benefit of continuous solar power.
5. Instrucțiuni de utilizare
5.1 În direct View și Redare
Open the iCSee app and select your camera to access the live view. From here, you can:
- Monitorizare în timp real: View flux video în direct.
- Control PTZ: Use the on-screen joystick to pan (355°) and tilt (90°) the camera.
- Zoom digital: Pinch to zoom on the live feed.
- Redare: Acces înregistrat footage stored on the SD card or cloud storage.

Figura 5.1: Demonstrates the superior clarity of 2K QHD resolution compared to 1080P, providing more details for monitoring.
5.2 Detectarea mișcării și alertele
The camera utilizes PIR (Passive Infrared) intelligent detection to identify human movement, minimizing false alarms from pets or swaying branches.
- Activare/Dezactivare: Activate or deactivate motion detection in the app settings.
- Ajustare sensibilitate: Adjust the PIR sensor's sensitivity to suit your environment.
- Notificări de alarmă: Receive instant push notifications on your smartphone when motion is detected.
- Alarmă sonoră și luminoasă: Configure the camera to trigger a strobe light and audible alarm upon detection.

Figura 5.2: The camera's PIR intelligent detection distinguishes human movement from other objects, reducing unnecessary alerts.

Figura 5.3: When motion is detected, the camera can send real-time push notifications and activate a sound and light alarm to deter intruders.
5.3 Moduri de vedere nocturnă
The camera offers two night vision modes for clear visibility in the dark:
- Spotlight Full Color Night Vision: Utilizes built-in spotlights to provide full-color video in low-light conditions.
- Spotlight Infrared Night Vision: Uses infrared LEDs for black-and-white video in complete darkness, with a range of up to 30 meters.
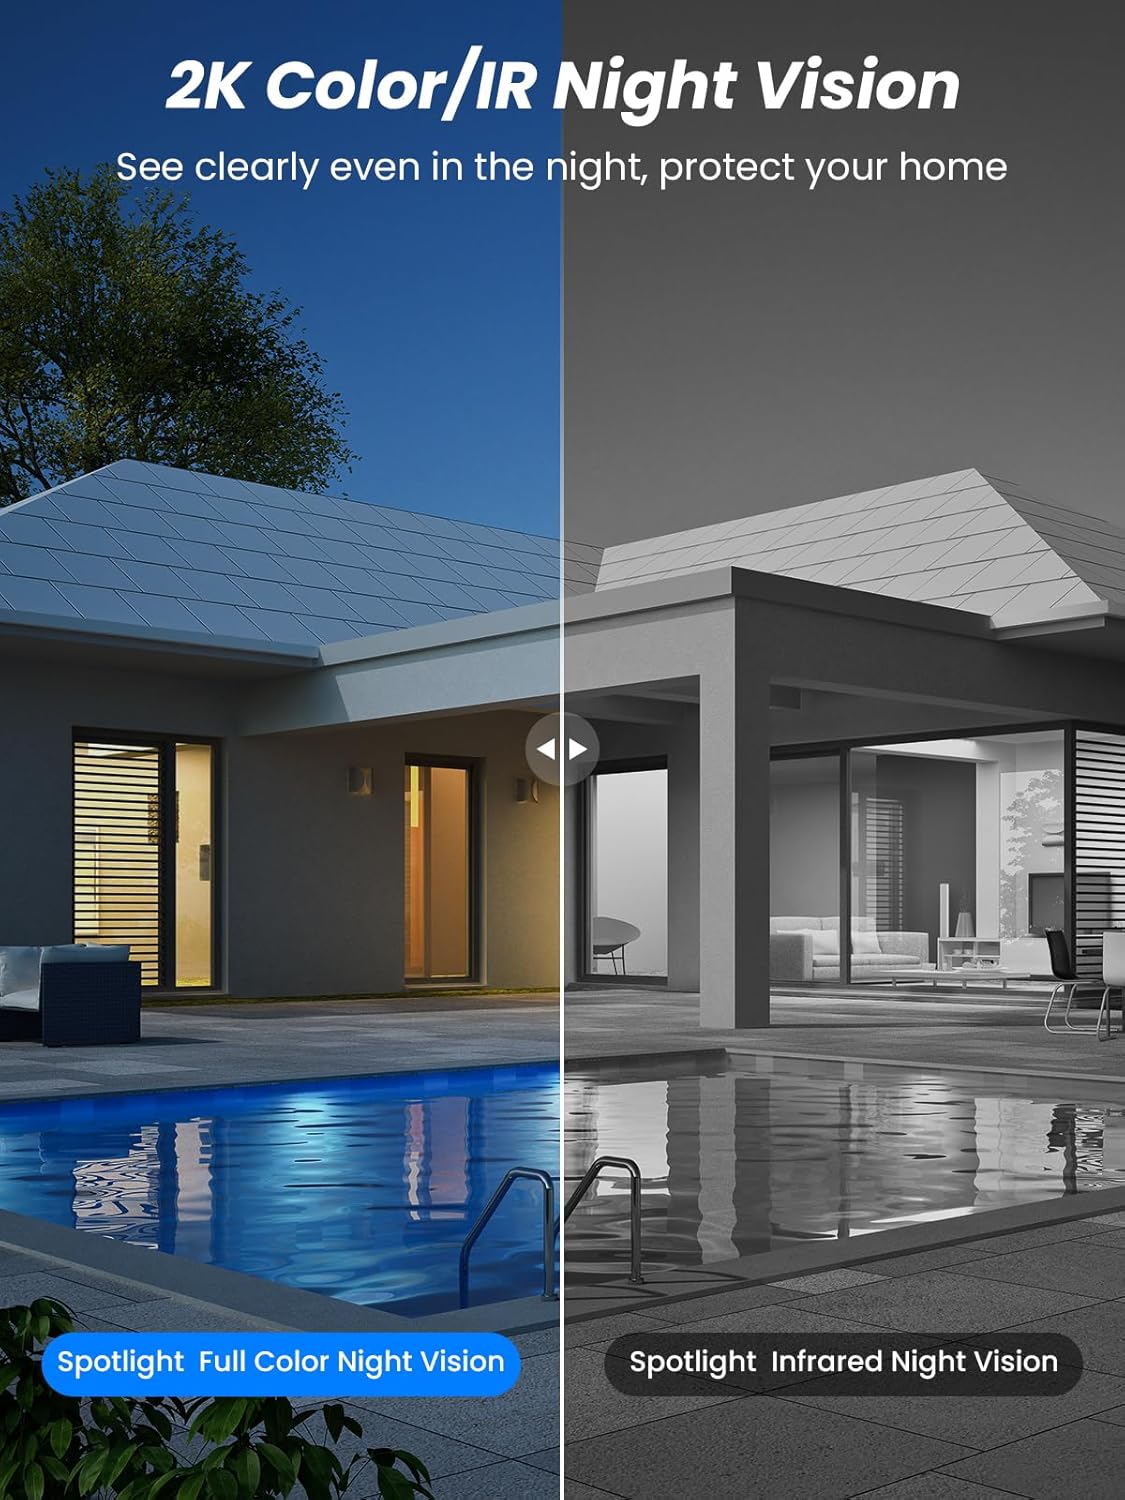
Figura 5.4: Illustrates the difference between full-color night vision, enabled by spotlights, and traditional infrared night vision.
5.4 Sunet bidirecțional
The integrated microphone and speaker allow for two-way communication.
- Vorbi: Atingeți pictograma microfonului din aplicație pentru a vorbi prin difuzorul camerei.
- Asculta: The camera's microphone captures audio from its surroundings.

Figura 5.5: The two-way audio function allows for direct communication through the camera, useful for interacting with visitors or delivery personnel.
6. Întreținere
- curatenie: Curățați periodic obiectivul camerei și panoul solar cu o lavetă moale șiamp cloth to ensure optimal performance and clear image quality. Avoid abrasive cleaners.
- Sănătatea bateriei: While solar-powered, extreme weather or prolonged periods of low sunlight may require manual charging. Monitor battery levels via the app.
- Actualizări firmware: Check the iCSee app regularly for available firmware updates to ensure your camera has the latest features and security enhancements.
- Protecție împotriva intemperiilor: The camera is IP66 weatherproof, designed to withstand rain, snow, and sun. However, ensure all connections are secure to maintain water resistance.

Figura 6.1: The IP66 rating ensures the camera's durability and functionality in various outdoor weather conditions, including snow, rain, and direct sunlight.
7. Depanare
- Camera nu se conectează la Wi-Fi:
- Ensure the camera is within range of your 2.4GHz Wi-Fi network. 5GHz networks are not supported.
- Verificați dacă parola Wi-Fi este corectă.
- Reporniți routerul și camera.
- If issues persist, try resetting the camera (refer to app or product for reset button location).
- Battery not charging or draining quickly:
- Ensure the solar panel is clean and receives direct sunlight for several hours daily.
- Verificați conexiunea dintre panoul solar și cameră.
- If in a low-light environment, manually charge the camera using the Type-C cable.
- Frequent motion detection events or live view streaming can consume battery faster. Adjust settings if needed.
- False motion detection alarms:
- Adjust the PIR motion detection sensitivity in the iCSee app.
- Ensure the camera is not pointed at areas with constant movement (e.g., busy roads, swaying trees) if not intended for monitoring.
- Calitate slabă a imaginii:
- Curățați obiectivul camerei.
- Ensure sufficient lighting for optimal image capture, especially at night.
- Verificați puterea semnalului Wi-Fi; un semnal slab poate afecta calitatea streamingului video.
8. Specificații
| Caracteristică | Detaliu |
|---|---|
| Numele modelului | D20-1P |
| Rezoluție captură video | 2.5K |
| Rezoluție video eficientă | 2K QHD |
| Tehnologia comunicațiilor fără fir | Wi-Fi (2.4 GHz) |
| Factor de formă | Dom |
| Viewunghiul ing | 355 Degrees (Pan), 90 Degrees (Tilt) |
| Tip de instalare | Montat pe perete |
| Gama de vedere nocturnă | 30 metri |
| Frame Rate | 25 fps |
| Material | Plastic |
| Voltage | 12 volți (DC) |
| Wattage | 5 wați |
| Sursa de alimentare | Alimentat cu baterii, alimentat cu energie solară |
| baterii | 3 baterii litiu-ion (incluse) |
| Protocol de conectivitate | Wifi |
| Tip controler | Aplicația iCSee |
| Caracteristici speciale | Night Vision (Color/IR), PIR Motion Detection, Two-Way Audio, IP66 Weatherproof |
| Greutatea articolului | 1.06 kg |
| Dimensiunile coletului | 21.7 x 19.5 x 13.8 cm |
9. Garanție și asistență
Reobiux offers a 1 an garanție for this product. For any issues or inquiries, please do not hesitate to reach out to our customer service. We provide 20 hours of online service to assist you.
For support, please refer to the contact information provided with your purchase or within the iCSee application.


