MASTECH M266C Digital Clamp Manual de utilizare al contorului
Model: GL-M266C
Professional Electrical Tool for Current, Voltage, and Circuit Testing
1. Introducere
Thank you for choosing the MASTECH M266C Digital Clamp Meter. This instrument is a professional, portable measuring device designed for electrical testing. It offers high accuracy, stability, and reliability, making it an ideal tool for electricians, technicians, and DIY enthusiasts.
The M266C is capable of measuring AC/DC voltage, AC current, resistance, continuity, and temperature. Its robust design and user-friendly interface ensure safe and efficient operation.
Caracteristici cheie:
- Display: 2000 counts for clear readings.
- Jaw Opening: Φ50mm (2.0") for large conductors.
- Continuity Buzzer: Audible indication for circuits with resistance less than 100Ω.
- Data Hold: Freezes the displayed reading for convenient recording.
- Low Battery Display: Indicates when batteries need replacement.
- Insulation Test capability.
- Safety Rating: CAT II 1000V / CAT III 600V.
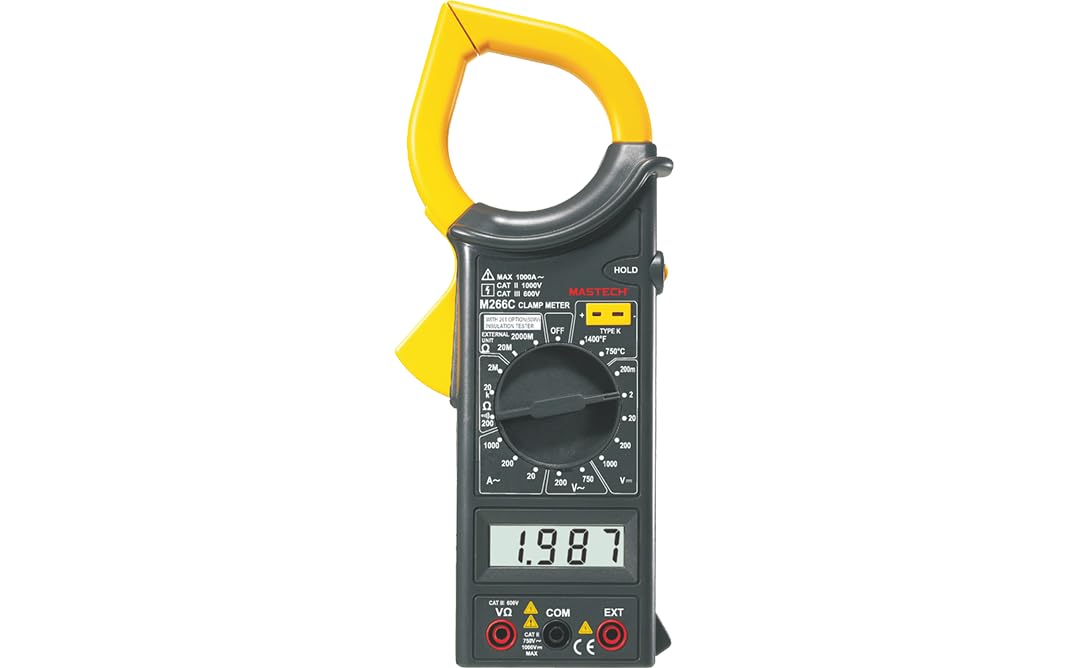
Figura 1: Față view of the MASTECH M266C Digital Clamp Metru.
2. Informații de siguranță
AVERTISMENT: Pentru a evita posibilele electrocutări sau vătămări corporale și pentru a evita deteriorarea contorului sau a echipamentului testat, respectați aceste reguli de siguranță:
- Read this manual thoroughly before using the meter.
- Nu aplicați mai mult decât volumul nominaltage, așa cum este marcat pe contor, între terminale sau între orice terminal și împământare.
- Aveți grijă când lucrați cu voltageste peste 60 V DC sau 30 V AC RMS. Un astfel de voltagreprezintă un pericol de șoc.
- Înainte de a măsura curentul, asigurați-vă că circuitul este dezactivat și că bornele de curent sunt închise.amp falca este complet închisă în jurul unui singur conductor.
- Deconectați întotdeauna sondele de testare de la circuit înainte de a schimba funcțiile sau intervalele.
- Do not use the meter if it appears damaged or if the insulation on the test leads is damaged.
- Asigurați-vă că capacul bateriei este închis corect înainte de utilizare.
- Observe the input limits for each function as specified in the specifications section.
3. Configurarea și instalarea bateriei
3.1 Despachetarea
Carefully unpack the meter and check for any damage. Verify that all accessories listed in the packaging information are present.
3.2 Instalarea bateriei
The M266C requires 2 LR44 batteries (included). To install or replace batteries:
- Asigurați-vă că aparatul de măsură este oprit.
- Localizați compartimentul bateriilor pe spatele contorului.
- Folosiți o șurubelniță pentru a slăbi șurubul de pe capacul bateriei.
- Scoateți capacul bateriei.
- Insert the 2 LR44 batteries, observing the correct polarity (+/-) as indicated inside the compartment.
- Puneți la loc capacul bateriei și strângeți bine șurubul.
When the low battery indicator appears on the display, replace the batteries immediately to ensure accurate readings.
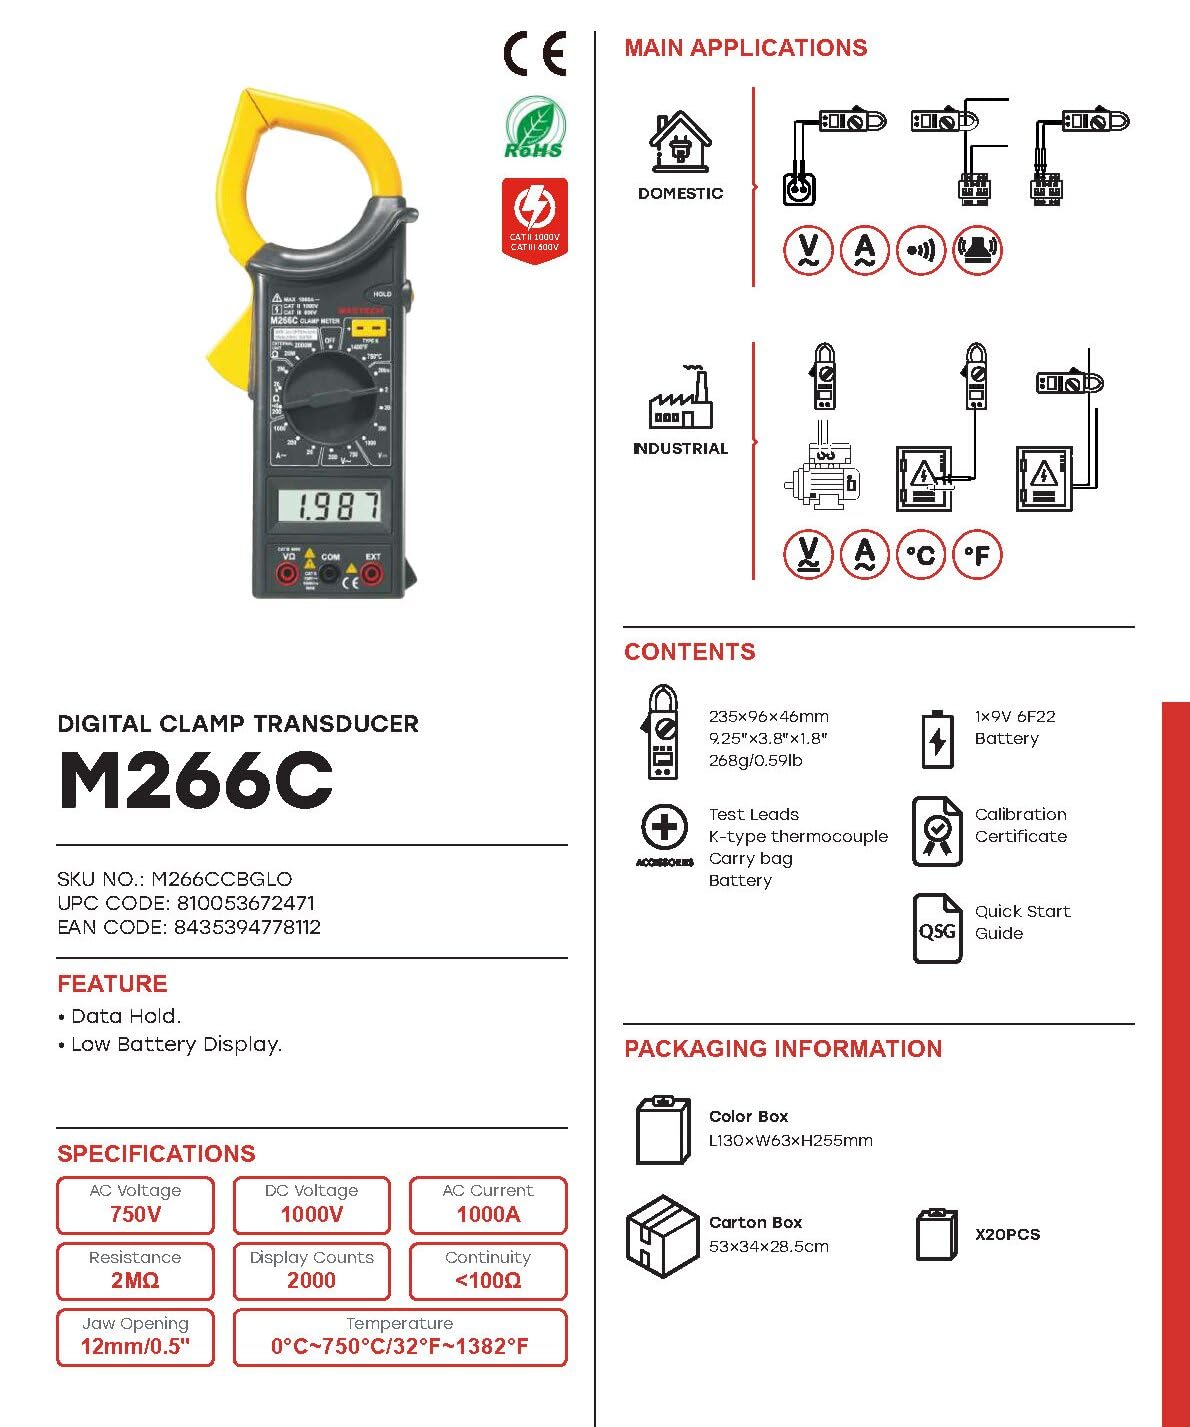
Figure 2: M266C packaging contents and basic specifications.
4. Instrucțiuni de utilizare
4.1 Funcționare generală
- Pornire/Oprire: Rotate the function dial from the OFF position to any desired measurement function to turn the meter ON. Rotate it back to OFF to turn the meter OFF.
- Selectarea funcției: Rotiți comutatorul rotativ pentru a selecta funcția de măsurare dorită (de exemplu, V~ pentru tensiunea AC).tage, A~ for AC Current, Ω for Resistance).
- Păstrarea datelor: Apăsați butonul „HOLD” pentru a îngheța valoarea curentă de pe afișaj. Apăsați-l din nou pentru a o elibera.
4.2 AC Current Measurement (A~)
- Set the rotary switch to the desired AC Current range (e.g., 200A or 1000A).
- Deschide clamp maxilarului apăsând trăgaciul.
- Așezați clamp jaw around a single conductor of the circuit to be measured. Ensure the jaw is completely closed.
- Citiți valoarea curentului alternativ de pe afișaj.
4.3 AC/DC VoltagMăsurarea e (V~ / V-)
- Insert the red test lead into the 'VΩ' input jack and the black test lead into the 'COM' input jack.
- Setați comutatorul rotativ la volumul AC dorittage (V~) sau Volum CCtage (V-) range.
- Conectați sondele de testare în paralel cu circuitul sau componenta care urmează să fie măsurată.
- Citiți voltage valoarea pe display.
4.4 Măsurarea rezistenței (Ω)
- Insert the red test lead into the 'VΩ' input jack and the black test lead into the 'COM' input jack.
- Setați comutatorul rotativ la intervalul de rezistență (Ω) dorit.
- Asigurați-vă că circuitul este dezactivat înainte de a măsura rezistența.
- Conectați sondele de testare la componenta care urmează să fie măsurată.
- Citiți valoarea rezistenței pe afișaj.
4.5 Continuity Test (<100Ω)
- Insert the red test lead into the 'VΩ' input jack and the black test lead into the 'COM' input jack.
- Set the rotary switch to the Continuity function (often indicated by a speaker symbol).
- Asigurați-vă că circuitul este dezactivat.
- Conectați sondele de testare la circuit sau la componentă.
- Dacă rezistența este mai mică de aproximativ 100 Ω, va suna un buzer, indicând continuitatea.
4.6 Temperature Measurement (°C / °F)
The M266C supports temperature measurement using a K-type thermocouple (often included).
- Set the rotary switch to the Temperature function (°C or °F).
- Insert the K-type thermocouple into the designated input jacks (usually labeled 'TEMP' or similar, or use the 'VΩ' and 'COM' jacks if specified for temperature).
- Place the tip of the thermocouple on or near the object whose temperature is to be measured.
- Citiți valoarea temperaturii de pe afișaj.
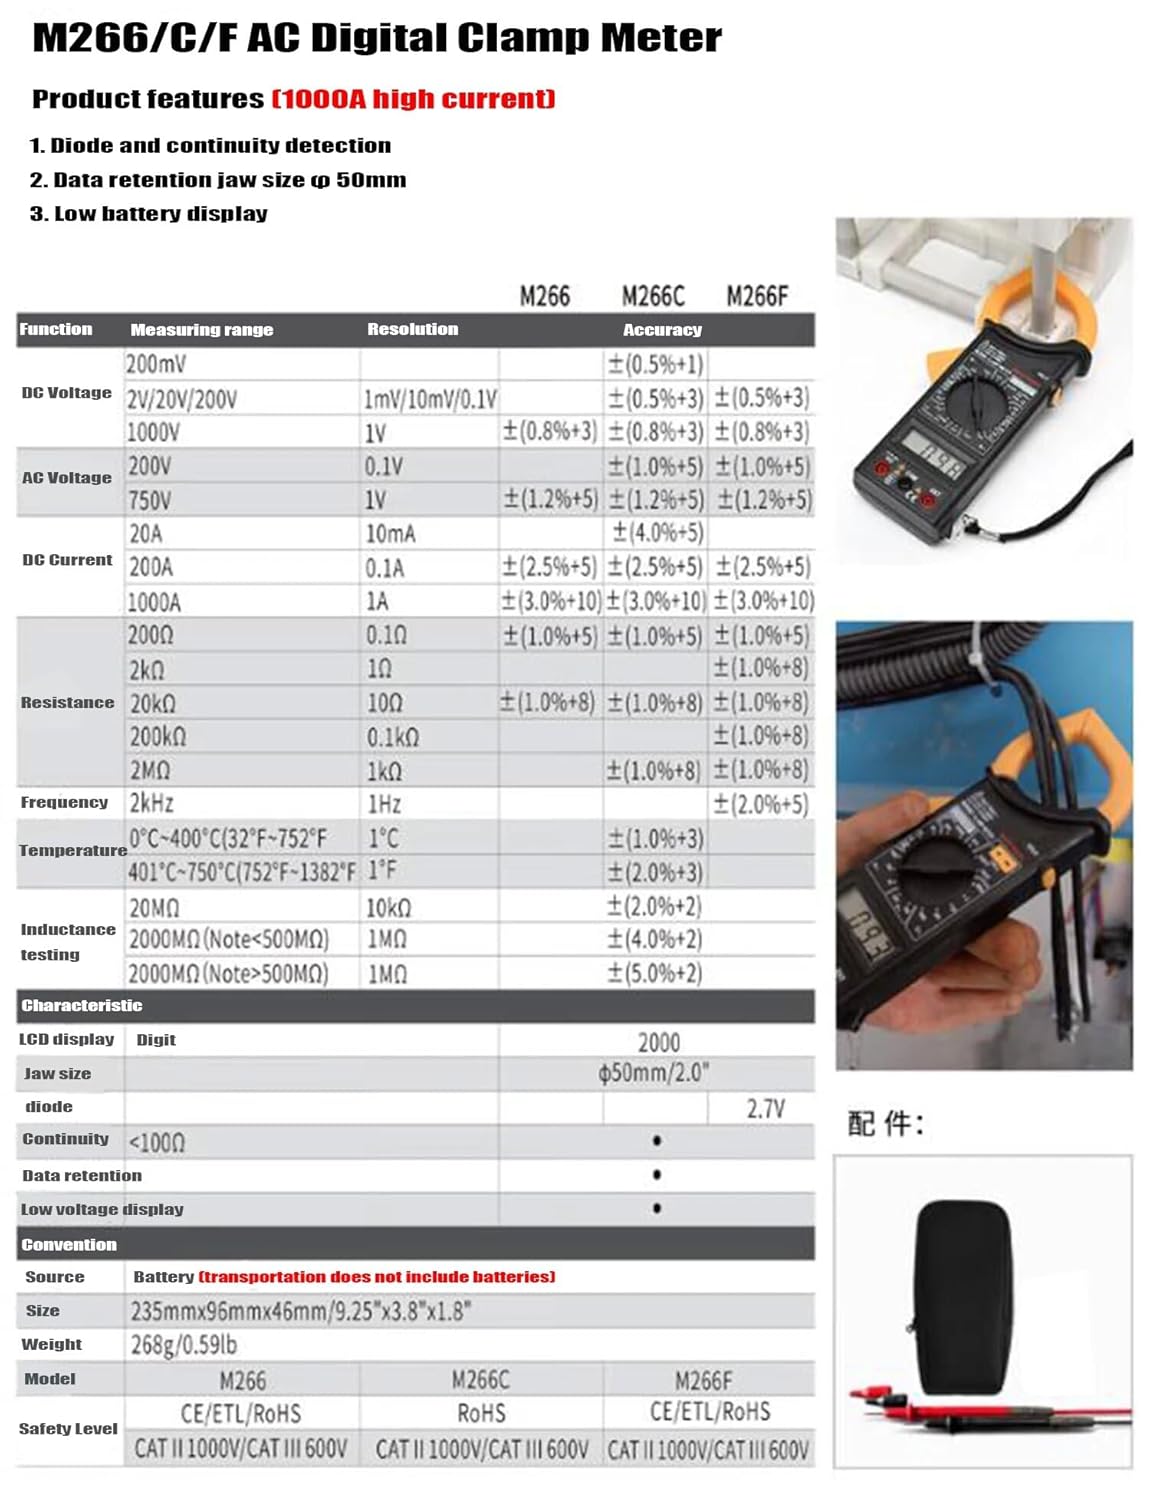
Figure 3: M266C/F AC Digital Clamp Meter product features and detailed specifications table.
5. Specificații
| Parametru | Caietul de sarcini |
|---|---|
| Afişa | 2000 de numere |
| Deschiderea maxilarului | Φ50mm / 2.0" |
| DC Voltage (V-) | 200mV, 2V, 20V, 200V, 1000V |
| AC Voltage (V~) | 200V, 750V |
| Curent continuu (A-) | 200A, 1000A |
| Curent alternativ (A~) | 200A, 1000A |
| Rezistență (Ω) | 200Ω, 2kΩ, 20kΩ, 200kΩ, 2MΩ, 20MΩ |
| Continuitate Buzzer | <100Ω |
| Temperatură | 0°C ~ 400°C (32°F ~ 752°F) and 401°C ~ 750°C (752°F ~ 1382°F) |
| Test de izolare | 20MΩ, 2000MΩ (Note: <500MΩ) |
| Sursa de alimentare | 2 baterii LR44 (incluse) |
| Dimensiuni (L x l x H) | 6.3 x 3.54 x 1.97 inchi (235 mm x 96 mm x 46 mm) |
| Greutatea articolului | 1.1 lire (0.5 kilograme) |
| Nivel de siguranță | CAT II 1000V / CAT III 600V |
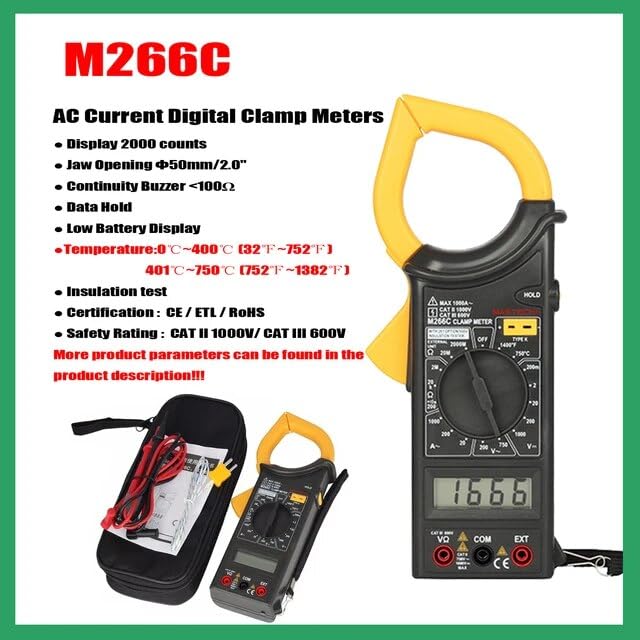
Figure 4: Key features of the M266C model.
6. Întreținere
6.1 Curățare
Pentru a curăța contorul, ștergeți carcasa cu un prosop de hârtie.amp o lavetă și un detergent blând. Nu utilizați abrazive sau solvenți. Asigurați-vă că aparatul de măsură este complet uscat înainte de utilizare.
6.2 Înlocuirea bateriei
As mentioned in Section 3.2, replace the batteries when the low battery indicator appears on the display to ensure accurate readings and proper operation.
6.3 Depozitare
If the meter is not to be used for a long period, remove the batteries to prevent leakage and damage to the meter. Store the meter in a cool, dry place, away from direct sunlight and extreme temperatures.
7. Depanare
| Problemă | Cauza posibila | Soluţie |
|---|---|---|
| Contorul nu pornește | Baterii uzate sau instalate incorect | Verificați polaritatea bateriilor; înlocuiți bateriile. |
| Indicator de baterie descărcată | Bateriile sunt slabe | Înlocuiți imediat bateriile. |
| Nu se citește sau se afișează „OL” | Overload, open circuit, or incorrect range | Select a higher range; check circuit for open; ensure clamp jaw is fully closed around a single conductor for current measurements. |
| Citiri inexacte | Low battery, external interference, or incorrect connection | Replace batteries; move away from strong electromagnetic fields; ensure proper test lead connection. |
8. Garanție și asistență
For warranty information and technical support, please refer to the documentation included with your purchase or visit the official Mastech webPăstrați bonul fiscal ca dovadă a achiziției pentru orice reclamații în garanție.
Mastech Official Website: Visit the Mastech Store on Amazon