1. Introducere
Thank you for choosing the ATTACK SHARK X2 Wireless Gaming Mouse. This manual provides detailed instructions for setting up, operating, and maintaining your mouse to ensure optimal performance. The X2 mouse features a transparent shell, 3-mode connectivity (2.4GHz wireless, Bluetooth 5.0, USB-C wired), adjustable DPI, 3D RGB lighting, and a rechargeable battery.

Image 1.1: The ATTACK SHARK X2 Wireless Gaming Mouse, showcasing its transparent design and vibrant RGB lighting. A USB receiver is also visible.
2. Produs terminatview
2.1 Conținutul pachetului
- ATTACK SHARK X2 Wireless Gaming Mouse
- Cablu de încărcare USB-C
- 2.4GHz USB Receiver (stored in the mouse)
- Manual de utilizare
2.2 Componentele mouse-ului

Imaginea 2.1: Partea de jos view of the X2 mouse, highlighting the USB receiver slot, mode switch, and light effect switch.
- Faceți clic stânga pe butonul
- Faceți clic dreapta pe butonul
- Rotiță de derulare (also functions as a button)
- Butonul DPI (below scroll wheel)
- Butonul înainte (partea stanga)
- Butonul înapoi (partea stanga)
- Comutator mod (bottom of mouse: OFF / 2.4G / Bluetooth)
- Comutator cu efect de lumină (bottom of mouse)
- Slot receptor USB (bottom of mouse)
- Port de încărcare USB-C (front of mouse)
3. Configurare și conectare
3.1 Încărcarea mouse-ului
The X2 mouse features an 800mAh rechargeable battery. Before first use, or when the battery is low, connect the mouse using the provided USB-C cable.
- Connect the USB-C end of the cable to the mouse's charging port.
- Conectați capătul USB-A la o sursă de alimentare (de exemplu, portul USB al computerului, adaptorul USB de perete).
- O încărcare completă durează de obicei aproximativ 4 ore.
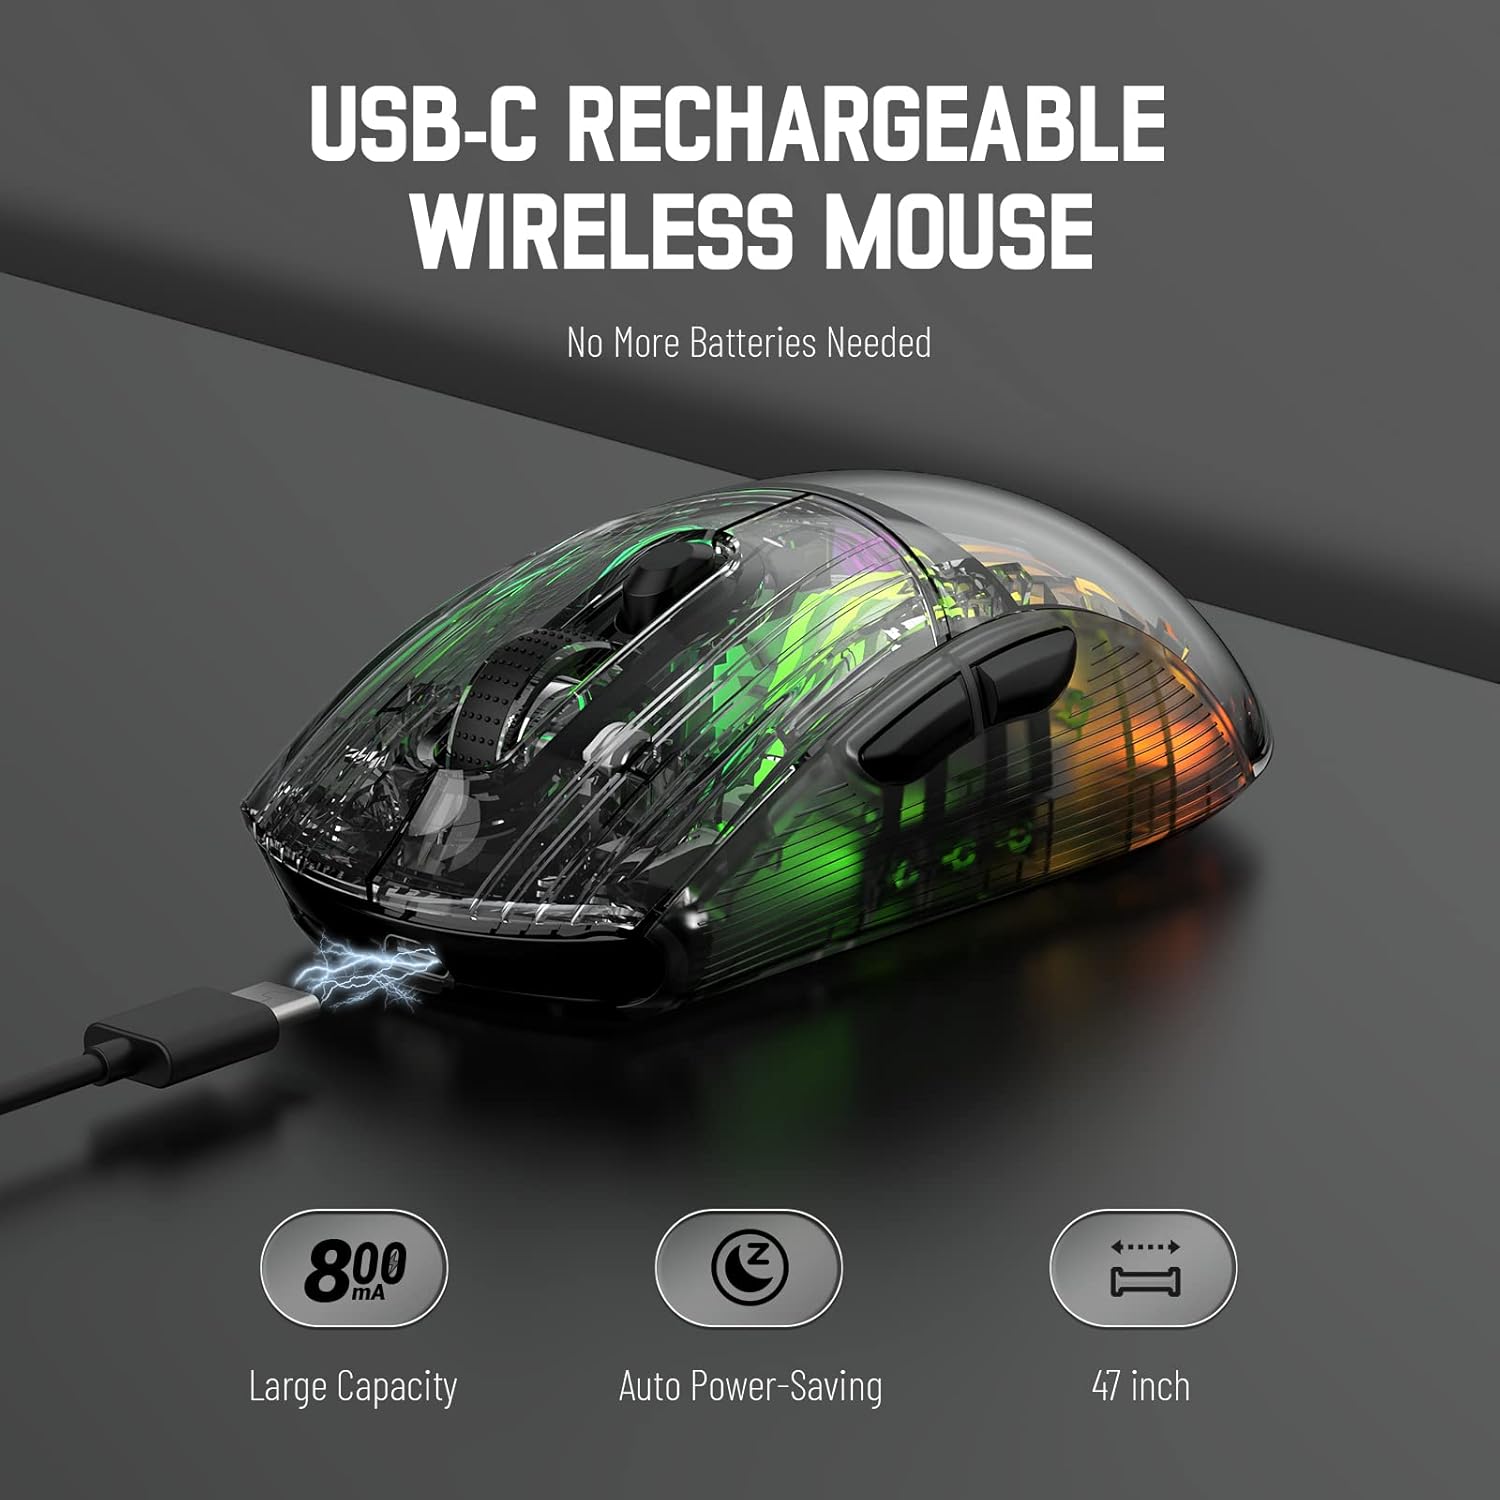
Image 3.1: The X2 mouse connected via its USB-C cable, illustrating the charging process.
3.2 Conexiune wireless de 2.4 GHz
For a stable and responsive wireless connection, use the 2.4GHz USB receiver.
- Locate the USB receiver stored in the slot on the bottom of the mouse.
- Push the mode switch on the bottom of the mouse to the "2.4G" position.
- Conectați receptorul USB la un port USB disponibil de pe computer sau dispozitiv.
- The computer should automatically detect and install the necessary drivers. The mouse is ready for use once installation is complete (typically plug-and-play).
- If the mouse is unresponsive, try plugging the receiver into a different USB port.
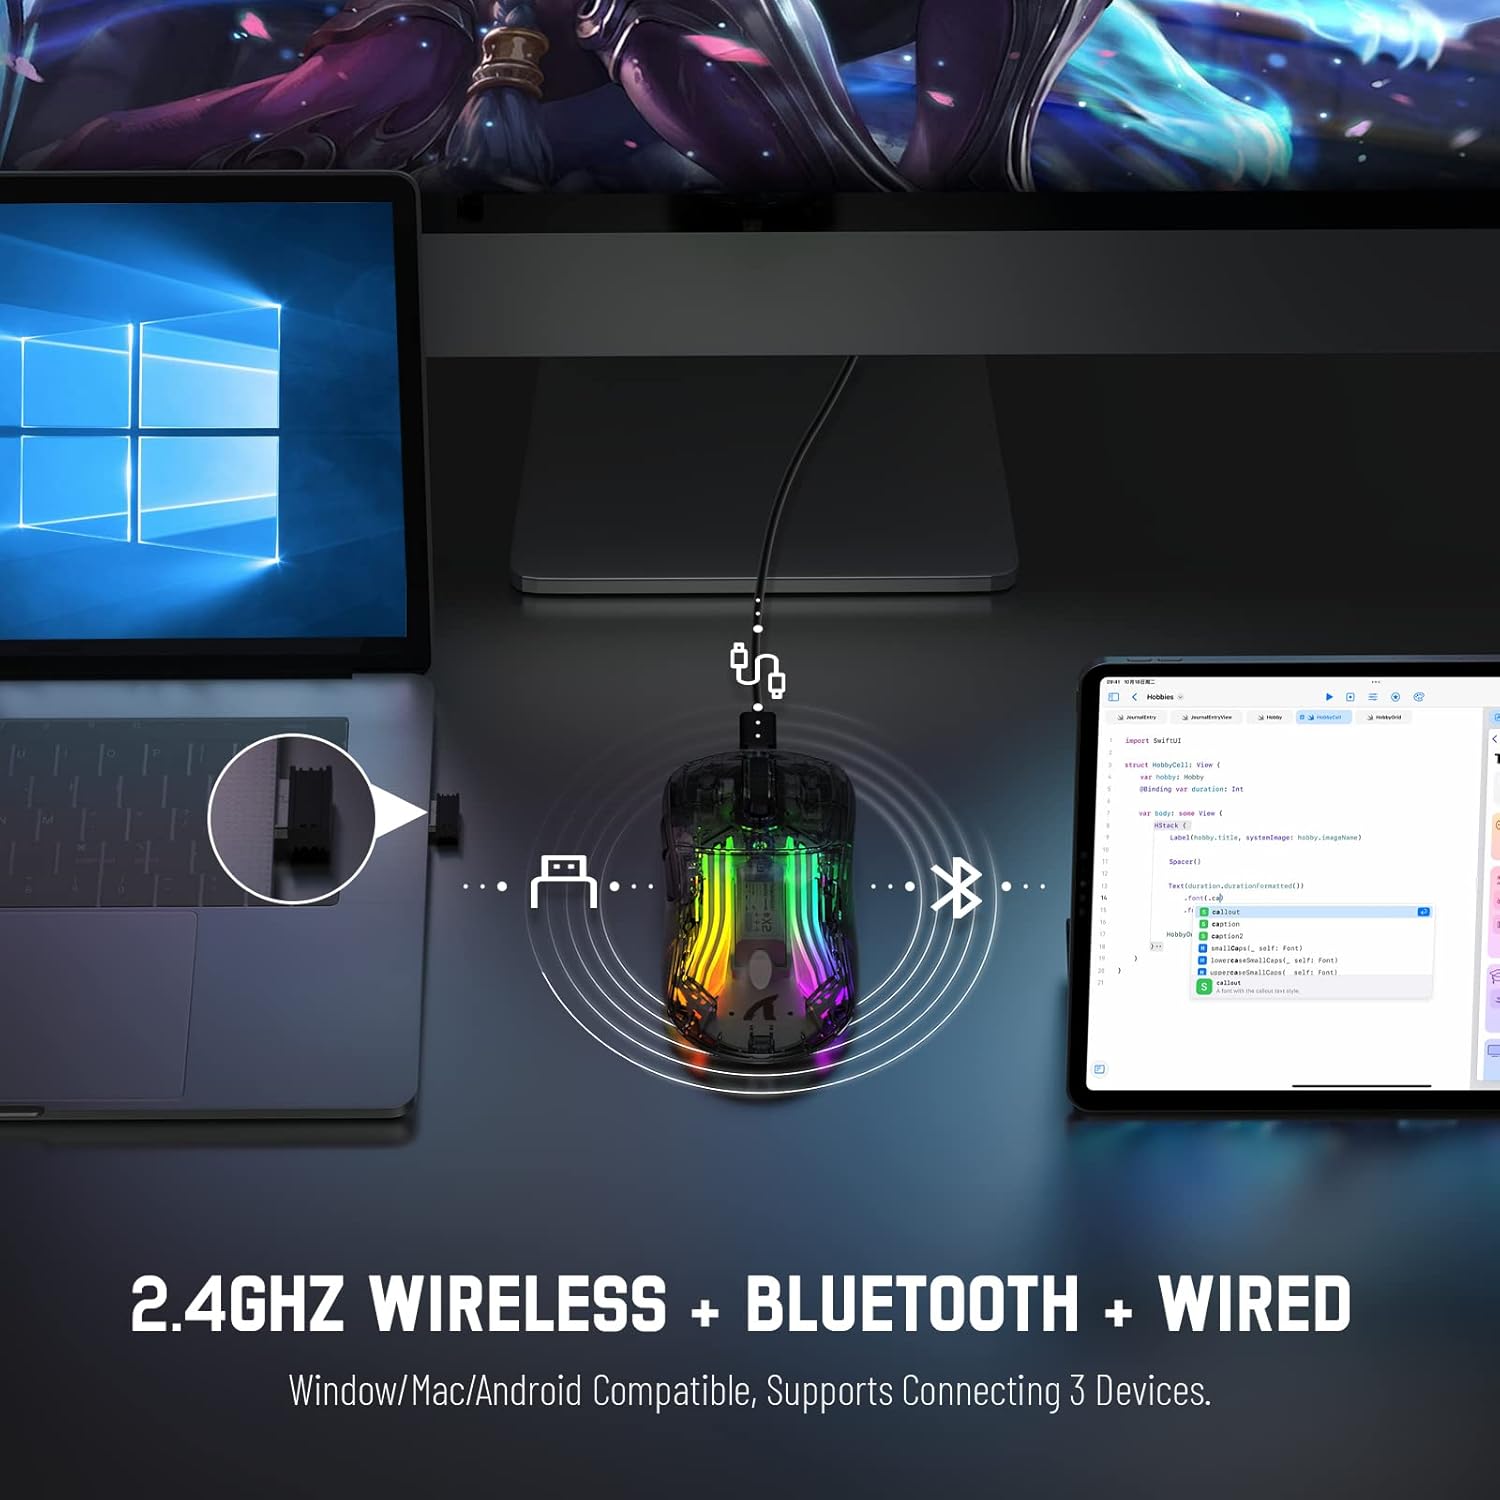
Image 3.2: Illustration of the 2.4GHz wireless connection, showing the USB receiver plugged into a laptop.
3.3 Conexiune Bluetooth 5.0
Connect your X2 mouse via Bluetooth for devices that support it, such as laptops, tablets, or smartphones.
- Push the mode switch on the bottom of the mouse to the "Bluetooth" position.
- Țineți apăsat butonul Faceți clic stânga pe butonul + Butonul roată de derulare + Faceți clic dreapta pe butonul simultaneously for approximately 3-4 seconds. The blue light on the mouse will flash rapidly, indicating it is in pairing mode.
- On your device, navigate to Bluetooth settings and enable Bluetooth.
- Caută available devices. Select "X2 Mouse" from the list to connect.
- Once connected, the blue light will stop flashing and remain solid or turn off, depending on the lighting mode.
3.4 Conexiune USB-C cu fir
For a direct and reliable connection, use the USB-C cable in wired mode.
- Connect the USB-C end of the cable to the mouse's charging port.
- Connect the USB-A end to an available USB port on your computer or device.
- The mouse will function immediately as a wired mouse (plug-and-play).
4. Instrucțiuni de utilizare
4.1 Ajustare DPI
The mouse features 5 adjustable DPI levels to suit various tasks and gaming preferences. The game chip used is PixArt 3212.
- Apăsați tasta Butonul DPI (located below the scroll wheel) to cycle through the available DPI settings.
- Available DPI levels: 800 / 1200 / 1400 / 2000 / 2400.
4.2 Controlul iluminării RGB
The X2 mouse features 3D RGB lighting with 11 different light colors and various effects.
- Apăsați tasta Comutator cu efect de lumină (located on the bottom of the mouse) to cycle through the different RGB lighting modes and colors.

Image 4.1: The X2 mouse displaying its 3D RGB lighting, complementing a gaming setup.
4.3 Gestionarea energiei
The mouse is designed with auto power-saving features to conserve battery life.
- The mouse will enter a sleep mode after a period of inactivity.
- Pentru a activa mouse-ul, pur și simplu mișcați-l sau faceți clic pe orice buton.
- When the battery is low, the mouse's indicator light may flash red.
4.4 Clicuri silențioase
The X2 mouse features silent click buttons, reducing noise during use.

Imaginea 4.2: O vedere lateralăfile of the X2 mouse, emphasizing its ergonomic shape and silent click functionality.
5. Întreținere
5.1 Curățare
- Disconnect the mouse from your device before cleaning.
- Folosiți o lavetă moale, uscată și fără scame pentru a șterge suprafața mouse-ului.
- Pentru murdăria persistentă, dreaptă ușorampClătiți cârpa cu apă sau o soluție de curățare delicată. Evitați substanțele chimice dure.
- Nu permiteți pătrunderea lichidelor în interiorul mouse-ului.
5.2 Depozitare
- Depozitați mouse-ul într-un loc răcoros și uscat, ferit de lumina directă a soarelui și de temperaturi extreme.
- When not in use, ensure the mode switch is set to "OFF" to conserve battery life.
- Keep the USB receiver stored in its designated slot on the bottom of the mouse to prevent loss.
6. Depanare
6.1 Mouse-ul nu răspunde
- Verificați bateria: Asigurați-vă că mouse-ul este încărcat. Conectați-l prin cablul USB-C pentru a-l încărca.
- Verificați comutatorul de mod: Verify the mode switch on the bottom of the mouse is set to the correct connection mode (2.4G, Bluetooth, or OFF for wired).
- Conexiune 2.4 GHz: Asigurați-vă că receptorul USB este conectat corect la un port USB funcțional. Încercați un alt port USB.
- Conexiune Bluetooth: Re-enter pairing mode (Left + Scroll + Right buttons for 3-4 seconds) and re-pair with your device. Ensure Bluetooth is enabled on your device.
- Conexiune prin cablu: Ensure the USB-C cable is securely connected to both the mouse and the device.
6.2 Conexiune intermitentă
- Distanţă: Ensure the mouse is within the effective range (up to 50ft for 2.4GHz).
- Interferență: Move the mouse and receiver away from other wireless devices or large metal objects that may cause interference.
- Nivel baterie: Low battery can affect connection stability. Charge the mouse.
6.3 Luminile RGB nu funcționează
- Check Light Switch: Press the Light Effect Switch on the bottom of the mouse to cycle through modes or turn lights on.
- Nivel baterie: Ensure the mouse has sufficient charge, as low battery might disable lighting to conserve power.
7. Specificații
| Caracteristică | Caietul de sarcini |
|---|---|
| Model | X2 |
| Conectivitate | Wireless 2.4GHz, Bluetooth 5.0, USB-C cu fir |
| Niveluri DPI | 800 / 1200 / 1400 / 2000 / 2400 (PixArt 3212 Chip) |
| Butoane | 7 (Left, Right, Scroll Wheel, DPI, Forward, Backward, Light Effect Switch) |
| Iluminat | 3D RGB Lighting (11 light colors) |
| Baterie | 800mAh reîncărcabil |
| Timp de încărcare | Aproximativ. 4 ore |
| Interval de operare | Up to 50ft (2.4GHz) |
| Compatibilitate | Windows 7/8/10/XP, Vista 7/8, Mac OS, Linux (PC, Laptop, Tablet, PS4, PS5, Xbox One) |
| Greutatea articolului | 6.4 uncii |
| Dimensiuni | 6.89 x 4.61 x 1.81 inci (Pachet) |
8. Garanție și asistență
ATTACK SHARK products are designed and manufactured to high-quality standards. For warranty information or technical support, please refer to the warranty card included with your product or contact the seller directly through your purchase platform. Please retain your proof of purchase for any warranty claims.
For further assistance, please visit the official ATTACK SHARK store on Amazon: ATTACK SHARK Store


