1. Introducere
This manual provides detailed instructions for the installation, operation, and maintenance of your sarmert Dash Cam Hardwire Kit. This kit is designed to provide a continuous power supply to your dash camera, enabling 24-hour parking monitoring and protecting your vehicle's battery from draining. Please read this manual thoroughly before installation and use to ensure proper function and safety.
2. Ce se află în cutie
La deschiderea ambalajului, vă rugăm să verificați dacă toate componentele sunt prezente și în stare bună:
- 1 x 3-lead cable hardwire kit (USB-C)
- 8 x Fuse Taps (various types for wide compatibility)

Imagine: Pesteview of the sarmert Dash Cam Hardwire Kit components.
3. Specificații
| Caracteristică | Descriere |
|---|---|
| Vol. De intraretage | DC 12V-24V |
| Ieșire Voltage / Curent | DC 5V/2.5A |
| Lungimea cablului | 11.5 ft (aproximativ 3.5 metri) |
| Tip conector | USB Type-C (Right-angle) |
| Vol. Scăzuttage Protecție | Adjustable (11.8V/12.0V/12.2V/12.4V for 12V battery; 23.6V/24.0V/24.4V/24.8V for 24V battery) |
| Compatibilitate | Dash cams, GPS navigators, radar detectors with USB-C input |
| Caracteristici de siguranță | Short circuit protection, overheating protection, cable reversal prevention, battery drain protection |

Image: Universal compatibility with USB Type-C devices.
4. Configurare și instalare
Installing the hardwire kit requires connecting to your vehicle's fuse box. If you are not comfortable with automotive electrical systems, it is recommended to seek professional assistance.
- Localizați cutia de siguranțe: Refer to your vehicle's owner's manual to find the location of the fuse box. Common locations include under the dashboard, in the glove compartment, or in the engine bay.
- Identify Fuse Types: The kit includes various fuse taps (ATO Maxi, Mini, Low Profile Mini, Micro2). Identify the correct type of fuse for your car's fuse box.
- Conectați firele: The hardwire kit has three leads:
- RED wire (ACC): Connect to a fuse that provides power only when the ignition is on (Accessory power).
- YELLOW wire (BAT+): Connect to a fuse that provides constant power, even when the ignition is off (Battery power). This is crucial for parking monitoring.
- BLACK wire (GND): Connect to a metal bolt or screw on the vehicle's chassis for a ground connection.
- Traseul cablurilor: Carefully route the cables from the fuse box to the location of your dash camera, ensuring they do not interfere with vehicle operation or safety features. Conceal cables under trim panels for a clean installation.
- Conectați-vă la Dash Cam: Plug the USB Type-C connector into your dash camera's power input.
- Funcționalitate de testare: Turn on your vehicle's ignition and verify that the dash camera powers on. Then, turn off the ignition and ensure the dash camera enters parking monitoring mode (if supported by your dash cam).

Image: Included Fuse Tap Sets.
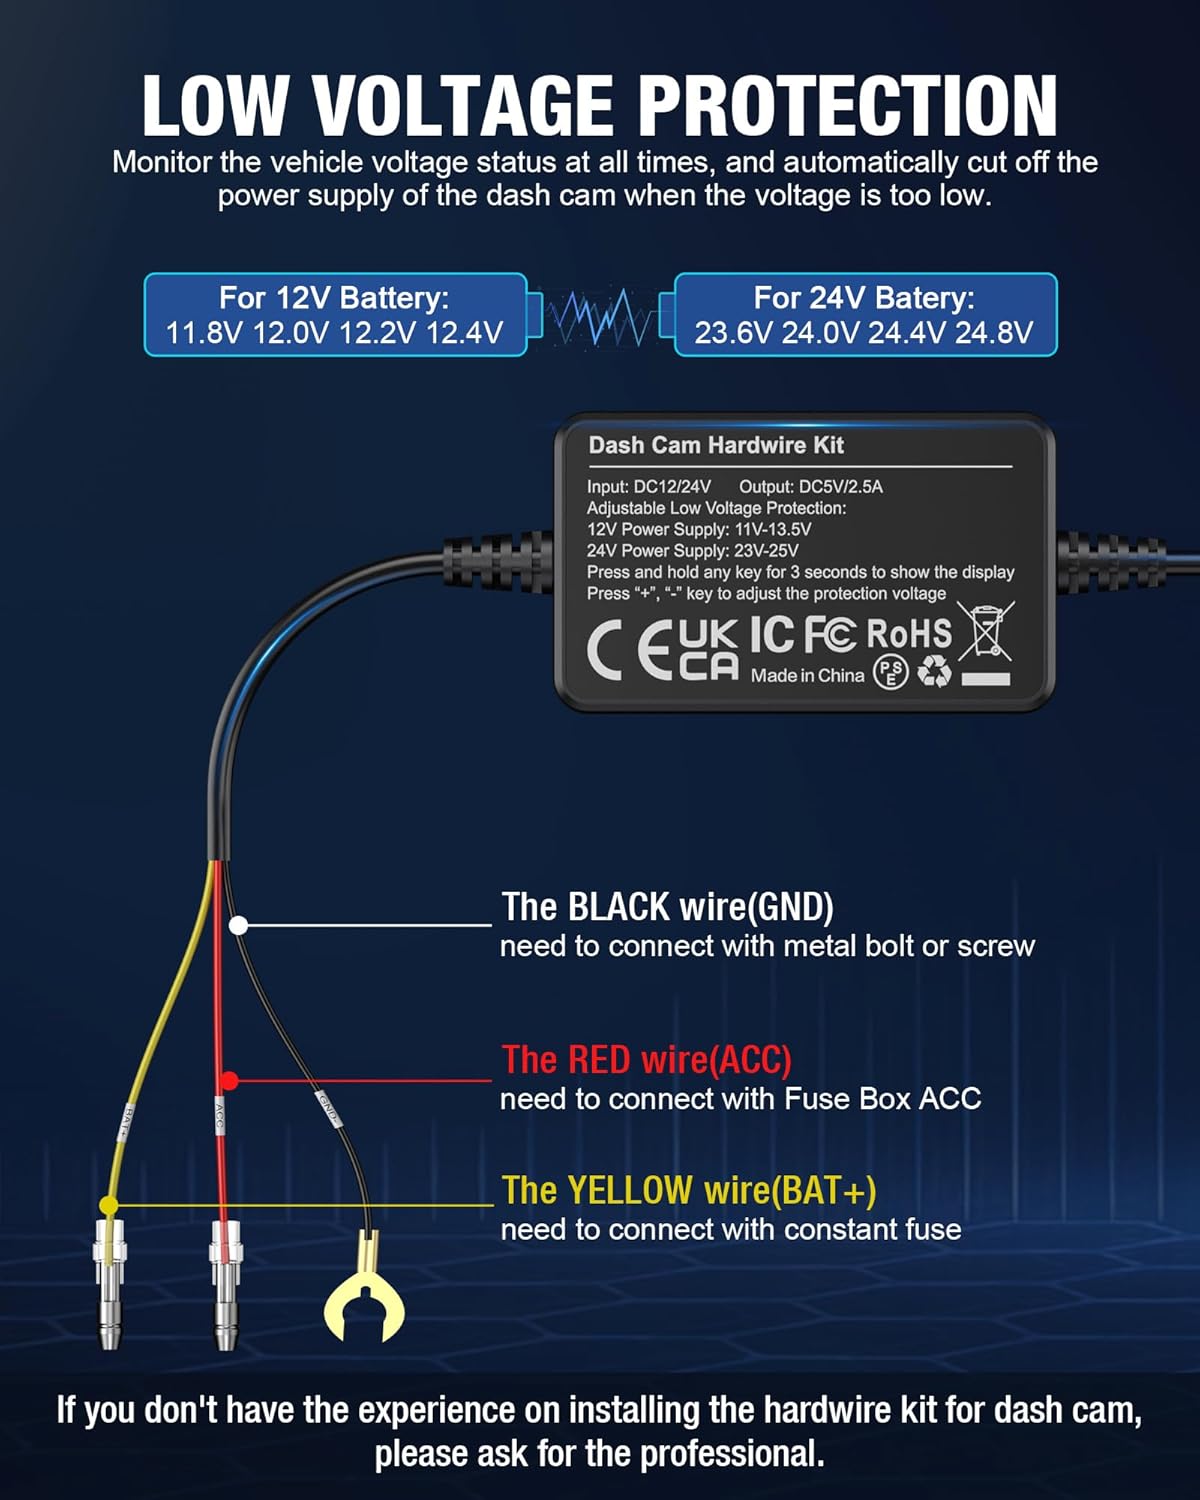
Image: Wiring diagram for the hardwire kit.

Image: Visual guide for the installation process.
5. Caracteristici de funcționare
The sarmert Hardwire Kit is designed for seamless operation and enhanced safety:
Vol. Scăzuttage Protecție
The kit features an adjustable low voltage protection system to prevent your car battery from draining. You can set the cut-off voltage to match your vehicle's battery type (12V or 24V). When the car battery voltage drops below the set threshold (e.g., 11.8V for a 12V battery), the kit will automatically cut off power to the dash cam after one minute, preserving enough power for your vehicle to start.

Image: Hardwire Kit Box with voltage adjustment controls.
Pentru a regla volumul de protecțietage:
- Press and hold any key (+ or -) for 3 seconds to show the current voltage afișare.
- Use the '+' and '-' keys to cycle through the available voltage setări.
Monitorizare parcare 24/7
By connecting to the vehicle's battery via the constant power (BAT+) wire, the hardwire kit ensures your dash cam receives continuous power. This allows your dash cam to utilize its 24-hour parking monitoring function, recording events even when your car is parked and the engine is off. This feature is dependent on your dash camera supporting parking monitoring modes.

Image: Explanation of 24-hour parking mode functionality.
Protecții de siguranță
The Type-C hardwire kit incorporates multiple safety mechanisms to ensure stable and safe operation:
- Protecție la scurtcircuit
- Protecție la supraîncălzire
- Adjustable Low Voltage Protecție
- Cable Reversal Prevention
- Battery Drain Protection

Image: Safety features of the 3-lead hardwire kit.
6. Întreținere
The sarmert Dash Cam Hardwire Kit is designed for durability and requires minimal maintenance. Ensure all connections remain secure and free from corrosion. Periodically check the cable routing to ensure it has not become dislodged or damaged. Keep the hardwire kit module clean and free from excessive dust or moisture.
7. Depanare
- No Power to Dash Cam:
- Check all wire connections (Red, Yellow, Black) to ensure they are securely attached to the correct points in the fuse box and chassis.
- Verify that the fuse taps are correctly inserted and that the fuses themselves are not blown.
- Ensure the USB-C connector is fully inserted into the dash cam.
- Verificați volumul bateriei vehicululuitage. If it's below the set low voltage protection threshold, the kit will cut power.
- Dash Cam Not Entering Parking Mode:
- Confirm that the YELLOW (BAT+) wire is connected to a constant power fuse.
- Ensure your dash camera model supports 24-hour parking monitoring and that the feature is enabled in its settings.
- Probleme de descărcare a bateriei:
- Verificați dacă volumul scăzuttage protection setting is appropriate for your vehicle's battery type (12V or 24V).
- If the issue persists, consult a professional auto electrician.
8. Garanție și asistență
sarmert offers a 12-month worry-free warranty for this Dash Cam Hardwire Kit. If you encounter any issues or have questions regarding the 3-Lead Hardwire Kit, please do not hesitate to contact our after-sales support team. Our team is available online 24 hours a day to assist you.
For support, please visit the official sarmert store on Amazon or use the contact information provided with your purchase.


