Introducere
Mulțumesc pentru achizițieasing the Nedis Alarm Clock with Wireless Charger. This device combines a digital alarm clock with a Qi-certified wireless charging pad, a USB-A charging port, a dimmable display, dual alarm settings, and a color-changing night light. This manual provides essential information for safe and efficient use of your new device.
Informații de siguranță
- Citiți cu atenție toate instrucțiunile înainte de utilizare.
- Țineți dispozitivul departe de apă, umiditate și temperaturi extreme.
- Nu încercați să dezasamblați sau să reparați dispozitivul singur. Apelați la personal calificat pentru toate lucrările de service.
- Ensure the power adapter used is compatible with the device's power requirements. For fast charging, a QC3.0 power adapter (not included) is recommended.
- Avoid placing metal objects on the wireless charging pad, as this may interfere with charging or cause overheating.
Conținutul pachetului
- Nedis Alarm Clock with Wireless Charger (Model WCACQ30WT)
- Power Adapter (if included, otherwise sold separately)
- Manual de utilizare
Produs terminatview
Familiarize yourself with the various components of your alarm clock:

Imaginea 1: Față View. This image displays the front of the alarm clock, featuring the large digital time display and the touch-sensitive control buttons located above it. The buttons include controls for display brightness, time setting, and alarm adjustments.
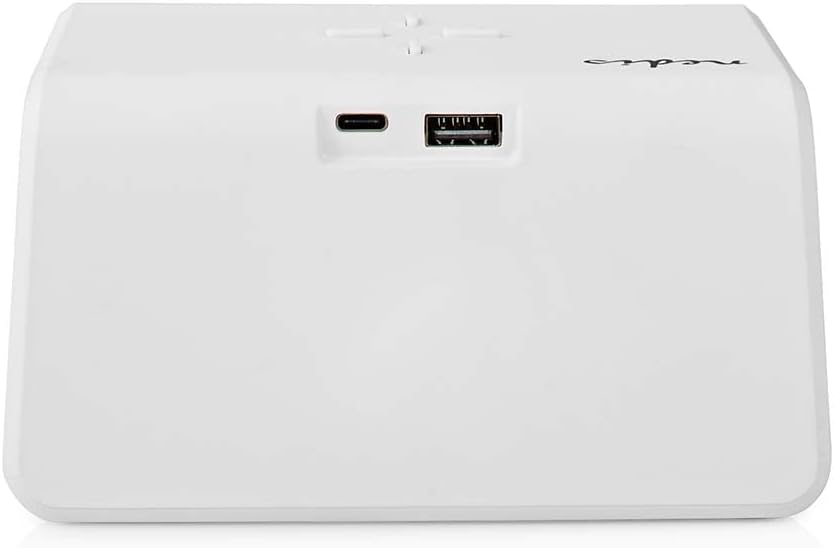
Imaginea 2: Spate View. The back of the alarm clock is shown, highlighting the USB-C port for power input and a standard USB-A port for charging external devices.
- Ecran digital: Shows time, alarm status, and other indicators.
- Butoane de control: (Located on top)
- Light Button: Controls night light.
- Time/Alarm Set Button: For setting time and alarms.
- +/- Buttons: Adjust values.
- Pad de încărcare fără fir: (Top surface) For Qi-compatible devices.
- Intrare USB-C: (Rear) For connecting the power adapter.
- Ieșire USB-A: (Rear) For charging other devices via cable.
- Night Light Panel: (Side/Rear) Emits ambient light.
Înființat
- Conectare alimentare: Plug the provided power adapter into the USB-C input port on the back of the alarm clock. Connect the other end to a wall outlet. The display will light up.
- Setare inițială a orei: The clock may display a default time. Proceed to the 'Operating Instructions' section to set the correct time.
Instrucțiuni de operare
1. Setarea orei
- Țineți apăsat butonul Time/Alarm Set button (usually marked with a clock icon) until the hour digits start flashing.
- Utilizați + or - butoane pentru a regla ora.
- Apăsați tasta Time/Alarm Set button again to switch to minute adjustment. The minute digits will flash.
- Utilizați + or - butoane pentru reglarea minutelor.
- Apăsați tasta Time/Alarm Set Apăsați butonul încă o dată pentru a confirma și a ieși din modul de setare a orei.
2. Setarea alarmelor (Alarma 1 și Alarma 2)
This device supports two independent alarm times.
- Apăsați tasta Time/Alarm Set button once to enter Alarm 1 setting mode. The alarm icon and hour digits for Alarm 1 will flash.
- Utilizați + or - buttons to adjust the hour for Alarm 1.
- Apăsați tasta Time/Alarm Set button again to switch to minute adjustment for Alarm 1.
- Utilizați + or - buttons to adjust the minutes for Alarm 1.
- Apăsați tasta Time/Alarm Set button again to confirm Alarm 1 and move to Alarm 2 setting mode (if applicable). Repeat steps 2-4 for Alarm 2.
- After setting Alarm 2, press the Time/Alarm Set button to confirm and exit alarm setting mode.
- Pentru a activa/dezactiva o alarmă, apăsați scurt butonul Time/Alarm Set button until the desired alarm icon (e.g., 'AL1' or 'AL2') appears or disappears on the display.
3. Funcția de amânare
When an alarm sounds, press any button (except the alarm off button, if present) to activate the snooze function. The alarm will temporarily stop and sound again after a few minutes (typically 5-10 minutes, refer to specific model details if available). To turn off the alarm completely, press the designated alarm off button or follow the instructions for deactivating the alarm.
4. Wireless Charging (Qi)
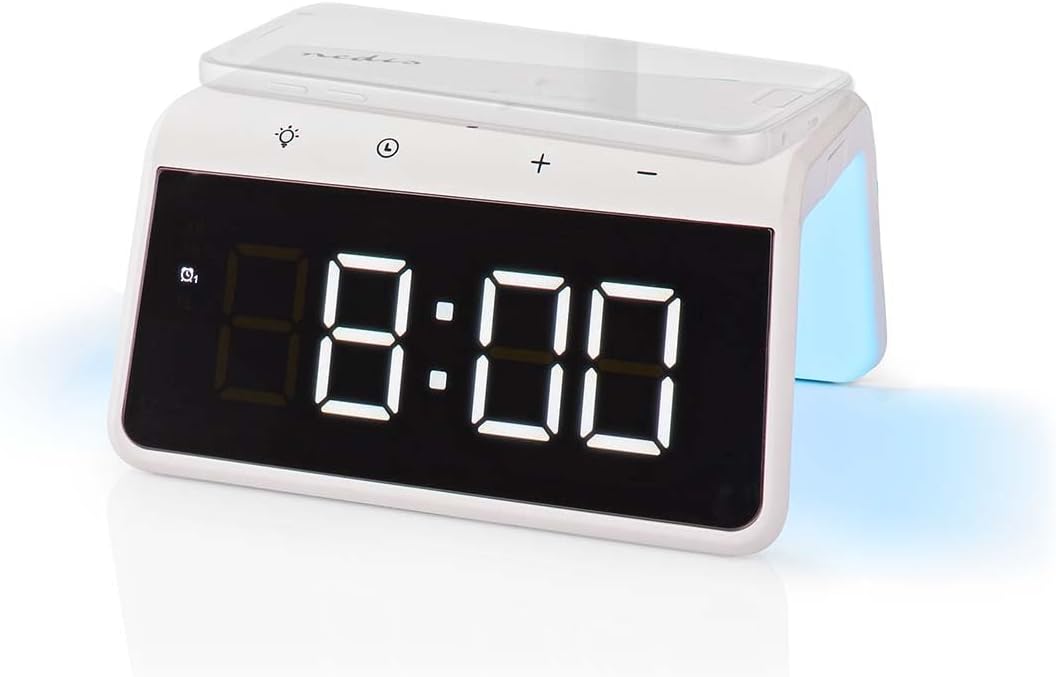
Image 3: Wireless Charging. A smartphone is shown resting on the top surface of the alarm clock, which functions as a Qi wireless charging pad.
- Place your Qi-compatible smartphone or device directly onto the wireless charging pad located on the top surface of the alarm clock.
- Asigurați-vă că dispozitivul este centrat pe suportul de încărcare pentru o performanță optimă.
- A charging indicator (e.g., an icon on the display or an LED light) will typically illuminate to confirm that charging has begun.
- The charger supports 5W, 7.5W, 10W, and 15W output, automatically adjusting to your device's requirements. For 15W fast charging, a QC3.0 power adapter (not included) is required.
5. USB-A Charging Output
The alarm clock features an additional USB-A port for charging devices that are not Qi-compatible or for simultaneous charging.
- Connect your device's USB charging cable to the USB-A output port on the back of the alarm clock.
- Conectați celălalt capăt al cablului la dispozitiv.
- Încărcarea va începe automat.
6. Funcția de lumină de noapte

Image 4: Night Light. This image shows the side of the alarm clock with its integrated night light emitting a soft glow.
- Apăsați tasta Aprinde button (usually marked with a light bulb icon) to turn the night light on or off.
- Apăsați în mod repetat tasta Aprinde button to cycle through different color modes or to set a specific color. The night light can display a diverse changing color palette.
- The night light can be set to remain on or to be manually activated as needed.
7. Reglarea luminozității afișajului
The digital display features dimmable backlighting for comfortable viewin diverse conditii de iluminare.
- Look for a dedicated brightness button or a combination of buttons (e.g., a short press of the Light button or +/- buttons when not in setting mode) to adjust the display brightness.
- Cycle through available brightness levels (e.g., high, medium, low, off).
Întreţinere
- curatenie: Ștergeți dispozitivul cu o lavetă moale, uscată sau ușor umedă.amp pânză. Nu utilizați agenți de curățare abrazivi sau solvenți.
- Depozitare: Când nu îl utilizați pentru perioade lungi de timp, deconectați dispozitivul și depozitați-l într-un loc răcoros și uscat.
Depanare
- Dispozitivul nu pornește: Ensure the power adapter is securely connected to both the alarm clock and a working power outlet.
- Încărcarea wireless nu funcționează:
- Verificați dacă dispozitivul dvs. este compatibil cu Qi.
- Asigurați-vă că dispozitivul este centrat pe suportul de încărcare.
- Remove any thick phone cases or metal objects between the phone and the charging pad.
- USB-A charging not working: Check the USB cable for damage and ensure it is properly connected to both the alarm clock and your device.
- Alarma nu sună: Ensure the alarm is activated (check for the alarm icon on the display) and the volume is not set to zero (if adjustable).
- Display too dim/bright: Adjust the display brightness using the dedicated controls.
Specificații
| Caracteristică | Caietul de sarcini |
|---|---|
| Numărul de model | WCACQ30WT |
| Marca | NEDIS |
| Dimensiunile produsului | 14 x 3.81 x 7 cm |
| Greutatea articolului | 242 grame |
| Ieșire de încărcare wireless | 5W / 7.5W / 10W / 15W (Qi Certified) |
| Ieșire USB-A | Da |
| Tip de afișare | Digital |
| Caracteristici speciale | Alarm, Charging Port, Dimmable Display, Night Light (Color Changing) |
| Sursa de alimentare | Electric cu fir |
| Culoare | Alb |
Garanție și suport
Nedis products are manufactured to high quality standards. In the unlikely event of a defect during the warranty period, please contact your retailer for support. The warranty period is subject to the terms and conditions of the retailer and local consumer laws.
For further assistance or technical support, please refer to the official Nedis website-ul web sau contactați direct serviciul lor de asistență pentru clienți. Păstrați bonul fiscal ca dovadă a achiziției.


