1. Introducere
This manual provides essential information for the safe and effective operation, setup, maintenance, and troubleshooting of your YESWELDER 205A MMA/Lift TIG Arc Welder. Please read this manual thoroughly before operating the machine to ensure proper use and to prevent injury or damage.

Imaginea 1.1: Față view of the YESWELDER 205A MMA/Lift TIG Arc Welder, showcasindatorită designului său compact și panoului de control.
2. Informații de siguranță
Welding operations involve significant risks. Always prioritize safety to prevent electric shock, burns, fire, and other hazards. Adhere to all local and national safety regulations.
Măsuri generale de siguranță:
- Purtați echipament individual de protecție (EIP) adecvat, inclusiv o cască de sudură cu umbră corespunzătoare, îmbrăcăminte rezistentă la flacără, mănuși de sudură și încălțăminte de siguranță.
- Ensure the welding area is well-ventilated to avoid inhaling fumes.
- Țineți materialele inflamabile departe de zona de sudare.
- Always disconnect power before performing maintenance or adjustments.
- Nu utilizați aparatul de sudură în poziție damp sau condiții umede.
Caracteristici de siguranță integrate:
The YESWELDER 205A is equipped with several safety mechanisms:
- Vol. Automattage Fluctuation Compensation: Helps maintain stable welding performance despite input power variations.
- Protecție la supracurent: Automatically shuts down the machine if current exceeds safe limits.
- Protecție la suprasarcină: Previne deteriorarea cauzată de încărcarea excesivă.
- Controlul temperaturii: Monitors internal temperature and initiates automatic shutdown if overheating occurs.
- IP21 Protection Standard: Provides protection against solid objects over 12mm and vertically falling water drops.
- Electrostatic Coating: Unique coating designed to prevent shock transfer.

Imaginea 2.1: Pesteview of the YESWELDER 205A's built-in safety features.
3. Produs terminatview
The YESWELDER 205A is a versatile 2-in-1 welding machine offering both Stick (MMA) and Lift TIG welding capabilities. It features an advanced IGBT inverter technology for stable arc performance and a user-friendly interface.
Caracteristici cheie:
- Moduri duble de sudare: Supports Stick (MMA) and Lift TIG welding.
- Ieșire ridicată: Până la 205 amperes, suitable for various welding tasks.
- Funcții avansate: Includes Hot Start, Arc Force, and Anti-Stick for improved arc ignition and stability.
- Afișaj LED mare: Provides clear visibility of current, electrode size, and welding mode.
- Design portabil: Cântărește aproximativ 3.8 kg (8.4 lbs) pentru transport ușor.
- Construcție durabilă: Features an additional plastic casing pentru protecție sporită.
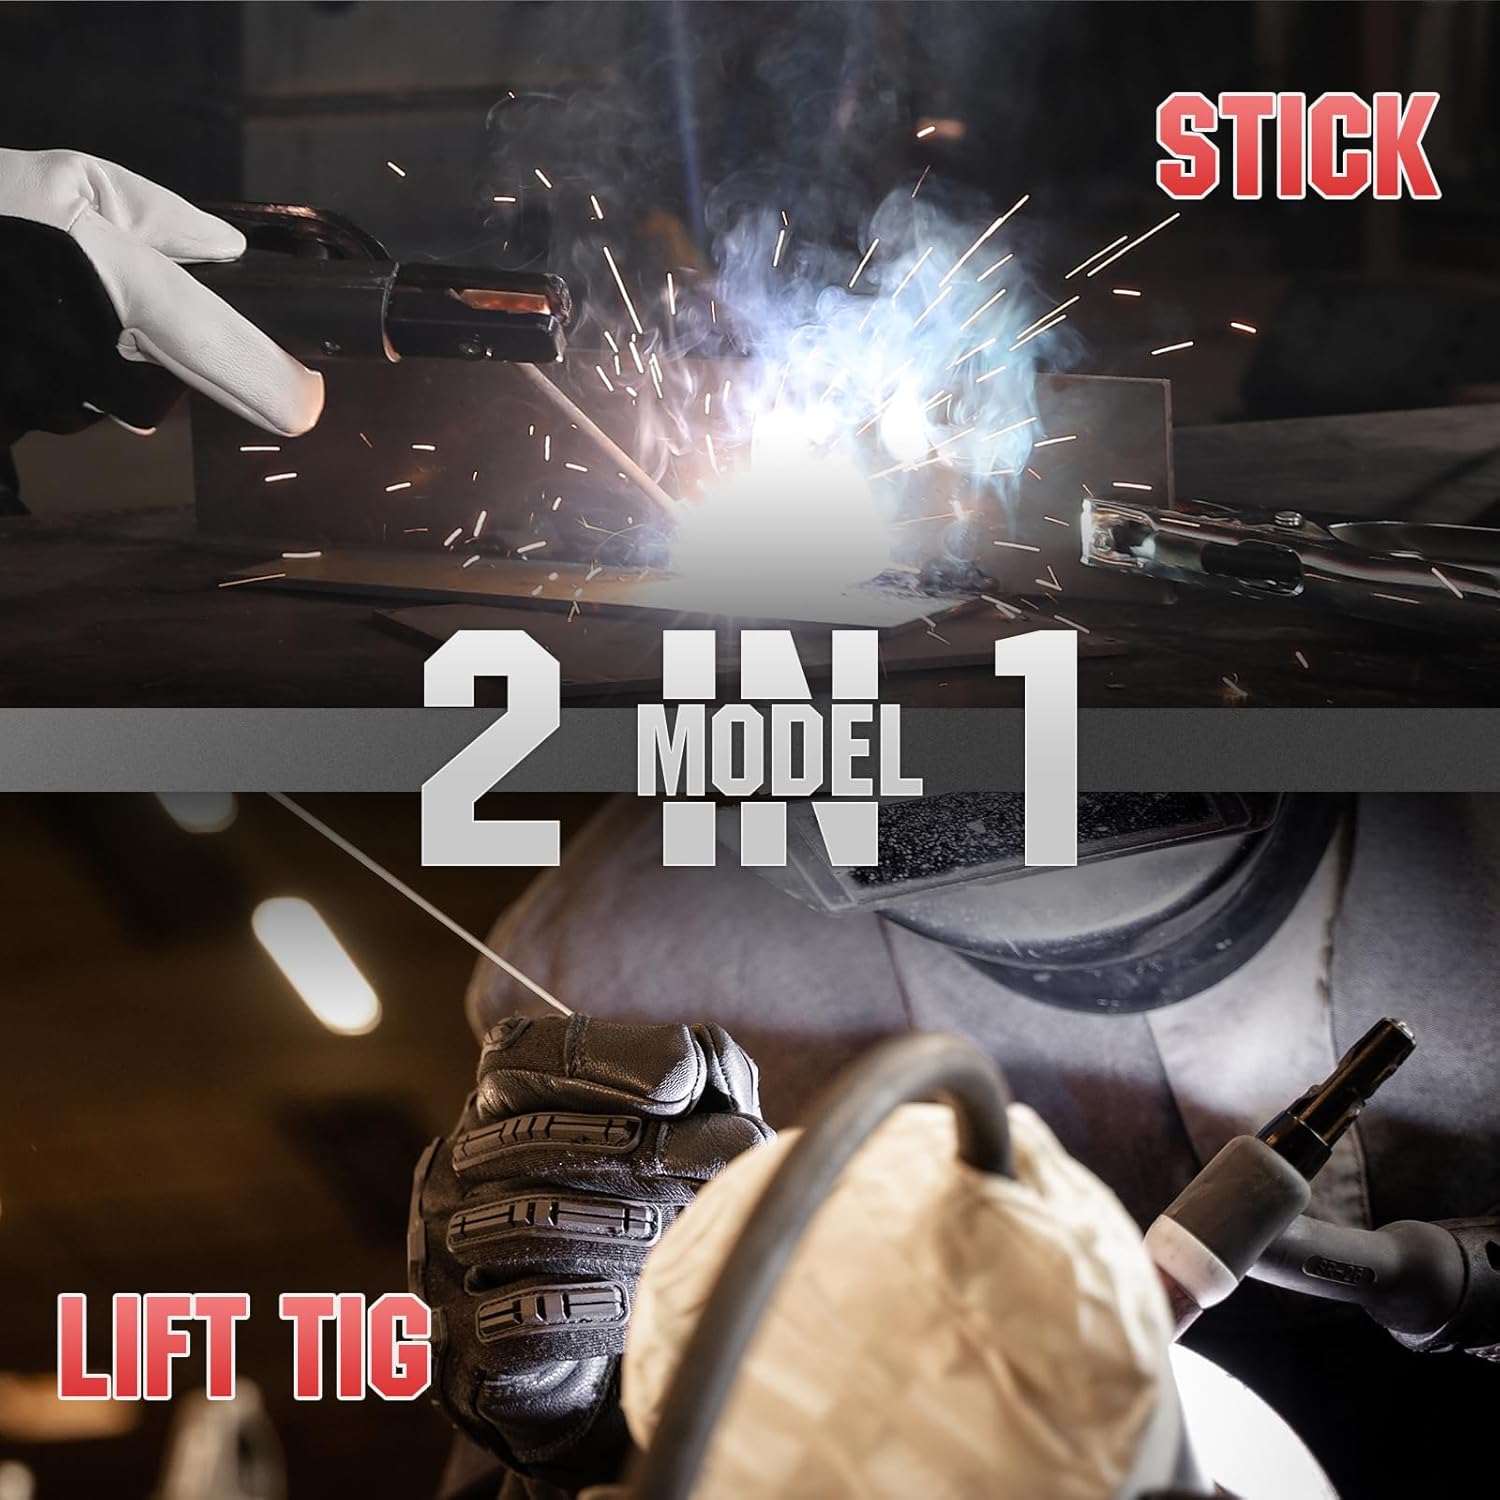
Image 3.1: The YESWELDER 205A supports both Stick (MMA) and Lift TIG welding modes.
Panoul de control Introducere:
Familiarize yourself with the control panel components for efficient operation.
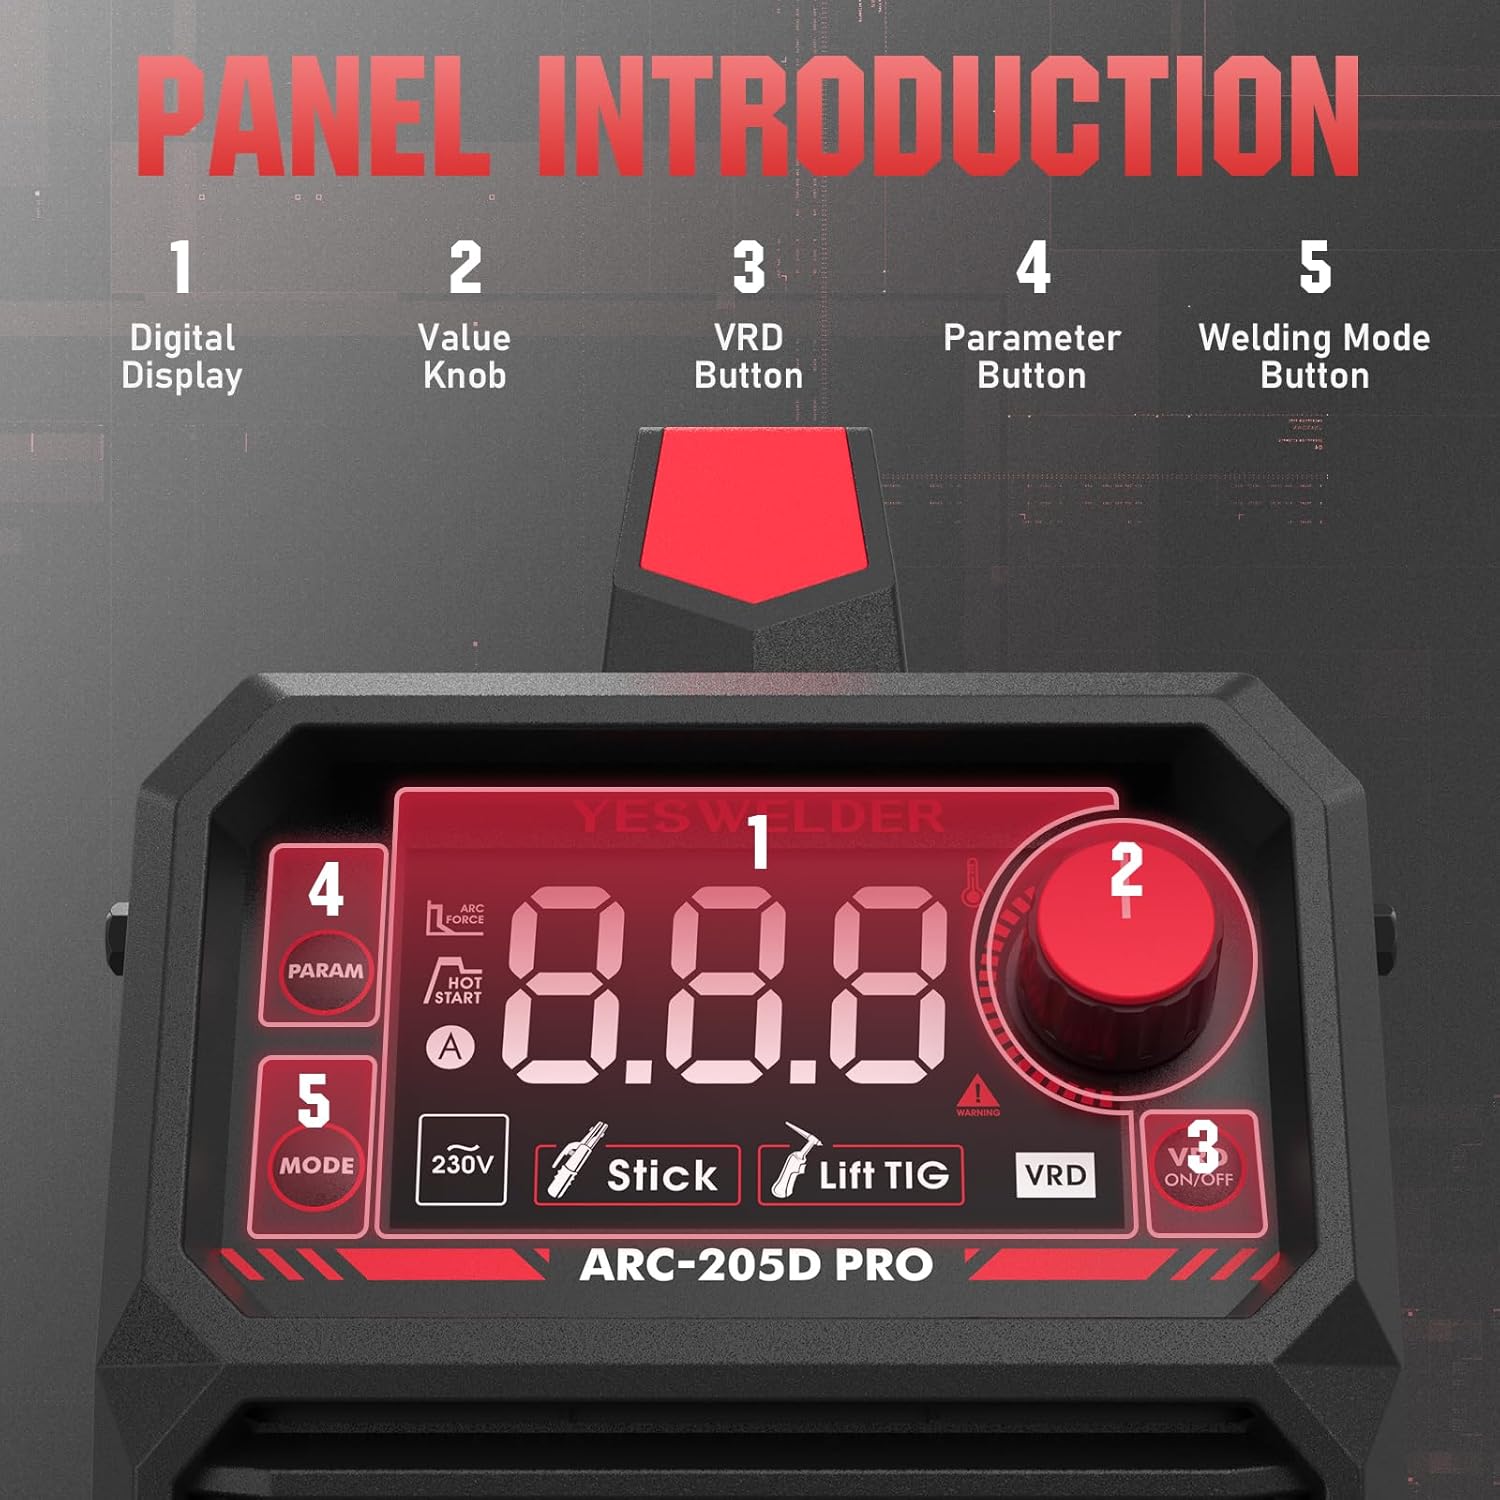
Imaginea 3.2: Detaliată view of the control panel, indicating the digital display, value knob, VRD button, parameter button, and welding mode button.
- Ecran digital: Shows welding parameters such as current, electrode size, and selected mode.
- Value Knob: Adjusts welding current and other parameters.
- VRD Button: Activates or deactivates Voltage Reduction Device for enhanced safety in certain environments.
- Parameter Button: Cycles through adjustable parameters (e.g., Hot Start, Arc Force).
- Buton Mod de sudare: Selects between Stick (MMA) and Lift TIG welding modes.

Image 3.3: The upgraded large LED display provides clear and comprehensive information during operation.
4. Configurare
Proper setup is crucial for safe and effective welding. Follow these steps carefully.
4.1 Despachetarea și inspecția:
- Remove the welder and all accessories from the packaging.
- Inspect for any shipping damage. Contact your supplier immediately if damage is found.
- Asigurați-vă că sunt prezente toate componentele enumerate în lista de ambalare.
4.2 Connecting Accessories:

Image 4.1: Electrode holder and ground clamp conexiuni.
- Pământ Clamp Conexiune: Conectați masa clamp cable to the negative (-) output terminal on the welder. Securely attach the ground clamp la piesa de lucru sau la masa de sudură, asigurând un contact electric bun.
- Electrode Holder Connection (for MMA/Stick): Connect the electrode holder cable to the positive (+) output terminal on the welder. Insert the welding electrode into the holder.
- TIG Torch Connection (for Lift TIG - torch sold separately): If performing Lift TIG welding, connect the TIG torch cable to the negative (-) output terminal. Connect the gas hose from the TIG torch to your argon gas regulator.
4.3 Conexiune la alimentare:
- Asigurați-vă că întrerupătorul de alimentare al aparatului de sudură este în poziția OPRIT.
- Connect the power input cable to a suitable 230V power outlet. Verify that the power source meets the welder's requirements.
5. Instrucțiuni de utilizare
The YESWELDER 205A offers two primary welding modes: Stick (MMA) and Lift TIG.
5.1 Starting the Welder:
- After connecting all cables and ensuring safety, turn the power switch to the ON position.
- The LED display will illuminate, showing the default welding mode and current.
5.2 Stick (MMA) Welding:

Image 5.1: Visual representation of Stick welding (left) and Lift TIG welding (right).
- Selectați modul: Press the 'Welding Mode Button' until 'Stick' (MMA) is indicated on the display.
- Set Current: Use the 'Value Knob' to adjust the welding current (amperes) according to the electrode type and material thickness. The machine supports up to 205A.
- Adjust Parameters (Optional): Press the 'Parameter Button' to cycle through Hot Start and Arc Force settings. Adjust these using the 'Value Knob' as needed for optimal arc ignition and stability.
- Începeți sudarea: Strike the arc by lightly touching the electrode to the workpiece and quickly lifting it slightly. Maintain a consistent arc length and travel speed.
5.3 Lift TIG Welding:
For Lift TIG welding, a TIG torch with a gas valve is required (not included).
- Selectați modul: Press the 'Welding Mode Button' until 'Lift TIG' is indicated on the display.
- Set Current: Use the 'Value Knob' to adjust the welding current (amperes) based on the material and tungsten electrode size.
- Debit de gaz: Open the gas valve on the TIG torch to establish argon gas flow.
- Inițiază Arcul: Gently touch the tungsten electrode to the workpiece and then lift it slightly (1-2mm) to initiate the arc. The arc will start at a low current and ramp up to the set current.
- Perform Weld: Maintain a short arc length and feed filler rod manually if required.
6. Întreținere
Întreținerea regulată asigură longevitatea și performanța optimă a aparatului dumneavoastră de sudură.
6.1 Întreținere zilnică:
- Clean the exterior of the machine with a dry, soft cloth.
- Inspect all cables and connections for damage or loose fittings.
- Check the electrode holder and ground clamp pentru purtare.
6.2 Periodic Maintenance (Monthly/Quarterly):
- Curatenie interioara: Disconnect power. Open the machine casing and use compressed air to blow out dust and debris from the cooling fins and internal components. Ensure no moisture enters.
- Verificarea ventilatorului: Verify that the cooling fan operates freely and is not obstructed.
- Inspecția terminalului: Check all power terminals for corrosion or looseness. Tighten if necessary.
Caution: Only qualified personnel should perform internal maintenance. Always disconnect power before opening the machine.
7. Depanare
Consultați tabelul de mai jos pentru problemele comune și posibilele soluții ale acestora.
| Problemă | Cauza posibila | Soluţie |
|---|---|---|
| Aparatul de sudură nu pornește | No power from outlet; Power switch off; Internal fuse blown | Check power supply; Turn power switch ON; Contact service for fuse replacement |
| Fără arc sau arc slab | Poor ground connection; Incorrect current setting; Wet or old electrodes; Damaged cables | Ensure good ground contact; Adjust current; Use dry electrodes; Inspect and replace cables |
| Indicatorul de supraîncălzire este pornit | Exceeded duty cycle; Insufficient ventilation; Fan malfunction | Allow machine to cool down; Ensure clear airflow; Check fan operation |
| Arc instabil | Curent/vol incorecttage; Contaminated workpiece; Improper electrode angle | Adjust settings; Clean workpiece; Correct electrode technique |
8. Specificații
Technical specifications for the YESWELDER ARC-205D-EU model.

Image 8.1: Detailed technical specifications for the ARC-205D model.
| Caietul de sarcini | Valoare |
|---|---|
| Numărul de model | ARC-205D-EU |
| Vol. De intraretage (U1) | 230V |
| Max Input Current (I1 max) | 29A |
| Effective Input Current (I1 eff) | 22.4A |
| Output Current (I2) | 205A (MMA), 158A (TIG) |
| Ieșire Voltage (U2) | 18.2V (MMA), 16.3V (TIG) at 60% duty cycle |
| Vol. fără încărcaretage (U0) | 65V |
| Duty Cycle (X) | 60% la 205A, 100% la 158A |
| Dimensiuni (L x l x H) | 31.5 x 12 x 20.8 cm |
| Greutate | 3.8 kg (8.4 lbs) |
| Metoda de răcire | Răcire cu ventilator |
| Grad de izolare | F |
| Clasa de protectie | IP21S |
9. Garanție și asistență
For warranty information, technical support, or service inquiries, please contact YESWELDER customer service. Keep your purchase receipt as proof of purchase.
For further assistance, visit the official YESWELDER website-ul lor sau contactați centrele lor de service autorizate.


