1. Introducere
This manual provides comprehensive instructions for the installation, operation, maintenance, and troubleshooting of your MAXSUN A520 M-ATX Motherboard. Please read this manual thoroughly before proceeding with any installation or operation to ensure proper functionality and to prevent damage to your components.
The MAXSUN A520 M-ATX Motherboard supports AMD AM4 Zen 3 processors, DDR4 memory, PCIe 3.0 x16, SATA 6Gb/s, M.2, USB 3.1, and offers HDMI/VGA outputs. It is designed for compatibility with all Ryzen 1000-4000 Series APU/CPU and Ryzen 5000 Series CPU. Note that 5000 Series APUs may require a BIOS flash to activate the internal GPU.

The MAXSUN A520M M-ATX Motherboard, shown alongside its retail packaging.
2. Aspectul plăcii de bază
Familiarize yourself with the various components and connectors on your motherboard.

An angled perspective of the MAXSUN A520M Motherboard, highlighting its compact M-ATX form factor and component layout.

Detaliat view of the motherboard's PCIe 3.0 slots, including one PCIe 3.0 x16 slot for graphics cards and one PCIe 3.0 x1 slot for expansion cards.

Illustration showing the dual DDR4 memory slots and the M.2 NVMe SSD slot, compatible with SATA, for high-speed storage.

View of the motherboard's power delivery system, featuring 3+2 phases pure digital PWM for stable power to the CPU.
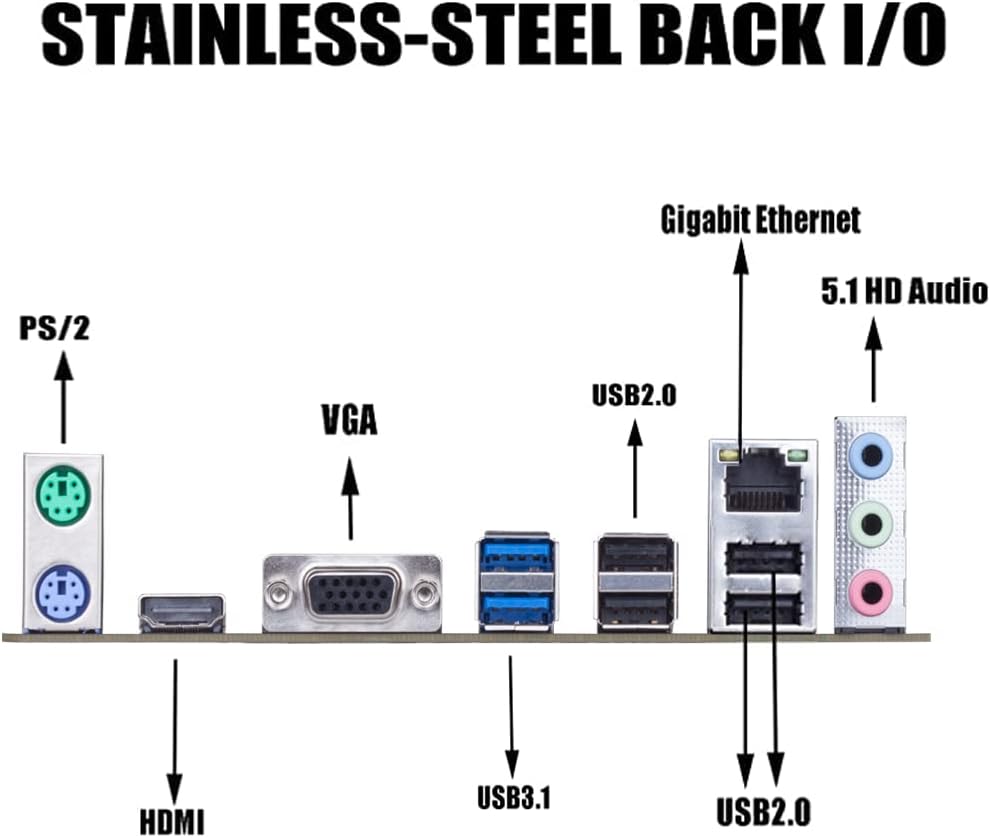
The rear input/output panel, showcasing ports such as PS/2, HDMI, VGA, USB 3.1, USB 2.0, Gigabit Ethernet, and 5.1 HD Audio jacks.

Un deasupra capului view of the entire MAXSUN A520M Motherboard, providing a comprehensive look at all its components and connectors.
3. Configurare și instalare
3.1. Instalarea procesorului
Carefully align your AMD AM4 processor with the socket on the motherboard. Ensure the triangle on the CPU matches the triangle on the socket. Lower the retention arm to secure the CPU.
3.2. Instalarea memoriei RAM
This motherboard supports Dual Channel DDR4 memory. Open the clips on both ends of the memory slots. Align the notch on the RAM module with the key in the slot, then press down firmly on both ends until the clips snap into place.
3.3. Storage Installation
The motherboard features an M.2 NVMe SSD slot and SATA 6Gb/s ports. For M.2 SSDs, insert the drive into the slot at an angle and secure it with the provided screw (ensure your M.2 drive comes with one, as the motherboard package may not include it). For SATA drives, connect the SATA data cable to the motherboard and the drive, and ensure the power cable is connected from your power supply.
3.4. Conexiuni de alimentare
Conectați conectorul de alimentare ATX cu 24 de pini și conectorul de alimentare CPU cu 8 pini de la sursa de alimentare la porturile corespunzătoare de pe placa de bază. Asigurați-vă că toate conexiunile sunt fixate corect.
3.5. Conexiuni panou frontal
Connect the front panel headers (power button, reset button, USB ports, audio jacks, etc.) to the corresponding pins on the motherboard. Refer to the motherboard's detailed diagram for precise pin assignments.
3.6. Actualizare BIOS
Updating the BIOS may be necessary for compatibility with newer CPUs, especially AMD Ryzen 5000 Series APUs. This process typically involves downloading the latest BIOS file from the MAXSUN support website and flashing it using a USB drive. Ensure all hard drives (M.2 and SATA SSDs) are disconnected before proceeding with a BIOS update to prevent data loss or corruption.
This video provides a step-by-step guide on how to update the BIOS for your MAXSUN motherboard using a USB storage device. It covers preparing the USB, downloading the BIOS file, configuring BIOS settings, and initiating the flash process.
4. Instalarea sistemului de operare
After assembling your system, you can proceed with installing your preferred operating system. Insert your OS installation media (USB drive or DVD) and follow the on-screen prompts. You may need to adjust the boot order in the BIOS to boot from the installation media.
5. Drivers and Software
For optimal performance and stability, install the latest drivers for your motherboard's components. These include chipset drivers, graphics drivers (if using an integrated GPU or dedicated graphics card), audio drivers, and LAN drivers. Drivers can typically be found on the MAXSUN support website-ul.
6. Întreținere și îngrijire
- Curățare de praf: Regularly clean dust from the motherboard and other components using compressed air. Accumulation of dust can lead to overheating and reduced performance.
- Manipulare corectă: Always handle the motherboard by its edges to avoid touching sensitive components or circuits. Use an anti-static wrist strap when working inside your PC.
- Actualizări BIOS: Only update the BIOS when necessary, such as for new CPU support or critical bug fixes. Follow the update procedure carefully to avoid damaging the BIOS.
7. Depanare
- No Boot/POST Errors: Ensure all power cables are securely connected. Verify that RAM modules are properly seated in their slots. Check CPU and GPU seating. If the system fails to POST (Power-On Self-Test), listen for beep codes or check for diagnostic LEDs on the motherboard (if available) to identify the issue.
- Probleme cu driverul: If a component is not functioning correctly after OS installation, ensure the correct drivers are installed. Download the latest drivers directly from the MAXSUN website or the component manufacturer's website-ul.
- Storage Not Detected: Verify SATA data and power connections for traditional drives. For M.2 SSDs, ensure it is properly seated and secured. Some M.2 slots may share bandwidth with SATA ports, disabling certain SATA ports when an M.2 drive is used. Consult the motherboard's detailed manual for specific configurations.
- Bent CPU Pins: Exercise extreme caution when installing the CPU. Bent pins can prevent the system from booting. If pins are bent, professional repair may be required.
8. Specificații
| Caracteristică | Caietul de sarcini |
|---|---|
| Marca | MAXSUN |
| Numele modelului | A520M CHALLENGER Motherboard |
| Soclu CPU | Priza AM4 |
| Procesoare compatibile | Ryzen 1000, 2000, 3000, 4000 Series CPU, Ryzen 5000 Series WITHOUT Internal GPU |
| Tehnologia memoriei RAM | DDR4 |
| Viteza ceasului memoriei | 2400 MHz |
| Tipul chipset-ului | AMD A520 |
| Dimensiuni pachet | 10.24 x 9.88 x 2.32 inci |
| Greutatea articolului | 1.54 lire sterline |
| Platformă | Linux |
9. Garanție și asistență
MAXSUN products are covered by a limited warranty. For detailed warranty terms, conditions, and duration, please refer to the warranty information included with your product or visit the official MAXSUN website. Pentru asistență tehnică, descărcări de drivere și asistență suplimentară, vă rugăm să vizitați MAXSUN Official Support Site.


