1. Introducere
This manual provides detailed instructions for the installation, configuration, and operation of your Hikvision DS-7104HGHI-K1 4-Channel Digital Video Recorder (DVR). Please read this manual thoroughly before using the product to ensure correct and safe operation. Keep this manual for future reference.
2. Produs terminatview și Caracteristici
The Hikvision DS-7104HGHI-K1 is a 4-channel 1080p Lite DVR designed for reliable surveillance recording. It supports various camera types and features advanced video compression technology.

Figura 2.1: Top view of the Hikvision DS-7104HGHI-K1 DVR, showing its compact design and branding.
Caracteristici cheie:
- 4-Channel Video Input: Supports up to 4 analog cameras.
- 1080p Lite Recording: Provides high-definition recording at 1080p Lite resolution.
- Compresie H.265+: Advanced video compression technology for efficient storage and reduced bandwidth usage.
- Multi-format Input: Compatible with HDTVI, AHD, CVI, CVBS, and up to 5 IP camera inputs (up to 2MP).
- Ieșire HDMI/VGA: For local monitoring.
- Acces de la distanță: Suporta telecomanda viewing via Hik-Connect app.

Figura 2.2: Fata si spate views of the Hikvision DVR, highlighting various ports and connectivity options, along with icons representing H.265 Pro, Mobile access, 5-in-1 compatibility, and IP/Analog XVR capabilities.
H.265+ Compression Benefits:
H.265+ compression significantly reduces the required storage space and bandwidth compared to older compression standards like H.264, without compromising video quality.

Figura 2.3: A bar graph illustrating the reduction in 24-hour recording file size (GB) when using H.265+ compression compared to H.264 and H.265, showing up to an 83% gap in storage requirements.
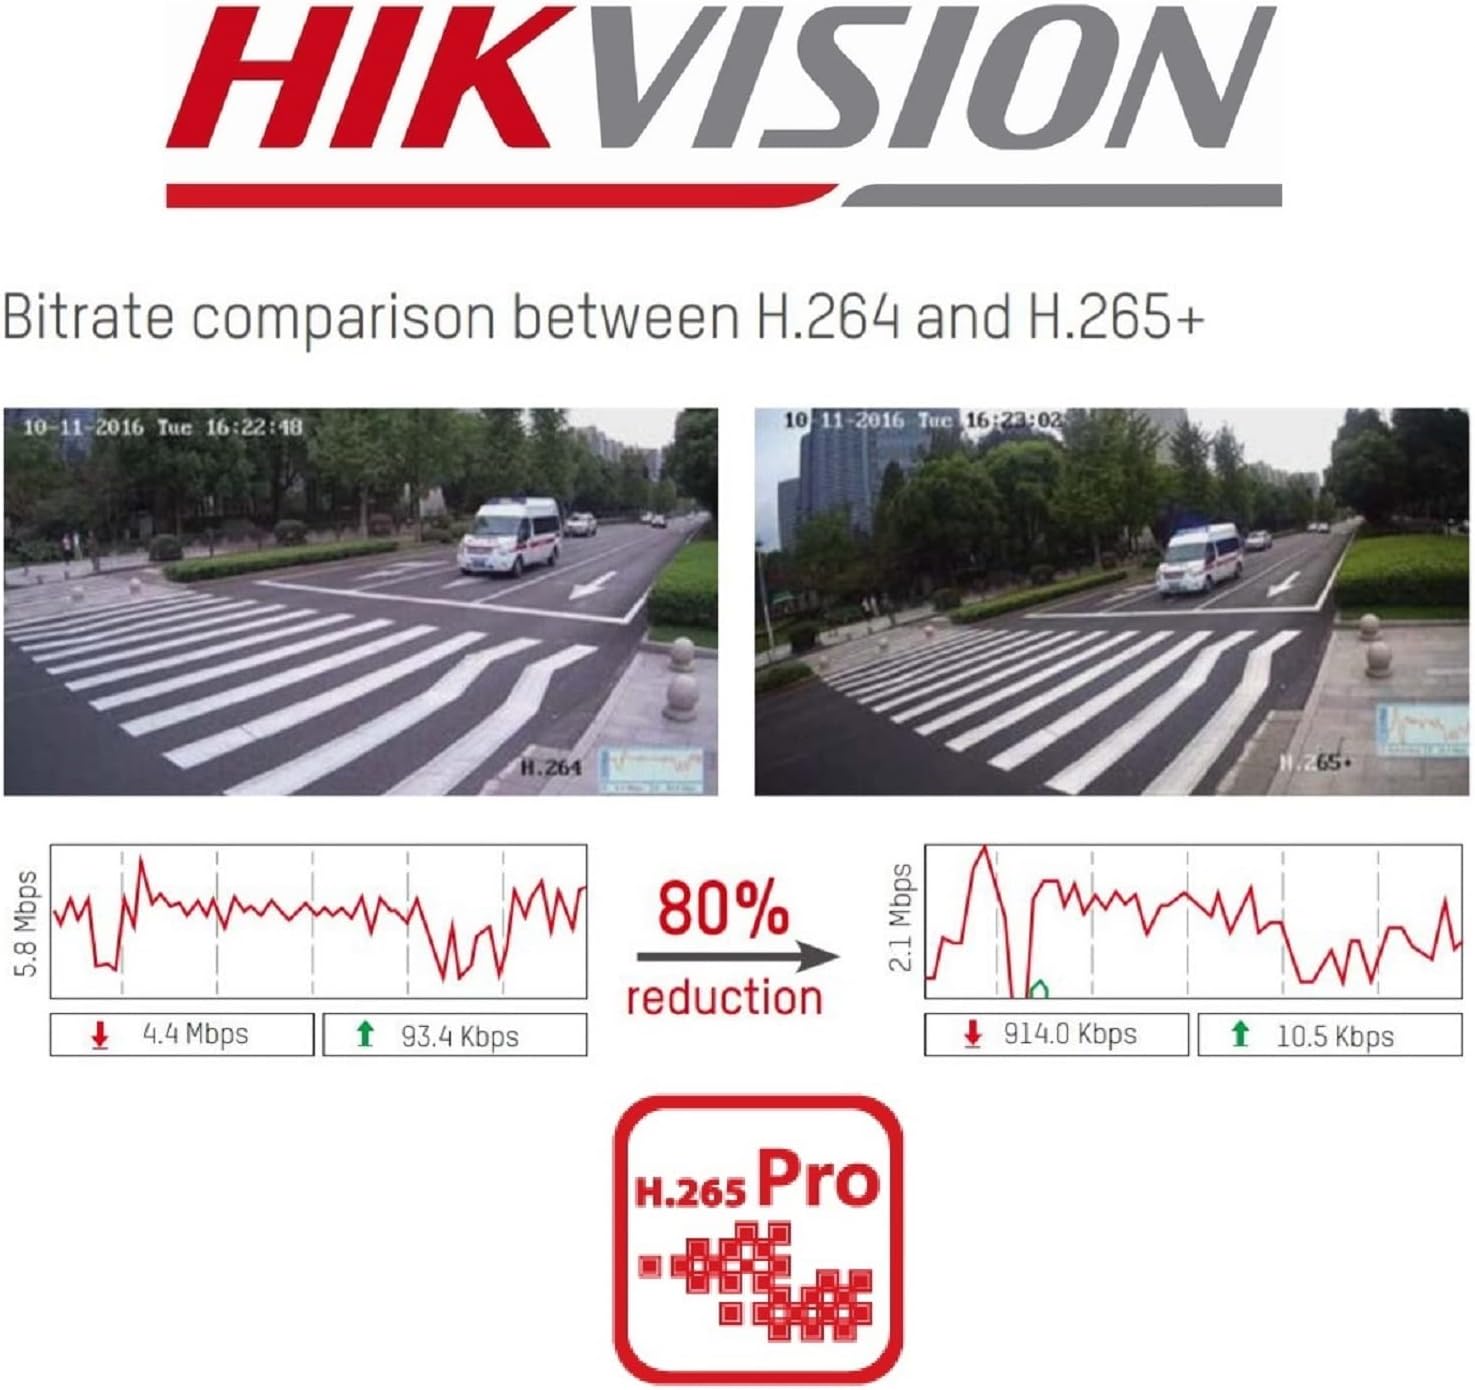
Figura 2.4: A visual comparison of bitrate usage between H.264 and H.265+ compression, demonstrating an 80% reduction in bitrate with H.265+ while maintaining similar video quality in sample surveillance footage.
3. Conținutul pachetului
Verificați dacă toate articolele sunt prezente în colet:
- Hikvision DS-7104HGHI-K1 DVR Unit
- Adaptor de alimentare
- Mouse USB
- SATA Cables (for HDD connection)
- Ghid de pornire rapidă
- Note: Hard drive is not included and must be purchased separately.
4. Informații de siguranță
- Ensure the power supply matches the DVR's requirements.
- Nu expuneți DVR-ul la apă sau umezeală.
- Avoid placing the DVR in direct sunlight or near heat sources.
- Asigurați o ventilație adecvată pentru a preveni supraîncălzirea.
- Utilizați numai accesorii specificate de producător.
5. Configurare
5.1 Instalare hardware
- Hard Drive Installation (HDD not included):
- Deșurubați și scoateți capacul superior al DVR-ului.
- Connect the SATA power and data cables from the DVR to the hard drive.
- Secure the hard drive inside the DVR using the provided screws.
- Puneți la loc capacul superior și fixați-l cu șuruburi.
- Conectați camerele: Connect your analog cameras to the BNC video input ports on the rear panel of the DVR.
- Conectați monitorul: Conectați un monitor la portul de ieșire HDMI sau VGA.
- Conectare rețea: Conectați un cablu Ethernet de la portul LAN al DVR-ului la router sau switch-ul de rețea.
- Conectați mouse-ul USB: Conectați mouse-ul USB la un port USB al DVR-ului.
- Pornire: Conectați adaptorul de alimentare la DVR și apoi la o priză. DVR-ul se va porni automat.
5.2 Configurare inițială
- First-Time Startup: Upon first boot, the DVR will guide you through a setup wizard.
- Seteaza parola: Create a strong password for the admin user. This is crucial for security.
- Setări de rețea: Configurați setările de rețea (DHCP este de obicei suficient pentru majoritatea rețelelor de domiciliu).
- Inițializarea HDD-ului: The DVR will prompt you to initialize the newly installed hard drive. This step is necessary for recording.
- Data și ora: Setați data și ora corecte.
6. Funcționare
6.1 În direct View
După configurarea inițială, DVR-ul va afișa imaginile în timp real view from connected cameras on the monitor. You can switch between single-camera view și o grilă cu mai multe camere view folosind comenzile de pe ecran sau mouse-ul.
6.2 Înregistrare
The DVR is typically configured to record continuously by default once the HDD is initialized. You can customize recording schedules, motion detection recording, and alarm recording settings through the DVR's menu:
- Du-te la Meniu > Înregistrare > Programare to adjust recording times.
- Du-te la Menu > Alarm > Motion Detection to configure motion-triggered recording.
6.3 Redare
La view inregistrat footage:
- Du-te la Meniu > Redare.
- Select the camera(s) and the date/time range you wish to review.
- Folosește comenzile de redare (redare, pauză, derulare rapidă înainte, derulare înapoi) pentru a naviga prin fișiere.tage.
6.4 Remote Access (Hik-Connect)
The Hik-Connect app allows you to view trăi footage, play back recordings, and receive alerts on your smartphone or tablet from anywhere with an internet connection.

Figura 6.1: The Hik-Connect application icon alongside a smartphone displaying a multi-camera live view, illustrating the remote monitoring capabilities of the DVR system.
- Download the Hik-Connect app from your device's app store.
- Create a Hik-Connect account.
- Adăugați DVR-ul în aplicație scanând codul QR de pe DVR sau introducând manual numărul de serie.
- Ensure your DVR is connected to the internet and Hik-Connect service is enabled in the DVR's network settings.
7. Întreținere
- Curățare regulată: Keep the DVR free from dust. Use a soft, dry cloth for cleaning.
- Actualizări firmware: Periodically check the Hikvision official website pentru actualizări de firmware pentru a asigura performanță și securitate optime.
- Backup de date: Regularly back up important recordings to an external storage device.
- Securitate prin parolă: Change your DVR password periodically to enhance security.
8. Depanare
- Fără ieșire video:
- Verificați conexiunile cablului HDMI/VGA.
- Asigurați-vă că monitorul este pornit și setat la intrarea corectă.
- Fără înregistrare:
- Verify that a hard drive is installed and initialized.
- Check recording schedules and ensure they are active.
- Ensure cameras are properly connected and functioning.
- Nu se poate accesa de la distanță:
- Asigurați-vă că DVR-ul este conectat la internet.
- Check network settings and Hik-Connect status on the DVR.
- Verify your Hik-Connect account and device binding in the app.
- DVR Unresponsive:
- Restart the DVR by disconnecting and reconnecting the power.
- If issues persist, consider a factory reset (note: this will erase configurations).
9. Specificații
| Caracteristică | Detaliu |
|---|---|
| Numărul de model | DS-7104HGHI-K1 |
| Intrare video | 4-channel BNC (HDTVI/AHD/CVI/CVBS) + up to 5 IP channels (up to 2MP) |
| Compresie video | H.265 Pro+/H.265+/H.265/H.264+/H.264 |
| Rezoluție de codificare | 1080p Lite @ 25/30 fps |
| Ieșire video | 1 HDMI, 1 VGA (simultaneous output) |
| Intrare audio | RCA cu 1 canal |
| Ieșire audio | RCA cu 1 canal |
| Suport pentru hard disk | 1 SATA interface, up to 4 TB capacity |
| Interfata retea | 1 RJ45 10M/100M self-adaptive Ethernet interface |
| Interfață USB | 2 interfețe USB 2.0 |
| Dimensiuni (L x l x H) | 20 x 20 x 4.5 cm |
| Greutate | 1.01 kg (fără HDD) |
10. Garanție și asistență
For warranty information and technical support, please refer to the official Hikvision website or contact your authorized Hikvision dealer. Keep your purchase receipt as proof of purchase.


