1. Produs terminatview
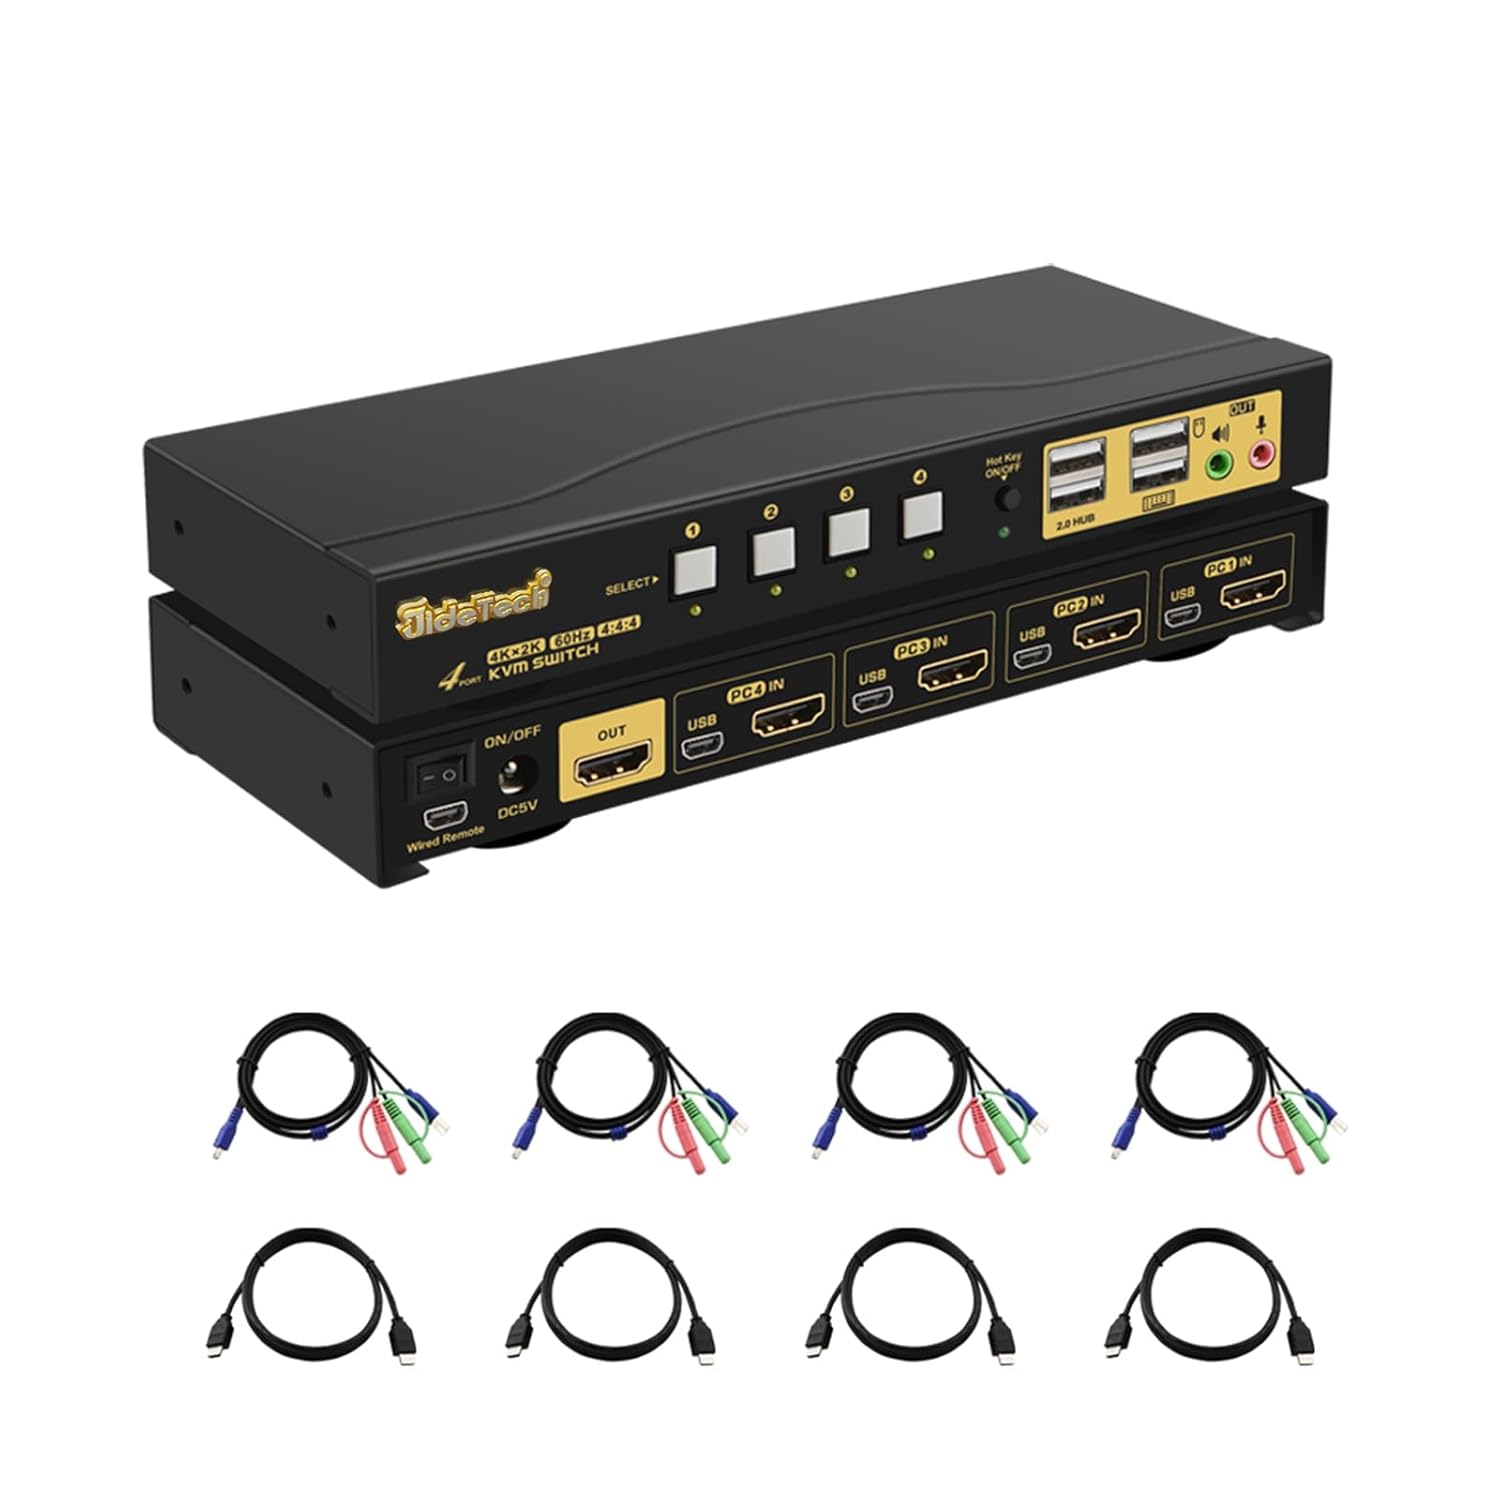
The JideTech 4-Port HDMI KVM Switch allows you to control up to four HDMI-enabled computers or devices using a single set of USB keyboard, USB mouse, and HDMI monitor. It supports Ultra HD 4K@60Hz resolution, ensuring high-quality video output. This switch is designed to streamline your workspace by reducing cable clutter and simplifying multi-system management.
Caracteristici cheie:
- Supports 4 HDMI devices (PC, Servers, NVR, Game Consoles, AppleTV, etc.)
- Ultra HD 4K (4096x2160) @ 60Hz resolution support
- Compatible with HDMI 2.0, EDID, HDCP2.2, HDR10
- Integrated 2-port USB 2.0 hub for sharing peripherals (printers, scanners, USB drives)
- 3.5mm microphone and speaker ports for audio input/output
- Multiple switching methods: Front Panel Button, Wired Remote, Keyboard Hotkey, Mouse Switching
- Plug and Play functionality, driver-free for most operating systems
Continutul pachetului:
- 1 x JideTech 4-Port HDMI KVM Switch
- 1 x adaptor de alimentare USB
- 4 x cabluri USB 3.0
- 4 x cabluri HDMI
- 1 x telecomandă cu fir
- 1 x Manual de utilizare (acest document)
2. Configurare și instalare
Follow these steps to properly set up your KVM switch:
- Opriți dispozitivele: Asigurați-vă că toate computerele și monitorul sunt oprite înainte de a face orice conexiune.
- Conectați monitorul: Connect your HDMI monitor to the 'OUT' HDMI port on the KVM switch.
- Conectați computerele (HDMI): Connect the HDMI output of each computer (PC1, PC2, PC3, PC4) to the corresponding 'PC IN' HDMI ports on the KVM switch.
- Conectarea computerelor (USB): Connect the USB 3.0 cable from each computer's USB port to the corresponding 'USB IN' ports on the KVM switch. These cables transmit keyboard, mouse, and USB hub data.
- Conectați tastatura și mouse-ul: Plug your USB keyboard and USB mouse into the dedicated keyboard and mouse USB ports on the front panel of the KVM switch.
- Conectați perifericele USB: If desired, connect additional USB devices (e.g., printer, USB drive) to the '2.0 HUB' ports on the front panel.
- Conectați sunetul: Connect your speakers or headphones to the green audio output port and your microphone to the pink microphone input port on the front panel.
- Conectare alimentare: Plug the provided USB power adapter into the 'DC5V' port on the KVM switch and then into a power outlet.
- Pornire: Power on the KVM switch using the 'ON/OFF' switch, then power on your monitor and computers.


3. Instrucțiuni de utilizare
The JideTech KVM Switch offers multiple convenient ways to switch between connected computers:
3.1. Comutarea modurilor

- Front Panel Button Switching:
Press the 'SELECT' buttons (1, 2, 3, 4) on the front panel of the KVM switch to directly switch to the corresponding computer input.

Figure 6: The Hotkey On/Off switch on the KVM. - Wired Remote Control Switching:
Use the included wired remote control to switch between inputs. Press the numbered buttons (1, 2, 3, 4) to select the desired computer. The 'AUTO' button can initiate an auto-scan function.
- Keyboard Hotkey Switching:
Ensure the 'Hot Key On/Off' switch on the front panel is in the 'ON' (green light) position. Use the following hotkey commands:
- Switch to PC1: Press CTRL dreapta de două ori, atunci 1, atunci Intră.
- Switch to PC2: Press CTRL dreapta de două ori, atunci 2, atunci Intră.
- Switch to PC3: Press CTRL dreapta de două ori, atunci 3, atunci Intră.
- Switch to PC4: Press CTRL dreapta de două ori, atunci 4, atunci Intră.
- Disable Beep Sound: Press CTRL dreapta de două ori, atunci B, atunci Intră.
- Enable Loudspeaker (Audio): Press CTRL dreapta de două ori, atunci P, atunci Intră.
Note: Hotkey functionality may vary with certain specialized keyboards (e.g., gaming or mechanical keyboards). If issues arise, try connecting the keyboard to a USB hub connected to the KVM's USB 2.0 hub port.
- Comutarea mouse-ului:
Move the mouse cursor to the far right edge of the screen and quickly move it right again. This will switch to the next active input. Repeat to cycle through inputs.
3.2. Capacități audio
The KVM switch includes 3.5mm audio input and output ports, allowing you to share speakers and a microphone across all connected computers. Simply plug your audio devices into the corresponding ports on the front panel.

4. Întreținere
To ensure the longevity and optimal performance of your JideTech KVM Switch, follow these maintenance guidelines:
- curatenie: Use a soft, dry cloth to clean the exterior of the KVM switch. Avoid using liquid cleaners or aerosols, which may damage the device.
- Ventilare: Asigurați-vă că comutatorul KVM este amplasat într-o zonă bine ventilată pentru a preveni supraîncălzirea. Nu blocați nicio deschidere de ventilație.
- Organizare de cabluri: Keep cables organized and untangled to prevent damage to ports and cables. Avoid excessive bending or pulling of cables.
- Alimentare electrică: Always use the original power adapter provided with the KVM switch.
- Depozitare: Dacă depozitați dispozitivul pentru o perioadă lungă de timp, deconectați toate cablurile și depozitați-l într-un loc răcoros și uscat.
5. Depanare
Dacă întâmpinați probleme cu switch-ul KVM, vă rugăm să consultați următoarele probleme și soluții comune:
- No Display or Flickering Screen:
- Asigurați-vă că toate cablurile HDMI sunt conectate în siguranță atât la comutatorul KVM, cât și la computer/monitor.
- Verify that the KVM switch is powered on.
- Try using different HDMI cables, especially if they are not the ones provided.
- Check the display resolution settings on your computers. Ensure they are compatible with 4K@60Hz or a supported lower resolution.
- Power cycle the KVM switch and all connected devices.
- Keyboard or Mouse Unresponsive:
- Ensure the keyboard and mouse are plugged into the dedicated USB ports on the front panel.
- Try unplugging and replugging the keyboard/mouse.
- If using a specialized keyboard/mouse (e.g., gaming, mechanical, or wireless with a dongle), connect them to a powered USB 2.0 hub, then connect the hub to one of the KVM's '2.0 HUB' ports.
- Ensure the USB 3.0 cables from the computers to the KVM are securely connected.
- Disable hotkey switching if it interferes with your specific keyboard/mouse.
- Fără sunet sau sunet distorsionat:
- Check that speakers/headphones and microphone are correctly plugged into the 3.5mm audio ports.
- Verify audio output settings on your computer.
- Ensure the 'Loudspeaker' hotkey (Right CTRL twice, then P, then Enter) is enabled if needed.
- Loud Beep Sound When Switching:
- The beep sound can be disabled using the hotkey command: Press CTRL dreapta de două ori, atunci B, atunci Intră.
- Auto-Scan Not Working:
- Ensure all connected computers are powered on and sending a video signal.
- Check the wired remote control connection.
If the problem persists after trying these solutions, please contact JideTech customer support for further assistance.
6. Specificații
| Caracteristică | Descriere |
|---|---|
| Numărul de model | 64H2UA |
| Dimensiunile produsului | 2.95 x 0.97 x 8.07 inci |
| Greutate | 2.93 lire sterline |
| Rezoluție video | Up to 4096x2160@60Hz (4K@60Hz) |
| Standard HDMI | HDMI 2.0 |
| Suport HDCP | HDCP 2.2 |
| Suport HDR | HDR10 |
| Porturi USB | 2 x USB 2.0 Hub, Dedicated Keyboard/Mouse USB ports |
| Porturi audio | 3.5mm Stereo Audio Out, 3.5mm Microphone In |
| Metode de comutare | Front Panel Button, Wired Remote, Keyboard Hotkey, Mouse Switching |
| Vol. De operaretage | 5 volți |
| Sisteme de operare compatibile | Windows 10/7/2000/XP/Vista, Linux, Mac, Debian, Ubuntu, Fedora, Raspbian, etc. |


7. Garanție și asistență
For warranty information and technical support, please refer to the official JideTech website or contact their customer service directly. Details regarding product registration, warranty claims, and technical assistance can typically be found on the manufacturer's support pages.
Informații de contact: Vă rugăm să vizitați JideTech Store on Amazon sau oficialul lor website-ul pentru cele mai actualizate date de contact pentru asistență.


