1. Introducere
Mulțumesc pentru achizițieasing the KEPLUG Sunrise Alarm Clock. This device is designed to enhance your waking and sleeping experience with its unique features, including sunrise and sunset simulations, dual alarms, FM radio, and various natural sounds. Please read this manual carefully to ensure proper use and optimal performance.
Continutul pachetului:
- 1 x KEPLUG Sunrise Alarm Clock
- 1 x cablu micro USB
- 1 x Adaptor de perete
- 1 x Manual de utilizare
2. Produs terminatview
Familiarize yourself with the main components and controls of your KEPLUG Sunrise Alarm Clock.

Imaginea 2.1: Faţă view of the KEPLUG Sunrise Alarm Clock, showing the digital time display and the illuminated light panel. The clock face is round with a white base.
Butoane de control și porturi:
Refer to the diagram below for button identification (exact button layout may vary slightly by model, but functions are consistent).
- Buton de setare a orei: Folosit pentru a intra în modul de setare a orei.
- Buton Alarmă 1: Used to set and activate Alarm 1.
- Buton Alarmă 2: Used to set and activate Alarm 2.
- FM Radio Button: Activates and controls FM radio functions.
- Buton luminos: Controls the light brightness and color modes.
- Butoane de volum +/-: Reglează volumul sunetului.
- Butoane Sus / Jos: Navighează prin meniuri și ajustează valorile.
- Snooze/Sleep Aid Button: Activates snooze during an alarm or sleep aid function.
- Port de încărcare USB: Pentru încărcarea dispozitivelor externe.
- Intrare alimentare micro USB: Se conectează la adaptorul de alimentare.
3. Configurare
3.1 Conexiune la alimentare
- Connect the micro USB cable to the power input port on the back of the alarm clock.
- Conectați adaptorul de perete la o priză electrică standard.
- The display will light up, indicating the device is powered on.
The clock includes a built-in backup battery to retain settings during power outages or disconnections.
3.2 Setarea orei
- Apăsați tasta Buton de setare a orei (often represented by a clock icon). The hour display will start flashing.
- Utilizați Butoane Sus / Jos pentru a regla ora.
- Apăsați tasta Buton de setare a orei again to confirm the hour and move to minute setting. The minute display will flash.
- Utilizați Butoane Sus / Jos pentru a regla minutele.
- Apăsați tasta Buton de setare a orei a third time to confirm the minutes.
- Pentru a comuta între formatul de 12 ore și cel de 24 de ore, apăsați butonul Butoane Sus / Jos while the time is flashing during setup, or refer to the specific instructions in your manual for a dedicated time format button.
3.3 Time Display Brightness
The time display offers three brightness settings: High, Low, and Off. This can typically be adjusted by repeatedly pressing a dedicated display brightness button or by holding the Time Setting button. Refer to your specific model's instructions for exact control.
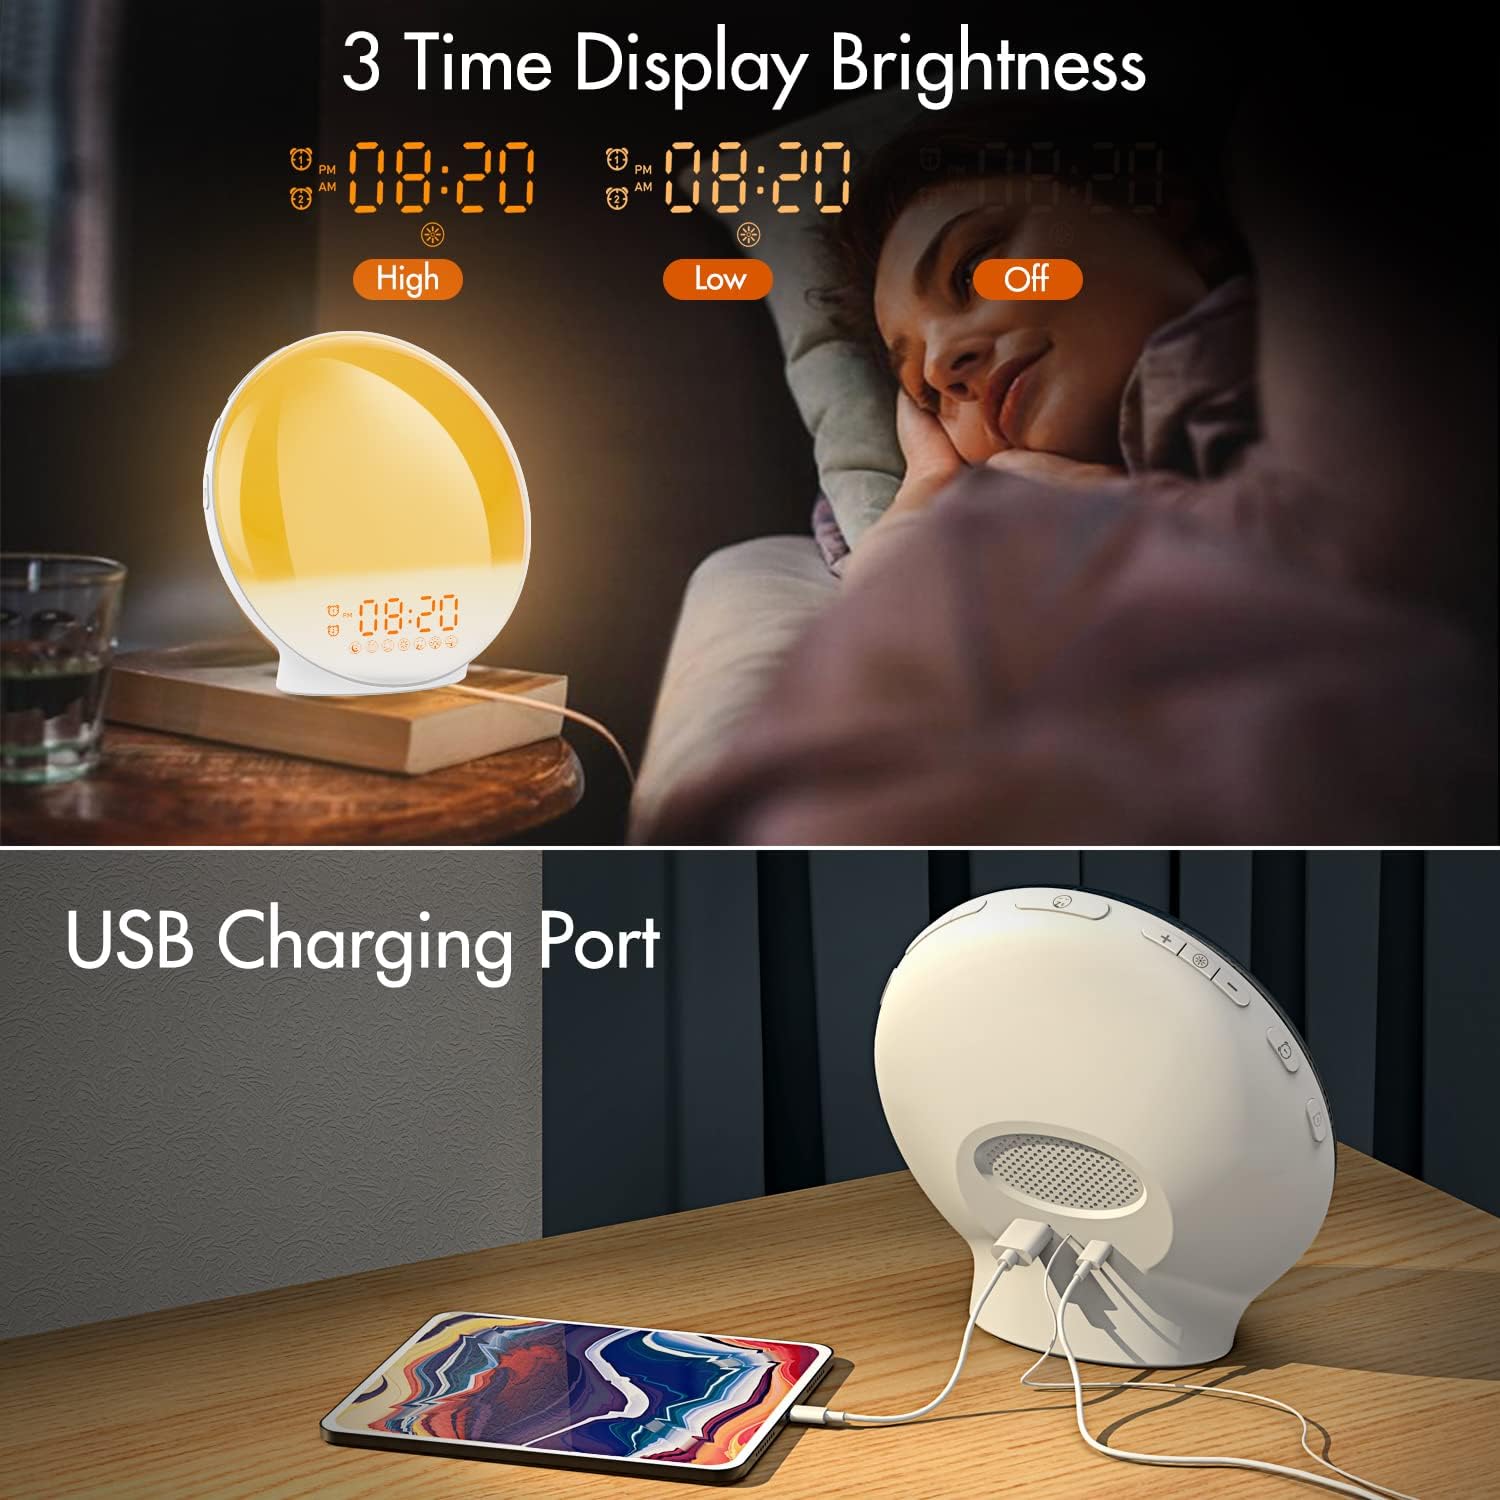
Imaginea 3.1: Illustration of the three time display brightness options: High, Low, and Off, allowing users to customize visibility for different times of day or night.
4. Instrucțiuni de utilizare
4.1 Setarea alarmelor (Alarma 1 și Alarma 2)
The clock features two independent alarms, allowing for separate wake-up times (e.g., weekday and weekend).

Imaginea 4.1: Depiction of the dual alarm functionality, allowing users to set different alarms for weekdays and weekends, along with the snooze feature.
- Apăsați tasta Butonul Alarmă 1 (sau Butonul Alarmă 2) to activate and enter alarm setting mode. The alarm time will flash.
- Utilizați Butoane Sus / Jos pentru a seta ora de alarmă dorită.
- Apăsați tasta Buton de alarmă again to confirm the hour and set the minutes.
- Utilizați Butoane Sus / Jos pentru a seta minutele dorite ale alarmei.
- Apăsați tasta Buton de alarmă again to select the wake-up sound. Use Butoane Sus / Jos to cycle through 7 nature sounds or FM radio.
- Apăsați tasta Buton de alarmă again to set the volume level (1-16) for the alarm sound. Use Butoane Sus / Jos a se ajusta.
- Apăsați tasta Buton de alarmă one last time to confirm all settings and activate the alarm. An alarm icon will appear on the display.
4.2 Funcția Snooze
Când sună o alarmă, atingeți Buton de amanare (often the large button on top or front) to pause the alarm for 9 minutes. This can be repeated up to 5 times.
4.3 Sunrise Simulation
The sunrise simulation gradually brightens the light before your alarm time, mimicking a natural sunrise.

Imaginea 4.2: Visual representation of the sunrise simulation feature, where the light intensifies gradually over a set period before the alarm, designed for a gentle wake-up.
- When setting an alarm, after selecting the sound and volume, you will typically be prompted to set the sunrise duration.
- Utilizați Butoane Sus / Jos to choose a duration between 10 to 60 minutes. The light will gradually increase from 0% to the set brightness level (0-20) during this period.
- The light color will transition from deep red to bright yellow, simulating a natural sunrise.
4.4 Sunset Simulation / Sleep Aid
The sunset simulation gradually dims the light and can play soothing sounds to help you fall asleep.

Imaginea 4.3: Illustration of the sunset simulation, where the light gradually dims over a period of 10 to 120 minutes, accompanied by optional sleep sounds like rain, forest, river, or FM radio.
- Apăsați tasta Snooze/Sleep Aid Button (or a dedicated Sleep Aid button) to activate the sleep aid function.
- Utilizați Butoane Sus / Jos to select a duration for the dimming process (10-120 minutes).
- You can also select a natural sound (Rain, Forest, River) or FM radio to play during this period.
- The light will gradually dim from 100% to 0% over the selected duration, and the sound will fade out.
4.5 Radio FM
The built-in FM radio allows you to listen to your favorite stations or use them as an alarm sound.

Imaginea 4.4: Pesteview of the 7 available alarm sounds and the FM radio option, providing diverse choices for waking up.
- Apăsați tasta Buton radio FM pentru a porni/opri radioul.
- Țineți Buton radio FM to automatically scan and save available stations.
- Utilizați Butoane Sus / Jos to manually tune to a specific frequency or cycle through saved stations.
- Reglați volumul folosind Volum +/- Butoane.
4.6 Night Light / Color Light
The clock can function as a night light with various color options and adjustable brightness.

Imaginea 4.5: Display of the 7 color atmosphere light options and 20 brightness levels, highlighting the clock's versatility as a mood light or reading lamp.
- Apăsați tasta Buton de lumină a aprinde lumina.
- Apăsați tasta Buton de lumină repeatedly to cycle through 7 static colors (e.g., Red, Green, Blue, Yellow, Indigo, Purple, White) or an automatic color-changing mode.
- Utilizați Butoane Sus / Jos to adjust the brightness level (0-20) of the selected color or white light.
- Țineți Buton de lumină a stinge lumina.
4.7 port de încărcare USB
A 5V/2.4A USB port is located on the back of the device, allowing you to charge your smartphone or other small electronic devices.
Imaginea 4.6: Spate view of the alarm clock showing the USB charging port in use, connected to a tablet for charging.
5. Întreținere
- curatenie: Ștergeți dispozitivul cu o lavetă moale și uscată. Nu utilizați substanțe de curățare abrazive sau solvenți.
- Depozitare: Depozitați dispozitivul într-un loc răcoros și uscat atunci când nu îl utilizați pentru perioade lungi de timp.
- Putere: Always use the provided power adapter to prevent damage.
6. Depanare
| Problemă | Cauza posibila | Soluţie |
|---|---|---|
| Ceasul nu pornește. | Adaptorul de alimentare nu este conectat sau este defect. | Ensure the power adapter is securely connected to both the clock and a working power outlet. Try a different outlet. |
| Alarma nu sună. | Alarma nu este activată sau volumul este prea scăzut. | Verificați dacă pictograma alarmei este afișată. Resetați alarma și asigurați-vă că volumul este setat la un nivel audibil. |
| Simularea răsăritului de soare nu funcționează. | Sunrise duration not set during alarm setup. | Ensure you have set a sunrise duration (10-60 minutes) when configuring the alarm. |
| Radio FM static sau recepție slabă. | Semnal slab sau poziția antenei. | Extend the antenna wire fully. Reposition the clock to improve reception. Perform an auto-scan for stations. |
| Încărcarea prin USB nu funcționează. | Dispozitivul nu este compatibil sau cablul este defect. | Ensure the device you are charging is compatible with 5V/2.4A USB charging. Try a different USB cable. |
7. Specificații
- Marca: KEPLUG
- Model: B09FRY71NH
- Dimensiuni produs: 16 x 16 x 6.1 cm
- Greutatea articolului: 481 g
- Voltage: 5 volți
- Sursa de alimentare: Alimentat cu baterii (cu adaptor CA)
- Tip de afișare: Digital
- Caracteristici speciale: Charging Port, Dimmable Light, Sunrise/Sunset Simulation, Dual Alarm, FM Radio, Nature Sounds
- Data primului disponibil: 12 noiembrie 2021
8. Garanție și asistență
For warranty information or technical support, please refer to the contact details provided with your purchase documentation or visit the official KEPLUG webPăstrați bonul fiscal ca dovadă a achiziției.