Weiser Halo WiFi Smart Lock with Touchscreen
Manual de instructiuni
Model: 9GED25000-004
Introducere
The Weiser Halo WiFi Smart Lock with Touchscreen offers advanced security and convenient access control for your home. This smart lock connects directly to your existing home Wi-Fi network, eliminating the need for a separate hub. With the Weiser app, you can operate, manage, and monitor your lock remotely from anywhere with an internet connection. This manual provides detailed instructions to help you install, set up, operate, and maintain your Weiser Halo Smart Lock.

Figure 1: Weiser Halo WiFi Smart Lock (Exterior and Interior Units)
Conținutul cutiei
Înainte de a începe instalarea, verificați dacă toate componentele sunt prezente în pachet:
- Unitate de asamblare interioară
- Exterior Assembly Unit
- Încuietoare reglabilă
- Placă de grevă
- Placa de montare
- Inel adaptor
- 4 x baterii AA
- Tava baterie
- SmartKey® Tool
- 2 Weiser® Keys
- Șuruburi (diferite dimensiuni)
- Instrucțiuni de instalare (acest manual)
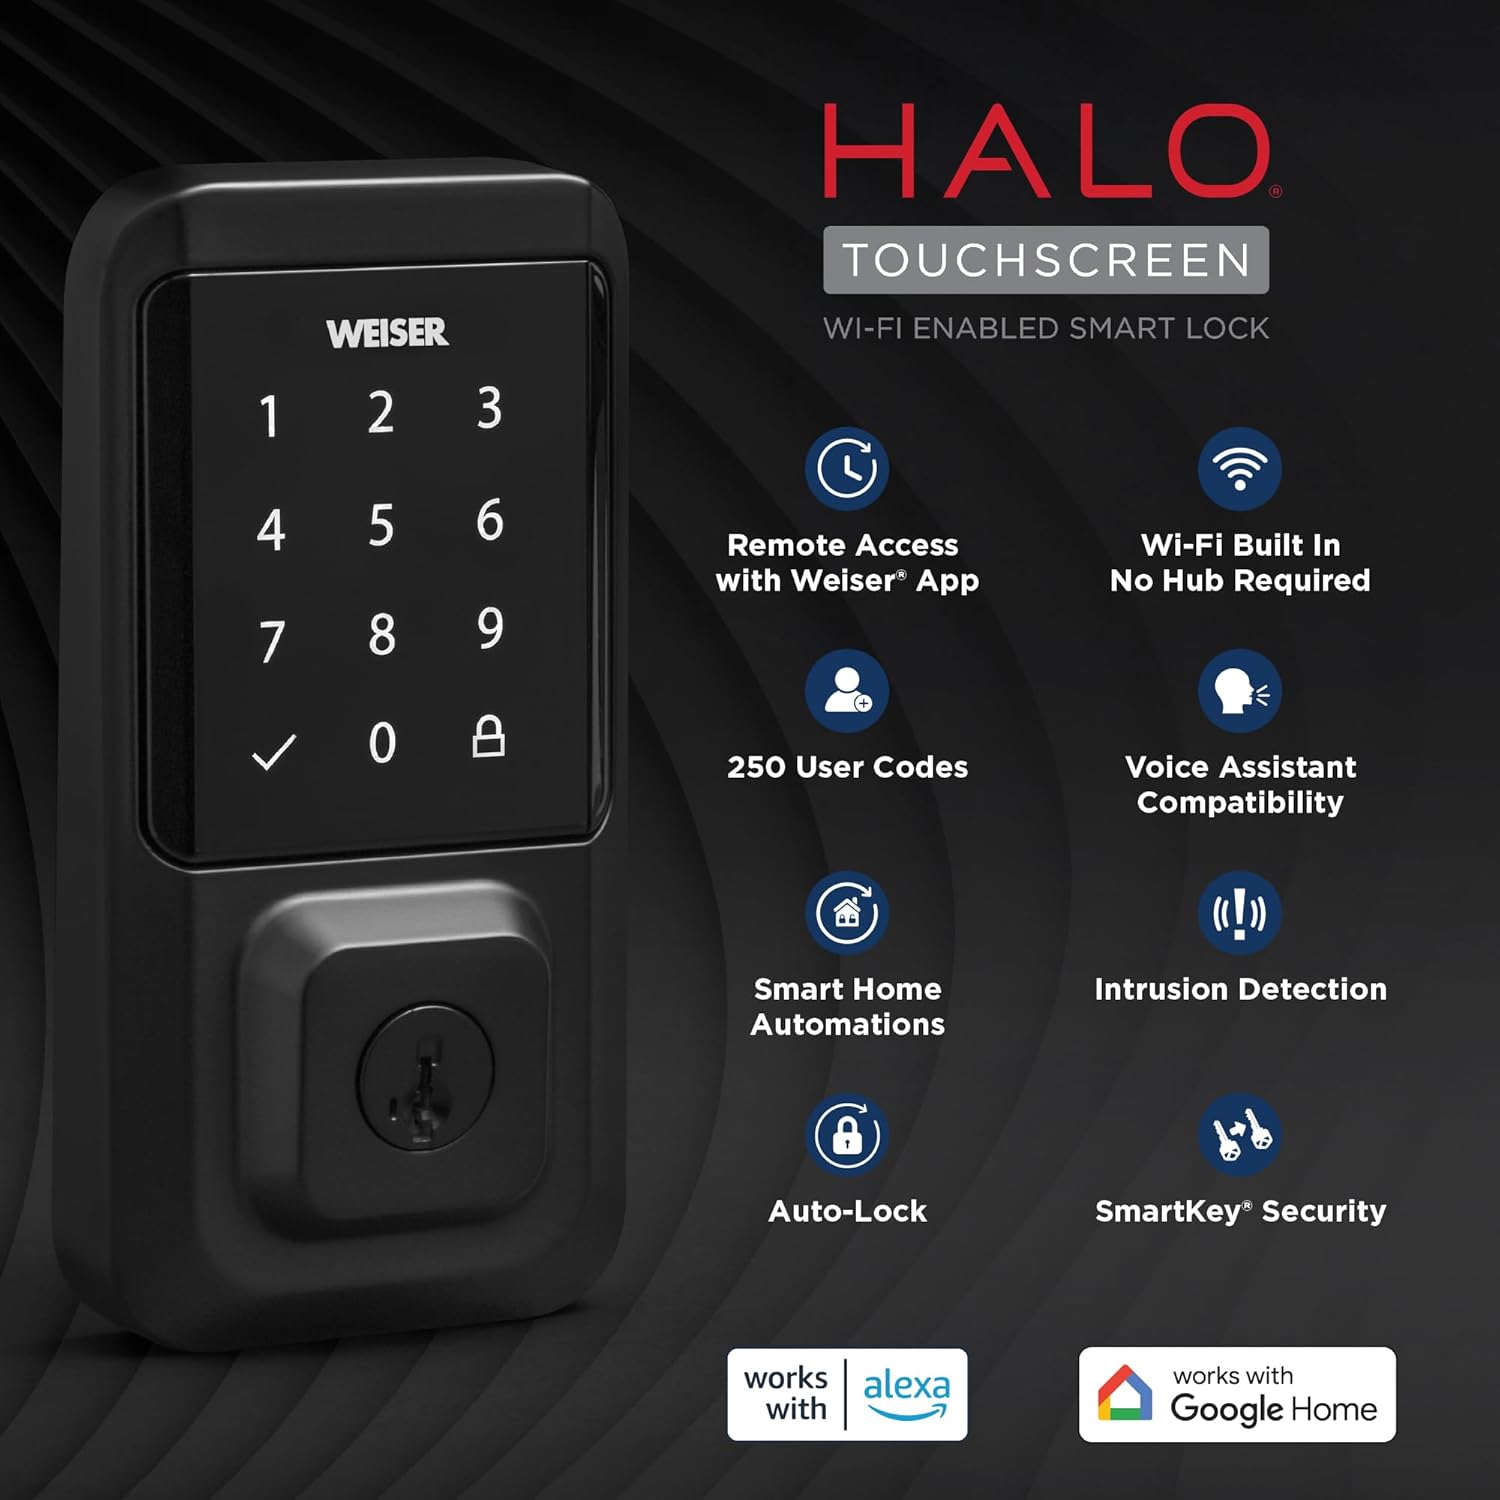
Figura 2: Componentele incluse
Ghid de instalare
The Weiser Halo Smart Lock is designed for easy installation, typically requiring only a screwdriver. It fits most standard doors 1-3/8" to 1-3/4" thick with an adjustable backset (2-3/8" or 2-3/4").
- Pregătiți ușa: Ensure your door is properly prepped for a deadbolt. Check the bore hole and backset dimensions.
- Instalați zăvorul: Insert the adjustable latch into the door edge. Ensure the latch is oriented correctly with the 'UP' arrow facing upwards.
- Instalați ansamblul exterior: Place the exterior keypad assembly onto the door, feeding the cable through the bore hole.
- Instalați placa de montare: Secure the mounting plate to the door using the provided screws, ensuring it aligns with the exterior assembly.
- Instalați ansamblul interior: Connect the cable from the exterior assembly to the interior assembly. Carefully tuck the excess cable into the recess. Attach the interior assembly to the mounting plate with the remaining screws.
- Instalați bateriile: Insert the 4 AA batteries into the battery tray and slide the tray into the interior assembly.
- Perform Door Handing: After installation, the lock will automatically perform a door handing process to learn the orientation of your door. Follow the prompts on the lock or in the Weiser app.

Figure 3: Easy Installation Process
Configurare și conectivitate
The Weiser Halo Smart Lock connects directly to your home Wi-Fi network for remote access and smart home integration.
- Download the Weiser App: Caută the 'Weiser App' on the Apple App Store or Google Play Store and install it on your smartphone.
- Creați un cont: Deschideți aplicația și urmați instrucțiunile de pe ecran pentru a crea un cont de utilizator nou.
- Adăugați lacătul: In the Weiser app, select the option to add a new device. Follow the in-app prompts to connect your Halo Smart Lock to your home's Wi-Fi network. This process typically involves putting the lock into pairing mode and entering your Wi-Fi credentials.
- Acces de la distanță: Once connected, you can lock and unlock your door remotely from your smartphone using the Weiser app, from anywhere with an internet connection.

Figure 4: Control Your Lock From Anywhere
Operațiunea
Deblocare și blocare
- tastatură: Enter your valid user code on the touchscreen keypad, then press the checkmark button to unlock. To lock, simply press the lock icon on the keypad.
- Cheie: Use the physical key provided to manually unlock or lock the deadbolt.
- Weiser App: Use the lock/unlock function within the Weiser app on your smartphone.
- Întoarcerea degetului mare: From the interior, manually turn the thumb turn to lock or unlock the deadbolt.
Managing User Codes
The Weiser Halo Smart Lock can store up to 250 unique user codes. You can create permanent, one-time, or scheduled entry codes through the Weiser app.
- Adding Codes: In the Weiser app, navigate to the 'Access Codes' section and follow the instructions to add new codes. You can assign names to codes for easy identification.
- Deleting Codes: Codes can be deleted at any time through the app.
- Scheduling Codes: Set specific days and times for codes to be active, ideal for guests or service providers.

Figure 5: Share Guest Access
Funcția de blocare automată
The auto-lock feature automatically locks your door after a set duration following entry or exit, providing hands-free locking and enhanced peace of mind. This duration can be customized within the Weiser app.

Figure 6: Auto-Lock Functionality
Integrare Smart Home
The Weiser Halo Smart Lock is compatible with popular voice assistants like Amazon Alexa and Google Assistant (functionality primarily from Android devices). This allows for voice control and integration into smart home routines.
- Control vocal: Use voice commands to lock your door (e.g., "Alexa, lock the front door.").
- Automatizari: Set up custom automations, such as locking the door at a specific time each night or turning on lights when the door is unlocked.
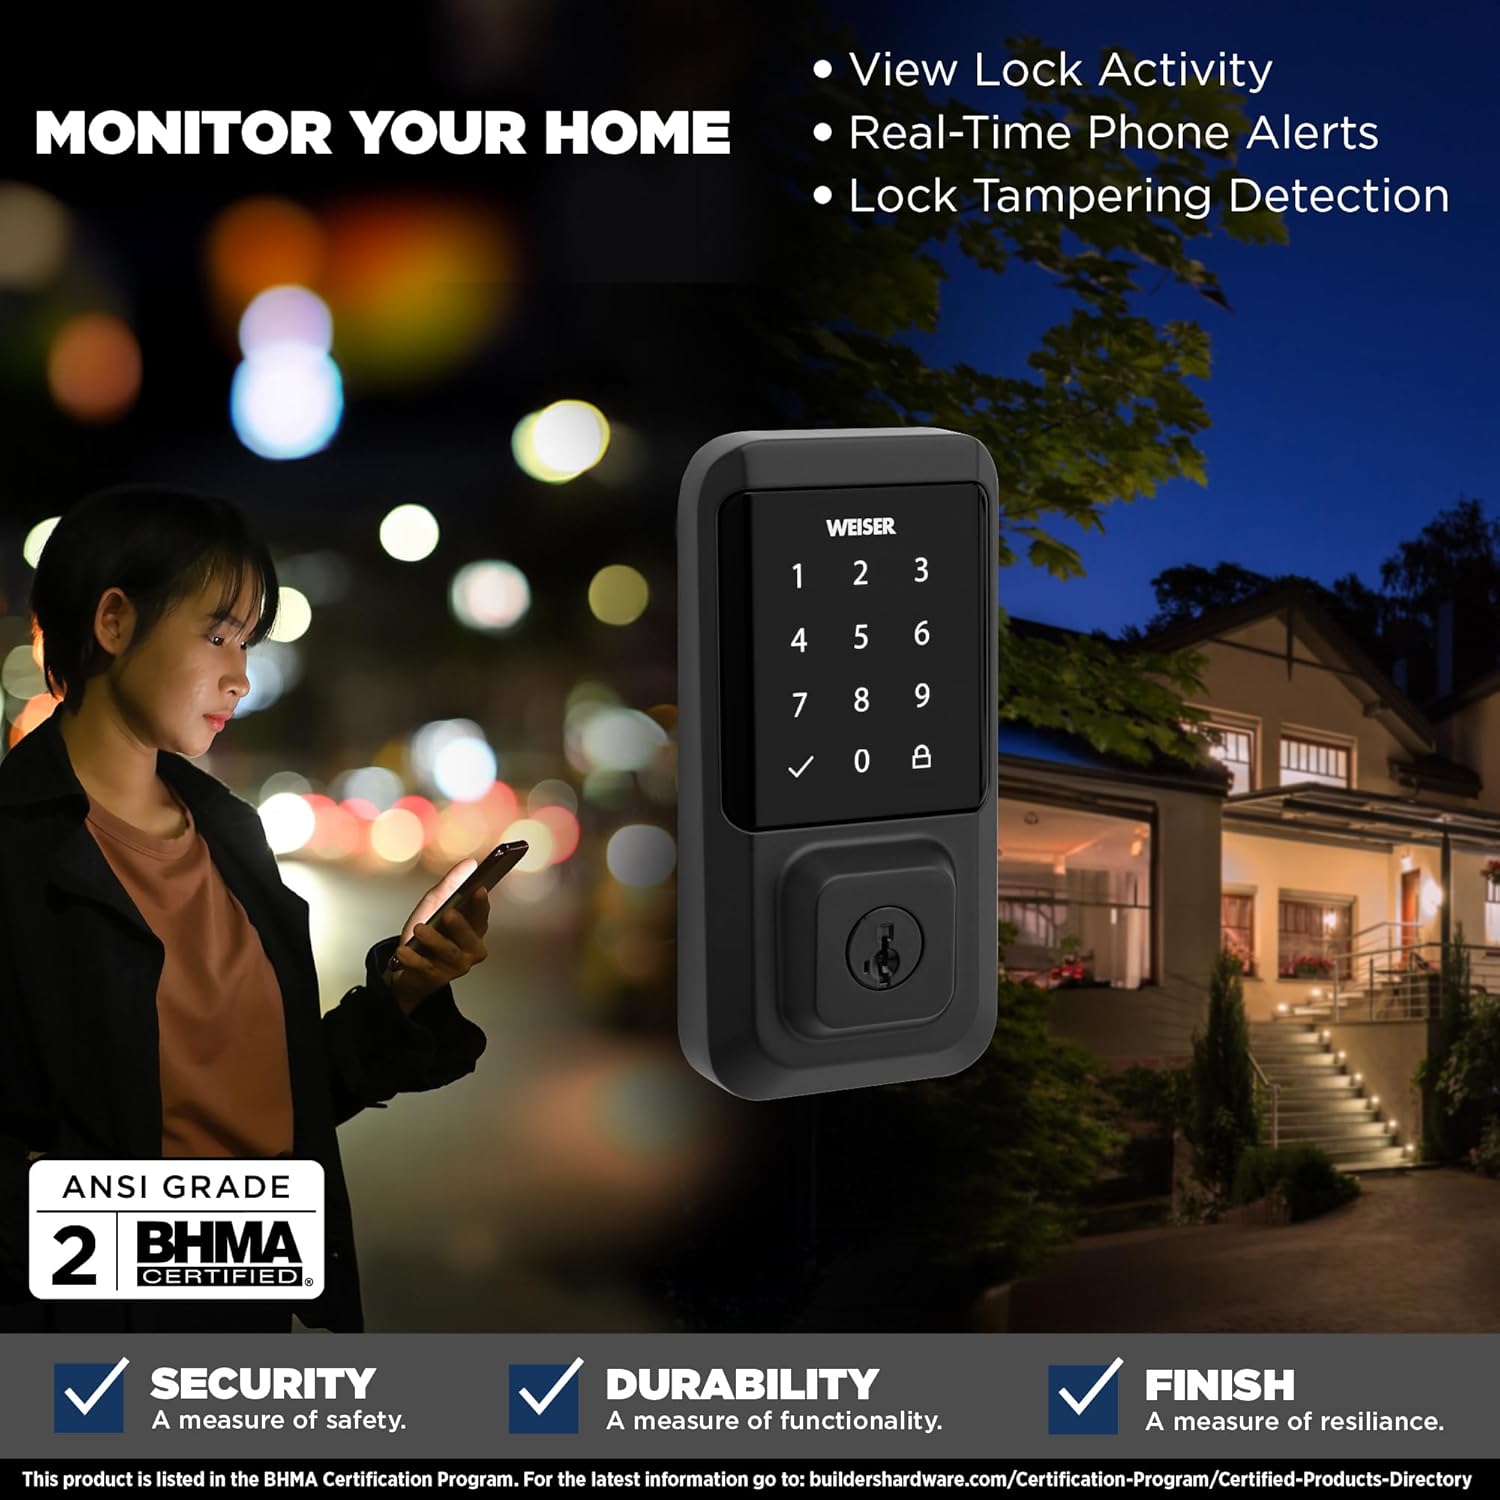
Figura 7: Integrare Smart Home
Monitorizare și alerte
The Weiser app provides real-time monitoring and alerts for your lock's activity.
- View Lock Activity: Access a detailed history of lock and unlock events, including who accessed the door and when.
- Real-Time Phone Alerts: Receive instant notifications on your smartphone for various events, such as lock/unlock actions or tampîncercări de curs.
- Blocarea TampDetectarea eroărilor: The lock is equipped with features to detect and alert you to potential tampering.

Figure 8: Monitor Your Home
Securitate SmartKey
The Weiser Halo Smart Lock features SmartKey Security, allowing you to re-key the lock yourself in seconds. This is useful if you've recently moved, lost keys, or wish to use a single key for multiple Weiser SmartKey compatible locks.
- Insert Existing Key: Insert your currently working key fully into the keyhole.
- La cheie: Turn the key 90 degrees clockwise (to the horizontal position).
- Introduceți instrumentul SmartKey: While holding the key in the horizontal position, insert the SmartKey tool firmly into the small hole next to the keyway.
- Remove Keys: Remove the SmartKey tool first, then remove the existing key.
- Introduceți cheie nouă: Insert your new key fully into the keyhole.
- Rotiți cheia nouă: Turn the new key 90 degrees counter-clockwise (back to the vertical position).
- Testare cheie nouă: Remove the new key and test it to ensure the re-keying process was successful.

Figure 9: SmartKey Security Re-keying
Întreţinere
To ensure optimal performance and longevity of your Weiser Halo Smart Lock, follow these maintenance guidelines:
- Înlocuire baterie: The lock requires 4 AA batteries. When the battery level is low, you will receive notifications through the Weiser app and potentially visual/audible alerts from the lock itself. To replace batteries, slide open the battery cover on the interior assembly, remove the old batteries, and insert new ones, ensuring correct polarity.
- curatenie: Curățați ecranul tactil și suprafețele exterioare cu o lavetă moale șiamp Evitați produsele de curățare abrazive sau solvenții care ar putea deteriora finisajul.
- Alinierea ușii: Periodically check that your door and frame are properly aligned. Misalignment can cause the deadbolt to bind, leading to increased battery drain and reduced performance.
Depanare
If you encounter issues with your Weiser Halo Smart Lock, refer to the following common problems and solutions:
| Problemă | Cauza posibila | Soluţie |
|---|---|---|
| Lock not responding / Dead battery | Bateriile sunt epuizate. | Replace all 4 AA batteries with new, high-quality alkaline batteries. |
| Lock frequently goes offline / Wi-Fi connectivity issues | Weak Wi-Fi signal; Router too far; Network interference. | Ensure the lock is within range of your Wi-Fi router. Consider a Wi-Fi extender if necessary. Check for network interference from other devices. Restart your router. |
| Keypad not responding to touch | Secure mode activated; Accidental touches prevented. | If 'Secure Mode' is enabled, the keypad may require a specific sequence (e.g., 4+6) to activate. Disable this feature in the app if not desired. Ensure hands are clean and dry. |
| Deadbolt binds or does not extend fully | Door/frame misalignment; Latch not installed correctly. | Check door and frame alignment. Ensure the strike plate is properly aligned with the deadbolt. Verify the latch was installed with the correct orientation. |
| Cannot add or delete user codes | Lock is offline; App synchronization issue. | Ensure the lock is connected to Wi-Fi and online in the Weiser app. Try closing and reopening the app. |
For further assistance, refer to the Weiser app's help section or contact Weiser customer support.
Specificații
| Caracteristică | Detaliu |
|---|---|
| Marca | Weiser |
| Numele modelului | Halo Touch Smart Lock Deadbolt |
| Numărul de model | 9GED25000-004 |
| Culoare | Negru Mat |
| Material | Metal |
| Tip blocare | Key Lock, Smart Lock |
| Caracteristica specială | Touchscreen, Wi-Fi Enabled |
| Protocol de conectivitate | Wifi |
| Metoda de control | Touch, Hand Control, SmartThings App |
| Sursa de alimentare | 4 baterii AA (incluse) |
| Dimensiuni articol (L x l x H) | 2.88 x 1.19 x 5.63 inci |
| Greutatea articolului | 4 lire sterline |
| Compatibilitatea ușilor | 1-3/8" to 1-3/4" thick doors, adjustable backset (2-3/8" or 2-3/4") |
| Coduri utilizator | Până la 250 |
| UPC | 059184399653 |
Garanție și suport
Weiser products are designed for durability and reliability. For specific warranty information regarding your Weiser Halo WiFi Smart Lock, please refer to the warranty card included with your product or visit the official Weiser website. For technical support, troubleshooting assistance, or to inquire about replacement parts, please contact Weiser customer service through their official channels.


