Introducere
Thank you for choosing the Genius GLT-85.4D 4-Channel Class-D Car Amplifier. This compact, high-performance amplifier is designed to deliver exceptional audio quality and power efficiency for your vehicle's sound system. This manual provides essential information for proper installation, operation, and maintenance of your ampVă rugăm să citiți cu atenție înainte de a încerca instalarea sau utilizarea.
Informații de siguranță
Respectați întotdeauna următoarele măsuri de siguranță în timpul instalării și utilizării:
- Disconnect the vehicle's negative battery terminal before any electrical work to prevent short circuits.
- Ensure all wiring is properly insulated to prevent damage and electrical hazards.
- Montați amplifier securely in a dry, well-ventilated area, away from direct sunlight, heat sources, and moisture.
- Folosiți cabluri cu calibru corespunzător pentru alimentare, împământare și conexiunile difuzoarelor, așa cum este specificat în acest manual.
- Nu operați amplifier if it is damaged or malfunctioning. Refer to the troubleshooting section or seek professional assistance.
- Păstrați amplifier departe de copii.
Conținutul pachetului
Verificați dacă toate articolele sunt prezente în colet:
- Genius GLT-85.4D 4-Channel Ampmai în viață
- Elemente de montare (șuruburi)
- Manual de utilizare (acest document)
Produs terminatview
The Genius GLT-85.4D is a compact 4-channel Class-D amplifier designed for high efficiency and powerful audio output. Its nanotechnology and SMD components contribute to its small size and robust performance.
Amplifier Top View

Această imagine arată partea de sus view of the Genius GLT-85.4D amplifier, highlighting its compact design and the "GENIUS AUDIO" branding along with the model number "GLT-85.4D" and "1000wMax" power rating.
Control Panel Layout (Input Side)
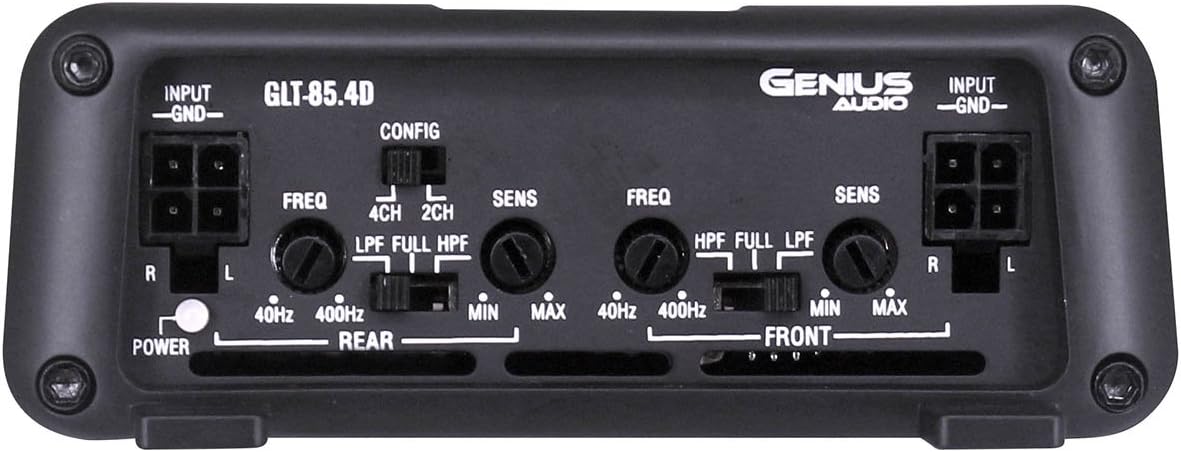
This image displays the input side of the GLT-85.4D amplifier, detailing the various controls and connections. It includes RCA input terminals (R, L) for both Rear and Front channels, gain controls (SENS MIN/MAX), frequency adjustment knobs (FREQ 40Hz-400Hz), and crossover switches (LPF, FULL, HPF) for both Rear and Front channels. A configuration switch (CONFIG 4CH, 2CH) is also visible, along with the Power indicator light.
Power and Speaker Terminal Layout (Output Side)

This image shows the output side of the GLT-85.4D amplifier, featuring the power and speaker terminals. From left to right, it includes the GROUND terminal, REMOTE turn-on terminal, +12V power terminal, and speaker output terminals for REAR BRIDGED (L+, L-, R+, R-) and FRONT BRIDGED (L+, L-, R+, R-) connections. The "4 Channel 'CLASS D' 2 ohm Stable Stereo Bridgeable MOSFET" text indicates key amplifier capabilities.
Configurare și instalare
Proper installation is crucial for optimal performance and safety. If you are unsure about any step, consult a professional installer.
Locația de montare
- Choose a location that is dry, well-ventilated, and protected from direct sunlight, excessive heat, and moisture.
- Asigurați un flux de aer suficient în jurul ampamortizor pentru o răcire corespunzătoare.
- Montați amplifier securely to a solid surface using the provided mounting hardware to prevent movement during vehicle operation.
Conexiuni de cablare
Înainte de a efectua orice conexiune, deconectați borna negativă a bateriei vehiculului.
- Cablu de alimentare (+12V): Run a heavy-gauge power cable (e.g., 8 AWG or thicker, depending on total system power) directly from the positive terminal of the vehicle's battery to the +12V terminal on the amplifier. Install an in-line fuse holder with an appropriate fuse (not supplied) within 18 inches (45 cm) of the battery.
- Fir de împământare (GND): Connect a heavy-gauge ground cable (same gauge as power wire) from the GND terminal on the amppe o suprafață metalică curată și nevopsită de pe șasiul vehiculului. Asigurați o conexiune solidă, cu rezistență redusă.
- Remote Turn-On Wire (REMOTE): Connect a remote turn-on wire (typically 18 AWG) from your head unit's remote output to the REMOTE terminal on the amplificător. Acest fir semnalizează ampactivator pentru a porni și a opri cu unitatea principală.
- RCA Input Cables: Conectați cablurile RCA de la mufa preinstalată a unității principaleamp outputs (Front and Rear) to the corresponding RCA input jacks on the ampmai în viață.
- Cabluri difuzoare: Conectați-vă difuzoarele la amplifier's speaker output terminals. Ensure correct polarity (+ to + and - to -). The GLT-85.4D supports 2-ohm stereo and 4-ohm bridged configurations. Refer to the "Power and Speaker Terminal Layout" image for terminal identification.
Nota: For bridged operation, connect the speaker to the designated bridged terminals (e.g., L+ and R- for a single channel in bridged mode). Consult a wiring diagram for specific bridged configurations.
Instrucțiuni de operare
Pornire inițială
- After all connections are made and verified, reconnect the vehicle's negative battery terminal.
- Porniți unitatea principală. amplifier's power indicator light should illuminate.
- Începe cu amplifier's gain (SENS) controls set to minimum.
- Play a familiar piece of music at a moderate volume level on your head unit.
Reglarea comenzilor
- Gain (SENS): Slowly increase the gain control for each channel until you hear distortion, then back off slightly. The gain control matches the ampsensibilitatea de intrare a activatorului la volumul de ieșire al unității principaletage. It is not a volume control.
- Crossover (LPF/FULL/HPF):
- LPF (filtru trece jos): Allows only frequencies below the set point to pass. Typically used for subwoofers.
- HPF (filtru de trecere înaltă): Allows only frequencies above the set point to pass. Typically used for full-range speakers to prevent low-frequency distortion.
- DEPLIN: Allows all frequencies to pass.
- Configuration (CONFIG 4CH/2CH): This switch determines how the input signals are routed to the ampcanale de filtrare.
- 4 canale: Uses all four RCA inputs (Front L/R, Rear L/R) to drive the four output channels independently.
- 2 canale: Uses only the Front L/R RCA inputs and internally routes them to all four output channels. Useful if your head unit only has two pre-amp outputs but you want to power four speakers.
Recomandare: Fine-tune settings gradually and listen carefully to avoid speaker damage or poor sound quality.
Întreţinere
- Păstrați amplifier clean by wiping it with a soft, dry cloth. Do not use harsh chemicals or abrasive cleaners.
- Asigurați-vă că ampLamele de răcire ale refrigeratorului sunt lipsite de praf și resturi pentru a menține o disipare corespunzătoare a căldurii.
- Verificați periodic toate conexiunile cablurilor pentru strângere și coroziune.
Depanare
| Problemă | Cauza posibila | Soluţie |
|---|---|---|
| Fără curent / AmpLifierul nu se aprinde |
|
|
| Fără sunet |
|
|
| Sunet distorsionat |
|
|
| Amplifier Se supraincalzeste |
|
|
Specificații
| Caracteristică | Detaliu |
|---|---|
| Model | GLT-85.4D |
| Canale | 4 |
| AmpClasa mai vie | Clasa-D |
| Max Power @ 12.6V | 1700W |
| RMS Power Output (4 Ohm Stereo @ 12.6V) | 85W x 4 |
| RMS Power Output (2 Ohm Stereo @ 12.6V) | 120W x 4 |
| RMS Power Output (4 Ohm Bridged @ 12.6V) | 240W x 2 |
| Vol. aprovizionare minimătage | 8.5V |
| Volumul maxim de alimentaretage | 16.8V |
| Idle Current Consumption @ 12.6VDC | 0.66A |
| Musical Max Current Consumption @ 12.6VDC | 31A |
| Dimensiuni (L x l x H) | 11.02 x 7.99 x 2.76 inci |
| Greutatea articolului | 3.5 lire sterline |
Garanție și suport
For warranty information, technical support, or service inquiries, please refer to the official Genius Audio website-ul lor web sau contactați departamentul lor de asistență pentru clienți. Păstrați bonul fiscal ca dovadă a achiziției pentru reclamațiile în garanție.
Oficial Website: Genius Audio Store on Amazon


