1. Introducere și Pesteview
The AT&T Air 4920 Airties Smart Wi-Fi Extender is designed to expand the coverage and improve the signal strength of your existing Wi-Fi network. It creates a seamless mesh network, allowing your devices to automatically connect to the strongest Wi-Fi signal as you move around your home or office. This manual provides detailed instructions for setting up, operating, maintaining, and troubleshooting your Wi-Fi extender.

Figura 1: Față view of the AT&T Air 4920 Airties Smart Wi-Fi Extender.
2. Conținutul pachetului
Vă rugăm să verificați dacă toate articolele sunt prezente în coletul dumneavoastră:
- AT&T Air 4920 Airties Smart Wi-Fi Extender Unit
- Adaptor de alimentare
- Ghid de pornire rapidă (acest manual servește ca ghid complet)
3. Caracteristicile și componentele produsului
Familiarize yourself with the various ports, buttons, and indicator lights on your Wi-Fi Extender.

Figura 2: Față și spate view of the Wi-Fi Extender with labeled components.
- 5 GHz Wi-Fi Indicator: Shows the status of the 5 GHz Wi-Fi band.
- 2.4 GHz Wi-Fi Indicator: Shows the status of the 2.4 GHz Wi-Fi band.
- Power Indicator / On/Off Button: Indicates power status. Can also be used to turn the device on/off.
- Butonul WPS: Used for Wi-Fi Protected Setup to quickly connect to your router.
- Gigabit Ethernet Ports (1 & 2): For wired connections to devices like computers, gaming consoles, or smart TVs.
- Comutator pornire/oprire: A physical switch to turn the device completely off or on.
- DC Power Input (12V): Conectați adaptorul de alimentare furnizat aici.
- Buton de resetare: Used to restore the device to factory default settings. (Requires a paperclip or similar pointed object).
4. Ghid de instalare
Follow these steps to set up your AT&T Air 4920 Wi-Fi Extender:
4.1 Plasamentul inițial
For initial setup, place the Wi-Fi Extender near your AT&T gateway (router). Once paired, you can move it to a more central location in your home where Wi-Fi signal is weak.
4.2 Conexiune la alimentare
- Connect the provided power adapter to the DC Power Input (7) on the back of the extender.
- Conectați adaptorul de alimentare la o priză de perete.
- Ensure the Power On/Off Switch (6) is in the 'On' position. The Power Indicator (3) should light up.
4.3 Pairing with Your AT&T Gateway (Router)
There are two primary methods for pairing:
Method A: Using WPS (Wi-Fi Protected Setup) - Recommended
- Țineți apăsat butonul WPS Button (4) on the front of the Wi-Fi Extender for 2-3 seconds until the indicator lights start blinking.
- În două minute, apăsați tasta butonul WPS on your AT&T gateway (router). Refer to your gateway's manual for the exact location of its WPS button.
- Wait for the indicator lights on the extender (1, 2, and 3) to turn solid green, indicating a successful connection. This may take a few minutes as the extender updates its firmware and synchronizes with your gateway.
Method B: Using an Ethernet Cable (If WPS fails or is not preferred)
- Connect one end of an Ethernet cable (not included) to one of the Gigabit Ethernet Ports (5) on the back of the extender.
- Connect the other end of the Ethernet cable to an available LAN port on your AT&T gateway (router).
- The extender will automatically detect the connection and begin pairing. Wait for the indicator lights (1, 2, and 3) to turn solid green.
- Once paired, you can disconnect the Ethernet cable if you wish to use the extender wirelessly.
4.4 Plasarea optimă
After successful pairing, unplug the extender and move it to a location roughly halfway between your AT&T gateway and the area where you need improved Wi-Fi coverage. Ensure the extender is placed in an open area, away from large metal objects, concrete walls, or other electronic devices that might cause interference. Plug it back into a power outlet. The indicator lights should turn solid green again, confirming a good connection.

Figure 3: The Wi-Fi Extender connected to its power adapter.
5. Operating Your Wi-Fi Extender
Once set up, the AT&T Air 4920 operates automatically to extend your Wi-Fi network. Your devices will seamlessly connect to the strongest signal, whether from your gateway or the extender, using your existing Wi-Fi network name (SSID) and password.
Stare indicator luminos:
- Verde continuu: Excellent connection and operation.
- Chihlimbar/Portocaliu solid: Fair connection. Consider repositioning the extender closer to your gateway.
- Roșu continuu: No connection or poor signal. Reposition the extender or check connections.
- Clipește: During WPS pairing or firmware update.
- Off: Device is powered off or not receiving power.
Conexiuni prin cablu:
You can connect wired devices (e.g., desktop computers, smart TVs, gaming consoles) to the Gigabit Ethernet Ports (5) on the back of the extender for a stable, high-speed connection.
6. Întreținere
To ensure optimal performance and longevity of your Wi-Fi Extender:
- curatenie: Gently wipe the exterior with a soft, dry cloth. Do not use liquid cleaners or aerosols.
- Ventilare: Asigurați-vă că fantele de ventilație nu sunt blocate pentru a preveni supraîncălzirea.
- Actualizări firmware: The extender typically receives automatic firmware updates from AT&T. Ensure it remains connected to power and your network for these updates to occur.
- Ciclu de alimentare: If you experience minor issues, try unplugging the extender from the power outlet for 10 seconds and then plugging it back in.
7. Depanare
If you encounter issues with your Wi-Fi Extender, refer to the following common problems and solutions:
| Problemă | Cauza posibila | Soluţie |
|---|---|---|
| Extender lights are off. | Fără putere. | Ensure the power adapter is securely connected and plugged into a working outlet. Check the Power On/Off Switch (6). |
| Indicator lights are red or amber. | Poor or no connection to the gateway. |
|
| Wi-Fi signal is still weak in extended areas. | Suboptimal placement. | Move the extender to a more central location between your gateway and the weak signal area. Avoid placing it in corners or behind furniture. |
| Devices not connecting to the extender. | Extender not properly paired or network issues. |
|
| Need to reset to factory settings. | Configuration issues or preparing for new setup. | With the extender powered on, use a paperclip or similar pointed object to press and hold the Buton de resetare (8) for about 10 seconds until the lights flash. The extender will restart with factory defaults. |
8. Specificații
| Caracteristică | Detaliu |
|---|---|
| Numărul de model | AIR-4920 |
| Dimensiunile produsului (înălțime x lățime x adâncime) | 3.94 x 4.27 x 1.63 inci (aprox.) |
| Greutatea articolului | 15 uncii |
| Comunicare wireless standard | 802.11ac |
| Rata de transfer de date | Până la 1000 de megabiți pe secundă |
| Tip conector | RJ45 (Ethernet) |
| Culoare | Alb |
| Producător | AirTies |
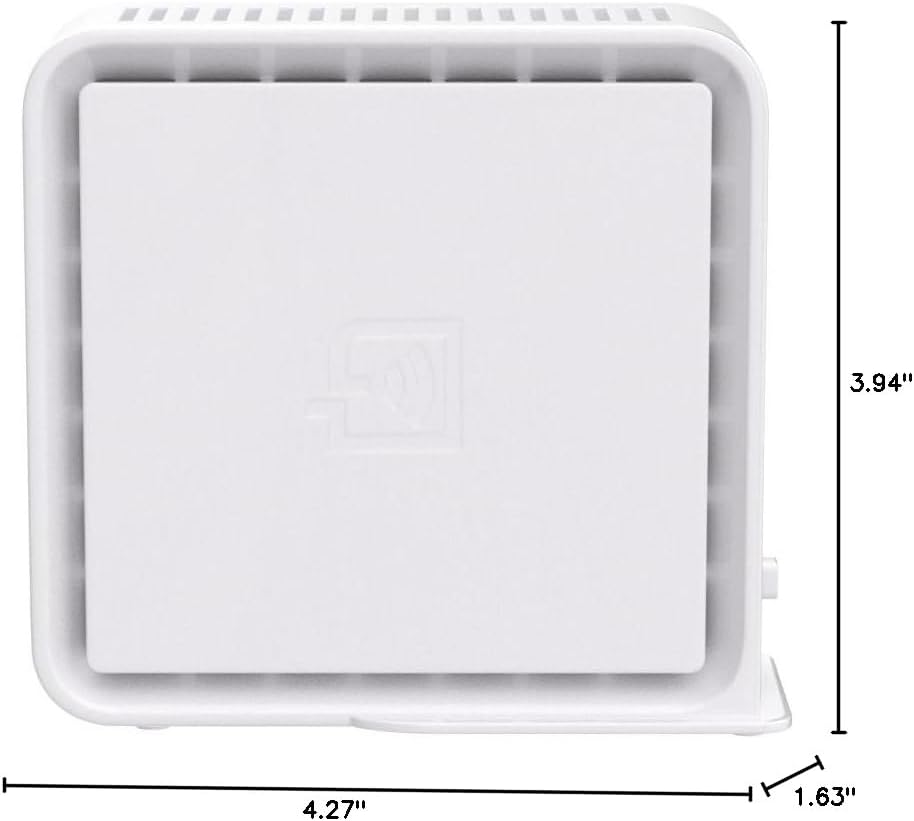
Figure 4: Approximate dimensions of the Wi-Fi Extender.


