1. Introducere
The Mastech MS6612 is a digital luxmeter designed for measuring illuminance. It features a large LCD display with backlight and a bar graph for easy reading. This device offers automatic and manual range switching, data hold, peak value measurement, relative value measurement, and zero calibration functions. It is capable of measuring up to 200,000 Lux or 20,000 Foot-Candles (Fc).
2. Informații de siguranță
Please read and understand all safety instructions before operating the device. Failure to follow these instructions may result in injury or damage to the meter.
- Do not operate the meter in environments with explosive gas, vapor, or dust.
- Avoid exposing the meter to extreme temperatures or high humidity.
- Scoateți bateriile dacă aparatul de măsură nu este utilizat pentru o perioadă lungă de timp, pentru a preveni scurgerile.
- Nu încercați să reparați sau să modificați contorul. Apelați la personal calificat pentru orice operațiune de service.
- Păstrați contorul curat și uscat.
3. Produs terminatview
The Mastech MS6612 Digital Luxmeter consists of a main unit with an LCD display and control buttons, and a silicon photoelectric diode sensor for light detection.
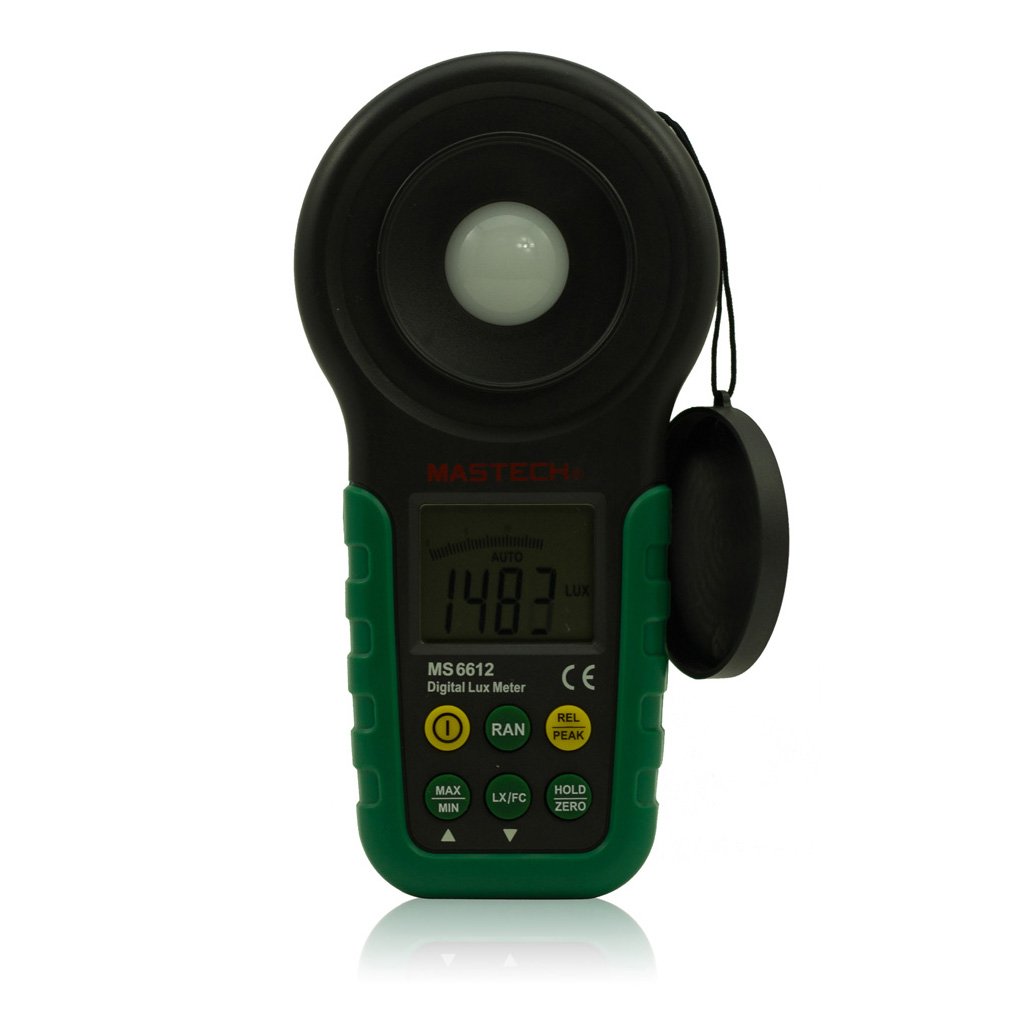
Figura 1: Faţă view of the Mastech MS6612 Digital Luxmeter. This image shows the main body of the device, including the large LCD screen, control buttons, and the light sensor located at the top.
Componente cheie:
- Display LCD: 3½ digits with analog bar display for clear readings.
- Butoane de control: For various functions such as power, range, hold, peak, relative, zero, unit conversion, and mute.
- Senzor de lumină: Silicon photoelectric diode for accurate light measurement.
- Compartiment baterie: Located at the rear for a 9V battery.
4. Configurare
4.1 Instalarea bateriei
- Localizați capacul compartimentului bateriilor pe spatele contorului.
- Folosiți o șurubelniță (dacă este necesar) pentru a deschide compartimentul bateriei.
- Insert one 9V (IEC 6LR61) battery, observing the correct polarity (+/-).
- Puneți la loc capacul compartimentului bateriei și fixați-l.
Notă: Pe afișaj va apărea un indicator de baterie descărcată atunci când bateria trebuie înlocuită.
5. Instrucțiuni de utilizare
5.1 Pornire/Oprire
- Apăsați tasta PUTERE pentru a porni contorul.
- Apăsați tasta PUTERE Apăsați din nou butonul pentru a opri contorul.
- The meter features an automatic power-off function, which will turn off the device if no keys are operated for more than 10 minutes.
5.2 Măsurare de bază
- Porniți contorul.
- Point the light sensor towards the light source to be measured.
- The illuminance value will be displayed on the LCD. The meter automatically selects the appropriate range.
5.3 Range Switching (Auto/Manual)
The MS6612 supports both automatic and manual range switching.
- In auto-ranging mode, the meter automatically selects the best measurement range.
- Apăsați tasta GAMA button to switch between auto and manual ranging modes. In manual mode, you can cycle through available ranges.
- If the measured value exceeds the current range in manual mode, the LCD will display "OL" (Overload).
5.4 Funcția de păstrare a datelor
Pentru a îngheța citirea curentă pe afișaj:
- Apăsați tasta ȚINE button. The "HOLD" indicator will appear on the display.
- Apăsați tasta ȚINE button again to release the data hold and resume live measurement.
5.5 Maximum/Minimum Value Measurement
La view the maximum or minimum illuminance recorded during a measurement session:
- Apăsați tasta MAX/MIN button. The display will show the maximum recorded value.
- Presa MAX/MIN again to cycle to the minimum recorded value.
- Presa MAX/MIN a third time to exit this mode and return to live measurement.
5.6 Peak Value Measurement
This function captures the highest instantaneous illuminance value.
- Apăsați tasta VÂRF button to activate peak measurement. The "PEAK" indicator will appear.
- The display will show the highest illuminance detected since activating the function.
- Presa VÂRF din nou pentru a ieși din acest mod.
5.7 Relative Value Measurement
This function allows you to set a reference point and measure the difference from that point.
- In a stable light environment, press the REL button. The current reading becomes the reference, and the display will show "0".
- Subsequent measurements will show the difference (positive or negative) from this reference value.
- Presa REL again to exit relative measurement mode.
5.8 Zero Calibration Function
To ensure accuracy, especially in low light conditions, perform a zero calibration.
- Place the light sensor in a completely dark environment (e.g., cover it with an opaque cap).
- Apăsați tasta ZERO button. The display should read "0.00".
- This calibrates the meter to account for any residual sensor output in darkness.
5.9 Unit Conversion (Fc/Lux)
The meter can display measurements in Lux or Foot-Candles (Fc).
- Apăsați tasta UNITATE button to toggle between Lux and Fc units.
- The selected unit will be indicated on the LCD.
- Conversie: 1 Fc = 10.764 Lux; 1 Lux = 0.09290 Fc.
5.10 Touch Tone and Mute Function
The meter may emit a touch tone when buttons are pressed. This can be muted.
- Refer to the specific button on your device for muting the touch tone.
6. Întreținere
6.1 Curățare
- Ștergeți suprafața contoruluiasing cu un d moaleamp pânză. Nu utilizați agenți de curățare abrazivi sau solvenți.
- Keep the light sensor clean and free from dust or smudges to ensure accurate readings. Use a soft, lint-free cloth.
6.2 Înlocuirea bateriei
Replace the 9V battery when the low battery indicator appears on the display. Follow the steps in Section 4.1 for battery installation.
6.3 Depozitare
- If storing the meter for an extended period, remove the battery to prevent leakage and potential damage.
- Depozitați glucometrul într-un loc răcoros și uscat, ferit de lumina directă a soarelui și de temperaturi extreme.
7. Depanare
| Problemă | Cauza posibila | Soluţie |
|---|---|---|
| Contorul nu pornește. | Baterie descărcată sau instalată incorect. | Check battery polarity, replace battery. |
| "OL" displayed on screen. | Measurement value exceeds current range (manual mode). | Switch to a higher range or enable auto-ranging. |
| Citiri inexacte. | Dirty sensor, uncalibrated zero, or incorrect range. | Clean sensor, perform zero calibration, ensure correct range. |
| Indicator baterie descărcată. | Puterea bateriei este scăzută. | Înlocuiți bateria de 9V. |
8. Specificații
| Parametru | Valoare |
|---|---|
| Domenii de măsurare | 20, 200, 2000, 20000, 200000 Lux 20, 200, 2000, 20000 Fc |
| Afişa | 3½ digits, max reading of 1999, with analog bar display |
| Senzor | Diodă fotoelectrică din siliciu |
| Measured Spectral Range | 320~730nm |
| SampLing Rate | ≥2 times/s |
| Temperatura de operare | -10~50 °C, max 80% RH (Non-Condensed) |
| Temperatura de depozitare | -10~50 °C, max 80% RH (Non-Condensed, removing batteries) |
| Mediul de operare | Utilizare în interior |
| Înălţime | 2000 m cea mai înaltă altitudine |
| Alimentare electrică | 1 x 9V, IEC 6LR61 battery |
| Durata de viață a bateriei | Aproximativ. 200 ore |
| Dimensiuni (HxLxD) | 190 mm x 89 mm x 42.5 mm (7.48 x 3.50 x 1.67 inchi) |
| Greutate (fara baterii) | Aproximativ. 360 g (12.7 oz) |
| Greutate (cu baterii) | Aproximativ. 420 g (14.8 oz) |
Conversia unității de iluminare:
- 1 Foot-Candle (Fc) = 10.764 Lux
- 1 Lux = 0.09290 Foot-Candle (Fc)
9. Garanție și asistență
Mastech products are designed for reliability and performance. For specific warranty information, please refer to the warranty card included with your purchase or visit the official Mastech website. For technical support or service inquiries, please contact Mastech customer service through their official channels.
Vă rugăm să păstrați bonul fiscal ca dovadă a achiziției pentru reclamațiile în garanție.