Introducere
This manual provides detailed instructions for the safe and proper installation, operation, and maintenance of your Progress Lighting Inspire Collection 9-Light Off-White Linen Shade Traditional Chandelier in Brushed Nickel. Please read all instructions carefully before beginning installation and retain this manual for future reference.
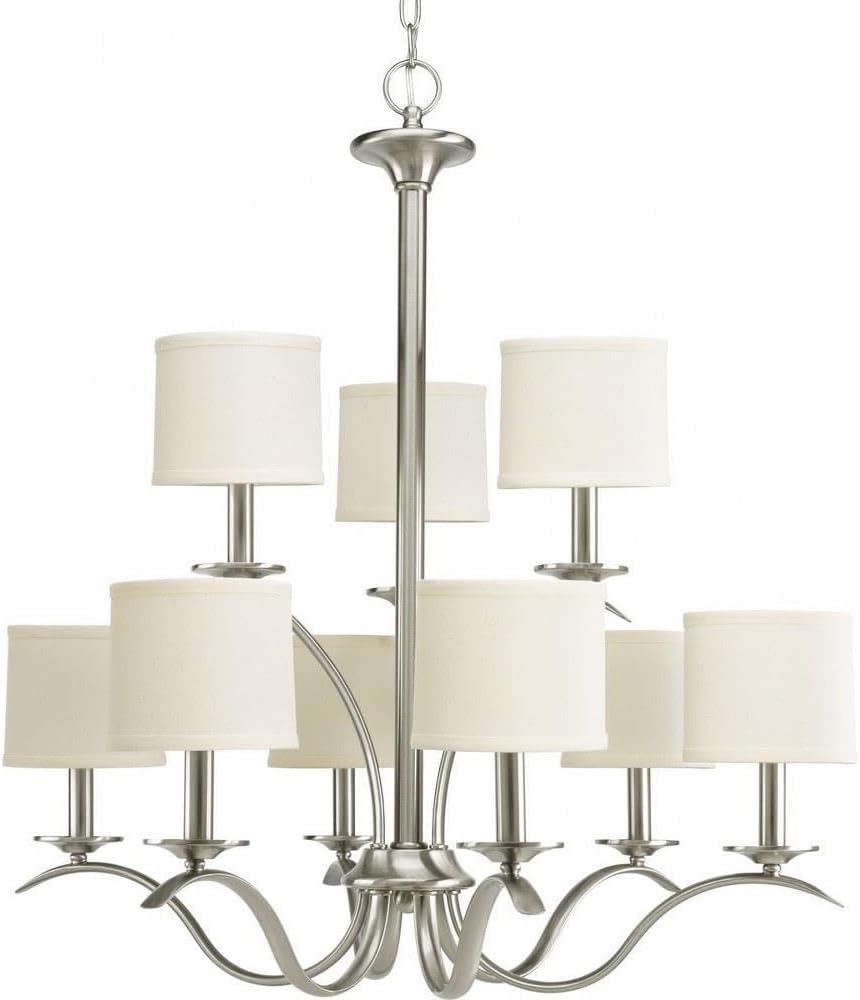
Image: The Inspire Collection 9-Light Chandelier featuring a brushed nickel finish and off-white linen shades.
Informații de siguranță
AVERTIZARE: To reduce the risk of fire, electric shock, or personal injury, always turn off the main power supply at the circuit breaker before installation, removal, or servicing. This product requires professional installation. Always consult a qualified electrician if you are unsure about the installation process.
Propunerea 65 Avertisment: Acest produs poate conține substanțe chimice cunoscute de statul California pentru a provoca cancer și malformații congenitale sau alte vătămări ale reproducerii. Spălați-vă mâinile după manipulare.
- Ensure all electrical connections are in accordance with local codes and ordinances.
- Utilizați numai tipul de bec și wat specificatetage pentru a evita supraîncălzirea.
- Do not hang anything from the fixture.
Conținutul pachetului
Verificați dacă toate componentele sunt prezente înainte de a începe instalarea:
- Chandelier fixture assembly
- 9 Off-white linen shades
- Ceiling chain (6 feet of 9 gauge chain supplied)
- Cablaje electrice
- Mounting hardware (may require additional screws not included)
- Foaie de instalare
Configurare și instalare
Professional installation is recommended for this chandelier. Follow these general steps, referring to the included installation sheet for specific details.
1. Pregătiți-vă pentru instalare
- Opriți alimentarea la întrerupătorul de circuit.
- Carefully unpack the fixture and components.
- Determine the desired hanging height. For an 8-foot ceiling, the bottom of the chandelier should be 30-36 inches above a dining table. For higher ceilings, divide the vertical space into thirds and position the chandelier two-thirds of the distance from the floor, ensuring at least 7 feet of clearance from the floor in areas where people walk underneath.
2. Mount the Fixture
- Attach the mounting bracket to the junction box in the ceiling.
- Adjust the chain length as needed. The supplied chain is 6 feet long.
- Thread the electrical wires through the chain and canopy.
3. Conexiuni electrice
- Connect the fixture's ground wire to the ground wire from the junction box.
- Connect the fixture's 'white or identified' wire (often with ridges) to the white (neutral) wire from the junction box.
- Connect the fixture's 'plain or black' wire to the black (hot) wire from the junction box.
- Asigurați toate conexiunile cu piulițe de sârmă și bandă electrică.
4. Adunarea finală
- Secure the canopy to the ceiling.
- Install 9 candelabra-shaped bulbs (E26 base, maximum 60 watts each). Note: Only candelabra-shaped bulbs can be used with the shades.
- Attach the off-white linen shades to each light socket.
- Restabiliți alimentarea la întrerupătorul de circuit.
Ghid vizual de instalare
Video: O prezentare completăview of chandelier installation by Progress Lighting, demonstrating key steps and considerations for proper setup.
Dimensiunile produsului

Image: Dimensional drawing of the chandelier, indicating a width of 29.38 inches and a height of 31 inches.
Instrucțiuni de operare
Once properly installed, your chandelier can be operated using a standard wall switch. If your electrical setup includes a dimmer switch, ensure it is compatible with incandescent bulbs for optimal performance.
The fixture's switch type is listed as 'Pull Chain' in some specifications, however, the primary control is typically via a wall switch for chandeliers of this design. Please refer to your specific home wiring and switch setup.
Întreţinere
Curatenie
- Opriți întotdeauna alimentarea cu energie electrică înainte de curățare.
- Ștergeți dispozitivul cu o cârpă moale și uscată.
- Do not use abrasive cleaners or solvents as they may damage the finish.
- The linen shades can be gently dusted or spot cleaned with a damp pânză dacă este necesar.
Înlocuirea becului
- Ensure power is off and bulbs have cooled before replacing.
- Unscrew old bulbs and screw in new E26 candelabra-shaped bulbs.
- Nu depășiți puterea maximătage de 60 de wați pe bec.
Depanare
If your chandelier is not functioning correctly, refer to the following common issues:
- Fara lumina: Check the circuit breaker, ensure bulbs are securely screwed in, and verify all electrical connections are tight.
- Lumini pâlpâitoare: Ensure bulbs are fully tightened. If using a dimmer, confirm it is compatible with the bulb type and that the bulbs are dimmable.
- Loose Fixture: Re-check mounting hardware and ensure it is securely fastened to the ceiling junction box.
Dacă problemele persistă, consultați un electrician calificat.
Specificații
| Marca | Iluminare progres |
| Numele modelului | Inspira |
| Numărul piesei | P4638-09 |
| Culoare | Nichel periat |
| Material | Oțel aliat |
| Material de umbră | Lenjerie |
| Stil | Tranzitorie |
| Forma de iluminat | Candelabru |
| Dimensiunile produsului | 29.38 cm L x 29.38 cm l x 31 cm Î |
| Greutatea articolului | 15 lire sterline |
| Numărul de surse de lumină | 9 |
| Baza becului | E26 |
| Wattage | 60 wați (per bec) |
| Voltage | 120 volți |
| Utilizare în interior/exterior | De interior |
| Caracteristica specială | Listat UL |
Informații despre garanție
This Progress Lighting product is covered by a Garanție limitată de 1 an. This warranty guarantees your complete satisfaction with your purchase and includes professional after-sales customer service support. Please retain your proof of purchase for warranty claims.
Asistență pentru clienți
For further assistance, technical support, or warranty inquiries, please visit the official Progress Lighting website or contact their customer service department. Refer to the packaging or the Progress Lighting website pentru informații de contact actuale.


