1. Introducere
Mulțumesc pentru achizițieasing the Atlanta 1669/19 Quartz Alarm Clock. This digital alarm clock features a silent movement, a light sensor for automatic display illumination, and a snooze function. This manual provides detailed instructions for setup, operation, and maintenance to ensure optimal performance and longevity of your device.
2. Informații de siguranță
- Țineți aparatul departe de apă și umiditate ridicată.
- Evitați expunerea ceasului la lumina directă a soarelui sau la temperaturi extreme.
- Nu încercați să dezasamblați sau să reparați ceasul singur. Apelați la personal de service calificat.
- Aruncați bateriile uzate în mod responsabil, conform reglementărilor locale.
- Nu amestecați baterii vechi cu noi sau diferite tipuri de baterii.
3. Conținutul pachetului
- Atlanta 1669/19 Quartz Alarm Clock Unit
- Manual de utilizare (acest document)
Notă: Bateriile nu sunt incluse și trebuie achiziționate separat.
4. Produs terminatview
The Atlanta 1669/19 features a clear digital display, intuitive controls, and a light sensor for enhanced visibility in low-light conditions.
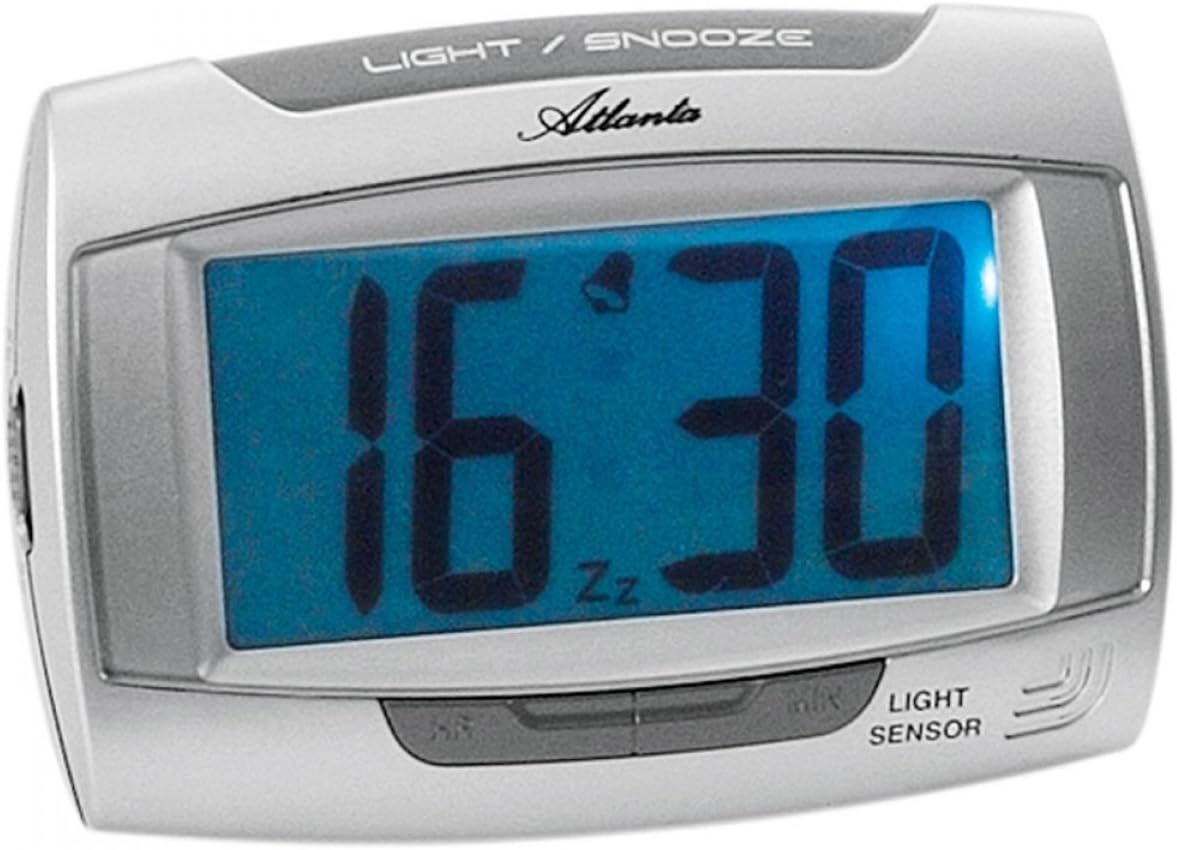
Figura 1: Faţă view of the Atlanta 1669/19 Quartz Alarm Clock. The clock features a large digital display, a "LIGHT / SNOOZE" button at the top, and a "LIGHT SENSOR" indicator at the bottom right. The display shows the time 16:30, with an alarm bell icon and 'Zz' indicating snooze functionality.
Componente cheie:
- Ecran digital: Afișează ora și starea alarmei.
- LIGHT / SNOOZE Button: Activates temporary backlight and snooze function.
- Senzor de lumină: Automatically illuminates the display in dark environments.
- Control Buttons (Rear/Side): For setting time and alarm.
- Battery Compartment (Rear): Holds the required batteries.
5. Configurare
5.1. Instalarea bateriei
- Localizați capacul compartimentului bateriilor pe spatele ceasului deșteptător.
- Îndepărtați capacul prin glisare sau ridicare.
- Insert the required batteries (typically 1x AA, refer to compartment markings) ensuring correct polarity (+ and -).
- Puneți bine capacul compartimentului bateriei.
5.2. Setarea inițială a orei
Upon battery installation, the display will typically show a default time. You will need to set the current time.
- Locate the time setting buttons, usually labeled "SET", "HOUR", and "MINUTE" or similar, on the back or side of the clock.
- Press the "SET" button (or equivalent) to enter time setting mode. The hour digits may start flashing.
- Folosiți butonul „ORĂ” pentru a regla ora.
- Press "SET" again to move to minute setting. The minute digits may start flashing.
- Use the "MINUTE" button to adjust the minutes.
- Press "SET" one more time to confirm and exit time setting mode.
6. Instrucțiuni de utilizare
6.1. Setarea alarmei
- Locate the alarm setting buttons, typically labeled "ALARM SET", "ALARM HOUR", and "ALARM MINUTE" or similar.
- Press the "ALARM SET" button to enter alarm setting mode. The alarm hour digits may flash.
- Use the "ALARM HOUR" button to adjust the desired alarm hour.
- Press "ALARM SET" again to move to alarm minute setting. The alarm minute digits may flash.
- Use the "ALARM MINUTE" button to adjust the desired alarm minutes.
- Press "ALARM SET" one more time to confirm and exit alarm setting mode.
6.2. Activarea/Dezactivarea alarmei
There is usually a switch or button to turn the alarm on or off. Look for a switch labeled "ALARM ON/OFF" or an alarm icon button. When the alarm is active, an alarm icon (e.g., a bell) will typically appear on the display.
6.3. Funcția de amânare
When the alarm sounds, press the large "LIGHT / SNOOZE" button located on the top of the clock. This will temporarily silence the alarm, and it will sound again after a few minutes (typically 5-9 minutes). The "Zz" icon on the display indicates that the snooze function is active.
6.4. Light Sensor and Display Backlight
- Automatic Backlight (Light Sensor): The clock is equipped with a light sensor. When enabled, the display will automatically illuminate with a soft, constant light in dark environments, making it easy to read the time at night without pressing any buttons. Look for a switch or button labeled "SENSOR ON/OFF" or similar to enable or disable this feature.
- Iluminare de fundal temporară: To briefly illuminate the display in any lighting condition, press the "LIGHT / SNOOZE" button on the top of the clock. The backlight will stay on for a few seconds and then turn off automatically.
7. Întreținere
- curatenie: Wipe the clock with a soft, dry cloth. Do not use abrasive cleaners or solvents, as these may damage the casing sau afișaj.
- Înlocuire baterie: When the display dims or the clock stops functioning correctly, it is time to replace the batteries. Follow the battery installation steps in Section 5.1.
- Depozitare: If the clock will not be used for an extended period, remove the batteries to prevent leakage and damage.
8. Depanare
| Problemă | Cauza posibila | Soluţie |
|---|---|---|
| Afișajul ceasului este gol sau întunecat. | Baterii descărcate sau descărcate; instalare incorectă a bateriilor. | Înlocuiți bateriile cu altele noi, asigurând polaritatea corectă. |
| Alarma nu sună. | Alarm is not activated; alarm time is incorrect; low batteries. | Ensure alarm is switched ON (bell icon visible); verify alarm time setting; replace batteries. |
| Automatic backlight not working. | Light sensor feature is disabled; insufficient darkness. | Ensure the light sensor switch is ON; test in a completely dark room. |
| Timpul este incorect. | Time was not set correctly; batteries were removed/replaced. | Reset the current time following Section 5.2. |
9. Specificații
| Model | 1669/19 |
| Marca | Atlanta |
| Modul de operare | Digital |
| Caracteristici speciale | Alarm, Lighting (Light Sensor) |
| Material | Plastic |
| Material cadru | Plastic |
| Tip de montare | Blat de masă |
| Culoare | Blue (display), Silver-coloured (case) |
| Bateriile necesare | Yes (Type not specified, typically AA or AAA for such clocks) |
| Baterii incluse | Nu |
| Dimensiuni (aprox.) | 11 x 7 cm |
10. Garanție și asistență
Pentru informații despre garanție sau asistență tehnică, vă rugăm să consultați documentația furnizată în momentul achiziției sau să contactați distribuitorul. Păstrați dovada achiziției pentru orice reclamații în garanție.


