1. Introducere
This manual provides detailed instructions for the installation, operation, maintenance, and troubleshooting of the ASUS P7F-M Micro ATX Motherboard. Please read this manual thoroughly before installing or using the motherboard to ensure proper setup and functionality.
The ASUS P7F-M is designed for Intel Xeon 3400 series, Core i7, Core i5, and Core i3 processors with an LGA 1156 socket, supporting DDR3 memory and offering various expansion and connectivity options.
2. Configurare și instalare
Înainte de a începe instalarea, asigurați-vă că sistemul este oprit și deconectat de la sursa de alimentare. Purtați o curea antistatică la încheietura mâinii pentru a preveni deteriorarea componentelor prin descărcare electrostatică (ESD).
2.1 Aspectul plăcii de bază

Imagine: De sus în jos view of the ASUS P7F-M motherboard, showing the CPU socket, RAM slots, PCIe slots, and various connectors.

Imagine: Înclinată view of the ASUS P7F-M motherboard, highlighting the rear I/O panel, CPU socket, and expansion slots.
2.2 Instalarea CPU
- Localizați soclul procesorului LGA 1156 pe placa de bază.
- Gently push down the load lever and pull it sideways to open the socket retention frame.
- Aliniați cu grijă procesorul cu soclul, asigurându-vă că triunghiul auriu de pe procesor se potrivește cu triunghiul de pe soclu. Nu forțați procesorul în soclu.
- Close the retention frame and push the load lever back into place until it clicks.

Imagine: Prim-plan view of the LGA 1156 CPU socket on the ASUS P7F-M motherboard, ready for processor installation.
2.3 Instalarea memoriei
The motherboard supports 4x DDR3-1333/1066 DIMMs, with a maximum capacity of 16GB. It supports both ECC and non-ECC un-buffered memory.
- Deschideți clemele de la ambele capete ale slotului DIMM.
- Aliniați modulul de memorie cu slotul, asigurându-vă că crestătura de pe modul se potrivește cu cheia din slot.
- Apăsați ferm pe ambele capete ale modulului de memorie până când clemele se fixează în poziție.
Imagine: Prim-plan view of the four DDR3 DIMM slots on the ASUS P7F-M motherboard, showing their arrangement.
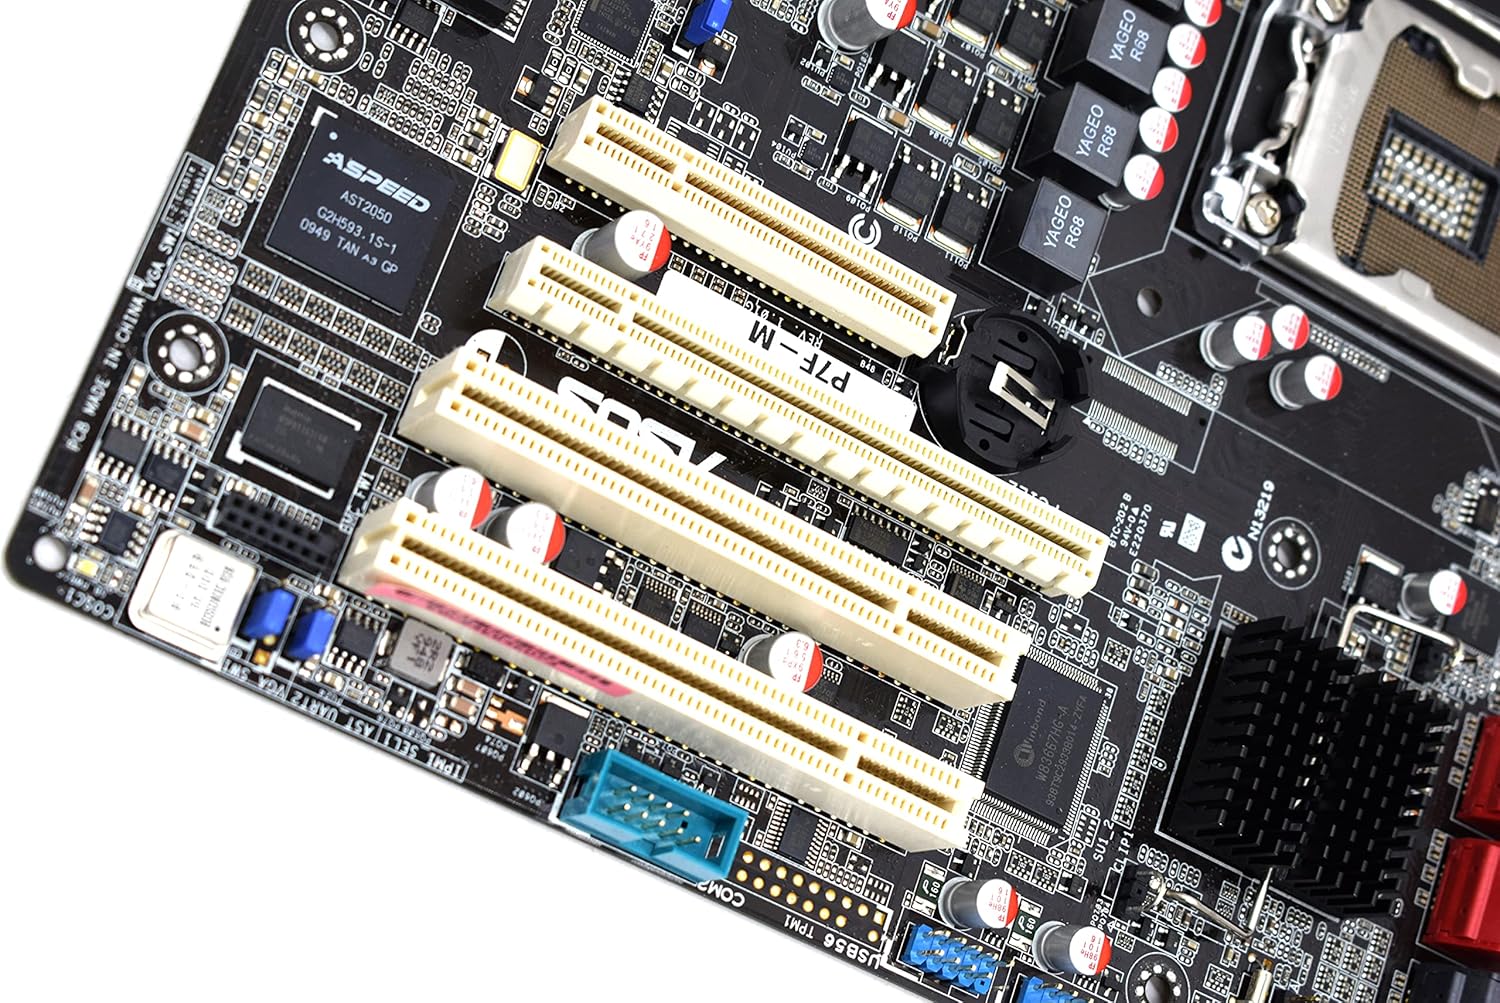
2.4 Instalarea plăcii de expansiune
The motherboard features:
- 1x PCI-Express x16 Slot
- 1x PCI-Express x8 Slot (operates at x4)
- 2x 32bit/33MHz PCI Slots
- Select an appropriate expansion slot for your card.
- Remove the corresponding metal slot cover from your PC case.
- Align the card with the slot and press down firmly until it is securely seated.
- Fixați placa cu un șurub pe carcasa PC-ului.

Imagine: Prim-plan view of the PCI Express and PCI expansion slots on the ASUS P7F-M motherboard.
2.5 Conectarea dispozitivului de stocare
Connect your SATA storage devices (HDDs, SSDs, optical drives) to the SATA ports on the motherboard.

Imagine: Prim-plan view of the SATA ports on the ASUS P7F-M motherboard, typically located near the chipset.
2.6 Conexiuni de alimentare
Connect the 24-pin ATX main power connector and the 8-pin CPU power connector from your power supply unit (PSU) to the corresponding ports on the motherboard.
2.7 Conexiuni la panoul din spate
Connect peripherals to the rear I/O ports:
- Porturi USB: 2.0 For keyboards, mice, and other USB devices.
- Porturi PS/2: For legacy PS/2 keyboards and mice.
- RJ45 LAN Ports: Pentru conectivitate la rețea.
- Port serial: For serial devices.
- Port VGA: For video output to a monitor.
3. Instrucțiuni de utilizare
3.1 Pornirea inițială
After all components are installed and connected, connect the power cable to your PSU and press the power button on your PC case. The system should initiate the Power-On Self-Test (POST).
3.2 Configurarea BIOS/UEFI
During POST, press the designated key (usually DEL or F2) to enter the BIOS setup utility. Here you can configure system settings, boot order, and monitor hardware status.
3.3 Instalarea driverului
After installing your operating system, install the necessary drivers for the motherboard chipset, LAN, and any other integrated components. These drivers are typically provided on a support CD or available for download from the ASUS website-ul.
4. Întreținere
4.1 Curățare
Curățați periodic interiorul computerului pentru a preveni acumularea de praf, care poate duce la supraîncălzire și defectarea componentelor. Folosiți aer comprimat pentru a îndepărta praful de pe ventilatoare, radiatoare și alte componente. Asigurați-vă că sistemul este oprit și deconectat de la priză înainte de curățare.
4.2 Actualizări BIOS
Verificați periodic asistența ASUS website for updated BIOS versions. BIOS updates can improve system stability, add support for new hardware, or fix bugs. Follow the instructions provided by ASUS carefully when performing a BIOS update to avoid system damage.
5. Depanare
If you encounter issues with your ASUS P7F-M motherboard, consider the following troubleshooting steps:
- Fără putere: Ensure all power cables (24-pin ATX, 8-pin CPU) are securely connected. Verify the PSU is functioning correctly.
- Fără afișare: Check that the monitor is connected to the correct video output (VGA on the motherboard or a dedicated graphics card). Reseat the graphics card and memory modules.
- Instabilitatea sistemului: This can be caused by incompatible memory, insufficient power, or overheating. Verify memory compatibility and check CPU/case fan operation.
- Coduri sonore POST: Listen for beep codes during startup. Refer to the ASUS website or a general BIOS beep code guide to diagnose the issue.
- Probleme de detectare a componentelor: Ensure all components (CPU, RAM, expansion cards, storage drives) are properly seated and connected.
For further assistance, consult the ASUS support website-ul sau contactați asistența lor tehnică.
6. Specificații
Below are the detailed technical specifications for the ASUS P7F-M Motherboard:
| Caracteristică | Caietul de sarcini |
|---|---|
| Soclu CPU | LGA 1156 |
| Procesoare compatibile | Intel Quad Core Xeon 3400 series, Core i7-800, Core i5-700, Core i3 series |
| Chipset | Intel 3420 PCH Chipset |
| Sloturi de memorie | 4x DDR3 DIMMs |
| Tip de memorie | DDR3-1333/1066, Dual Channel, Un-buffered, ECC/non-ECC |
| Capacitate maximă de memorie | 16 GB |
| Sloturi PCI-Express x16 | 1 |
| Sloturi PCI-Express x8 | 1 (runs in x4 mode) |
| Sloturi PCI | 2x 32bit/33MHz |
| Controler LAN | Intel 82574L Dual Port Gigabit LAN controller, 1x Management LAN |
| Porturi USB 2.0 | 7 (2 rear, 5 via header) |
| PS/2 Ports | 2 |
| Porturi LAN RJ45 | 3 |
| Porturi seriale | 2 (1 rear, 1 via header) |
| Port VGA | 1 |
| Conector principal de alimentare | 1x 24-pini |
| Conector de alimentare CPU | 1x 8-pini |
| Factor de formă | Micro ATX |
| Dimensiuni | 13.3 x 11.1 x 3.1 inci (Pachet) |
| Greutatea articolului | 1.5 lire sterline |
7. Garanție și asistență
For information regarding the product warranty, please refer to the warranty card included with your motherboard or visit the official ASUS website. ASUS provides technical support and resources, including driver downloads, FAQs, and contact information, on their support portal.
Suport ASUS Website: https://www.asus.com/support/


