
1. Introducere
Thank you for choosing the Hama Usedom Weather Station. This device provides digital display of indoor and outdoor temperature, humidity, time, date, and a weather forecast. It features a DCF radio-controlled clock for automatic time adjustment and a frost alarm. Please read this instruction manual carefully before initial use to ensure proper operation and safety.
2. Instrucțiuni de siguranță
- Protejați produsul de murdărie, umiditate și supraîncălzire.
- Nu scăpați produsul și nu îl expuneți la șocuri puternice.
- Nu deschideți dispozitivul și nu continuați să îl utilizați dacă este deteriorat.
- Nu lăsați acest produs, ca toate produsele electrice, la îndemâna copiilor.
- Aruncați imediat materialul de ambalare conform reglementărilor locale aplicabile.
- Nu modificați produsul în niciun fel. Procedând astfel, se anulează garanția.
- Utilizați produsul numai în scopul pentru care a fost destinat.
- Nu utilizați produsul în imediata apropiere a radiatoarelor sau a altor surse de căldură sau în lumina directă a soarelui.
3. Conținutul pachetului
Please check that the package contains the following items:
- 1x Hama Usedom Weather Station (Main Unit)
- 1x Senzor exterior
- 1x unitate de alimentare
- 2x AA Mignon Batteries (for sensor)
- 1x manual de instrucțiuni

Image: The main weather station unit, the outdoor sensor, and the power adapter included in the package.
4. Produs terminatview
4.1 unitate principală

Image: Front display of the weather station, showing various readings and icons.
- Afișare timp
- Date and Day display
- Pictograme pentru prognoza meteo
- Afișaj de temperatură interioară și umiditate
- Afișajul temperaturii și umidității exterioare
- Frost alarm indicator
- DCF radio signal indicator
4.2 Back Panel Controls
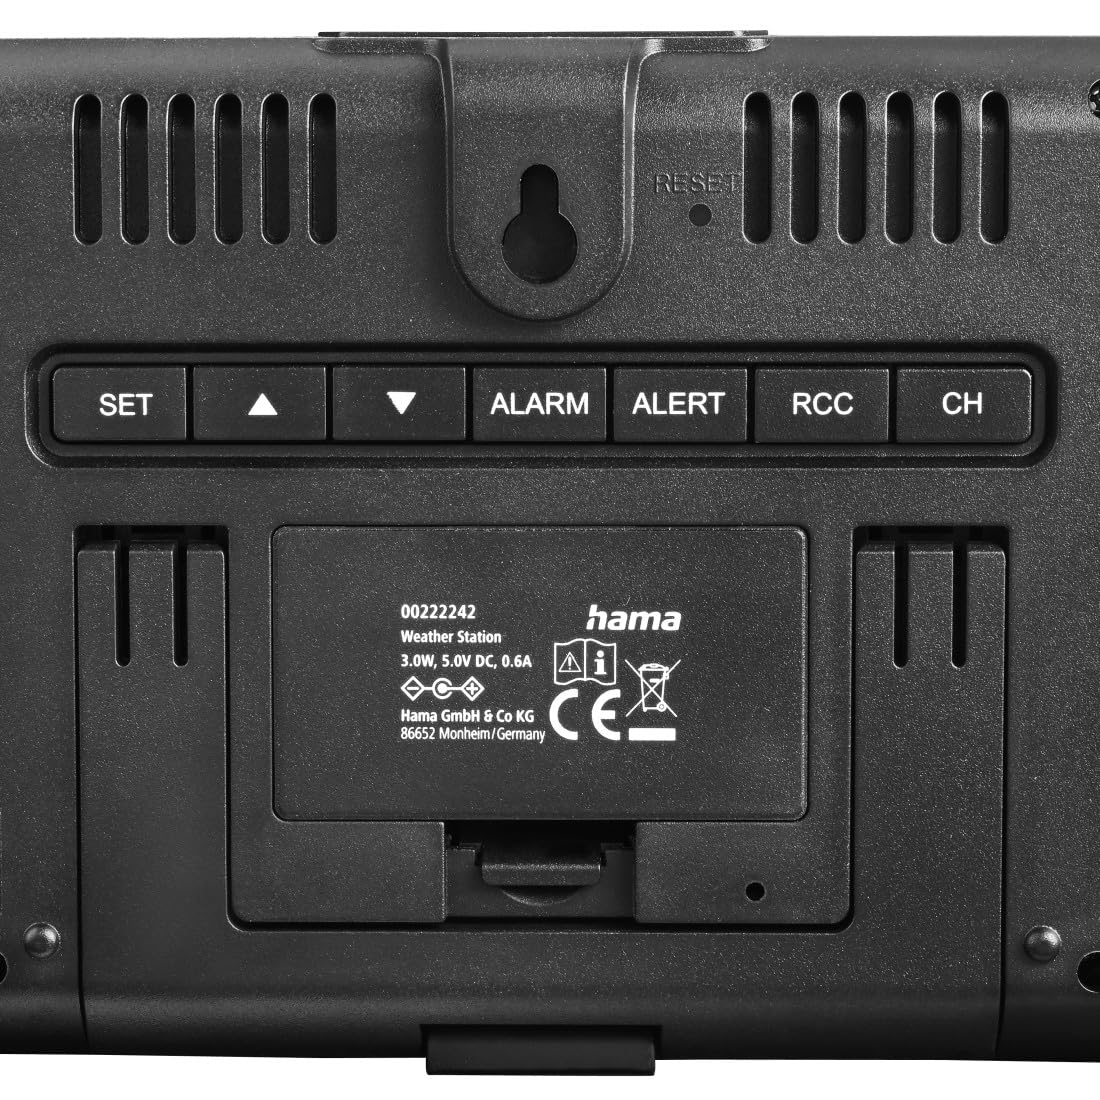
Imagine: Spate view of the main unit, highlighting the control buttons and power input.
- SET button: Enters setting mode.
- ▲ (UP) button: Increases values, navigates menus.
- ▼ (DOWN) button: Decreases values, navigates menus.
- ALARMA button: Sets or activates/deactivates alarm.
- ALERTA button: Sets temperature alerts.
- RCC button: Manually initiates DCF signal reception.
- CH button: Switches between outdoor sensor channels.
- RESET button: Resets the device to factory settings (use a thin object to press).
- SNOOZE / LUMINĂ button (top): Activates backlight, snoozes alarm.

Image: Close-up of the SNOOZE/LIGHT button on top of the main unit.
4.3 Senzor exterior
The outdoor sensor measures external temperature and humidity and transmits data wirelessly to the main unit.

Image: The outdoor sensor positioned on a window sill.
5. Configurare
5.1 Instalarea bateriei (senzor exterior)
- Deschideți compartimentul bateriilor din spatele senzorului exterior.
- Insert the two AA Mignon batteries, ensuring correct polarity (+/-).
- Închideți bine compartimentul bateriei.
5.2 Alimentarea unității principale
The main unit can be powered via the included power supply unit.
- Connect the power supply unit to the main unit's power input.
- Conectați unitatea de alimentare la o priză adecvată.
- The display will light up, and the unit will begin searching for the DCF signal and outdoor sensor.
Nota: The main unit can also use 2x AA batteries (not included) for backup power, but it is primarily designed to be powered by the adapter for continuous display illumination.
5.3 Sincronizare inițială
After powering on, the weather station will automatically attempt to synchronize with the DCF radio signal and connect to the outdoor sensor.
- Place the main unit and outdoor sensor close to each other during initial setup.
- The DCF signal icon will flash during reception. Once successful, the icon will appear solid, and the correct time will be displayed. This process may take several minutes.
- The outdoor temperature and humidity will appear on the display once the sensor connects.
5.4 Amplasarea senzorilor exteriori
For accurate outdoor readings, consider the following:
- Mount the outdoor sensor in a shaded, dry location, protected from direct sunlight and rain.
- Avoid placing it near heat sources (e.g., vents, windows that get direct sun) or large metal objects that could interfere with the signal.
- Ensure the sensor is within the effective transmission range (typically up to 30 meters in open areas) of the main unit.
6. Funcționarea stației meteo
6.1 Afișează informații
The main display shows:
- Ora și data: Automatically set by the DCF signal.
- Temperatura/umiditatea interioară: Măsurat de unitatea principală.
- Temperatura/umiditatea exterioară: Received from the outdoor sensor.
- Prognoza meteo: Based on atmospheric pressure changes, displayed with icons (sunny, partly cloudy, cloudy, rainy).
- Alarmă de îngheț: An icon will appear when the outdoor temperature is between -1°C and +1°C.
6.2 Setarea manuală a orei și datei
If the DCF signal is not available or you wish to set the time manually:
- Țineți apăsat butonul SET timp de aproximativ 3 secunde pentru a intra în modul de setare.
- The setting value will flash. Use the ▲ or ▼ butoane pentru a regla valoarea.
- Presa SET again to confirm the setting and move to the next parameter (e.g., 12/24 hour format, hour, minute, year, month, day, temperature unit °C/°F).
- After setting all parameters, press SET pentru a ieși din modul de setare.
6.3 Setarea alarmei
- Apăsați tasta ALARMA apăsați butonul o dată pentru a afișa ora alarmei.
- Țineți apăsat butonul ALARMA button for approximately 3 seconds to enter alarm setting mode.
- Utilizați ▲ or ▼ butoane pentru a regla ora și minutul.
- Presa ALARMA pentru a confirma fiecare setare.
- Pentru a activa/dezactiva alarma, apăsați butonul ALARMA button repeatedly until the alarm icon appears/disappears.
6.4 Snooze and Backlight
Apăsați tasta SNOOZE / LUMINĂ button on the top of the unit:
- When an alarm sounds, press this button to activate the snooze function (alarm will sound again after a few minutes).
- At any other time, press this button to temporarily illuminate the display backlight.
6.5 Setarea alertei de temperatură
The device allows setting alerts for specific outdoor temperatures.
- Apăsați tasta ALERTA button to cycle through alert settings (e.g., high temperature alert, low temperature alert).
- Țineți apăsat butonul ALERTA button to enter alert setting mode.
- Utilizare ▲ or ▼ to adjust the desired temperature threshold.
- Presa ALERTA pentru a confirma și a trece la următoarea setare.
- To activate/deactivate an alert, press ALERTA repeatedly until the alert icon appears/disappears.
7. Întreținere
- Curăţaţi acest produs numai cu un uşor damp, cârpă fără scame și nu utilizați agenți de curățare agresivi.
- Asigurați-vă că nu pătrunde apă în produs.
- Replace batteries in the outdoor sensor when the low battery indicator appears on the main unit.
- If the product is not used for an extended period, remove the batteries.
8. Depanare
| Problemă | Cauza posibila | Soluţie |
|---|---|---|
| Nu apare afișaj pe unitatea principală. | Fără curent sau baterii descărcate. | Ensure power adapter is connected or replace backup batteries. |
| Outdoor readings not displayed or incorrect. | Senzor în afara razei de acțiune, baterii descărcate ale senzorului sau interferențe. | Move sensor closer, replace sensor batteries, or reposition to avoid interference. Press CH button to re-sync. |
| DCF time not synchronizing. | Semnal slab, interferențe sau setare incorectă a fusului orar. | Move unit to a window, away from electronics. Manually initiate DCF search with RCC button. Set time manually if necessary. |
| Prognoza meteo pare inexactă. | Weather forecasts are based on atmospheric pressure changes and are estimates. | This is normal. The forecast is a prediction based on local pressure trends, not a satellite forecast. |
9. Specificații
| Numărul de model | 00222242 |
| Tip de afișare | LED (VA Display) |
| Sursă de alimentare (unitate principală) | Power Adapter (5.0V DC, 0.6A), 2x AA Mignon Batteries (backup) |
| Sursă de alimentare (senzor) | 2x AA Mignon Batteries (included) |
| Tehnologia de conectivitate | Frecvență radio (433 MHz) |
| Precizia temperaturii | ±0.5 °C |
| Caracteristici speciale | DCF Radio Controlled Clock, Frost Alarm, Adjustable Brightness, Large Display |
| Dimensiuni (unitatea principală) | Aprox. 15.6 cm (lățime) x 11.4 cm (înălțime) x 3.1 cm (adâncime) |
| Dimensiuni (senzor) | Aprox. 4.4 cm (lățime) x 10.2 cm (înălțime) x 3 cm (adâncime) |

Image: Dimensional drawing of the main unit and outdoor sensor.
10. Garanție și asistență
Hama GmbH & Co KG oferă garanție de la producător pentru acest produs. Pentru condiții detaliate de garanție, vă rugăm să consultați cardul de garanție inclus împreună cu produsul sau să vizitați site-ul oficial Hama. website-ul.
For technical support or service inquiries, please contact your local Hama customer service or visit www.hama.com pentru mai multe informații.


