1. Introducere
Thank you for choosing the KEENSTAR 20Bar Espresso Machine. This manual provides essential information for the safe operation, maintenance, and troubleshooting of your new espresso machine. Please read it thoroughly before first use and keep it for future reference.
2. Instrucțiuni importante de siguranță
- Citiți toate instrucțiunile înainte de a utiliza aparatul.
- Nu atingeți suprafețele fierbinți. Folosiți mânere sau butoane.
- Pentru a vă proteja împotriva incendiilor, șocurilor electrice și rănirii persoanelor, nu scufundați cablul, ștecherele sau aparatul în apă sau alt lichid.
- Este necesară supravegherea atentă atunci când orice aparat este folosit de copii sau în apropierea acestora.
- Deconectați de la priză atunci când nu este utilizat și înainte de curățare. Lăsați să se răcească înainte de a pune sau scoate piesele și înainte de a curăța aparatul.
- Nu utilizați niciun aparat cu cablul sau ștecherul deteriorat sau după ce aparatul funcționează defectuos sau a fost deteriorat în vreun fel.
- Utilizarea accesoriilor nerecomandate de producătorul aparatului poate duce la incendiu, electrocutare sau rănirea persoanelor.
- Nu utilizați în aer liber.
- Nu lăsați cablul să atârne peste marginea mesei sau a blatului și nu atingeți suprafețele fierbinți.
- Nu așezați pe sau lângă un arzător electric sau cu gaz fierbinte sau într-un cuptor încălzit.
- Conectați întotdeauna mai întâi ștecherul la aparat, apoi conectați cablul la priza de perete. Pentru a deconecta, rotiți orice control în poziția „oprit”, apoi scoateți ștecherul din priză.
- Nu utilizați aparatul pentru alte utilizări decât cele prevăzute.
- Procedați cu mare precauție când aruncați aburul fierbinte.
- Acest aparat este doar pentru uz casnic.
3. Conținutul pachetului
Vă rugăm să verificați conținutul pachetului la despachetare pentru a vă asigura că toate articolele sunt prezente și nedeteriorate.
Imagine: All components included in the KEENSTAR 20Bar Espresso Machine package. This includes the main unit, portafilter with handle, single and double shot filters, coffee spoon with tamper, and a removable drip tray. The water tank and steam nozzle are also visible.
- KEENSTAR 20Bar Espresso Machine Main Unit
- Mâner portafiltru
- 1-Shot Filter Basket
- 2-Shot Filter Basket
- Lingură de cafea cu Tamper
- Tavă de picurare detașabilă
- Manual de utilizare
4. Produs terminatview
Familiarizează-te cu diferitele părți ale espressorului tău.

Imagine: Faţă view of the KEENSTAR 20Bar Espresso Machine, showcasing its sleek stainless steel design and key operational areas.
- Rezervor de apă: Detachable, 1.1 Liter capacity. Located at the back of the machine.
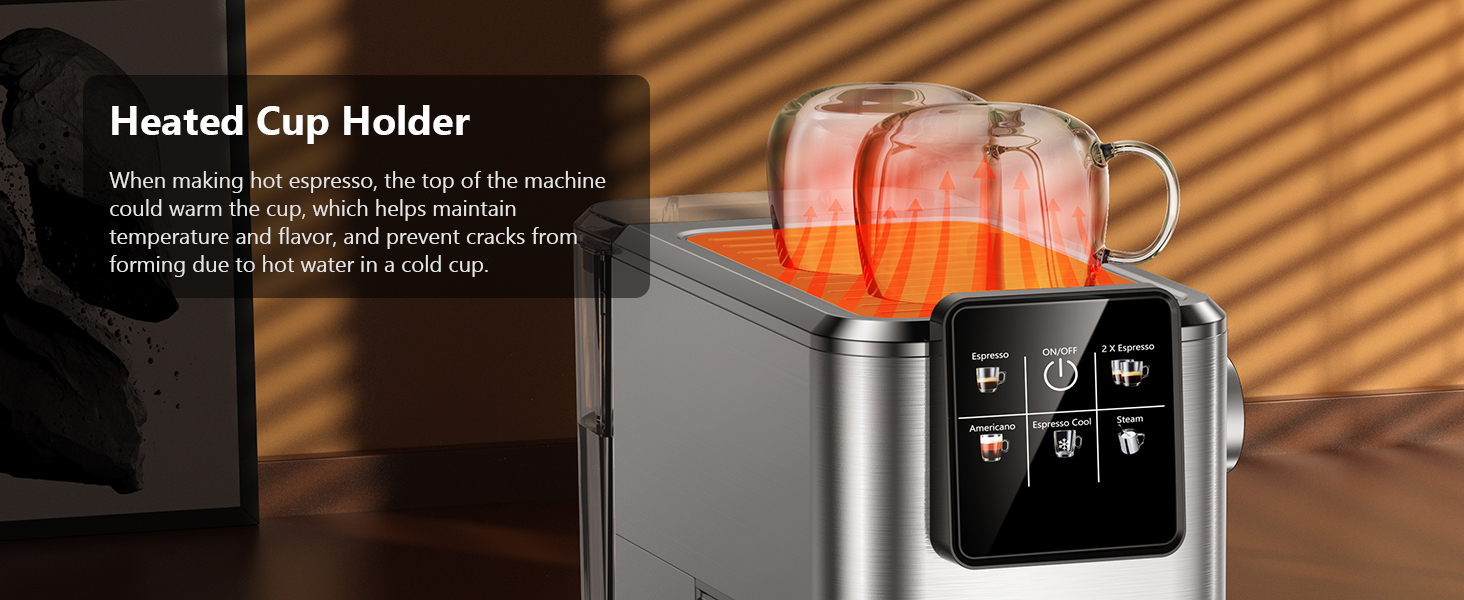
- Panou de control: Intuitive touch screen for selecting brew options (Espresso, Americano, Espresso Cool, Steam, ON/OFF, 2X Espresso).
- Portafiltru: Conține cafea măcinată pentru preparare.
- Duză de abur: For frothing milk for lattes and cappuccinos. Features a 360-degree rotation.
- Tavă de scurgere: Detasabil pentru curatare usoara.
- Heated Cup Holder: Located on top of the machine to warm cups, maintaining coffee temperature.
5. Configurare
5.1 Initial Use and Priming
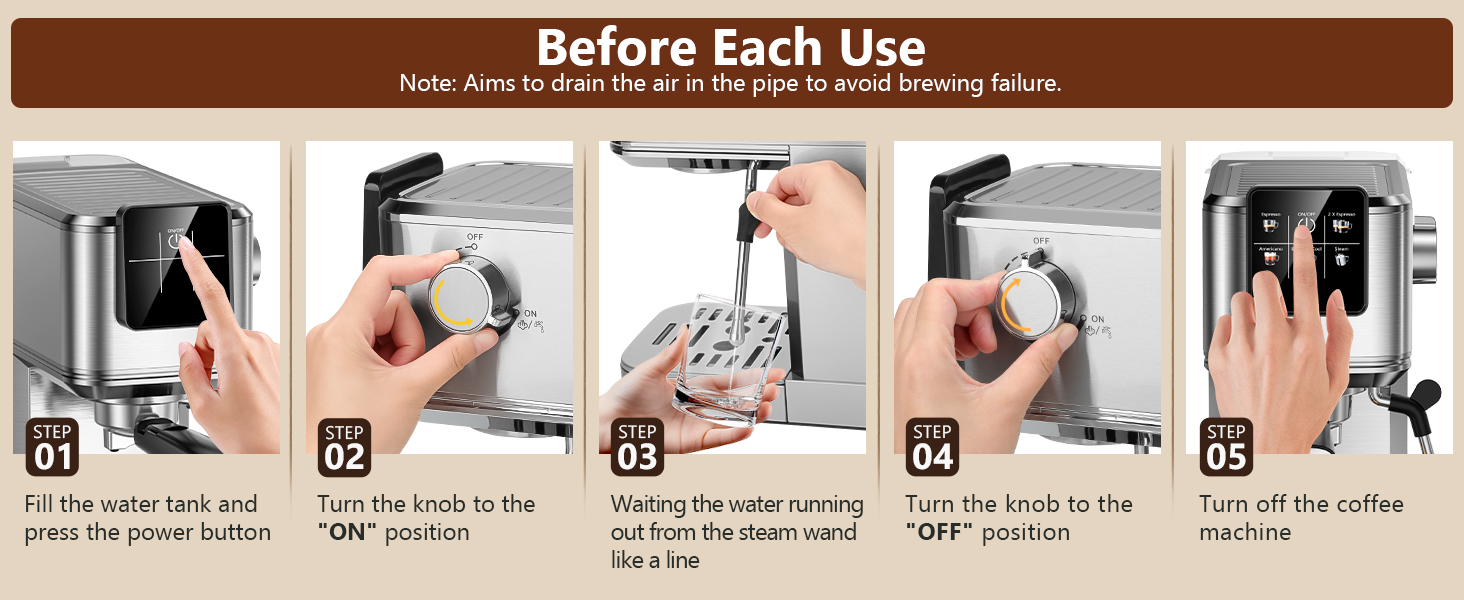
Before first use, or if the machine has not been used for a long time, it is essential to prime the system to ensure proper operation and remove any air from the pipes.
- Fill the water tank with fresh water and place it back into the machine. Ensure the tank cover is properly closed.
- Plug the machine into a power outlet. The ON/OFF button on the touch screen will illuminate.
- Press the ON/OFF button to turn on the machine. The indicator lights will blink as the machine preheats.
- Once the indicator lights are steady, the machine is ready.
- Puneți o cană goală sub bagheta de abur.
- Turn the steam knob to the "ON" position. Water will run out from the steam wand like a line. Let it run for about 10-15 seconds to purge air.
- Turn the steam knob to the "OFF" position.
- Press the ON/OFF button to turn off the machine. The machine is now primed and ready for use.

Imagine: Visual steps for priming the espresso machine before its first use or after a period of inactivity. This process drains air from the internal pipes.
5.2 Umplere rezervor de apă
The water tank has a maximum capacity of 1200ml. Do not exceed the maximum fill line to prevent overflow.
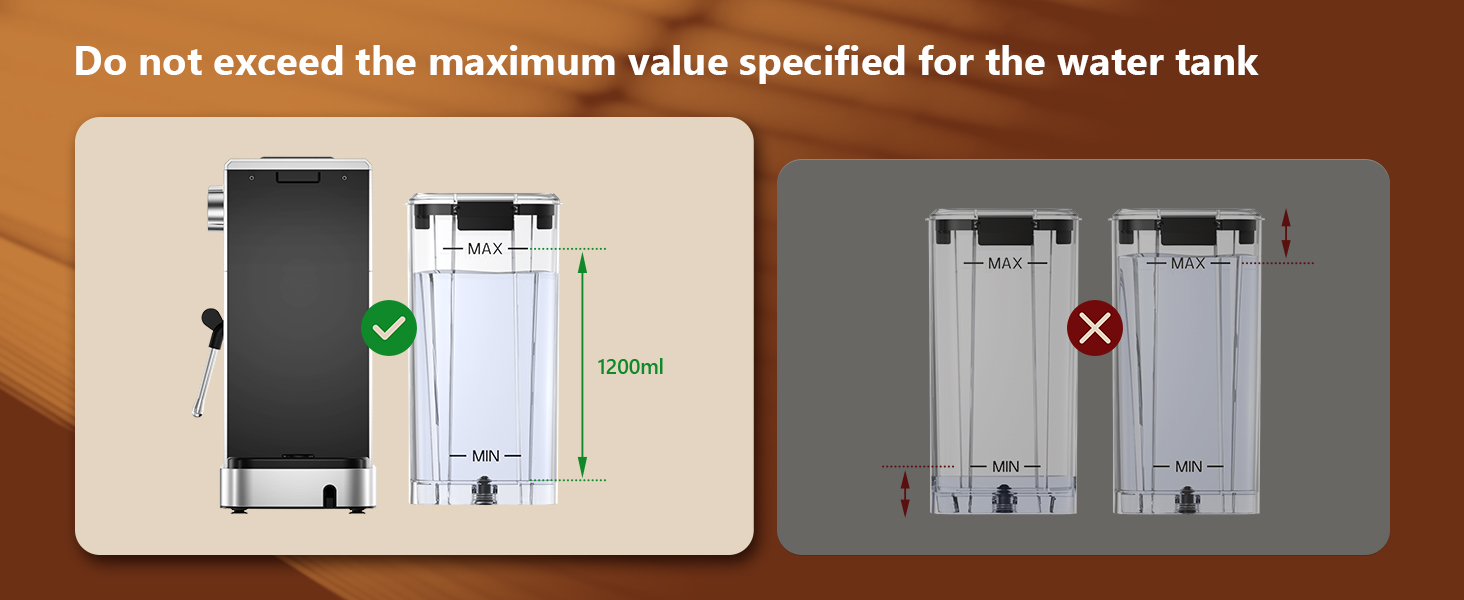
Imagine: Guidance on filling the water tank, indicating the 1200ml maximum fill level to avoid overfilling.
6. Instrucțiuni de utilizare
6.1 Prepararea espressoului
The machine features a 20-bar pressure system and pre-soak technology for rich espresso extraction.
- Ensure the steam knob is set to the "OFF" position before brewing coffee.
- Fill the water tank with fresh water and press the ON/OFF button to power on. Wait for the indicator to become steady, signifying preheating is complete.
- Select the appropriate filter basket (1-shot or 2-shot) and place it into the portafilter.
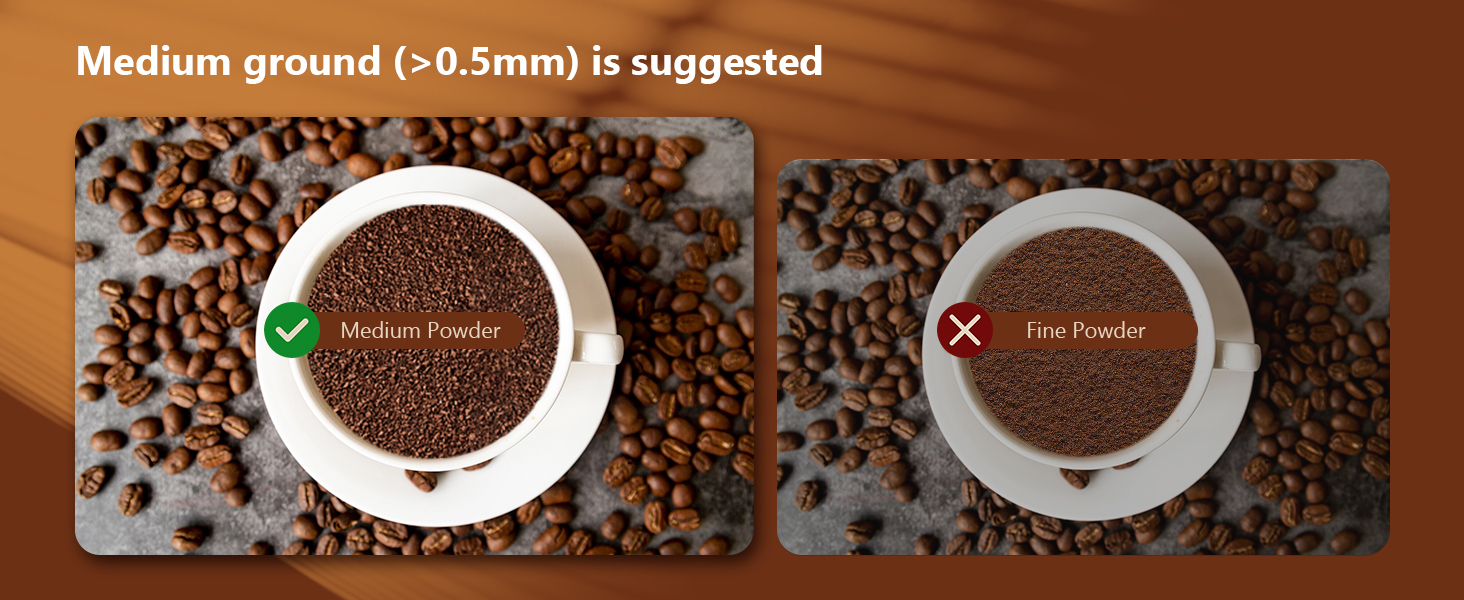
- Add ground coffee to the filter basket. Use medium ground coffee (greater than 0.5mm) for optimal results.
- Tamp the ground coffee firmly and evenly using the coffee tamper.
- Attach the portafilter to the machine, ensuring it is fully locked into place.
- Așezați ceștile pe tava de scurgere de sub portafiltru.
- Select "Espresso" for a single shot or "2 X Espresso" for a double shot on the touch screen. The machine will begin brewing.
- După ce prepararea cafelei este completă, aparatul se va opri automat.

Imagine: Step-by-step visual instructions for brewing espresso, from preparing the machine to the final extraction.
Imagine: Illustration demonstrating the correct way to lock the portafilter before brewing to prevent leaks and ensure proper extraction.

Imagine: Recommended coffee grind size (medium, >0.5mm) for optimal espresso extraction, contrasting it with fine ground coffee.
6.2 Making Cold Brew Espresso
This machine offers a rapid cold brew function, producing smooth cold brew in as little as 10 minutes.
- Ensure the water tank is filled with iced water for the cold brew function.
- Prepare the portafilter with ground coffee as described in Section 6.1.
- Attach the portafilter to the machine and place a cup underneath.
- Select "Espresso Cool" on the touch screen. The machine will begin the cold brew process.
- Enjoy your rapid cold brew espresso.

Imagine: The espresso machine preparing cold brew, emphasizing the requirement for iced water in the tank.
6.3 Spumarea laptelui
The powerful steam wand allows you to create creamy microfoam for lattes and cappuccinos.
- Fill the water tank with fresh water and press the ON/OFF button to power on.
- Press the "Steam" button on the touch screen to preheat the steam function. The indicator will blink during preheating and become steady when ready.
- After preheating, turn the steam knob to the "ON" position to release any remaining water in the pipe before frothing.
- Insert the steam nozzle approximately 1 inch into the surface of your milk.
- Gradually turn the steam knob to increase steam until the desired foam consistency is achieved.
- Once finished, turn the steam knob to the "OFF" position and clean the steam wand immediately.
Imagine: Visual instructions for frothing milk, detailing the steps from preheating to creating microfoam.
7. Întreținere și curățare
Curățarea regulată asigură longevitatea și performanța optimă a espressorului dumneavoastră.
- Curatenie generala: Ștergeți exteriorul mașinii cu reclamăamp pânză. Nu utilizați substanțe de curățare abrazive sau de curățat.
- Tavă de scurgere: The removable drip tray should be emptied and cleaned regularly.
- Portafiltru și coșuri de filtrare: După fiecare utilizare, scoateți portafiltrul și aruncați zațul de cafea folosit. Clătiți portafiltrul și coșul filtrului sub jet de apă.
- Duză de abur: Imediat după spumarea laptelui, ștergeți duza de abur cu un strat de abur.amp cloth to prevent milk residue from drying. Purge steam briefly to clear any internal blockages.
- Rezervor de apă: Curățați periodic rezervorul de apă cu un detergent blând și clătiți bine.
- Detartraj: Depending on water hardness, descale the machine every 2-3 months. Follow the instructions provided with a suitable descaling solution.

Imagine: Important cleaning instruction: All accessories must be washed by hand and are not dishwasher safe.
8. Depanare
Consultați această secțiune pentru probleme frecvente și soluțiile aferente.
| Problemă | Cauza posibila | Soluţie |
|---|---|---|
| Nu se distribuie cafea / Debit lent |
|
|
| Water leaks from portafilter edge |
|
|
| Duza de abur nu produce abur |
|
|
| Cafeaua nu este suficient de fierbinte |
|
|
9. Specificații
- Marca: KEENSTAR
- Nume model: JH-C5210
- Sistem de presiune: 20 bar
- Putere: 1350W
- Capacitatea rezervorului de apa: 1.1 litri (37 oz)
- Dimensiuni produs: 11.8" D x 12.6" L x 5.5" H
- Greutatea articolului: 4.6 lire sterline
- Material: Oţel inoxidabil
- Caracteristica speciala: Programmable, Touch Screen, Milk Frother, Hot & Rapid Cold Brew
- Tip de intrare cafea: Cafea măcinată
- Tip filtru: Reutilizabil
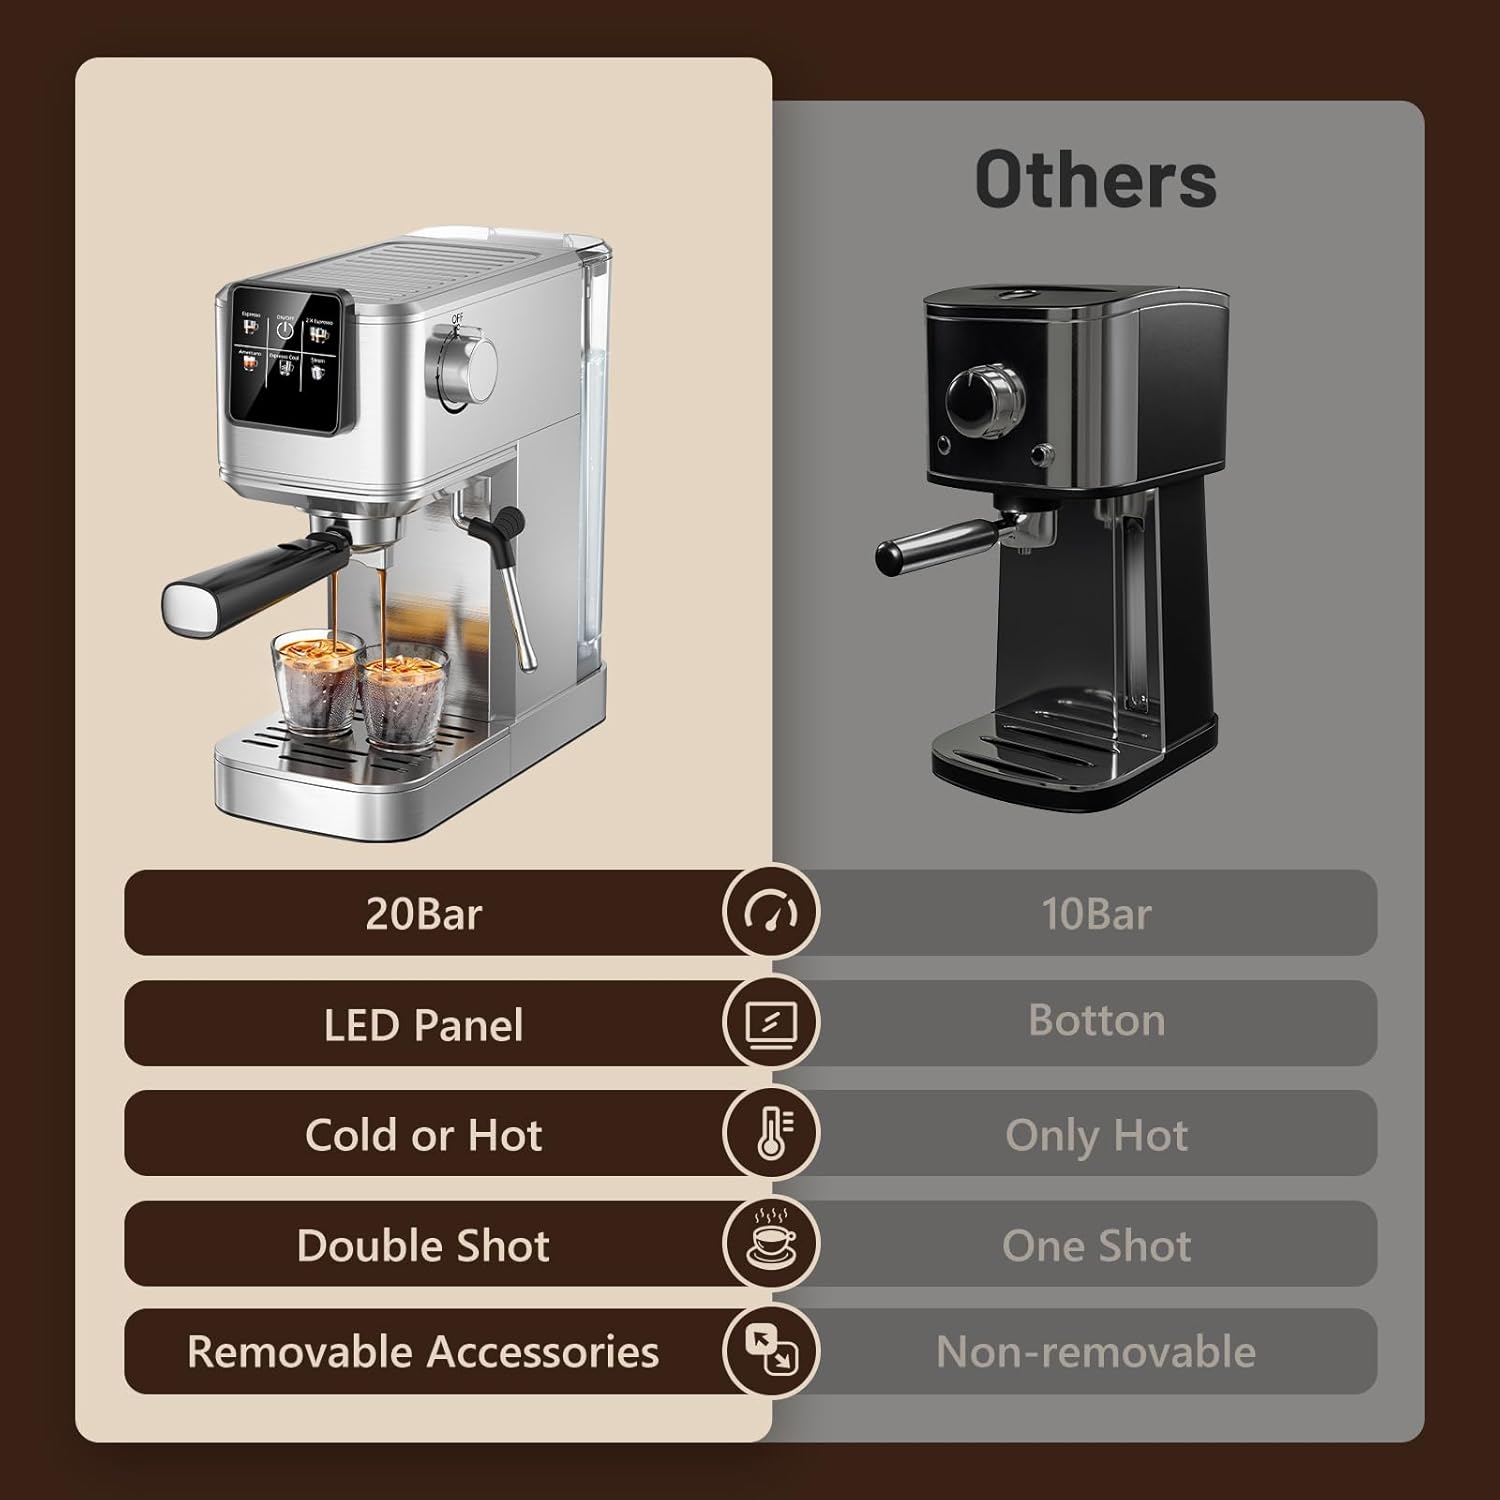
Imagine: Feature comparison of the KEENSTAR machine, emphasizing its 20Bar pressure, LED panel, and versatility for hot and cold beverages.

Imagine: Dimensions of the KEENSTAR espresso machine, indicating its compact size.
10. Garanție și asistență
For warranty information or technical support, please refer to the contact details provided on the product packaging or visit the official KEENSTAR webPăstrați dovada achiziției pentru orice reclamații în garanție.