
1. Introducere și prezentarea produsuluiview
Thank you for choosing the Qidoe 83W PD USB C Car Charger. This device is designed to provide efficient and versatile charging solutions for your electronic devices in a vehicle environment. Featuring a 65W Power Delivery (PD) USB-C port and an 18W Quick Charge 3.0 (QC3.0) USB-A port, it offers a combined output of up to 83W. The charger is compatible with 12V/24V vehicle power systems and includes an intuitive LED digital display for monitoring voltage and current, along with a physical on/off switch and a dustproof flip cover for enhanced durability.
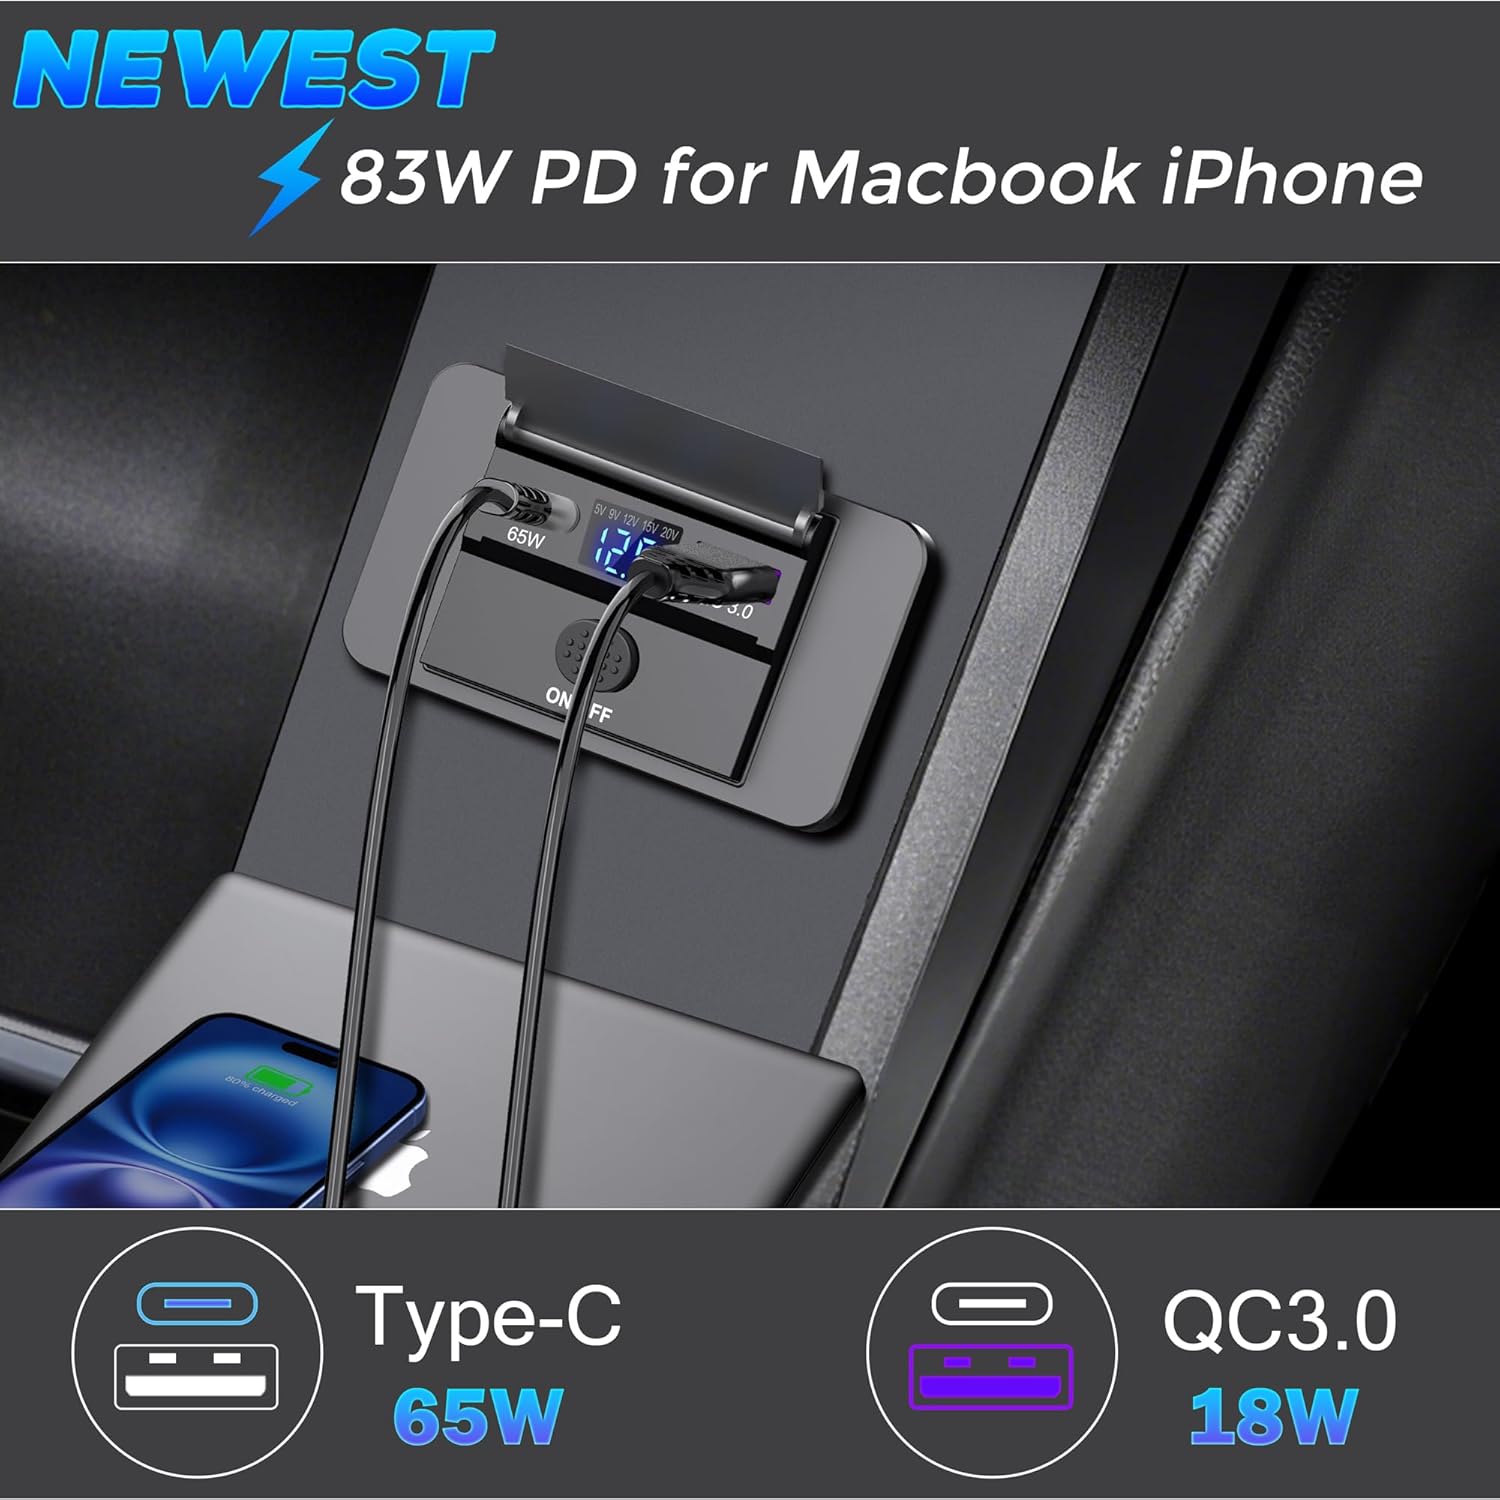
Imaginea 1.1: The Qidoe 83W PD USB C Car Charger in use, demonstrating its dual charging capabilities for a MacBook and an iPhone.
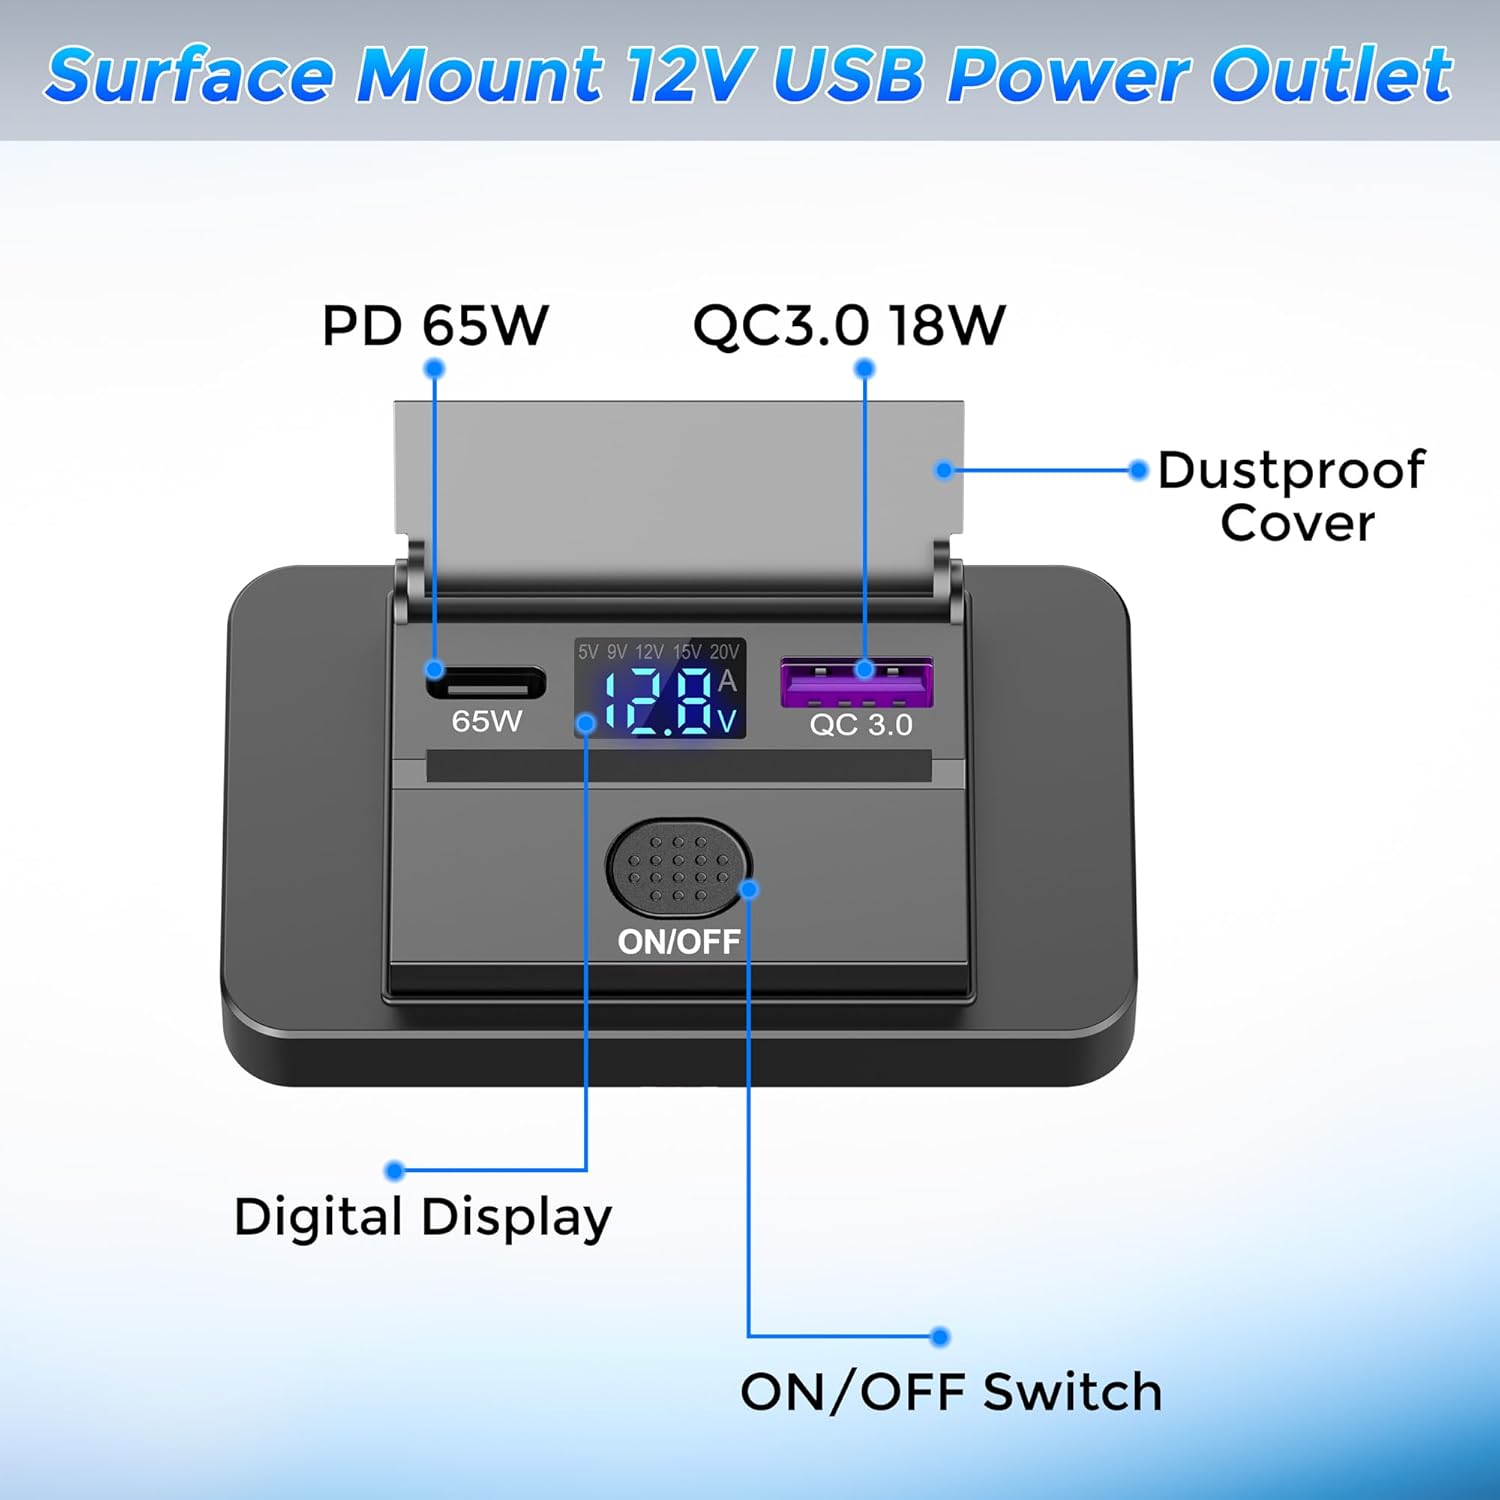
Imaginea 1.2: Detaliat view of the charger's components, including the ports, digital display, and control switch.
2. Configurare și instalare
This charger is designed for surface mounting, requiring minimal modification to your vehicle's interior. Follow these steps for proper installation:
- Pregătiți suprafața de montare: Choose a flat, stable surface in your vehicle for installation.
- Deschide capacul: Carefully open the outer frame/cover of the charger unit.
- Drill Wiring Holes: Drill a small hole (approximately 1.8 cm in diameter, refer to dimensions in Section 5) through the chosen mounting surface to pass the power cables. Ensure the hole is only large enough for the wires, not the entire unit.
- Conectare cablare:
- Conectați fir roșu to the positive (+) terminal of your vehicle's 12V/24V power source.
- Conectați fir negru to the negative (-) terminal or a suitable ground point.
Important: Ensure correct polarity to prevent damage to the charger and your vehicle's electrical system. It is recommended to connect through a fuse (not included) for safety.
- Securizarea unității: Place the main body of the charger onto the mounting surface, aligning the wiring through the drilled hole. Use the provided screws to firmly fix the unit to the surface.
- Închideți capacul: Reattach the outer frame/cover to the main unit. Ensure it snaps securely into place.

Imaginea 2.1: Step-by-step guide for surface mount installation.
3. Instrucțiuni de utilizare
3.1 Pornire/Oprire
- The charger features a physical ON/OFF pressure switch. Press the switch to toggle the power to the USB ports and the digital display.
- When the charger is powered on, the LED digital display will illuminate.

Imaginea 3.1: Demonstrating the ON/OFF function of the charger.
3.2 Using the Charging Ports
- USB-C (PD 65W) Port: Connect your USB-C compatible laptops, tablets, or smartphones to this port for fast charging. The 65W PD3.0 port can boost voltage to 15V and 20V for optimal charging of larger devices.
- USB-A (QC3.0 18W) Port: Connect your Quick Charge 3.0 compatible devices or standard USB devices to this port for efficient charging.
- Puteți încărca două dispozitive simultan folosind ambele porturi.
3.3 Funcționalitatea afișajului digital
- Volumul baterieitage Monitorizare: In standby mode or when only the USB-A port is in use, the display shows the vehicle's battery voltage (V), allowing you to monitor its health.
- Real-time Charging Data: When a device is connected to the 65W USB-C port, the display automatically switches to show the real-time output voltage (V) and current (A) for the PD interface, providing immediate feedback on charging performance.

Imaginea 3.2: The digital display showing vehicle battery voltage and real-time charging output for various devices.
4. Întreținere
- curatenie: Use a soft, dry cloth to clean the surface of the charger. Avoid using abrasive cleaners or solvents.
- Capac rezistent la praf: Keep the flip cover closed when the ports are not in use to protect them from dust and moisture.
- Conditii de mediu: While designed for automotive use, avoid exposing the charger to extreme water or harsh weather conditions.
- Verificarea cablului: Periodically check charging cables for any signs of wear or damage. Replace damaged cables immediately.
5. Depanare
- Încărcătorul nu pornește:
- Ensure the vehicle's ignition is on (if required by your vehicle's wiring).
- Check the ON/OFF switch to ensure it is pressed to the 'ON' position.
- Verify that the red and black wires are correctly connected to the positive and negative terminals, respectively.
- Check the vehicle's fuse for the circuit the charger is connected to. Replace if blown.
- Device Not Charging / Slow Charging:
- Ensure the charging cable is securely connected to both the charger and your device.
- Try a different charging cable to rule out cable issues.
- Confirm your device supports PD (for USB-C) or QC3.0 (for USB-A) for fast charging.
- If charging multiple devices, note that total power output is shared.
- Check the digital display for output voltage and current. If values are unexpectedly low, there might be an issue with the power source or the device being charged.
- Vol. inexacttage Afișaj:
- Ensure the charger is properly connected to a stable 12V/24V power source.
- Fluctuations in vehicle battery voltage are normal, especially during engine start-up or heavy electrical load.
6. Specificații
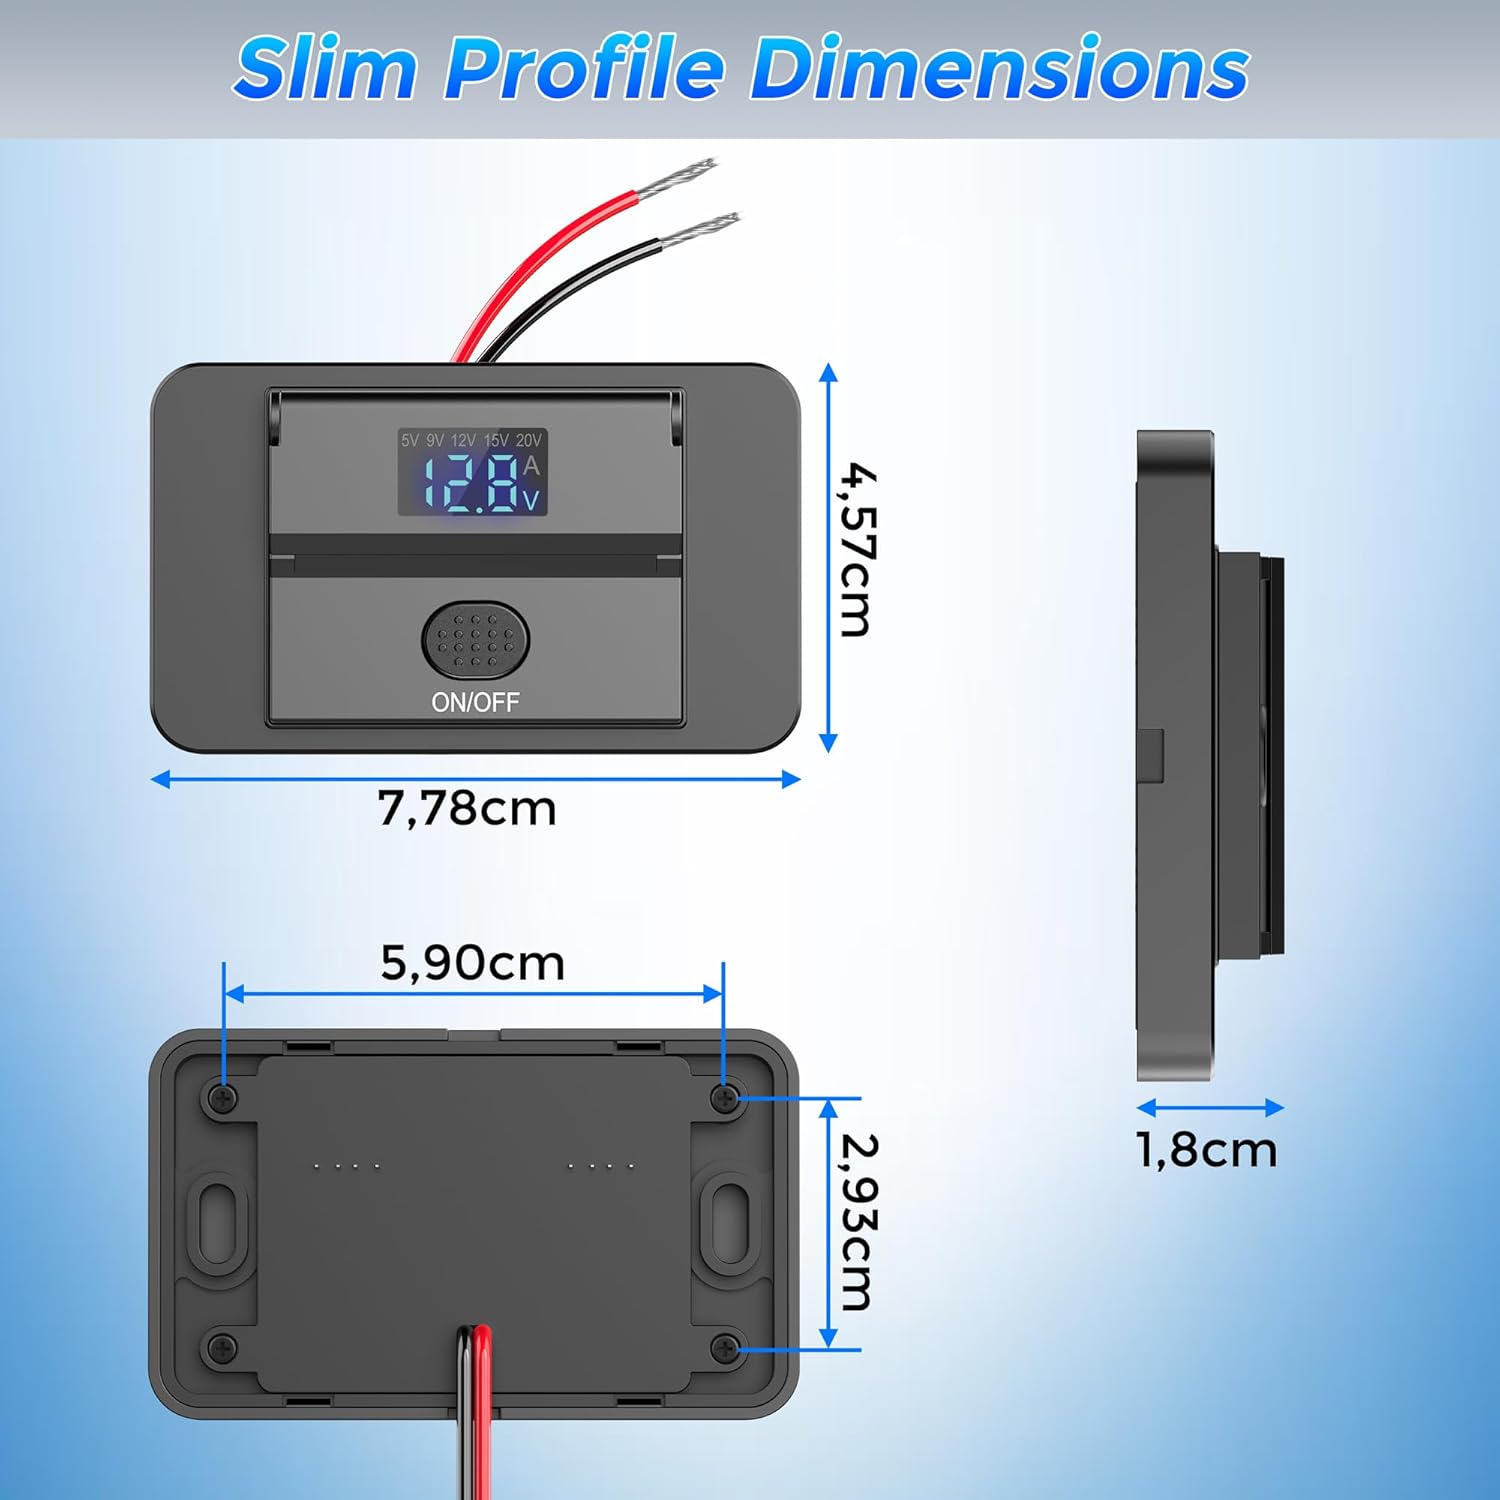
Imaginea 6.1: Physical dimensions of the Qidoe 83W PD USB C Car Charger.
| Caracteristică | Caietul de sarcini |
|---|---|
| Numele modelului | QD1009 |
| Marca | qidoe |
| Putere totală | 83 Watts (Max Combined) |
| Ieșire port USB-C | 65W Power Delivery (PD3.0) |
| Ieșire port USB-A | 18W Quick Charge (QC3.0) |
| Vol. De intraretage | 12 V / 24 V DC |
| Ieșire Voltage (USB-C) | Up to 20 Volts DC |
| Curent de ieșire (Max) | 4.15 A |
| Total porturi USB | 2 (1x USB-C, 1x USB-A) |
| Tip conector | USB tip C, USB tip A |
| Tip de montare | Surface Mount (Dashboard Mount) |
| Caracteristica specială | Fast Charging, Digital Voltage/Current Display, ON/OFF Switch, Dustproof Cover |
| Dispozitive compatibile | Laptopuri, tablete, smartphone-uri |
| Componente incluse | 1 x 65W Surface Mount USB-C Outlet |
| Certificari | CE, FCC |
| Material intern | Plastic |
| Dimensiuni produs (aproximativ) | 7.78 cm (L) x 5.90 cm (L) x 4.57 cm (Î) |
| Dimensiuni pachet | 9.5 x 8.8 x 2.2 cm |
| Greutatea articolului | 51 de grame |
7. Garanție și asistență
The Qidoe 83W PD USB C Car Charger comes with a garanție de un an de la producător.
For any questions, technical assistance, or warranty claims, please contact Qidoe customer service directly via email. Our support team is committed to providing a satisfactory resolution as quickly as possible.
Informații de contact: Please refer to the contact details provided on the product packaging or the official Qidoe website pentru cele mai recente informații de asistență.
8. Compatibilitatea vehiculului
This charger is designed to be compatible with a wide range of 12V-24V vehicles, including:
- Mașini
- Furgonete
- Autocaravane
- Camioane
- Autobuze
- Bărci
- Motociclete

Imaginea 8.1: Examples of compatible vehicles for the Qidoe car charger.