
Introducere
This manual provides detailed instructions for setting up and operating your VEDINDUST KVM HDMI Switch 2x2. This device allows you to control two computers or laptops using a single set of keyboard and mouse, while sharing two monitors and up to four USB devices. It supports high resolutions up to 8K@60Hz and 4K@120Hz, with backward compatibility for lower resolutions. Please read this manual thoroughly before use to ensure proper installation and functionality.
Conținutul pachetului
Vă rugăm să verificați dacă toate articolele enumerate mai jos sunt incluse în pachetul dumneavoastră:
- 1 x VEDINDUST KVM HDMI Switch 2x2
- 1 x Desktop Control (Wired Remote)
- 2 x USB 3.0 A to USB-C Cables
- 1 x Adaptor de alimentare DC12V
- 1 x Manual de utilizare

Image: Contents of the VEDINDUST KVM HDMI Switch package, showing the KVM switch unit, a wired desktop controller, two USB-A to USB-C cables, a DC12V power adapter, and a printed user manual.
Produs terminatview
Panoul frontal
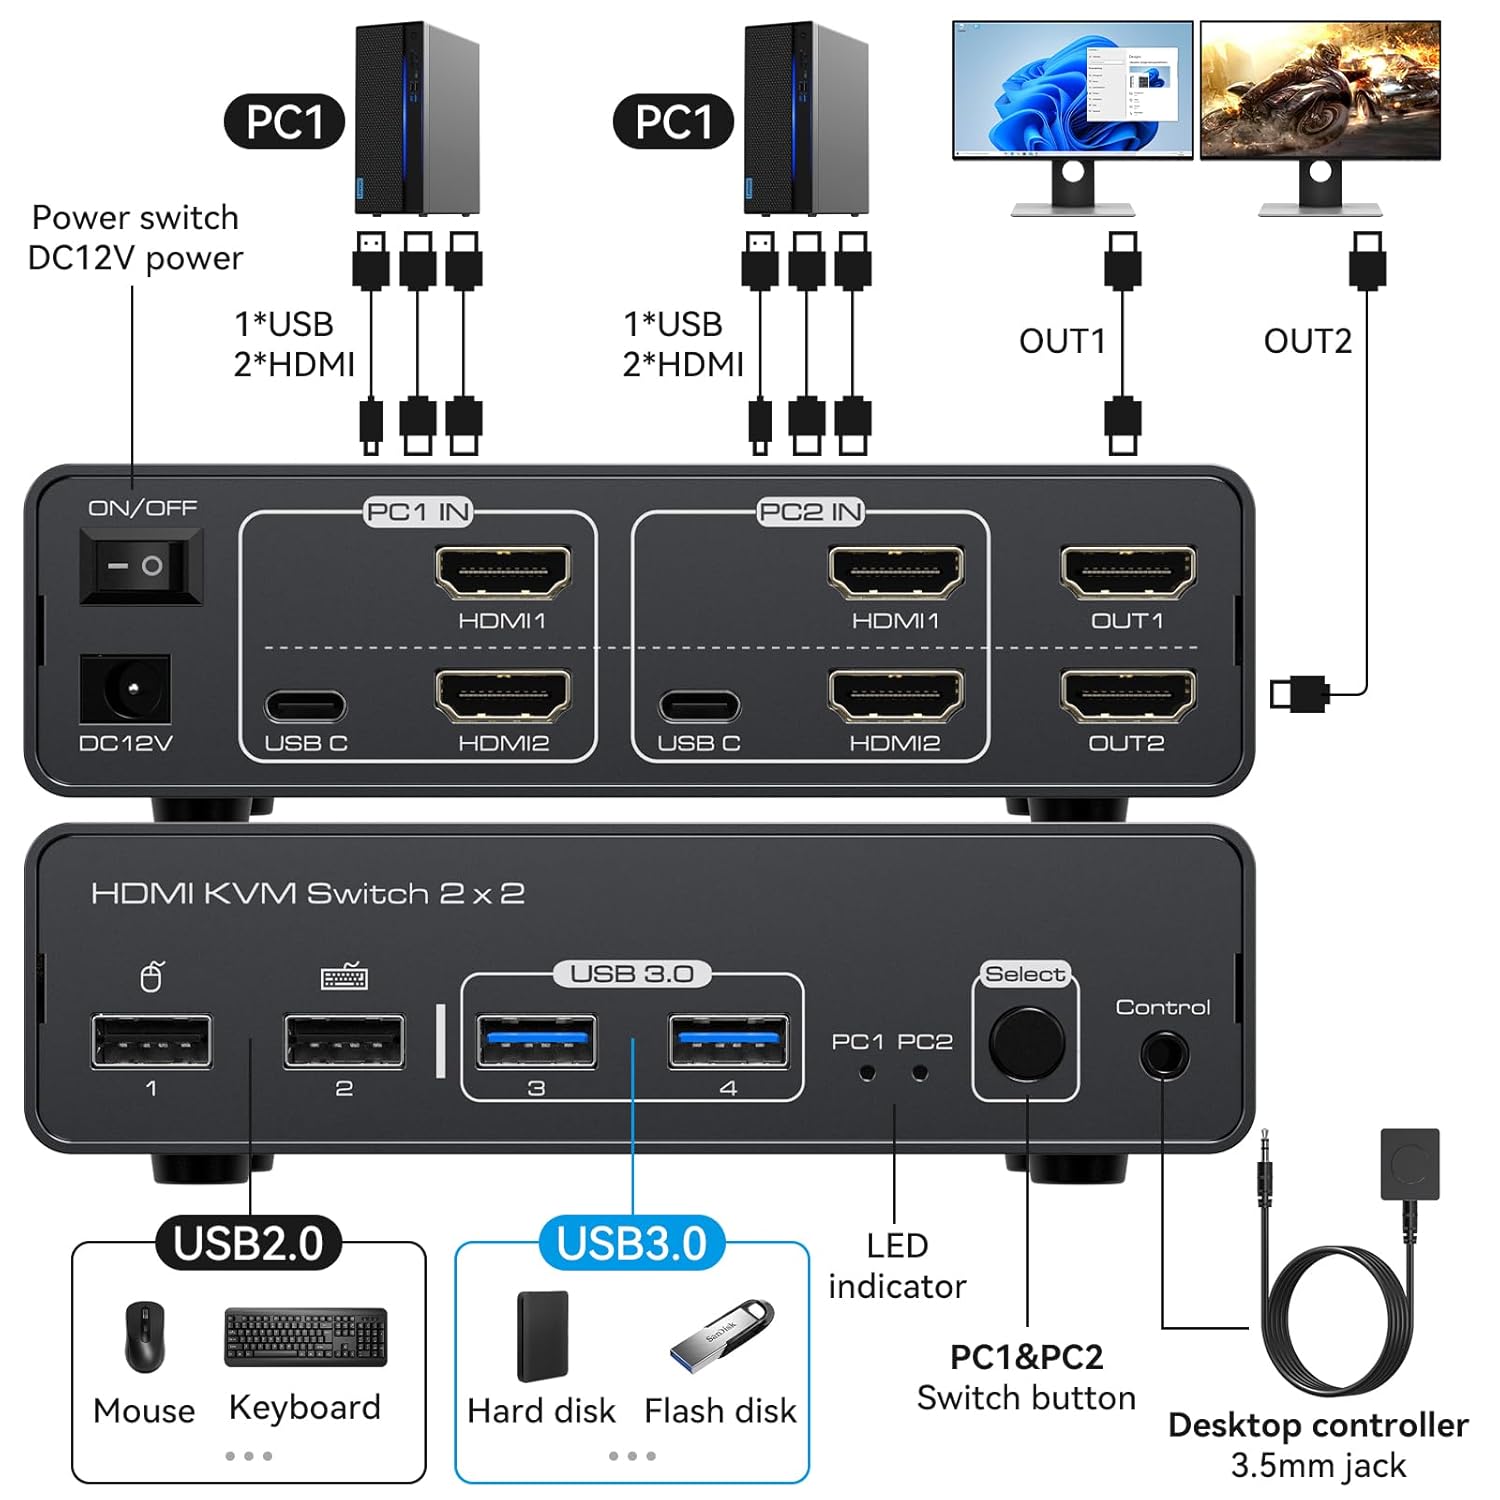
Image: The front panel of the KVM switch, highlighting two USB 2.0 ports (typically for mouse and keyboard), two USB 3.0 ports (for high-speed data devices like hard drives or flash drives), a 'Select' button for switching between PCs, a 'Control' port for the wired desktop controller, and an LED indicator for the active PC.
- USB 2.0 Ports (1, 2): For connecting low-speed USB devices such as mouse and keyboard.
- USB 3.0 Ports (3, 4): For connecting high-speed USB devices like external hard drives or flash drives.
- Select Button: Press to switch between PC1 and PC2.
- LED Indicator (PC1, PC2): Illuminates to show which PC is currently active.
- Port de control: Connects to the wired desktop controller for remote switching.
Panoul din spate

Image: The back panel of the KVM switch, displaying the DC12V power input, an ON/OFF switch, two input sections labeled 'PC1 IN' and 'PC2 IN'. Each PC input section includes a USB-C port, HDMI1, and HDMI2 ports. Additionally, there are two HDMI output ports labeled 'OUT1' and 'OUT2' for connecting monitors.
- DC12V: Port de intrare pentru alimentare.
- Comutator PORNIT / OPRIT: Power toggle for the KVM switch.
- PC1 IN / PC2 IN: Each input section includes:
- USB-C: For data transfer from the computer to the KVM. Note: This USB-C port does not support video transfer.
- HDMI1 / HDMI2: HDMI video inputs from the computer. Both HDMI1 and HDMI2 must be connected to the same computer for dual monitor output from that computer.
- OUT1 / OUT2: HDMI video outputs to connect to your monitors.
Instrucțiuni de configurare
Follow these steps to connect your KVM HDMI Switch:
- Opriți dispozitivele: Asigurați-vă că toate computerele și monitoarele sunt oprite înainte de a face orice conexiune.
- Conectați monitoare: Connect your two monitors to the KVM's OUT1 şi OUT2 HDMI ports using HDMI cables.
- Connect PC1:
- Connect the USB-C cable from PC1 to the KVM's PC1 IN USB-C port.
- Connect two HDMI cables from PC1's video outputs to the KVM's PC1 IN HDMI1 şi PC1 IN HDMI2 porturi.
- Connect PC2:
- Connect the USB-C cable from PC2 to the KVM's PC2 IN USB-C port.
- Connect two HDMI cables from PC2's video outputs to the KVM's PC2 IN HDMI1 şi PC2 IN HDMI2 porturi.
Notă importantă: For dual monitor output from a single PC, both HDMI1 and HDMI2 inputs for that specific PC must be connected. Ensure your computers support dual monitor output. The USB-C ports on the KVM are for data transfer only and do not support video.
- Conectați perifericele USB: Connect your mouse and keyboard to the KVM's USB 2.0 ports (1, 2) on the front panel. Connect any other USB devices (e.g., external hard drives, flash drives) to the KVM's USB 3.0 ports (3, 4).
- Conectarea telecomenzii cu fir (opțional): Plug the wired desktop controller into the Controla port on the KVM's front panel.
- Conectare alimentare: Plug the DC12V power adapter into the KVM's DC12V port și apoi la o priză de curent.
- Pornire: Turn on the KVM switch using the ON/OFF switch on the back panel, then power on your monitors and computers.
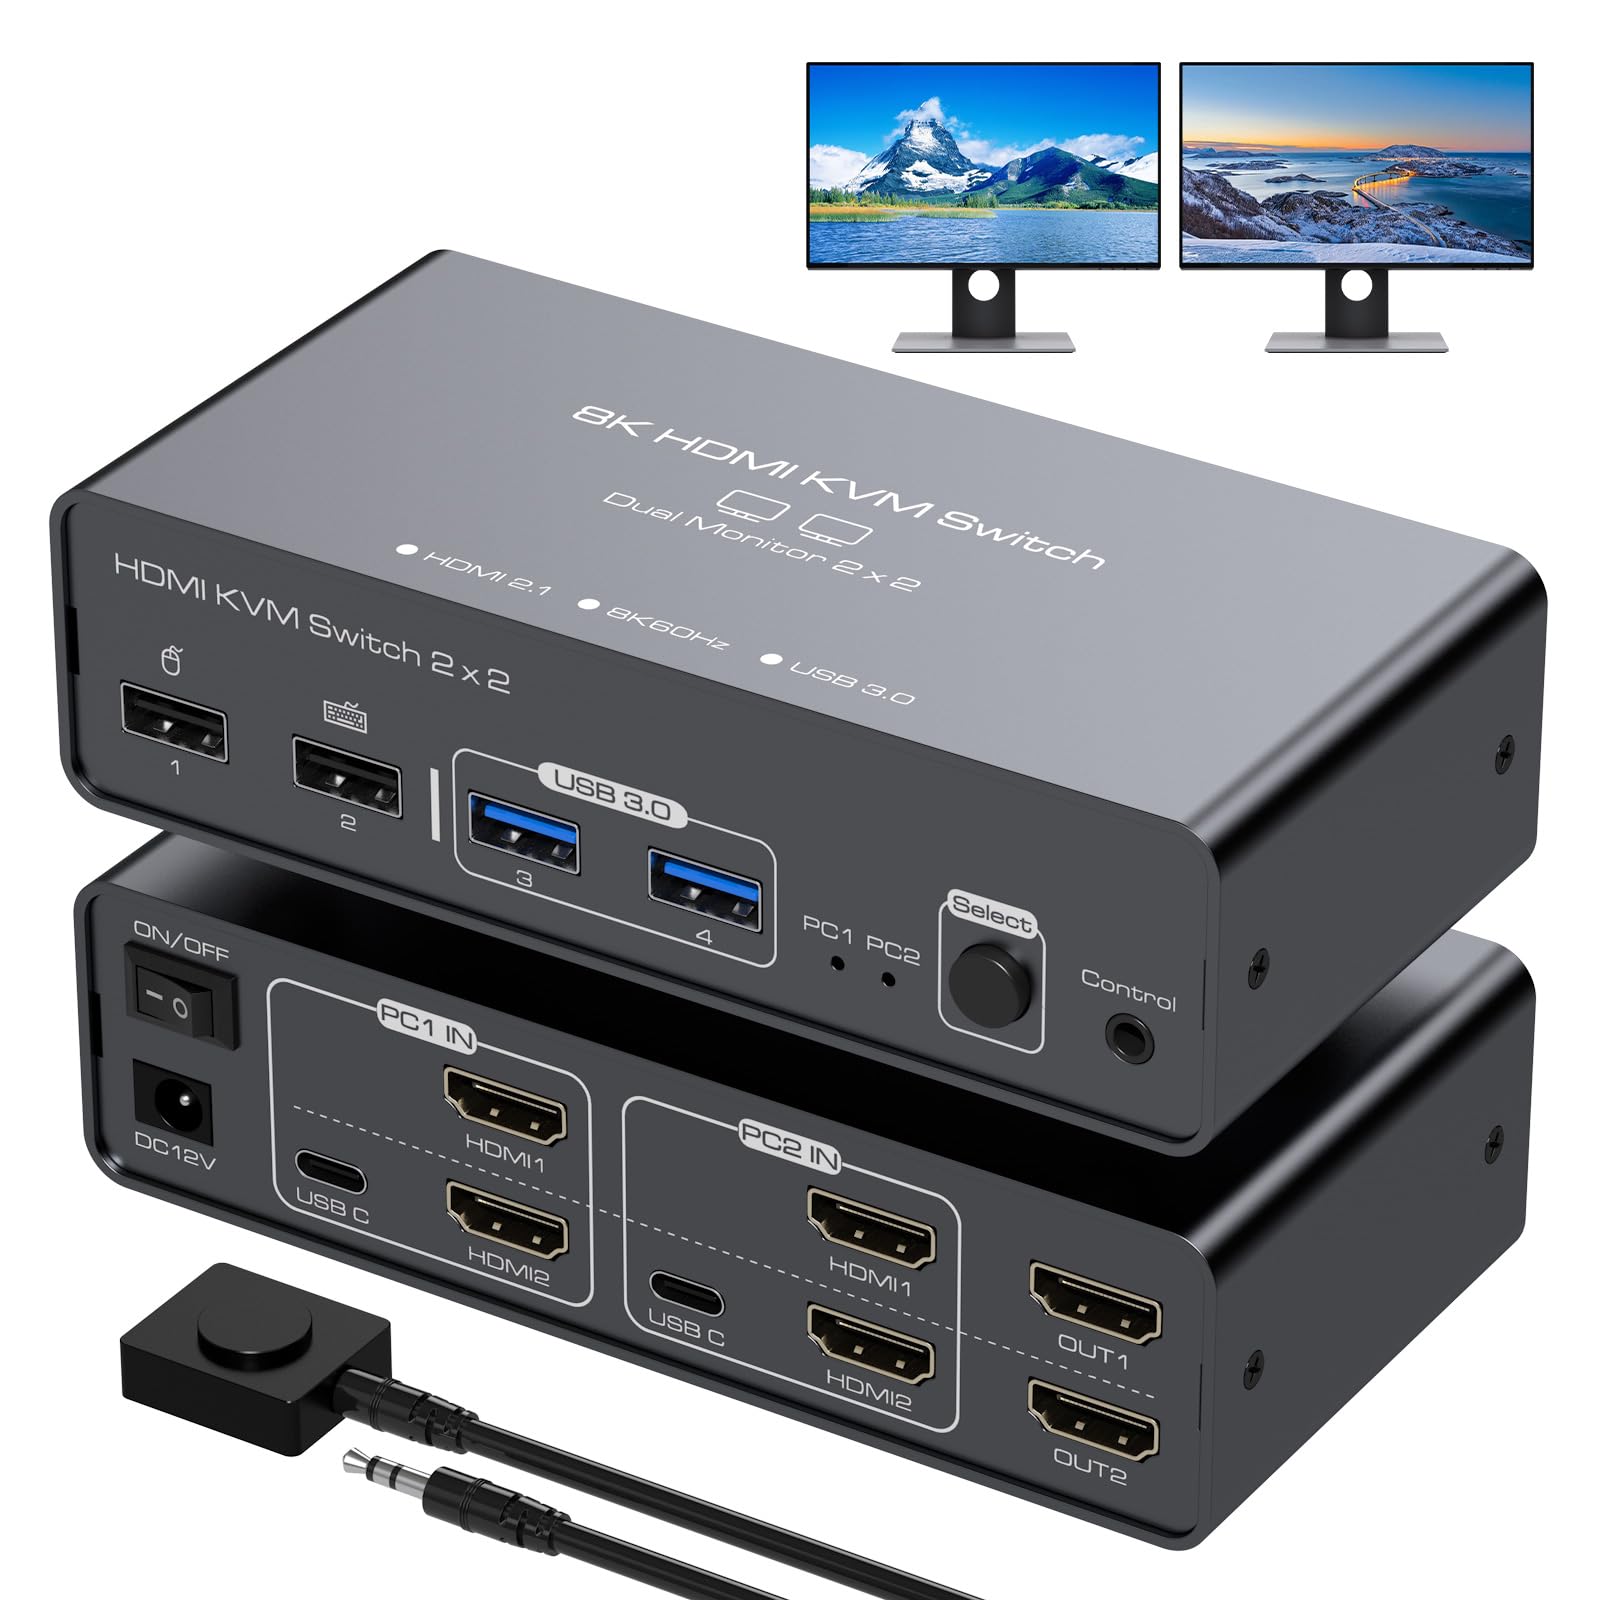
Image: A comprehensive connection diagram illustrating how to set up the KVM switch. It shows two PCs connected via USB-C and dual HDMI cables to the KVM's input ports. Two monitors are connected to the KVM's HDMI output ports. A mouse, keyboard, and other USB devices are connected to the KVM's front USB ports. The KVM is powered by a DC12V adapter, and a wired desktop controller is also connected.
Instrucțiuni de operare
Comutarea între computere
You can switch between PC1 and PC2 using one of the following methods:
- Butonul panoului frontal: Apăsați tasta Selecta button on the front panel of the KVM switch. The LED indicator will change to show the currently active PC (PC1 or PC2).
- Controler desktop cu fir: If connected, press the button on the wired desktop controller to switch between PC1 and PC2. This allows for convenient switching if the KVM is placed out of reach.
Nota: Hotkey switching via keyboard shortcuts is not supported by this KVM switch.

Image: A visual guide on switching between PC1 and PC2. It shows a close-up of a hand pressing the 'Select' button on the KVM's front panel, and an image of the wired desktop controller, both used for switching the active computer.
Display Working Modes
The KVM switch supports two primary display modes, which are configured on your computer's operating system:
- Modul extindere: This mode allows your two monitors to display different content, extending your desktop across both screens. One monitor acts as the main screen, and the other as an extended screen.
- Mod duplicat (oglindă): In this mode, both monitors display the exact same content, mirroring your main screen.
To switch between these modes, adjust your display settings within your computer's operating system (e.g., Windows Display Settings or macOS System Preferences). Ensure your computer supports dual or multiple monitors to utilize these modes effectively.

Image: A diagram showing two display working modes. The 'Extend' mode depicts two monitors showing different parts of a desktop, while the 'Duplicate' mode shows both monitors displaying identical content.
Depanare
Dacă întâmpinați probleme, vă rugăm să consultați următorii pași comuni de depanare:
- No Display or Incorrect Resolution:
- Ensure all HDMI cables are securely connected to both the KVM and your computers/monitors.
- Verify that your source devices (computers), monitors, and HDMI cables all support the desired resolution (e.g., 8K@60Hz or 4K@120Hz).
- Confirm that both HDMI1 and HDMI2 inputs for the active PC are connected to that PC for dual monitor output.
- Check your computer's display settings to ensure dual monitors are detected and configured correctly (Extend or Duplicate mode).
- Try restarting the KVM switch and then your computers and monitors.
- Dispozitivele USB nu funcționează:
- Ensure the USB-C cables from your computers are properly connected to the KVM's PC IN USB-C ports.
- For external hard drives or flash drives, check your computer's power management settings for USB ports. Some operating systems may put USB ports to sleep, causing devices to disconnect during switching. Disabling these power-saving features for USB root hubs can resolve this.
- Încercați să conectați dispozitivul USB direct la computer pentru a confirma că funcționează independent.
- Wired Desktop Controller Not Responding:
- Ensure the controller cable is securely plugged into the KVM's 'Control' port.
- Test switching using the 'Select' button on the KVM's front panel to confirm the KVM itself is functioning.
Specificații
| Model | 241011003 |
| Marca | VEDINDUST |
| Dimensiuni (L x l x H) | 14.1 x 6.8 x 3.8 cm (5.6 x 2.7 x 1.5 țoli) |
| Greutate | 530 g |
| Suport pentru rezoluția video | Up to 8K@60Hz, 4K@120Hz, 1440P@60Hz, 1080P@60Hz |
| Porturi USB | 2x USB 2.0, 2x USB 3.0 |
| Metoda de control | Manual button, Wired remote control |
| Intrare de putere | DC 12V |
| Material | Aluminum (shell), Copper, Brass (contact material) |
| Compatibilitatea sistemelor de operare | Windows, Vista, XP, Linux, Unix |

Imagine: O imagine detaliată view of the KVM switch's front panel, illustrating the two USB 2.0 ports for mouse and keyboard, and two USB 3.0 ports for high-speed devices like hard disks and flash drives, along with their respective data transfer speeds.

Image: A setup featuring two monitors displaying ultra-high-definition content, demonstrating the KVM switch's support for 8K@60Hz and 4K@120Hz resolutions, with backward compatibility for 1080P.
Garanție și suport
VEDINDUST is committed to providing high-quality products and customer satisfaction. If you encounter any problems during the use of your KVM HDMI Switch, please do not hesitate to contact our professional after-sales support team. We are dedicated to providing timely and effective solutions to ensure your product functions correctly.
For support, please refer to the contact information provided with your purchase or visit the official VEDINDUST website-ul.
Videoclipul produsului de mai susview
Video: O scurtă prezentareview of the VEDINDUST KVM HDMI Switch, demonstrating its front and back panels, connection points, and the process of switching between two computers. It also highlights the extend and mirror display modes and the use of USB 2.0 and USB 3.0 ports.

