
E-ACE DMMRUTXB
E-ACE 4.3-Inch Dual Lens Car DVR Rearview Manual de utilizare Mirror Dash Cam
Model: DMMRUTXB
1. Produs terminatview
The E-ACE 4.3-inch Dual Lens Car DVR Rearview Mirror Dash Cam is designed to enhance driving safety by providing comprehensive video recording of your journeys. This device integrates a front-facing camera and supports an optional rear-facing camera, offering a wide field of view and continuous recording capabilities. Its sleek design replaces your existing rearview mirror, providing a discreet and integrated solution for vehicle surveillance.
Key features include a 4.3-inch high-definition display, dual-lens recording, night vision, loop recording, and a G-sensor for automatic incident detection.

Image: The E-ACE rearview mirror dash cam displaying both front and rear camera feeds on its integrated screen.
2. Conținutul pachetului
Vă rugăm să verificați pachetul pentru următoarele articole:
- E-ACE Rearview Mirror Dash Cam Unit
- Încărcător auto
- Fixed Bandages (for mounting)
- Manual de utilizare
- Cititor de carduri
- Optional: Rear View Camera + Cable (6M or 10M, depending on variant)
- Optional: Buck Line (for parking monitoring power)
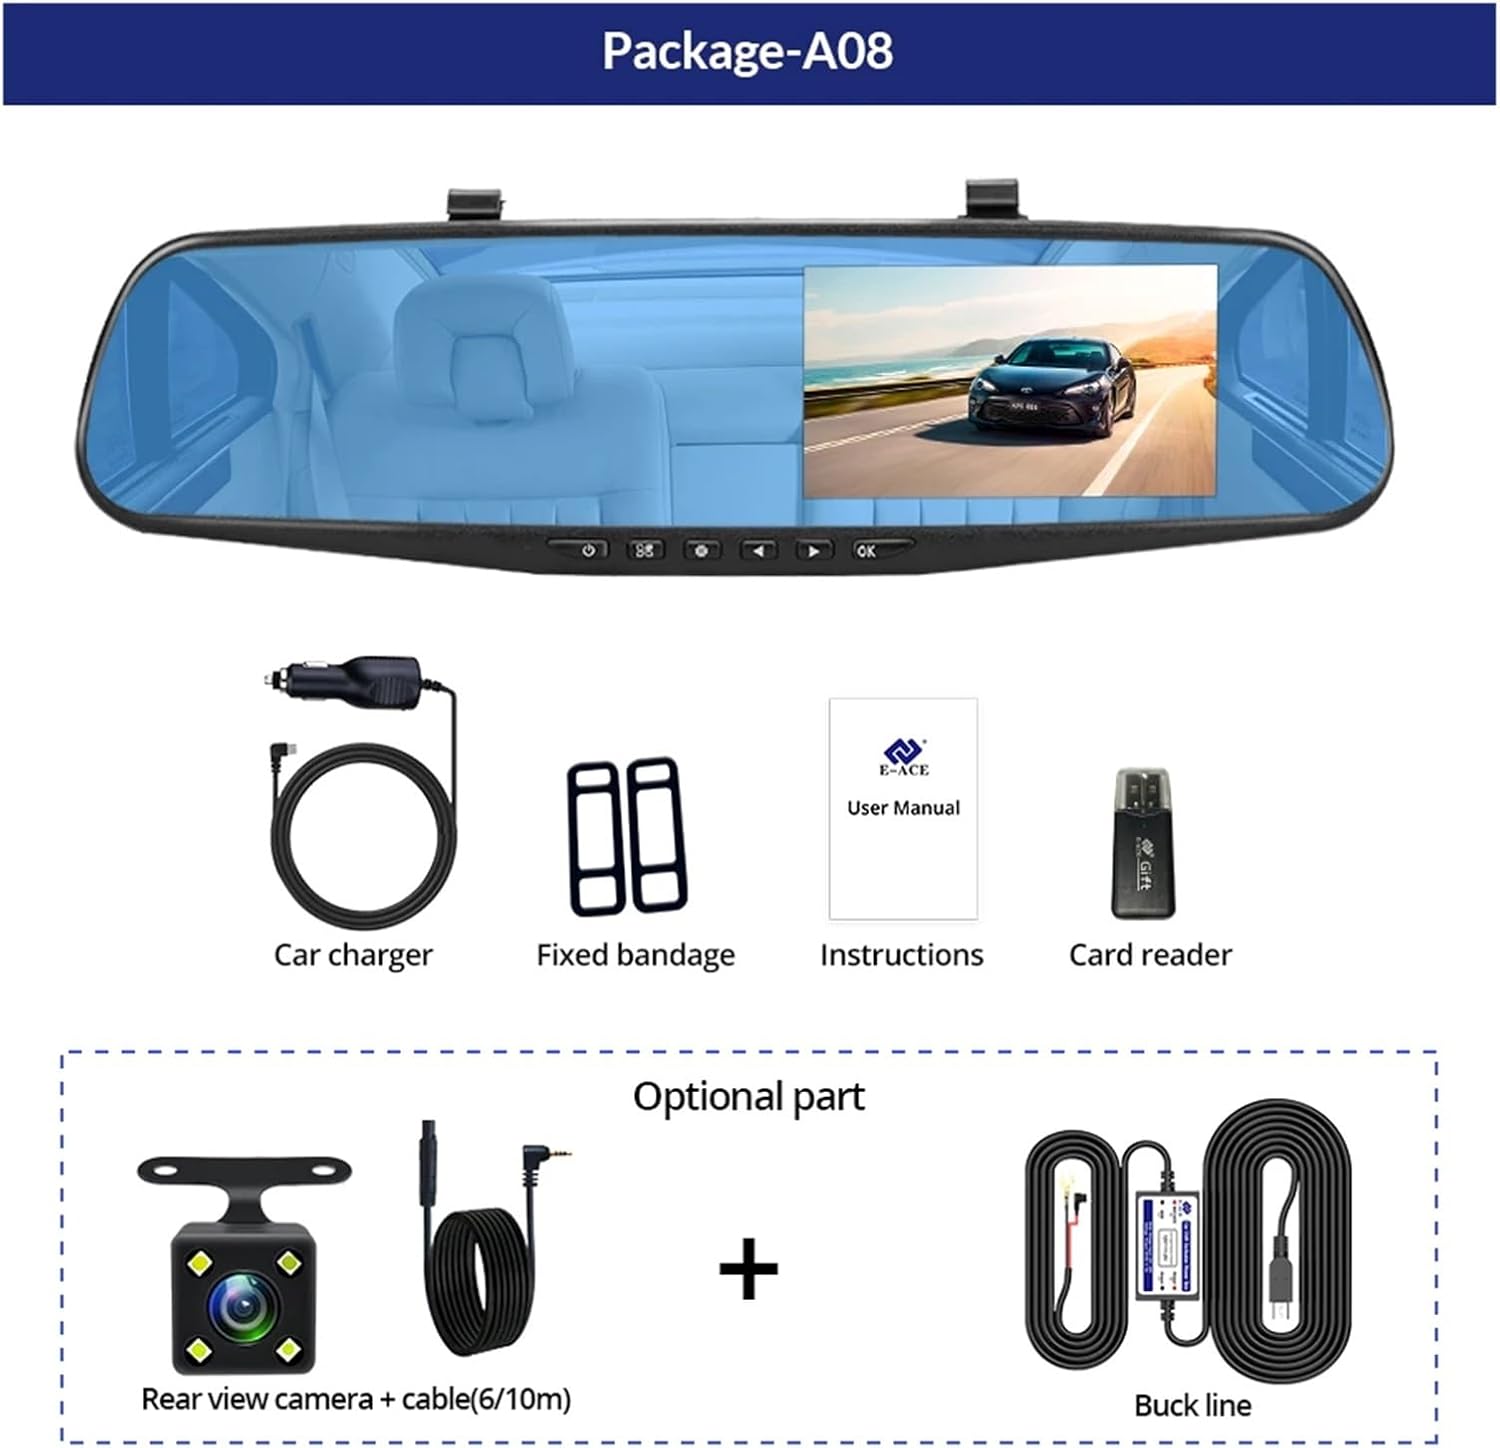
Image: A visual representation of the items included in the E-ACE dash cam package, showing the main unit and accessories.
3. Caracteristicile produsului
- 4.3-inch High-Definition Display: Provides clear visibility for real-time monitoring and playback.
- Design cu lentilă dublă: Captures both front and rear footage simultaneously for comprehensive coverage.
- Built-in Night Vision Technology: Ensures clear recordings in low-light conditions.
- Instalare ușor de utilizat: Sleek rearview mirror design integrates seamlessly into your vehicle.
- Înregistrare în buclă: Suprascrie automat cele mai vechi alimentetage când cardul de memorie este plin, asigurând înregistrarea continuă.
- G-Sensor Feature: Detects sudden movements or impacts and automatically locks the current video file pentru a preveni suprascrierea acestuia.
- Monitorizarea parcării: Records video when motion or impact is detected while the vehicle is parked (requires buck line connection).
- Unghi larg de 170 de grade: Oferă o gamă largă view a drumului din fata.
- Imagine inversă: Displays the rear camera view cu instrucțiuni de parcare la mersul înapoi.
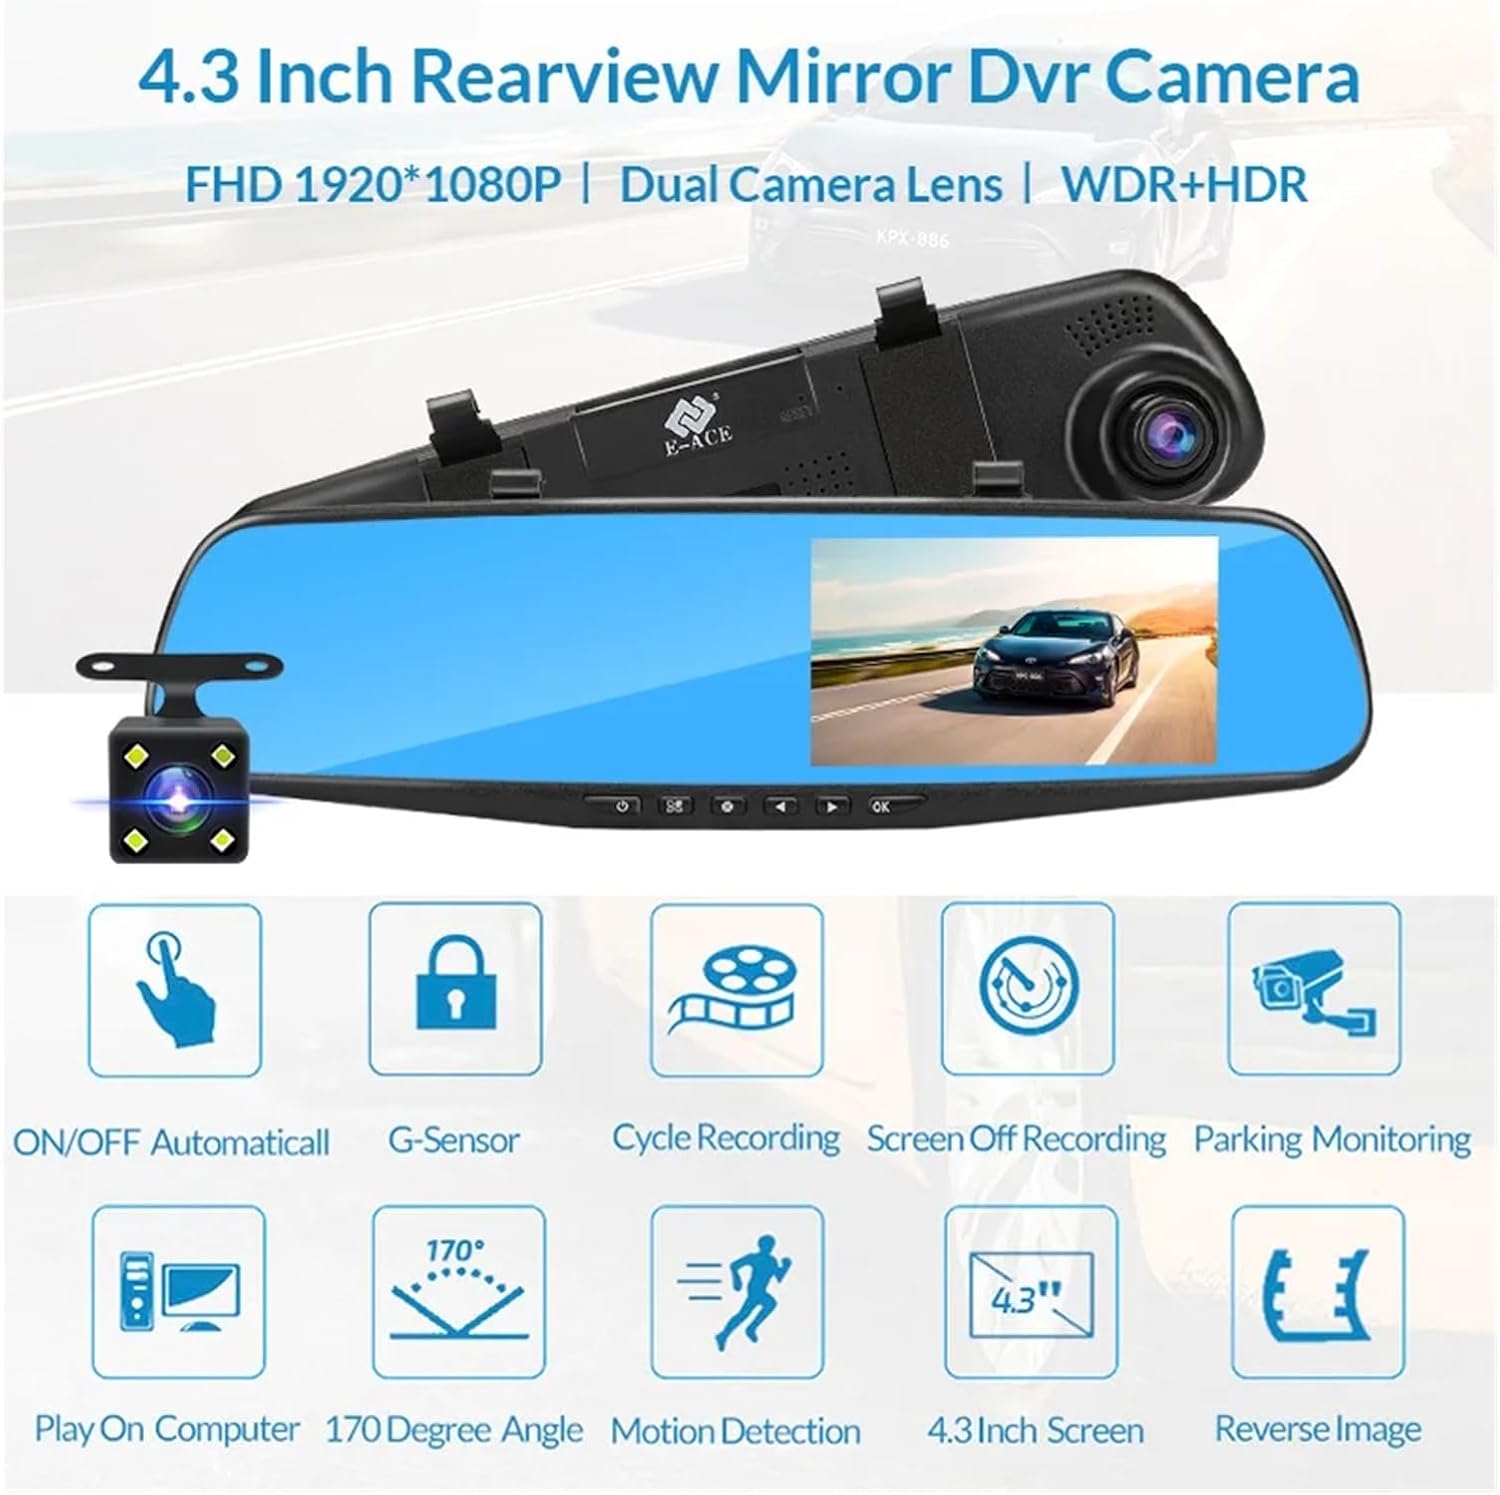
Image: An illustration highlighting the various functional features of the E-ACE dash cam.
4. Identificarea componentelor
Familiarize yourself with the various parts and controls of your E-ACE dash cam:

Image: A detailed diagram identifying the buttons, ports, and features on the E-ACE dash cam unit.
- Buton ON/OFF: Pornește sau oprește dispozitivul.
- Buton de meniu: Accesează setări și opțiuni.
- Butonul de mod: Switches between video recording, photo, and playback modes.
- Buton SUS: Navigates up in menus or adjusts settings.
- Buton jos: Navigates down in menus or adjusts settings.
- Buton OK: Confirmă selecțiile sau pornește/oprește înregistrarea.
- Slot pentru carduri TF: Insert your MicroSD (TF) card here.
- Port AV-IN: Conectează camera din spate.
- Port USB: Pentru alimentarea cu energie electrică și transferul de date.
- Buton de resetare: Resetează dispozitivul la setările din fabrică (folosește un ac subțire).
- Microfon: Înregistrează sunetul din interiorul vehiculului.
5. Configurare și instalare
5.1 Introducerea cardului de memorie
Before installation, insert a high-speed MicroSD (TF) card (Class 10 or higher, up to 64GB recommended) into the TF Card Slot (7) with the contacts facing the screen. Ensure the card is inserted correctly until it clicks into place.
5.2 Montarea camerei de bord
- Attach the fixed bandages to the back of the dash cam unit.
- Securely strap the dash cam over your vehicle's existing rearview mirror using the fixed bandages. Ensure it is centered and stable.
5.3 Conectarea sursei de alimentare
- Connect the car charger to the USB Port (9) on the dash cam.
- Conectați celălalt capăt al încărcătorului auto la priza brichetei vehiculului.
- Route the power cable neatly along the windshield trim to avoid obstructing your view.
5.4 Instalarea camerei spate (opțional)
- Connect the rear camera cable to the AV-IN Port (8) on the dash cam.
- Route the rear camera cable from the dash cam to the rear of your vehicle. This typically involves tucking the cable under the headliner and along the side pillars.
- Mount the rear camera on the rear windshield or near the license plate using its adhesive or screws. Ensure it has a clear view a drumului din spate.
- If using the reverse image function, connect the red wire from the rear camera cable to your vehicle's reverse light power supply.
6. Instrucțiuni de utilizare
6.1 Pornire/Oprire
- Automat: The dash cam will automatically power on and start recording when your vehicle's ignition is turned on (if connected to a switched power source).
- Manual: Press and hold the ON/OFF Button (1) to manually power the device on or off.
6.2 Operare de bază
- Comutare moduri: Press the Mode Button (3) to cycle between Video Recording, Photo, and Playback modes.
- Meniu de acces: In any mode, press the Menu Button (2) to enter the settings menu. Use the UP (4) and Down (5) buttons to navigate, and OK (6) to select.
- Porniți/Opriți înregistrarea: In Video Recording mode, press the OK Button (6) to manually start or stop recording.
6.3 Moduri de afișare
While recording, you can typically switch between different display views by pressing the UP or Down buttons:
- Front Camera Only
- Rear Camera Only
- Picture-in-Picture (Front main, Rear sub-window)
- Picture-in-Picture (Rear main, Front sub-window)
6.4 Înregistrare în buclă
Set the loop recording duration (e.g., 1, 3, or 5 minutes) in the settings menu. When the memory card is full, the oldest unlocked filevor fi suprascrise de noile înregistrări.
6.5 G-Senzor
The G-sensor automatically detects collisions or sudden braking. When triggered, it locks the current video file, preventing it from being overwritten by loop recording. Adjust sensitivity in the settings.
6.6 Monitorizarea parcării (opțional)
If the buck line is installed, the dash cam can monitor your vehicle while parked. When motion or impact is detected, it will automatically record a short video. Enable this feature in the settings.
6.7 Setarea datei și orei
It is important to set the correct date and time in the system settings for accurate timestamps pe înregistrările tale.
7. Întreținere
- curatenie: Folosiți o lavetă moale și uscată pentru a curăța lentila și ecranul. Evitați substanțele de curățare abrazive sau solvenții.
- Card de memorie: Format the MicroSD card regularly (e.g., once a month) within the dash cam's settings to maintain optimal performance and prevent data corruption. Back up important files înainte de formatare.
- Temperatură: Avoid exposing the device to extreme temperatures, as this can affect battery life and component integrity.
- Actualizări firmware: Verifică-l pe cel al producătorului website periodically for firmware updates that may improve performance or add features.
8. Depanare
| Problemă | Cauza posibila | Soluţie |
|---|---|---|
| Camera de bord nu pornește. | Fără alimentare; încărcător defect; conexiune slăbită. | Check car charger connection and vehicle's cigarette lighter. Try a different USB cable/charger. |
| Înregistrarea se oprește automat. | Memory card full; slow memory card; G-sensor sensitivity too high. | Format the memory card. Use a Class 10 or higher MicroSD card. Lower G-sensor sensitivity in settings. |
| Video footage este neclar. | Folie de protecție pe lentilă; lentilă murdară; focalizare incorectă. | Remove any protective film. Clean the lens with a soft cloth. |
| Camera din spate nu afișează. | Conexiune slăbită; cablu/cameră defectă. | Check the AV-IN connection. Ensure the rear camera is properly installed. |
| Dispozitivul se blochează sau se blochează. | Software issue; memory card error. | Press the Reset Button (10) with a thin pin. Format the memory card. |
9. Specificații
- Nume model: DMMRUTXB
- Afişa: 4.3 inci
- Camera: Dual Lens (Front & Rear support)
- Rezoluție video: FHD 1920x1080P (Front)
- Caracteristici: Loop Recording, G-Sensor, Night Vision, Parking Monitoring, 170-degree wide angle
- Depozitare: Supports MicroSD (TF) card, Class 10 or higher (up to 64GB)
- Conectivitate: USB, AV-IN (for rear camera)
- Greutatea articolului: Aproximativ 1.76 uncii (50 grame)
- Dimensiuni pachet: Aproximativ 0.39 x 0.39 x 0.39 inci
- Producător: DMMRUTXB
10. Garanție și asistență
For warranty information and technical support, please refer to the documentation provided with your purchase or contact the retailer/manufacturer directly. Keep your purchase receipt as proof of purchase.
Ask a question about this manual
Ask about setup, troubleshooting, compatibility, parts, safety, or missing instructions. Manuals+ will review the question and use this page’s manual context to help answer it.