
Introducere
This manual provides detailed instructions for the installation, operation, and maintenance of your ARK DESIGN Dog Door for Sliding Glass Doors. This product is designed to offer a convenient and secure passage for your large dog through a sliding glass patio door.
Key features include an adjustable height range of 76 1/8"-80 7/8" to fit various sliding door tracks, a pre-assembled design for easier setup, and a 10" wide x 15" high flap suitable for pets up to 90 pounds. The door features a durable aluminum frame, tempered glass, a magnetic sealing flap, and a windproof strip for weather resistance and insulation. Enhanced security is provided by an included lock kit.
Configurare și instalare
1. Verificări înainte de instalare
Before beginning installation, ensure your sliding glass door track meets the minimum width requirement and measure your pet to confirm the flap size is appropriate.
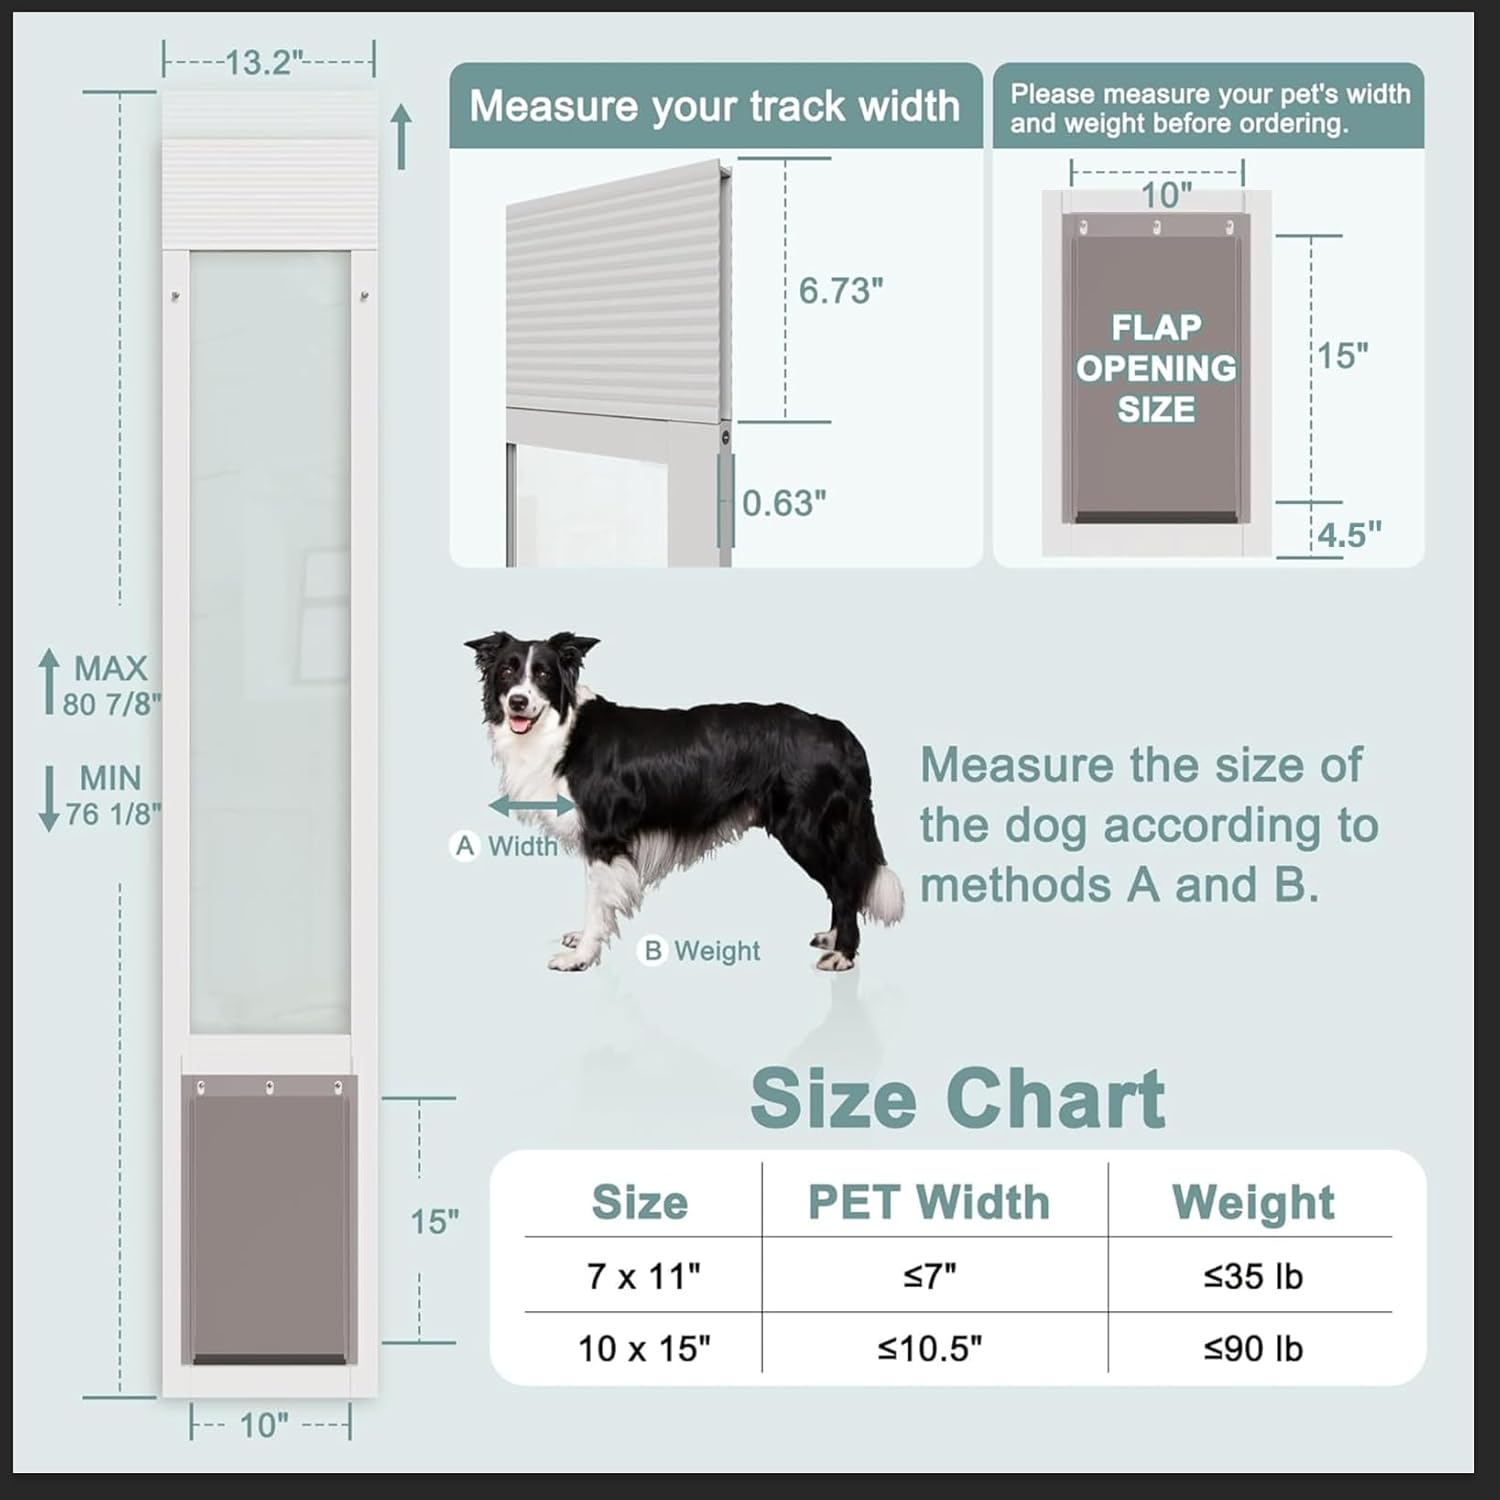
Image 1: Measuring Guide and Size Chart. This diagram illustrates how to accurately measure your pet's width and weight to ensure they fit through the 10" x 15" flap. It also shows how to measure your sliding door track width and the overall height of the dog door insert. A size chart is provided to match pet dimensions with appropriate flap sizes.

Image 2: Installation Overview and Track Requirements. Această imagine oferă o imagine de ansambluview of the pet door insert installed in a sliding glass door. It highlights the adjustable height range of 76 1/8" - 80 7/8" and notes that the sliding glass door track needs to be at least 7/8" wide for proper installation. It also shows the placement of weather stripping.
2. Despachetare și componente
Carefully unpack all components. Verify that all parts listed below are present.

Image 3: Included Components and Accessories. This image displays all the parts included with your dog door: the preassembled patio panel, a baffle, glass sweep, two rolls of weather stripping, top and bottom anchors with screws, a patio lock with screws, and a pet door lock with screws. Note that some reinforcement accessories may require drilling.
3. Installing the Pet Door Insert
- Place the pre-assembled pet door insert into the track of your sliding glass door. The spring-loaded design allows it to slide easily.
- Adjust the height by releasing the knobs on the spring mechanism. The upper frame will extend. Align the upper frame to the top of your patio door frame. Ensure the door and panel sit level on the threshold.

Image 4: Adjusting the Spring Mechanism. This visual guide demonstrates how to adjust the height of the pet door insert. By releasing the knobs, the upper frame extends upwards. The user should align this extended frame with the top of the patio door frame, ensuring the entire unit is level and stable on the threshold.
- Once the height is set, tighten the screws against the edge of the track to secure the pet door insert.

Image 5: Securing the Door in the Track. Acest prim-plan view shows the bottom track of the sliding door. It illustrates how to tighten a screw against the edge and lock it into the groove of the sliding glass door track, providing stability and security for the pet door insert.
4. Installing Security Locks
Install the provided patio lock and pet door lock to enhance security. Follow the instructions included with the lock kit for proper placement and attachment. Some installations may require drilling.

Image 6: Secure Lockable Design. This image highlights the security features of the dog door. It shows the pet door insert installed in a sliding glass door, with close-ups of the two types of security locks provided: a patio lock and a pet door lock, both with accompanying screws. These locks ensure double stable locking and tiered safety protection.
5. Applying Weather Stripping and Glass Sweep
Apply the weather stripping to the edges of the pet door insert and the sliding glass door to create a tight seal, preventing drafts and insects. Install the glass sweep to protect the gap of your sliding glass door.
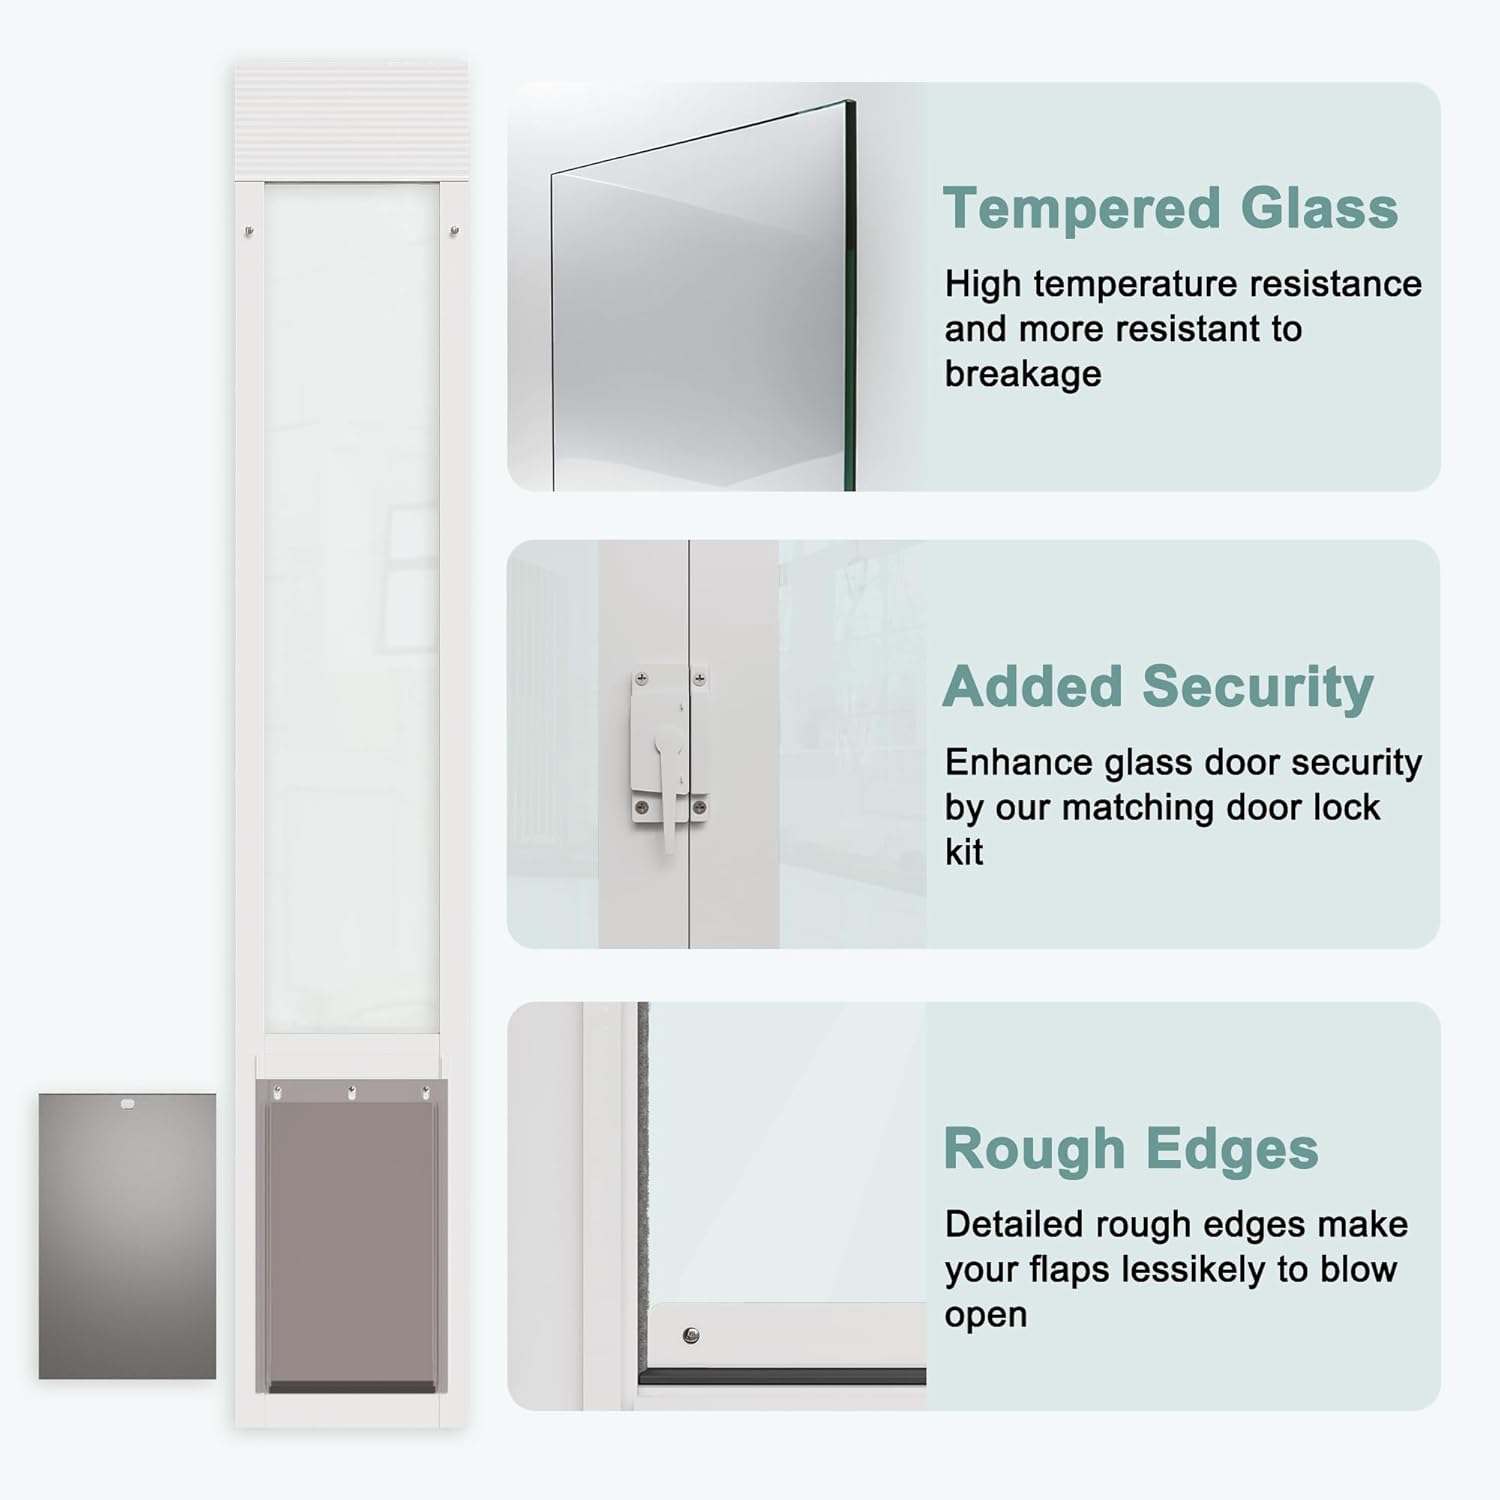
Image 7: Product Features. This image highlights key features of the dog door: Sticla securizata for high temperature resistance and breakage resistance; Added Security through the matching door lock kit; and Rough Edges on the flap to make it less likely to blow open, contributing to weatherproofing.
Ghid video de instalare
Video 1: How to Install Patio Pet Door. This official video from Arkdesign provides a visual step-by-step guide on installing the patio pet door. It demonstrates the process from preparing the sliding door track to securing the pet door insert and installing the locks, offering a clear demonstration of the installation procedure.
Instrucțiuni de operare
1. Using the Pet Flap
The pet flap is designed for easy access for your dog. It features a magnetic seal to help it close securely after your pet passes through, minimizing drafts.
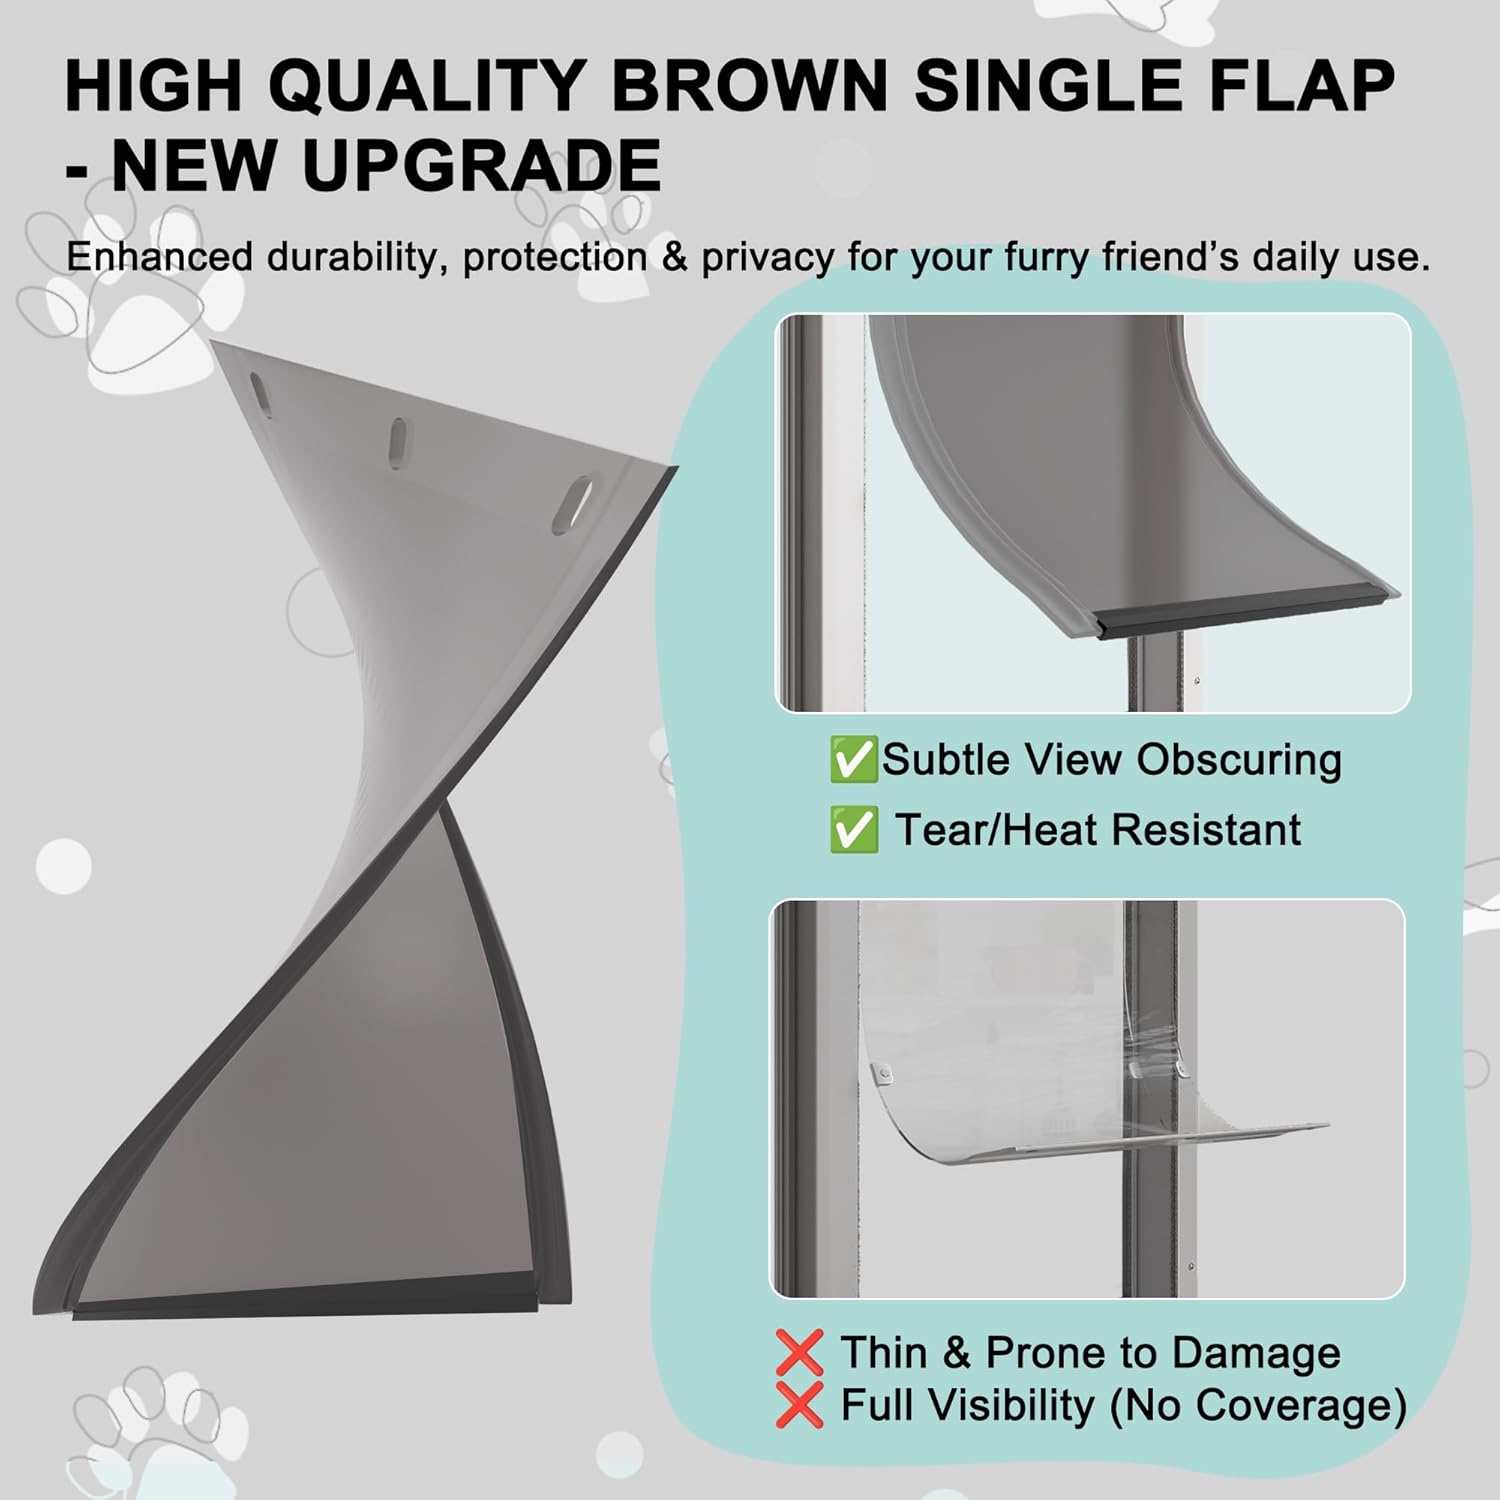
Image 8: Flap Design and Durability. This image details the high-quality brown single flap, highlighting its enhanced durability, protection, and privacy features. It specifically points out that the flap offers subtle view obscuring and is tear/heat resistant, contrasting it with a less durable, fully transparent flap.
2. Using the Sliding Closure Panel
A sliding closure panel is included to restrict access through the pet door when needed. Simply slide the panel into the designated grooves to block the flap opening. Remove the panel to allow pet access.
3. Engaging Security Locks
Utilize the installed patio lock and pet door lock to secure your sliding glass door and the pet door insert. Always engage these locks when you need to ensure the highest level of home security, especially overnight or when away from home.
Întreţinere
1. Cleaning the Frame and Glass
Clean the aluminum frame and tempered glass with a mild soap and water solution. Use a soft cloth to avoid scratching. Rinse thoroughly and dry.
2. Cleaning the Pet Flap
The pet flap can be wiped clean with a damp cloth. For deeper cleaning, it may be removed according to the installation instructions in reverse. Ensure it is dry before re-installing.
3. Checking Weather Stripping
Periodically inspect the weather stripping for wear or damage. Replace any worn stripping to maintain optimal insulation and weatherproofing.
Depanare
- Issue: Drafts or poor seal.
Soluţie: Check the weather stripping around the pet door and the sliding glass door. Ensure it is properly installed and not damaged. Replace if necessary. Verify the magnetic seal on the flap is functioning correctly. - Issue: Pet flap not closing completely.
Soluţie: Inspect the flap for any obstructions or debris. Clean the flap and its hinges. Ensure the magnetic strips are clean and aligned. - Issue: Pet door insert feels loose in the track.
Soluţie: Re-check the tension of the spring mechanism and ensure the securing screws in the bottom track are tightened firmly. - Issue: Sliding glass door does not lock properly after installation.
Soluţie: Ensure the patio lock and pet door lock are correctly installed and aligned. Adjust their position if needed to allow for proper engagement with the sliding door frame.
Specificații
| Caracteristică | Detaliu |
|---|---|
| Numărul de model | LINJ-DD-1015-7781 |
| Gama de inaltime reglabila | 76 1/8" - 80 7/8" |
| Dimensiunea deschiderii clapetei | 10 cm (lățime) x 15 cm (înălțime) |
| Maximum Pet Weight | 90 lbs |
| Maximum Pet Width | 10.5" |
| Material | Aluminum Frame, Tempered Glass |
| Track Thickness Compatibility | 0.7" (suitable for track width greater than 0.7") |
| Culoare | Brown Flap, White Frame |
Informații despre garanție
This product comes with a manufacturer's warranty. Please refer to the product packaging or the official ARK DESIGN website for specific warranty terms, conditions, and registration details. Keep your proof of purchase for warranty claims.
Asistență pentru clienți
For technical assistance, missing parts, or any questions regarding your ARK DESIGN Dog Door, please contact ARK DESIGN customer support. Contact information can typically be found on the product packaging, the manufacturer's website-ul web sau prin intermediul distribuitorului dumneavoastră.


