
1. Introducere
The Raddy VP7 Wireless Weather Station provides comprehensive weather monitoring for your home and surroundings. This manual details the setup, operation, and maintenance of your device, ensuring accurate and reliable weather data.
2. Ce se află în cutie
Despachetați cu grijă toate componentele și asigurați-vă că următoarele articole sunt prezente:
- Manual de instructiuni
- Senzor exterior
- Pală de vânt
- Panou solar
- Consola de afișare pentru interior
3. Caracteristicile produsului
- Ecran color de 7.4 inchi: Provides detailed weather information including indoor/outdoor temperature and humidity, precipitation, 12-hour weather forecasts, atomic clock, RCC calendar, wind direction and speed, dew point, felt temperature, atmospheric pressure, and daily maximum/minimum temperatures.
- High-Precision Outdoor Sensors: Includes a rain funnel, wind vane, speed sensor, thermo-hygrometer with anti-radiation shield, and a solar panel. Designed for accurate data with a communication range of up to 100 meters and resistance to harsh weather.
- Alerte personalizabile: Configure alerts for maximum/minimum temperature and humidity, wind speed, and precipitation. Features two alarms for weekdays and weekends.
- Scalable Monitoring: Connect up to three additional Raddy R5 remote sensors to monitor up to five different areas (e.g., baby's room, garden, living room, kitchen).
4. Configurare
4.1 Instalarea senzorului exterior
Proper placement of the outdoor sensor is crucial for accurate readings. Choose an open location, free from obstructions, that allows for accurate wind, rain, and temperature measurements.
- Assemble the wind cups and wind vane onto the sensor unit.
- Mount the sensor using the provided hardware. Ensure it is level using a spirit level for accurate rain and wind measurements.
- Insert 3 AA batteries (not included) into the outdoor sensor's battery compartment.

Image: The Raddy VP7 outdoor sensor showing its main components: Wind Cups, Rain Funnel, Thermo-Hygrometer Radiation Shield, Solar Panel, and Wind Vane.

Image: Various mounting options for the outdoor sensor, including top, side, and pole mounting, along with a detailed view of the sensor's battery compartment and reset button.
4.2 Indoor Display Console Setup
- Place the indoor display console in a central location within range of the outdoor sensor (up to 100 meters).
- Connect the power adapter to the console and a power outlet. Alternatively, insert 3 AA batteries (not included) for backup power. Note that continuous backlight requires AC power.
- The console will automatically search for the outdoor sensor and synchronize data. This may take a few minutes.

Image: Illustration showing the wireless data transmission between the indoor display console and the outdoor sensor, highlighting the 330ft (100m) range.
5. Instrucțiuni de utilizare
5.1 Afișare pesteview
The 7.4-inch color display presents various weather parameters. Familiarize yourself with the layout:
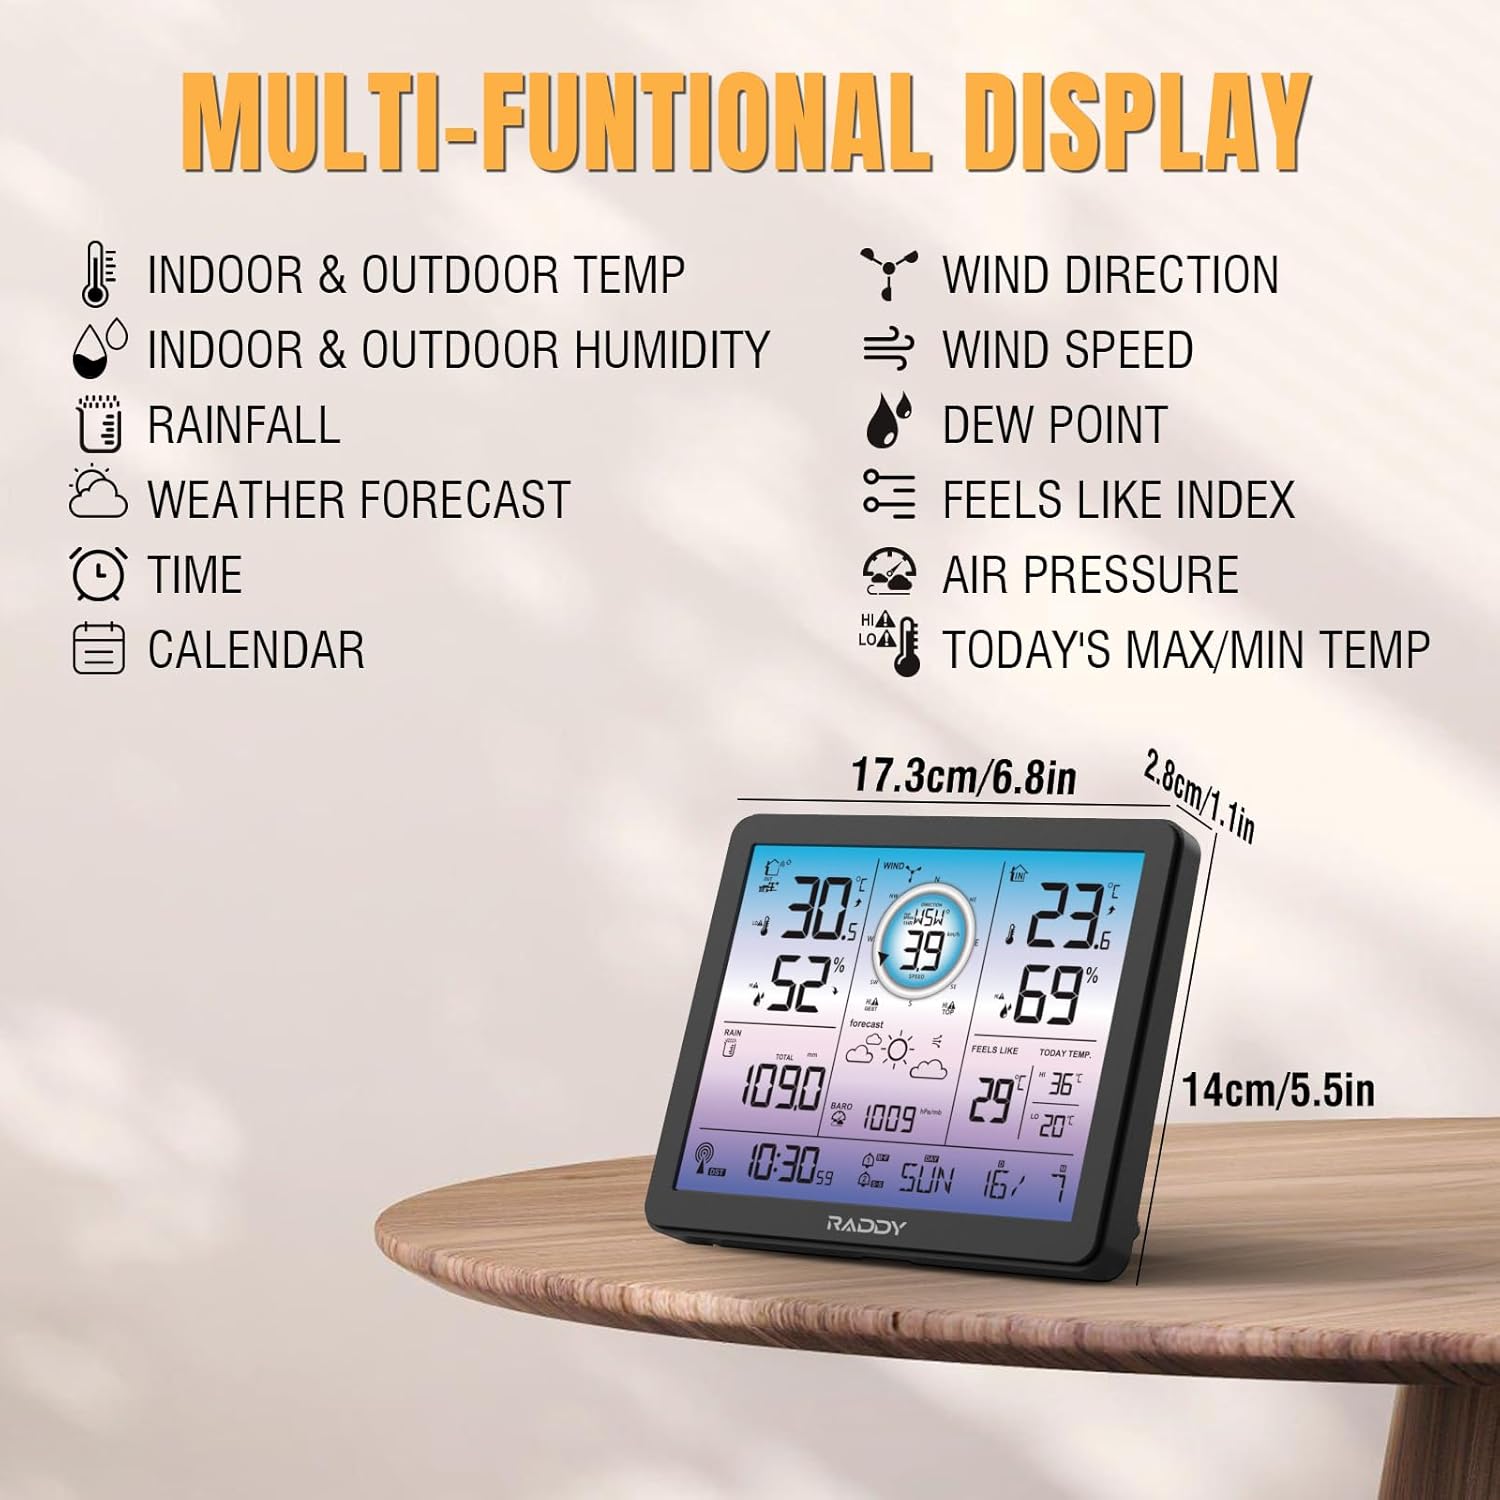
Image: The Raddy VP7 indoor display console showing its multi-functional display with various weather data points and dimensions.
- Stânga sus: Indoor & Outdoor Temperature, Indoor & Outdoor Humidity
- Sus în dreapta: Wind Direction, Wind Speed, Dew Point, Feels Like Index
- Mijloc: Rainfall, Weather Forecast, Air Pressure
- Fund: Time, Calendar, Today's Max/Min Temperature
5.2 Setarea orei și datei
The Raddy VP7 features an atomic clock with DCF functionality for automatic time synchronization. If manual adjustment is needed:
- Press the 'SET' button to enter time setting mode.
- Use the '+' and '-' buttons to adjust values.
- Press 'SET' again to confirm and move to the next setting (e.g., year, month, day).

Image: The Raddy VP7 display console highlighting the atomic clock with DCF feature for precise timekeeping.
5.3 Understanding Weather Data
The display provides real-time and forecasted weather information:
- Temperatura/Umiditatea: Displays current indoor and outdoor readings.
- Date despre vânt: Afișează viteza și direcția curentă a vântului.
- Precipitaţii: Tracks daily, weekly, and monthly precipitation.
- Prognoza meteo: Provides a 12-hour forecast based on barometric pressure changes.
- Presiune barometrică: Afișează presiunea atmosferică actuală.
Alerte 5.4
Set custom alerts for various weather conditions:
- Press the 'ALERT' button to cycle through alert settings (temperature, humidity, wind, rain).
- Use '+' and '-' to set desired high/low thresholds.
- Press 'ALERT' again to activate or deactivate the alert.
5.5 Reglarea luminii de fundal
The display features 4 adjustable backlight levels (LV0 to LV3) for optimal visibility in different lighting conditions.

Imagine: Patru foștiamples of the Raddy VP7 display showing different backlight levels from LV0 (off) to LV3 (brightest).
6. Întreținere
- curatenie: Wipe the display console and outdoor sensor with a soft, damp pânză. Nu utilizați agenți de curățare abrazivi sau solvenți.
- Înlocuire baterie: Replace batteries in both the outdoor sensor and indoor console when the low battery indicator appears on the display.
- Verificarea senzorului exterior: Periodically check the outdoor sensor for debris (leaves, dirt) that might obstruct the rain funnel or wind sensors.
7. Depanare
| Problemă | Cauza posibila | Soluţie |
|---|---|---|
| No outdoor data displayed | Outdoor sensor out of range or low battery. | Relocate sensor closer to console. Replace sensor batteries. |
| Temperatură/umiditate incorectă | Senzor expus la lumina directă a soarelui sau la surse de căldură. | Ensure sensor is in a shaded, well-ventilated area. |
| Ora/data incorectă | DCF signal interference or manual setting error. | Ensure console is away from electronic interference. Manually set time/date if automatic sync fails. |
| Rainfall not registering | Rain funnel blocked by debris. | Clear any obstructions from the rain funnel. |
8. Specificații
| Caracteristică | Detaliu |
|---|---|
| Model | VP7 |
| Producător | Raddy |
| Stil de afișare | Afișaj digital color |
| Dimensiunea ecranului | 7.4 inci |
| Sursă de alimentare (consolă) | AC Adapter (included), 3x AA Batteries (not included) |
| Sursă de alimentare (senzor) | 3x AA Batteries (not included), Solar Panel |
| Tehnologia de conectivitate | Fără fir |
| wireless Range | Până la 100 metri (330 picioare) |
| Precizia temperaturii | ±1 °C |
| Componente incluse | Instruction Manual, Outdoor Sensor, Wind Vane, Solar Panel, Indoor Display Console |
| Dimensiuni (pachet) | 38.1 x 29.7 x 14.8 cm |
| Greutate (pachet) | 1.7 kilograme |
9. Garanție și asistență
Raddy provides lifetime technical support for the VP7 Wireless Weather Station. For any questions, issues, or assistance with installation and setup, please contact Raddy customer service. Refer to the product packaging or Raddy's official website pentru detalii de contact.