
Introducere
Thank you for choosing the Cherub WST-670 Rechargeable Clip-On Tuner. This compact and versatile tuner is designed for precise tuning of various musical instruments, including chromatic, guitar, ukulele, and violin. Featuring a high-contrast color LCD display and a long-lasting rechargeable battery, it offers convenience and accuracy for musicians of all levels.
Conținutul pachetului
Vă rugăm să verificați pachetul pentru următoarele articole:
- 1 x Cherub WST-670 Clip-On Tuner
- 1 x cablu de încărcare USB
- 1 x Manual de utilizare (acest document)
Produs terminatview
The Cherub WST-670 tuner features a robust clip mechanism and a clear display for easy readability. Its intuitive controls allow for quick mode selection and precise tuning.

Imagine: față view of the Cherub WST-670 Clip-On Tuner, showing the display and clip mechanism.

Image: Close-up of the Cherub WST-670 Tuner's color LCD display, showing tuning indicators and battery level.
Caracteristici cheie:
- Moduri de reglare: Chromatic (C), Guitar (G), Ukulele (U), Violin (V).
- Baterie reîncărcabilă: Built-in Li-Po battery provides over 10 hours of continuous use per charge.
- High-Contrast LCD: Bright and clear color display shows tuning status.
- Clip reglabil: Strong and flexible clip for optimal viewunghiul de ing.
- Oprire automată: Automatically turns off to maximize battery life.
Înființat
1. Charging the Tuner
Before first use, fully charge the tuner. The built-in rechargeable battery ensures long operation time.
- Connect the included USB charging cable to the tuner's charging port.
- Conectați celălalt capăt al cablului USB la un adaptor de alimentare USB standard (nu este inclus) sau la portul USB al unui computer.
- The battery indicator on the display will show charging status. Once fully charged, the indicator will show a full battery.
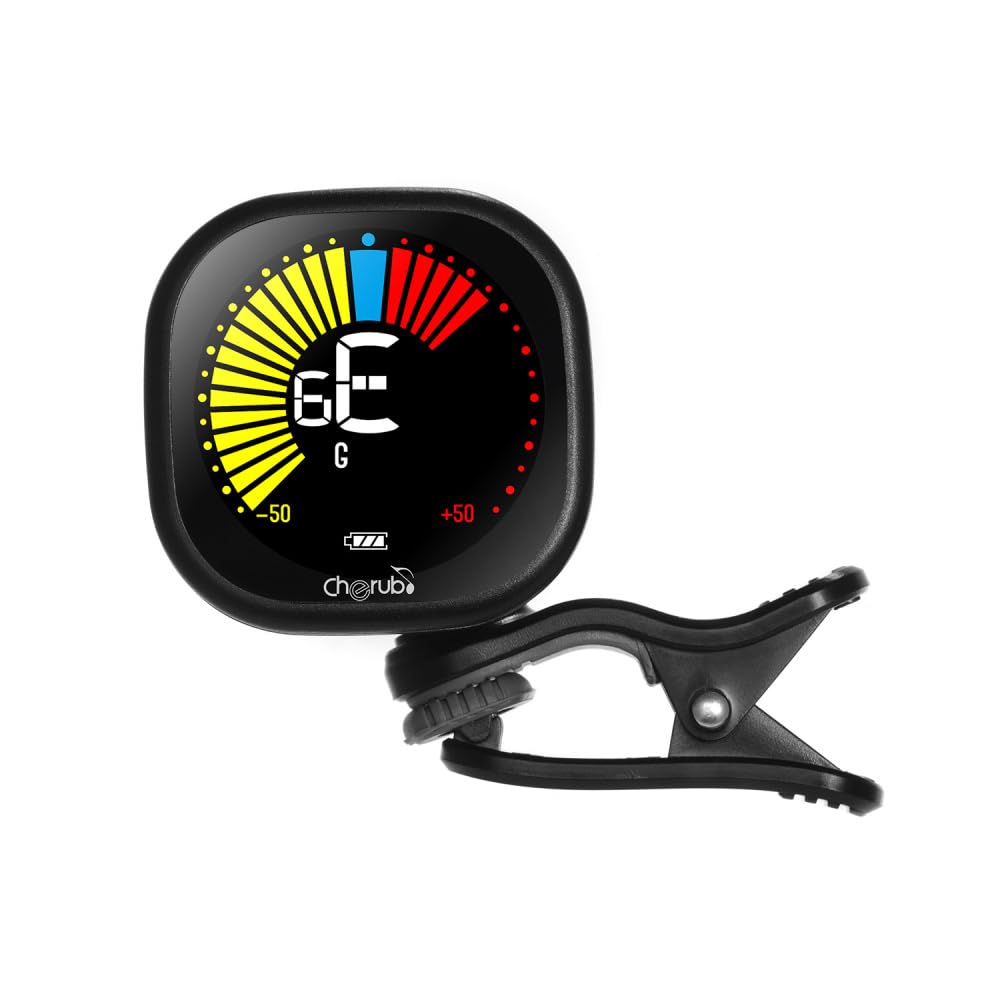
Image: Diagram illustrating how to connect the USB charging cable to the Cherub WST-670 Tuner for recharging.
2. Atașarea tunerului
The clip-on design allows for easy attachment to the headstock of your instrument.
- Gently open the clip and attach it securely to the headstock of your guitar, ukulele, or violin.
- Adjust the tuner's display angle for optimal visibility.

Image: The Cherub WST-670 Tuner securely clipped onto the headstock of an acoustic guitar.
Instrucțiuni de operare
1. Pornire/Oprire
- To power on, press and hold the power button (usually marked with a power symbol) for a few seconds.
- To power off, press and hold the power button again. The tuner also features an auto power-off function to save battery.
2. Selectarea modului de acordare
The WST-670 supports multiple tuning modes:
- Chromatic (C): For all instruments, displays the exact note.
- Guitar (G): Optimized for guitar tuning.
- Ukulele (U): Optimized for ukulele tuning.
- Violin (V): Optimized for violin tuning.
To change the tuning mode, press the "MODE" button repeatedly until the desired mode (C, G, U, or V) is displayed on the screen.
3. Acordarea instrumentului
- Ensure the tuner is powered on and the correct tuning mode is selected for your instrument.
- Pluck a single string on your instrument. The tuner will detect the vibration and display the note.
- Interpreting the Display:
- If the needle points to the left and the display is red/yellow, the note is flat. Tighten the string.
- If the needle points to the right and the display is red/yellow, the note is sharp. Loosen the string.
- When the note is in tune, the needle will be centered, and the display will turn green.
- Repeat for all strings until your instrument is perfectly in tune.
Întreţinere
Curatenie
To clean the tuner, use a soft, dry cloth. Do not use liquid cleaners or abrasive materials, as they may damage the display or casing.
Îngrijirea bateriei
- Evitați descărcarea completă frecventă a bateriei pentru a-i prelungi durata de viață.
- If storing the tuner for an extended period, charge it to about 50% capacity and recharge every few months.
- Use only the provided USB cable or a compatible cable for charging.
Depanare
Tuner not turning on:
- Ensure the battery is charged. Connect the tuner to a USB power source and allow it to charge for at least 30 minutes before attempting to power on again.
- Apăsați și țineți apăsat ferm butonul de pornire timp de câteva secunde.
Reglare inexactă:
- Check that the tuner is securely clipped to the instrument's headstock. Loose attachment can affect vibration detection.
- Ensure the correct tuning mode (C, G, U, or V) is selected for your instrument.
- Tune in a quiet environment to avoid interference from external sounds.
- If using Chromatic mode, ensure you are aware of the specific notes for your instrument's standard tuning.
Afișajul este slab sau pâlpâie:
- The battery might be low. Recharge the tuner using the provided USB cable.
Specificații
| Marca: | Heruvim |
| Model: | WST-670 |
| Moduri de reglare: | Chromatic (C), Guitar (G), Ukulele (U), Violin (V) |
| Interval de detectare: | A0 (27.50 Hz) - C8 (4186 Hz) |
| Metoda de detectare: | Piezo (clip) |
| Pitch de referință: | 440 Hz |
| Precizia reglajului: | +/-1 cent |
| Alimentare electrică: | Built-in Rechargeable Li-Po Battery (3.7V 180mAh) |
| Greutatea articolului: | 30 g / 1.1 oz |
| Dimensiuni produs: | 10.5 x 9.5 x 5 cm (aprox. 4.1 x 3.7 x 2 inci) |
Garanție și suport
This product comes with a standard manufacturer's warranty. For specific warranty details, please refer to the documentation provided at the time of purchase or contact your retailer. For technical support or further assistance, please contact the customer service department of your retailer.
Note: The guitar shown in images is for illustration purposes only and is not included with the tuner.


