
1. Introducere
This manual provides detailed instructions for the setup, operation, maintenance, and troubleshooting of your GEEKOM A6 Mini PC. Please read this manual thoroughly before using the device to ensure optimal performance and longevity.
The GEEKOM A6 is a compact and powerful mini PC designed for various applications, from office productivity and multimedia consumption to light gaming and creative tasks. It features an AMD Ryzen 7 6800H processor, Radeon 680M graphics, 16GB DDR5 RAM, and a 1TB SSD, running on Windows 11 Pro.
2. Ce se află în cutie
Carefully unpack your GEEKOM A6 Mini PC and check for the following items:
- Mini PC GEEKOM A6
- Adaptor de alimentare
- Cablu HDMI
- Suport VESA cu șuruburi
- Ghidul utilizatorului
- Card de mulțumire

Figura 2.1: Conținutul pachetului
3. Configurare
3.1 Conexiuni fizice
Înainte de a porni Mini PC-ul, conectați toate perifericele necesare:
- Conectare la afișaj: Use the provided HDMI cable to connect the Mini PC to your monitor or TV. The device supports up to four 4K displays via its two USB4 ports and two HDMI ports.
- Conectați periferice: Conectați tastatura, mouse-ul și alte dispozitive USB la porturile USB disponibile.
- Conexiune retea: Pentru o conexiune cu fir, conectați un cablu Ethernet la portul LAN de 2.5 Gbps. Pentru conexiunea wireless, asigurați-vă că rețeaua Wi-Fi este disponibilă.
- Conexiune de alimentare: Conectați adaptorul de alimentare la portul de intrare CC de pe Mini PC, apoi introduceți adaptorul într-o priză.
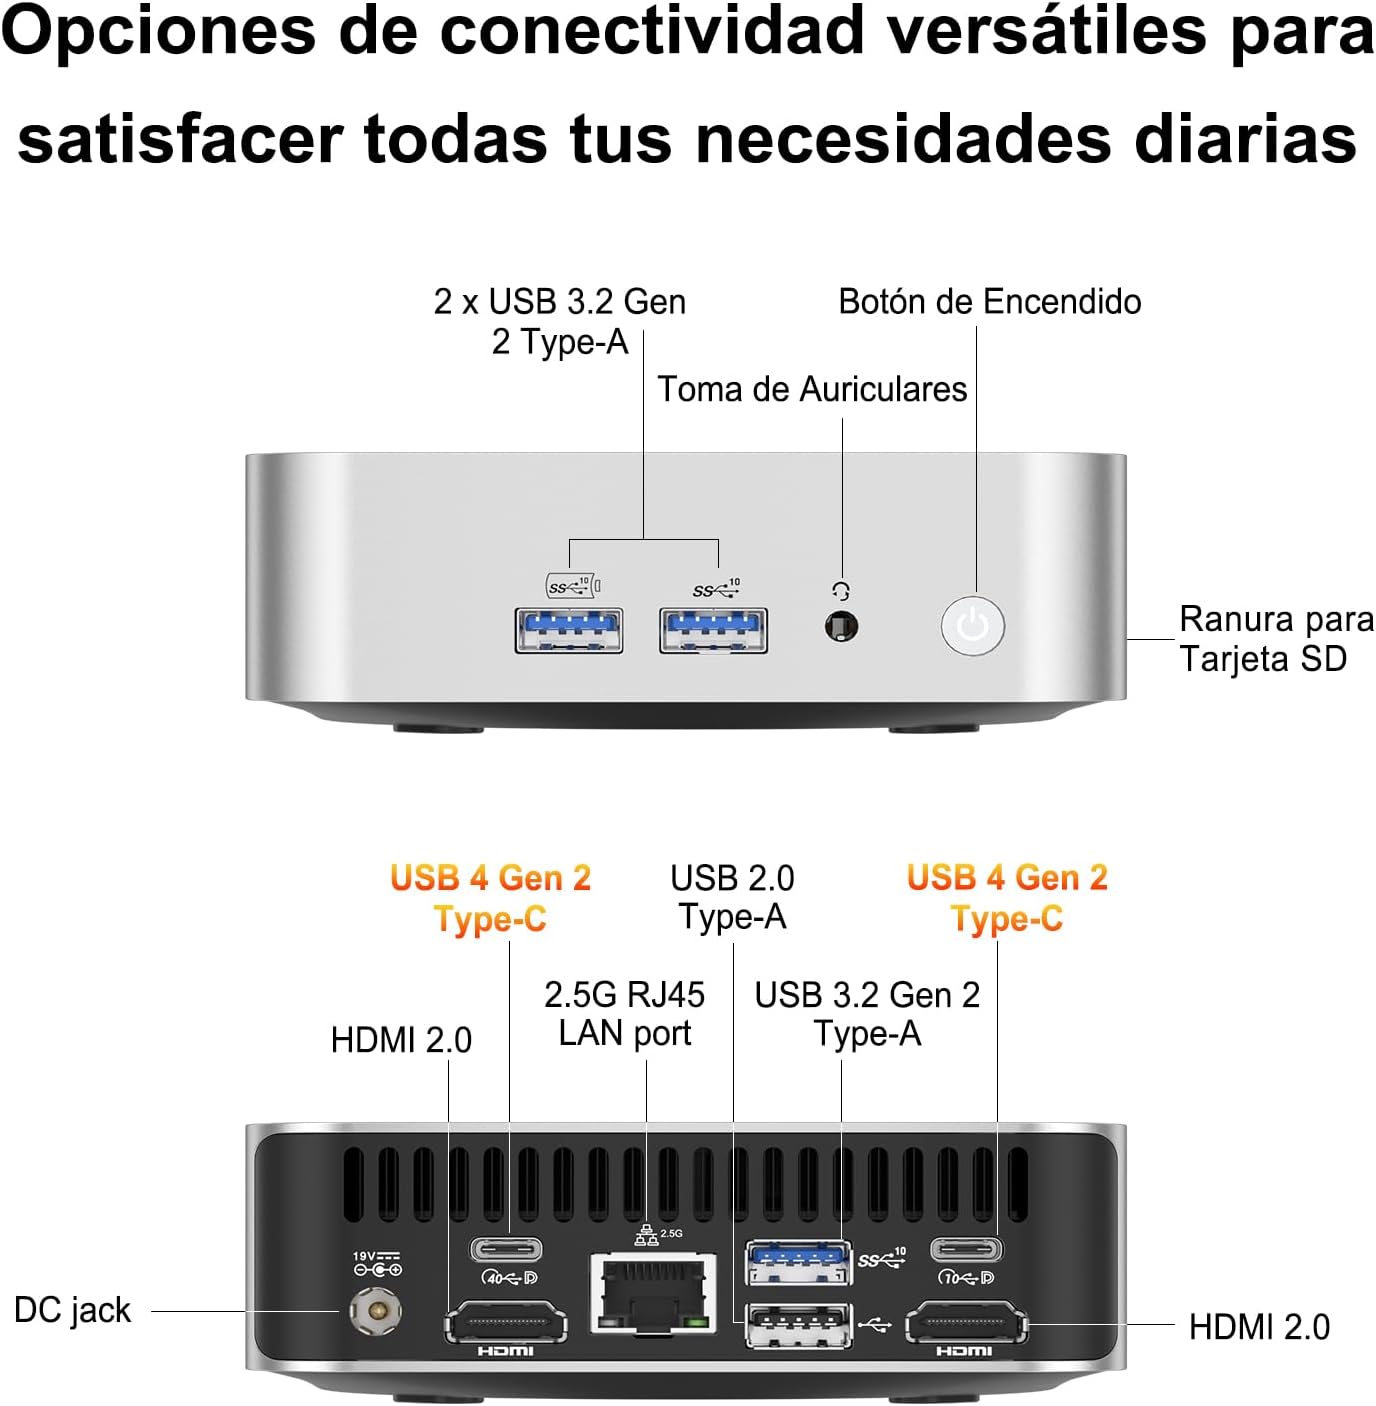
Figura 3.1: Dispunerea porturilor
3.2 Instalarea suportului VESA
The GEEKOM A6 Mini PC includes a VESA mount for flexible installation behind a monitor or on a wall. This helps save desk space and keeps your workspace tidy.
- Atașați suportul de montare VESA pe spatele monitorului folosind șuruburile furnizate. Asigurați-vă că suportul este fixat în siguranță.
- Slide the GEEKOM A6 Mini PC onto the VESA mount until it clicks into place.

Figura 3.2: Instalarea suportului VESA
3.3 Pornire
Press the power button located on the front of the Mini PC. The system will boot up, and Windows 11 Pro will load. Follow the on-screen instructions for initial Windows setup if it's your first time using the device.
4. Operare
4.1 Sistem de operare
The GEEKOM A6 comes with Windows 11 Pro pre-installed, offering a secure and efficient computing experience. It also supports other operating systems like Linux, providing flexibility for various user needs.

Figura 4.1: Compatibilitatea sistemului de operare
4.2 Configurarea cu mai multe afișaje
The GEEKOM A6 supports up to four displays simultaneously, with resolutions up to 8K via USB4 and 4K via HDMI. This capability enhances productivity for multitasking and provides an immersive entertainment experience.

Figure 4.2: Multi-Display Setup
4.3 Conectivitate
Mini PC-ul oferă opțiuni complete de conectivitate:
- Porturi USB: Multiple USB 3.2 Gen 2 Type-A ports and two USB4 Gen 2 Type-C ports for high-speed data transfer and peripheral connections.
- Porturi HDMI: Two HDMI 2.0 ports for display output.
- Port LAN: A 2.5Gbps RJ45 LAN port for high-speed wired network access.
- Fără fir: Integrated Wi-Fi 6E for fast and reliable wireless internet, and Bluetooth 5.2 for connecting wireless peripherals.
- Cititor de carduri SD: A built-in SD card slot for easy access to photos and videos.

Figura 4.3: Conectivitate wireless
4.4 Performanță pesteview
The GEEKOM A6 is equipped with high-performance components:
- Procesor: AMD Ryzen 7 6800H with 8 cores, 16 threads, and a max boost clock of 4.7 GHz, providing robust processing power.
- Grafică: Integrated AMD Radeon 680M GPU, capable of handling demanding visual tasks and light to medium gaming.
- Memorie: 16GB of high-speed DDR5 RAM, expandable up to 64GB, ensuring smooth multitasking.
- Depozitare: 1TB PCIe Gen4x4 SSD for rapid boot times and quick application loading.
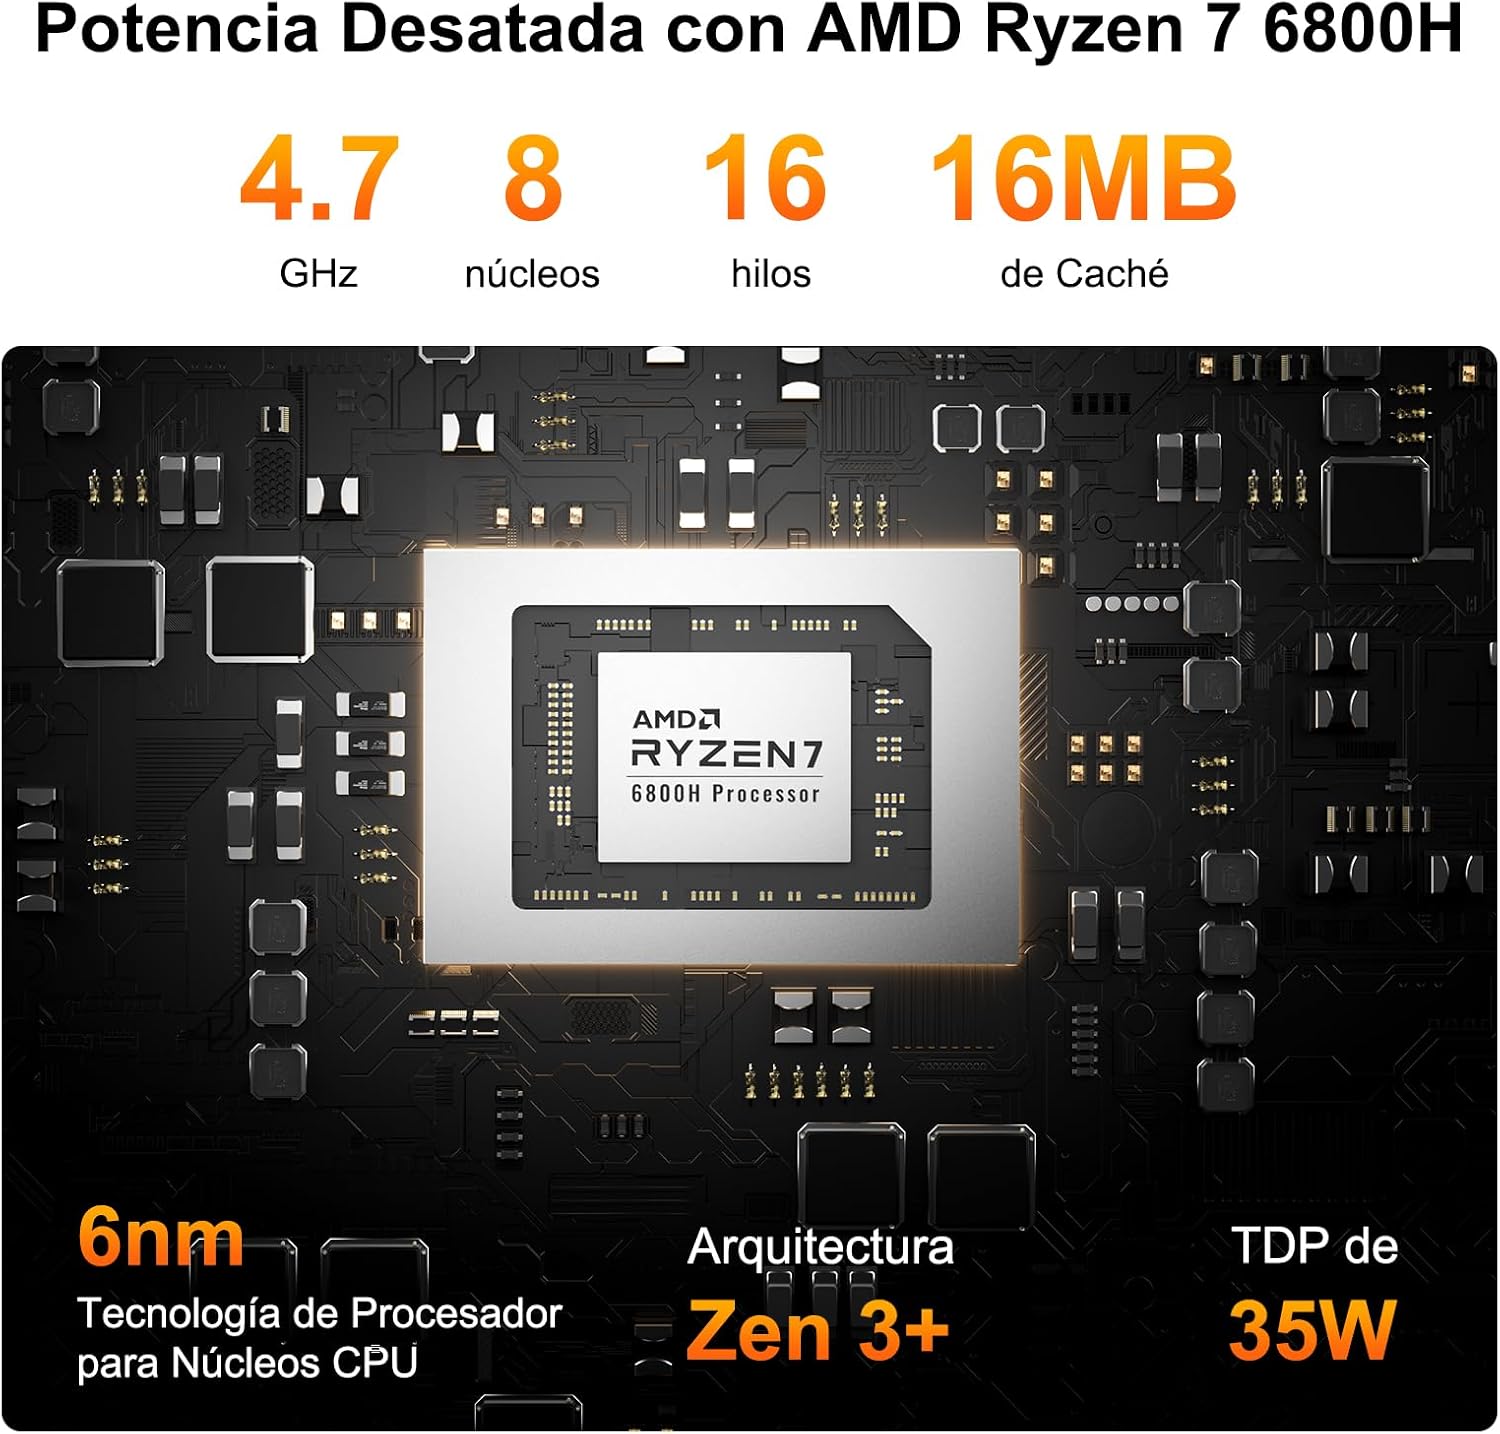
Figure 4.4: AMD Ryzen 7 6800H Processor Details

Figure 4.5: AMD Radeon 680M Graphics Performance
4.5 Sistem de răcire
The GEEKOM A6 features IceBlast 2.0 cooling technology, designed to maintain optimal operating temperatures and ensure stable performance even under heavy workloads. The system utilizes large fan blades and copper heat sinks for efficient heat dissipation, resulting in quiet operation.

Figure 4.6: IceBlast 2.0 Cooling System
5. Întreținere
5.1 Upgrade-uri RAM și SSD
The GEEKOM A6 is designed for user-friendly upgrades. It features two DDR5 memory slots, with one 16GB module pre-installed and one slot free for expansion up to 64GB. The 1TB PCIe Gen4x4 SSD can also be upgraded or expanded.
- Oprire: Asigurați-vă că Mini PC-ul este complet oprit și deconectat de la sursa de alimentare.
- Accesați componentele interne: Carefully remove the bottom panel of the Mini PC. Refer to the exploded view diagram for component locations.
- Upgrade RAM: Locate the DDR5 memory slots. Gently press the clips on either side of the RAM module to release it. Insert new RAM modules, ensuring they are seated correctly.
- Upgrade/Add SSD: Locate the M.2 2280 NVMe PCIe 4.0 SSD slot. If upgrading, remove the existing SSD. Insert the new SSD at an angle and secure it with the retaining screw.
- Reasamblați: Carefully replace the bottom panel and secure it.

Figure 5.1: RAM and SSD Upgrade Options

Figura 5.2: Componente interne
5.2 Curățare
To maintain optimal performance and prevent overheating, regularly clean your Mini PC:
- Utilizați o cârpă moale și uscată pentru a șterge exteriorul dispozitivului.
- Use compressed air to clear dust from the ventilation grilles and ports. Do not insert any objects into the vents.
- Asigurați-vă că dispozitivul este oprit și deconectat înainte de curățare.
6. Depanare
If you encounter issues with your GEEKOM A6 Mini PC, refer to the following common problems and solutions:
| Problemă | Cauza posibila | Soluţie |
|---|---|---|
| Nu există alimentare/Dispozitivul nu pornește | Power adapter not connected, faulty outlet, power button issue. | Check power connections, try a different outlet, ensure power adapter is functional. |
| Nicio ieșire de afișare | Incorrect cable connection, monitor input not selected, faulty cable/monitor. | Verify HDMI/USB4 cable connections, select correct input on monitor, test with another cable/monitor. |
| Intermittent Wi-Fi/Bluetooth connection | Driver issues, interference, weak signal. | Update Wi-Fi/Bluetooth drivers from GEEKOM's official website or AMD's website. Ensure no physical obstructions or interference sources. |
| Unexpected reboots or shutdowns | Overheating, software conflicts, power supply issues, outdated drivers (e.g., AMD ERP Mode related). | Ensure proper ventilation. Update all system drivers, especially chipset and graphics drivers. Check for Windows updates. If issues persist, contact support. |
| USB peripherals not recognized | Driver issues, faulty port, incompatible device. | Try different USB ports. Update USB drivers. Test peripherals on another computer. |
7. Specificații
| Caracteristică | Detaliu |
|---|---|
| Procesor | AMD Ryzen 7 6800H (8 Cores, 16 Threads, up to 4.7 GHz) |
| Grafică | AMD Radeon 680M (integrată) |
| Memorie (RAM) | 16GB DDR5 (4800 MHz), 2 SO-DIMM slots, expandable up to 64GB |
| Depozitare | 1TB PCIe Gen4x4 SSD (expandable up to 4TB) |
| Sistem de operare | Windows 11 Pro (pre-installed), Linux compatible |
| Ieșire video | 2x HDMI 2.0, 2x USB4 (supports up to 4 displays, 8K resolution) |
| Porturi USB | 2x USB4 Gen 2 Type-C, 2x USB 3.2 Gen 2 Type-A, 1x USB 2.0 Type-A |
| Reţea | 2.5Gbps RJ45 LAN, Wi-Fi 6E |
| Bluetooth | Bluetooth 5.2 |
| Alte porturi | SD Card Reader, 3.5mm Headphone Jack, DC-in |
| Dimensiuni | 11.18 x 11.18 x 3.56 cm |
| Greutate | 500 g |
| Răcire | IceBlast 2.0 Technology (Air Cooling) |
| Caracteristici de securitate | Windows Defender, Windows Hello, BitLocker, TPM 2.0 |
8. Garanție și asistență
The GEEKOM A6 Mini PC comes with a comprehensive warranty and dedicated customer support:
- Garanție de calitate de 3 an: Covers defects in design and manufacturing.
- Înlocuire gratuită timp de 1 an: For eligible issues within the first year.
- 2-Years Free Maintenance: For eligible issues within the first two years.
- 24/7 Online Customer Support: Professional assistance is available at all times.
For any inquiries or support, please contact GEEKOM customer service through your Amazon account (Order History > Get Help) or via email at pan.he@geekom.tw. You will receive a response within 24 hours.

Figura 8.1: Informații despre garanție și asistență