
1. Produs terminatview
The JONSBO D32 STD Micro-ATX PC Case is a compact and highly compatible chassis designed for building high-performance desktop systems. It supports a wide range of hardware components, including back-connect motherboards, various cooling solutions, and long graphics cards, making it suitable for both gaming and business applications.
This manual provides detailed instructions for setting up, operating, maintaining, and troubleshooting your JONSBO D32 STD PC Case.

Figure 1: JONSBO D32 STD Micro-ATX PC Case, front view cu componente interne.
2. Caracteristici cheie
- Compatibilitate ridicată: Supports MATX Back-Connect/BTF motherboards, 240mm AIO liquid coolers, 365mm GPUs, and ATX/SFX-L/SFX PSUs.
- Design compact: Optimized for desktop use with a small footprint, featuring a magnetic dust-proof net at the bottom.
- Flexible Cooling Options: Accommodates up to 6 cooling fans (Top: 2x120mm/140mm, Bottom: 3x120mm/2x140mm, Rear: 1x120mm) and CPU air coolers up to 164mm (Intel) or 163mm (AMD).
- Configurare stocare: Supports up to 3x 2.5" SSDs or 2x 2.5" SSDs + 1x 3.5" HDD.
- I / O frontală: Includes USB3.2 Gen1 Type-A (x1), USB3.2 Gen2 Type-C (x1), and a combined HP MIC 2-in-1 port.
3. Configurare și instalare
3.1 Despachetarea și inspecția
Carefully remove the PC case from its packaging. Inspect the case for any signs of damage during transit. Ensure all accessories listed in the packing list are present. The case includes a plastic container with labeled bags for screws and zip ties for convenience.
3.2 Component Installation Guidelines
The D32 STD case is designed for efficient component installation. Follow these guidelines for optimal setup:
- Instalare placa de baza: The case supports MINI-ITX and MICRO-ATX motherboards, including back-connect MICRO-ATX types. Ensure proper standoff alignment before securing the motherboard. For back-connect motherboards, the D32STD supports widths up to 207mm.
- Instalarea unității de alimentare (PSU): The case supports ATX, SFX-L, and SFX PSUs. A front power structure improves internal space utilization. For ATX PSUs, the recommended length varies based on GPU installation: 150mm (GPU in 1st PCI-E slot) or 170mm (GPU in 2nd PCI-E slot). A 14cm ATX PSU is generally easier to manage. Note: Internal power adapter cable is incompatible with 16A plug power supply.
- Instalarea plăcii grafice (GPU): The D32 STD supports graphics cards up to 365mm in length. The total clearance from the GPU backplane to the bottom is 94mm (1st PCI-E slot) or 73mm (2nd PCI-E slot). Adjust bottom fan installation based on GPU thickness and position.
- Instalarea sistemului de racire:
- Răcire cu lichid: The top of the case supports 240mm AIO integrated liquid coolers. It can also accommodate a 30mm thick radiator with 30mm fans.
- Răcire cu aer: Compatible with high-performance dual tower air-cooled radiators with a height of up to 164mm (Intel CPU) or 163mm (AMD CPU).
- Configurație ventilator:
- Top: 2 x 120mm or 2 x 140mm fans
- Bottom: 3 x 120mm or 2 x 140mm fans (forms a high flow intake channel)
- Rear: 1 x 120mm fan
- Instalarea unității de stocare: The case offers flexible storage options. It supports up to three 2.5" SSDs or a combination of two 2.5" SSDs and one 3.5" HDD.
- Organizare de cabluri: Utilize the provided zip ties and the case's internal routing options to manage cables effectively. For back-connect motherboards, ensure sufficient space for stiffer power supply cables.

Figure 2: Motherboard tray with highlighted areas for back-connect motherboard support.

Figure 3: Power supply installation area and internal airflow design.

Figure 4: Graphics card length and clearance specifications.

Figure 5: Fan installation locations and sizes.

Figure 6: Storage drive installation options.
4. Operarea carcasei PC-ului
Once all components are installed and secured, connect your peripherals and power cable. The front I/O panel provides convenient access to USB ports and audio jacks.
4.1 Front I/O Interface
- USB3.2 Gen1 Type-A: 1 port
- USB3.2 Gen2 Type-C: 1 port
- HP MIC 2 in 1 (Headphone & Microphone composite audio port): 1 port

Figure 7: Front I/O panel for easy connectivity.
4.2 Pornire
Press the power button located on the front panel to turn on your system. Ensure all cables are securely connected before powering on.
5. Întreținere
Întreținerea regulată ajută la asigurarea performanței optime și a longevității componentelor PC-ului.
- Managementul prafului: The case features a magnetic dust-proof net at the bottom. Regularly remove and clean this filter to prevent dust buildup inside the case, which can hinder airflow and component cooling.
- Curățarea exteriorului: Folosiți un moale, damp cloth to clean the exterior surfaces of the case. Avoid abrasive cleaners or solvents.
- Curatenie interioara: Periodically open the side panels and use compressed air to remove dust from internal components like fans, heatsinks, and circuit boards. Ensure the system is powered off and unplugged before performing internal cleaning.

Figure 8: Magnetic dust filter for easy cleaning.
6. Depanare
This section addresses common issues you might encounter with your PC case.
6.1 Sistemul nu pornește
- Verificați conexiunile de alimentare: Ensure the PSU is properly connected to the wall outlet and the motherboard. Verify the power button cable from the case is correctly connected to the motherboard's front panel header.
- Comutator sursă de alimentare: Confirm the power switch on the PSU itself is in the "ON" position.
- Scaune componente: Reseat the CPU, RAM, and GPU to ensure they are properly seated in their respective slots.
6.2 Probleme de supraîncălzire
- Configurație ventilator: Verify that all installed fans are spinning and configured for optimal airflow (e.g., intake at front/bottom, exhaust at top/rear).
- Acumulare de praf: Curățați toate filtrele de praf și componentele interne așa cum este descris în secțiunea Întreținere.
- Pastă termică: Ensure CPU cooler has adequate thermal paste application.
6.3 Porturile USB nu funcționează
- Front Panel Header: Check that the USB cables from the front I/O panel are securely connected to the correct headers on your motherboard.
- Probleme cu driverul: Asigurați-vă că driverele chipset-ului plăcii de bază sunt actualizate.
7. Specificații
| Caracteristică | Caietul de sarcini |
|---|---|
| Model de produs | D32 STD |
| Chassis Size (excluding protruding parts) | 384 mm (L) x 207 mm (l) x 302 mm (înălțime) |
| Chassis Size (including footrest) | 395 mm (L) x 207 mm (l) x 314 mm (înălțime) |
| Suport pentru placa de baza | MINI-ITX / MICRO-ATX / Back-connect MICRO-ATX |
| Sloturi de expansiune | 4 |
| Material șasiu | SPCC steel plate (Thickness: 0.7mm-0.8mm) |
| CPU Air Cooler Height Limit | 164mm MAX (Intel CPU) / 163mm MAX (AMD CPU) |
| CPU Water-cooled Radiator Support | Top 240 AIO |
| GPU Compatible Length | Până la 365 mm |
| ATX PSU Length Limit | 150mm (GPU in 1st PCI-E slot) / 170mm (GPU in 2nd PCI-E slot) / 200mm (GPU length 288mm) |
| SFX PSU Support | SFX / SFX-L |
| Drive Bays | 3 x 2.5" SSD or 2 x 2.5" SSD + 1 x 3.5" HDD |
| I/O față | 1x USB3.2 Gen1 Type-A, 1x USB3.2 Gen2 Type-C, 1x HP MIC 2-in-1 |
| Suport pentru fani | Top: 2x120mm/2x140mm, Rear: 1x120mm, Bottom: 3x120mm/2x140mm |
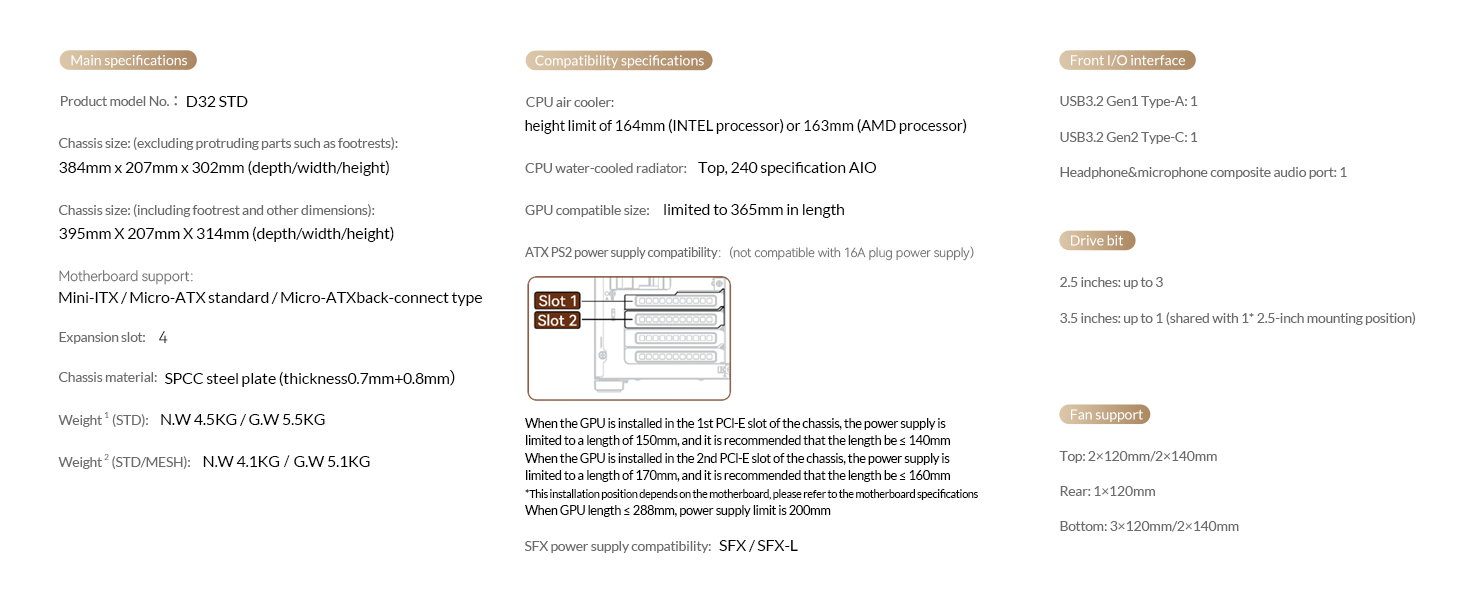
Figura 9: Specificații tehnice complete.
8. Videoclipuri oficiale ale produselor
JONSBO D32 STD Micro ATX PC Case Overview
Acest videoclip oferă o prezentare completăview of the JONSBO D32 STD Micro ATX PC Case, highlighting its features, design, and compatibility. It showcases the case from various angles and demonstrates its compact size and internal layout.
9. Garanție și asistență
Pentru informații despre garanție și asistență tehnică, vă rugăm să consultați site-ul oficial JONSBO website-ul lor web sau contactați serviciul lor de asistență pentru clienți. Păstrați bonul fiscal ca dovadă a achiziției pentru reclamațiile în garanție.
Pentru asistență suplimentară, puteți vizita Magazinul Jonsbo pe Amazon.