
1. Introducere
Welcome to the user manual for your Emerson CKSS7071 Sunrise Smartset Alarm Clock Radio. This device is designed to enhance your daily routine with its unique features, including a sunrise simulation, soothing sound options, Bluetooth connectivity, and an 8-color dimmable LED display. Please read this manual thoroughly to understand the full functionality and ensure proper use and care of your new alarm clock radio.
Video 1: Pesteview of the Emerson CKSS7071 Sunrise Smartset Alarm Clock Radio. This video demonstrates the key features and design of the product.
2. Informații importante privind siguranța
- Citiți toate instrucțiunile înainte de a utiliza aparatul.
- Păstrați aceste instrucțiuni pentru referințe viitoare.
- Nu utilizați acest aparat lângă apă.
- Curățați numai cu o cârpă uscată.
- Nu blocați niciun orificiu de ventilație. Instalați conform instrucțiunilor producătorului.
- Nu instalați lângă nicio sursă de căldură, cum ar fi calorifere, registre de căldură, sobe sau alte aparate (inclusiv ampliificatori) care produc căldură.
- Protejați cablul de alimentare să nu fie călcat sau ciupit, în special la prize, prize convenabile și la punctul de ieșire din aparat.
- Utilizați numai atașamente/accesorii specificate de producător.
- Deconectați acest aparat din priză în timpul furtunilor cu fulgere sau când nu este utilizat pentru perioade lungi de timp.
- Toate lucrările de întreținere se adresează personalului de service calificat. Întreținerea este necesară atunci când aparatul a fost deteriorat în vreun fel, cum ar fi cablul de alimentare sau ștecherul este deteriorat, s-a vărsat lichid sau au căzut obiecte în aparat, aparatul a fost expus la ploaie sau umezeală, nu funcționează normal , sau a fost abandonat.
3. Conținutul pachetului
Verificați dacă toate articolele sunt prezente la deschiderea pachetului:
- Emerson CKSS7071 Sunrise Smartset Alarm Clock Radio
- Adaptor de curent alternativ
- Manual de utilizare
4. Produs terminatview
4.1 Față View

Imaginea 1: Faţă view of the alarm clock, featuring the digital time display and the sunrise simulation light panel.
The front of the unit features the main 1.2-inch LED time display and the large circular light panel for sunrise simulation and ambient lighting. Indicators for AM/PM, Alarm 1/2, and Bluetooth status are also visible.
4.2 Latura View (Controale)
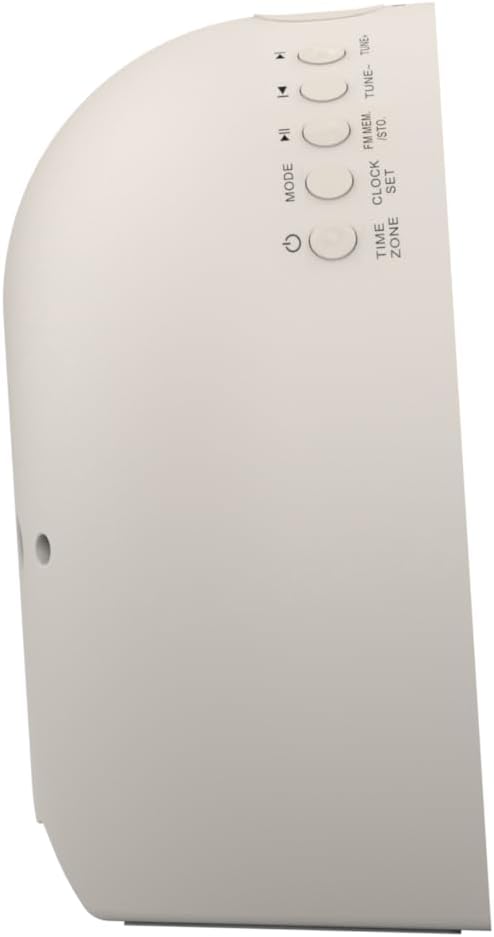
Imaginea 2: Latura view a ceasului deșteptător, evidențiind butoanele de control pentru diverse funcții.
The side panel houses the primary control buttons, including Power, Mode, Clock Set, Time Zone, Tune/Skip, and Volume controls. These buttons are used for setting time, alarms, and navigating audio functions.
4.3 Spate View

Imaginea 3: Spate view of the alarm clock, showing the speaker grille and power connection port.
The rear of the unit features the main speaker grille and the power input port for connecting the AC adapter.
5. Configurare
5.1 Conexiune la alimentare
- Plug the AC power adapter into the DC IN jack located on the back of the unit.
- Plug the other end of the adapter into a standard wall outlet (AC 100-240V, 50/60Hz).
- Unitatea se va porni automat.
5.2 SmartSet Automatic Time Setting
The SmartSet system automatically sets the correct time and date as soon as you plug in the unit. It also maintains time and alarm settings during power disruptions or outages, provided the button cell battery is installed.
5.3 Instalarea bateriei de rezervă
A button cell battery (CR2032, included) is required for battery backup. This ensures that time and alarm settings are retained during a power outage.
- Localizați compartimentul bateriilor în partea de jos a unității.
- Deschideți capacul compartimentului bateriei.
- Introduceți o baterie tip pastilă CR2032, asigurându-vă că respectați polaritatea corectă (+/-).
- Închideți bine capacul compartimentului bateriei.
6. Instrucțiuni de utilizare
6.1 Setting the Clock Manually
- Țineți apăsat butonul SET Ceas buton. Cifrele orelor vor clipi.
- Utilizați TUNE -/+ Apăsați butoanele pentru a regla ora. SET Ceas pentru a confirma.
- The minute digits will flash. Use the TUNE -/+ Apăsați butoanele pentru a regla minutele. SET Ceas pentru a confirma.
- Continuați acest proces pentru a seta anul, luna și ziua.
- Presa SET Ceas din nou pentru a ieși din modul de setare a orei.
6.2 Setarea alarmelor (Alarma 1 și Alarma 2)
The unit features dual alarms. Follow these steps for each alarm:
- Țineți apăsat butonul ALARMA 1 or ALARMA 2 Cifrele orei alarmei vor clipi.
- Utilizați TUNE -/+ buttons to adjust the alarm hour. Press the respective ALARMA butonul pentru a confirma.
- Cifrele minutelor alarmei vor clipi. Folosiți TUNE -/+ buttons to adjust the alarm minutes. Press the respective ALARMA butonul pentru a confirma.
- Select the alarm source (Buzzer, FM Radio, or Soothing Sound). Press the respective ALARMA butonul pentru a confirma.
- Reglați volumul alarmei folosind VOL - / + buttons. Press the respective ALARMA butonul pentru a confirma.
- The alarm is now set. The alarm indicator (AL1 or AL2) will appear on the display.
6.3 Sunrise Simulation
The sunrise simulation feature gradually brightens the light panel before your set alarm time, mimicking a natural sunrise to gently wake you.
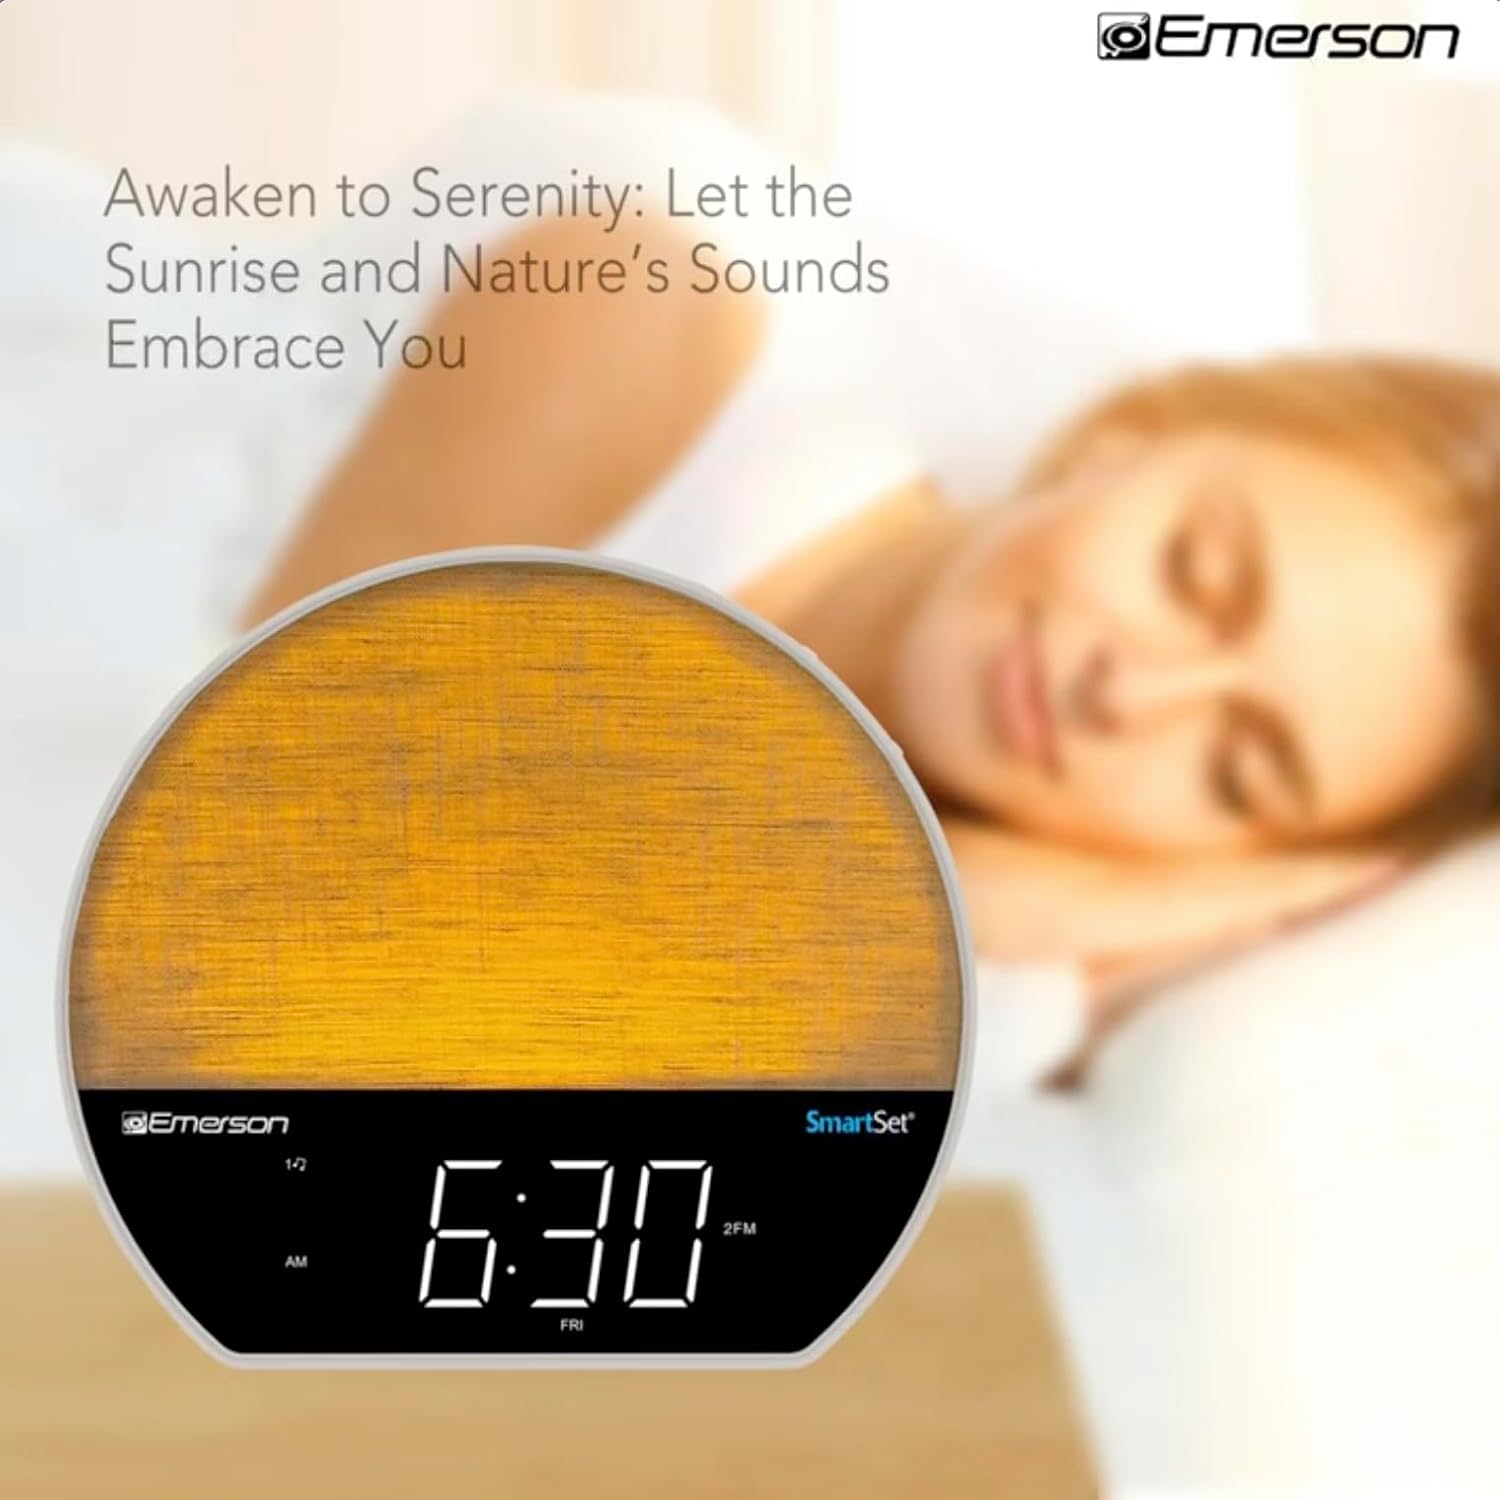
Imaginea 4: The alarm clock simulating a sunrise with a warm, increasinintensitatea luminii g.
To activate, ensure the sunrise option is selected during alarm setup. The light will begin to brighten 30 minutes before the alarm sounds.
6.4 Soothing Sounds and White Noise
The unit includes 6 soothing sounds and white noise to help with relaxation or waking up.
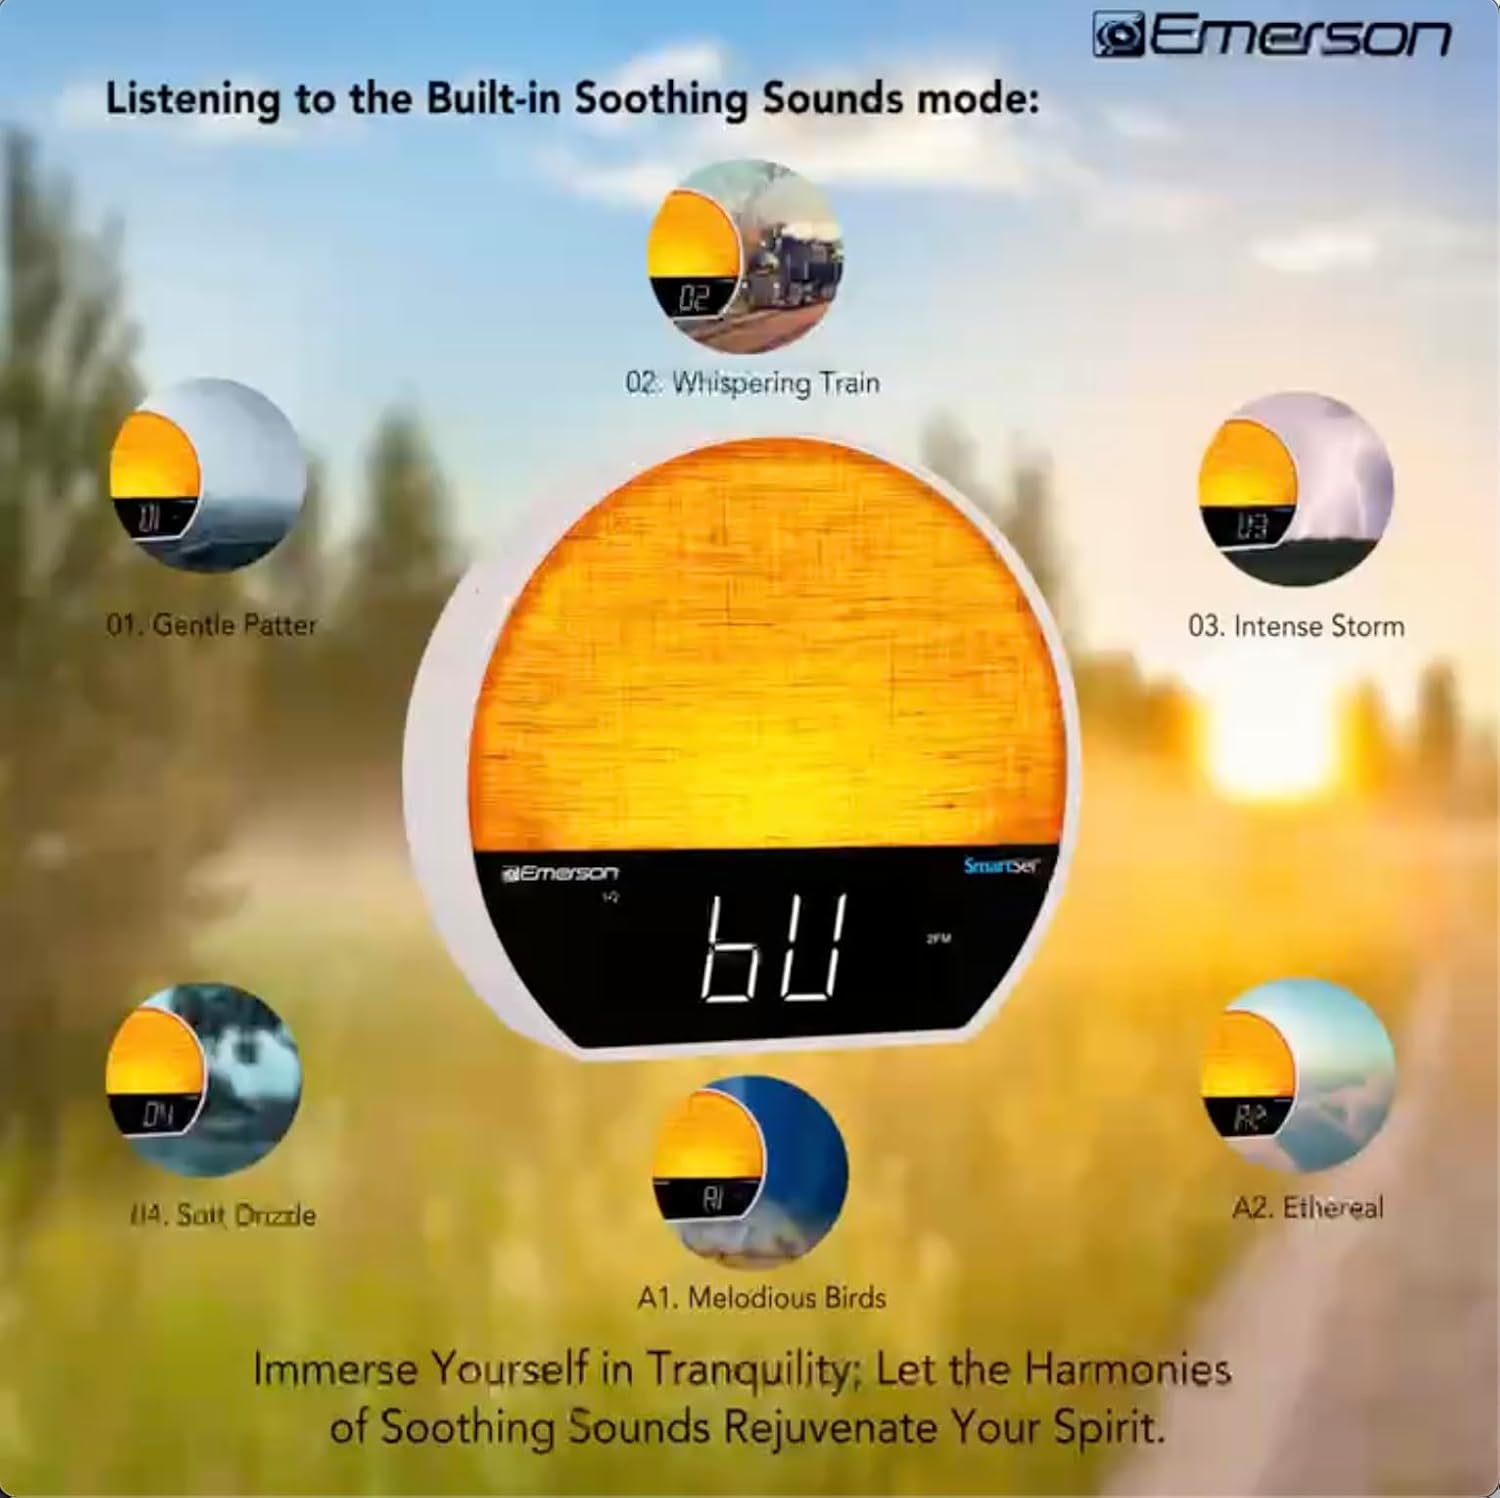
Imaginea 5: Visual representation of the six soothing sound modes available on the alarm clock.
- Apăsați tasta MOD button repeatedly until the Soothing Sound mode is selected.
- Utilizați TUNE -/+ buttons to cycle through the available sounds (e.g., Gentle Patter, Whispering Train, Intense Storm, Soft Drizzle, Melodious Birds, Ethereal, White Noise).
- Reglați volumul folosind VOL - / + butoane.
6.5 Funcția difuzor Bluetooth
Conectați smartphone-ul sau alt dispozitiv compatibil Bluetooth pentru a reda audio în flux wireless.

Imaginea 6: The alarm clock in Bluetooth mode, paired with a mobile device for audio streaming.
- Apăsați tasta MOD button until 'BT' appears on the display, indicating Bluetooth mode.
- On your device, enable Bluetooth and search for 'Emerson CKSS7071'.
- Select the device to pair. A confirmation tone will sound upon successful pairing.
- You can now play audio from your device through the alarm clock's speaker.
6.6 Funcționarea radioului FM
Ascultă posturile tale de radio FM preferate.
- Apăsați tasta MOD apăsați butonul până când pe afișaj apare „FM”.
- Apăsați tasta TUNE -/+ buttons briefly to manually tune to a station.
- Țineți apăsat butonul TUNE -/+ butoane pentru a scana automat următorul post disponibil.
- Pentru a salva un post, apăsați și mențineți apăsat butonul FM MEM până când numărul presetat clipește. Folosiți butonul TUNE -/+ pentru a selecta un număr presetat, apoi apăsați FM MEM din nou pentru a salva.
6.7 LED Decor and Dimmer Control
Customize the ambient light with 8 different colors and adjust the brightness.

Imaginea 7: The alarm clock demonstrating its 8-color dimmable LED decor options.
- Apăsați tasta APRINDE button to cycle through the 8 available colors or turn the light off.
- To adjust the brightness of the LED decor light, press and hold the APRINDE button. The brightness will cycle through 5 levels. Release the button at your desired brightness.
6.8 Controlul variatorului de intensitate a afișajului
Adjust the brightness of the 1.2-inch LED time display.

Imaginea 8: The alarm clock illustrating the five distinct levels of display luminescence.
Apăsați tasta DIMMER button (often combined with another function, refer to button labels) to cycle through 4 levels of display brightness (Bright, Moderate, Dim, Faint).
6.9 Temporizator de repaus
Set a timer for the audio to automatically turn off after a specified duration.

Imaginea 9: The alarm clock set for a sunset sleep timer, providing a harmonious end to the day.
- While audio is playing (FM or Soothing Sound), press the DORMI buton.
- Apăsați în mod repetat tasta DORMI button to cycle through available sleep timer durations (e.g., 15, 30, 60, 90 minutes, or OFF).
- The audio will automatically turn off after the selected time.
6.10 Funcția Snooze
Când sună o alarmă, apăsați butonul PUI DE SOMN button (usually a large button on top) to temporarily silence the alarm for a few minutes. The alarm will sound again after the snooze period.
7. Întreținere
7.1 Curățare
- Deconectați întotdeauna unitatea de la priză înainte de curățare.
- Utilizați o cârpă moale și uscată pentru a curăța suprafețele exterioare.
- Nu folosiți produse de curățare lichide, abrazive sau spray-uri chimice, deoarece acestea pot deteriora finisajul.
7.2 Înlocuirea bateriei
Dacă setările de oră și alarmă nu sunt păstrate în timpul unei întreruperi de curenttage, the button cell backup battery may need to be replaced. Follow the instructions in section 5.3 to replace the CR2032 battery.
8. Depanare
| Problemă | Cauza posibila | Soluţie |
|---|---|---|
| Unitatea nu pornește. | Adaptorul de alimentare nu este conectat sau este defect. | Asigurați-vă că adaptorul de curent alternativ este conectat corect la unitate și la o priză de perete funcțională. |
| Setările de oră/alarmă s-au pierdut după întreruperea alimentăriitage. | Bateria de rezervă este descărcată sau nu este instalată. | Install or replace the CR2032 button cell battery (see section 5.3). |
| Alarma nu sună. | Alarma nu este activată sau volumul este prea scăzut. | Ensure the alarm is set and activated (AL1/AL2 indicator on). Increase alarm volume. |
| Dispozitivul Bluetooth nu se poate conecta. | Unit not in Bluetooth mode or device too far. | Ensure the unit is in Bluetooth mode ('BT' displayed). Move your device closer to the unit. Try unpairing and re-pairing. |
| Recepție radio FM slabă. | Antena nu este extinsă sau există interferențe. | Extend the FM wire antenna fully and reposition it for better reception. Avoid placing near other electronic devices. |
| Afișajul este prea luminos/întunecat. | Display dimmer setting needs adjustment. | Apăsați tasta DIMMER button to cycle through brightness levels (see section 6.8). |
9. Specificații
| Caracteristică | Detaliu |
|---|---|
| Numărul de model | CKSS7071 |
| Sursa de alimentare | AC 100-240V, 50/60Hz (via AC adapter) |
| Bateria de rezervă | 1 x CR2032 Button Cell Battery (included) |
| Tip de afișare | Afișaj LED de 1.2 inci |
| Versiune Bluetooth | V5.4 |
| Sunete liniștitoare | 6 Nature Sounds + White Noise |
| LED Decor Colors | 8 Dimmable Colors |
| Dimensiuni produs (L x A x H) | 7.09 cm x 3.15 cm x 6.37 cm |
| Greutate | Nu este specificat |
10. Informații despre garanție
Emerson products are manufactured to the highest quality standards. This product is covered by a limited warranty against defects in materials and workmanship for a period of one (1) year from the original date of purchase. This warranty does not cover damage caused by misuse, accident, unauthorized modification, or normal wear and tear. Proof of purchase is required for all warranty claims. Please retain your receipt.
11. Asistență pentru clienți
If you have any questions, require assistance, or experience issues with your Emerson CKSS7071 Sunrise Smartset Alarm Clock Radio, please contact our customer support team.
- Website: Visit the official Emerson website pentru întrebări frecvente și resurse de asistență.
- E-mail: Consultați ambalajul produsului sau instrucțiunile oficiale website pentru contactarea prin e-mail a serviciului clienți.
- Telefon: Consultați ambalajul produsului sau instrucțiunile oficiale website cu numere de telefon pentru serviciul clienți.
Please have your model number (CKSS7071) and proof of purchase ready when contacting support.