
1. Introducere
This instruction manual provides comprehensive guidance for the assembly, operation, and maintenance of your TRYX LUCA L70 E-ATX Mid-Tower PC Case. The LUCA L70 is designed to accommodate a wide range of components, supporting E-ATX, ATX, Micro-ATX, and Mini-ITX motherboards. It features a 270° panoramic tempered glass panel for an unobstructed view of your internal components, a modular design for flexible power supply placement, and extensive cooling capabilities. Please read this manual carefully before beginning assembly to ensure proper installation and safe use.
2. Informații de siguranță
Always observe the following safety precautions to prevent injury and damage to your components:
- Electricitate statica: Always ground yourself before handling internal components to prevent electrostatic discharge (ESD) damage. Use an anti-static wrist strap if available.
- Deconectare de la curent: Ensure all power is disconnected from the power supply unit (PSU) and the wall outlet before installing or removing any components.
- Margini ascuțite: Be cautious of sharp edges inside the case during installation.
- Greutate: The PC case, especially when fully assembled with components, can be heavy. Lift with care and seek assistance if necessary.
- Ventilare: Ensure adequate airflow around the case to prevent overheating. Do not block ventilation openings.
- Sticla securizata: Handle the tempered glass panels with extreme care. They are fragile and can shatter if dropped or subjected to impact. Avoid placing heavy objects on the glass.
3. Produs terminatview și Caracteristici
The TRYX LUCA L70 PC case offers a blend of aesthetic design and functional features for high-performance PC builds.
3.1 Caracteristici cheie
- 270° Panoramic Tempered Glass: Front and side panels feature reinforced tempered glass for an unobstructed view a componentelor tale interne.
- Design modular: The power supply unit (PSU) can be positioned at the top or bottom, offering flexibility for various build configurations and improved cable management.
- Excellent Cooling Support: Supports up to nine fans and radiators up to 420mm, ensuring optimal thermal performance for demanding systems.
- Interior spatios: Accommodates E-ATX motherboards (up to 280mm width), graphics cards up to 460mm in length, and CPU coolers up to 170mm in height. Rear cable management space up to 65mm.
- Opțiuni de stocare: Features nine 2.5-inch drive bays and two 3.5-inch drive bays for ample depozitare.
- Advanced I/O Ports: Includes one USB 3.2 Gen2x2 Type-C port (20Gbps, 30W Power Delivery), two USB 3.0 Type-A ports, and one 3.5mm 4-pole TRRS audio jack.
- Filtre de praf: Equipped with dust filters on the top and bottom to maintain a clean interior.
- Vertical GPU Mount Support: Ready for vertical GPU mounting (riser cable sold separately).
3.2 Suprapunere vizualăview

Figure 1: Stylish Design & Superior Performance. This image highlights the internal layout of the TRYX LUCA L70 PC case, showcasing its spacious interior, fan mounting options, and the 270-degree tempered glass panels. It also indicates a 19mm ultra-slim chassis, 4mm thick tempered glass, and an X-shaped floating foot construction that elevates the case by 40mm for improved airflow.
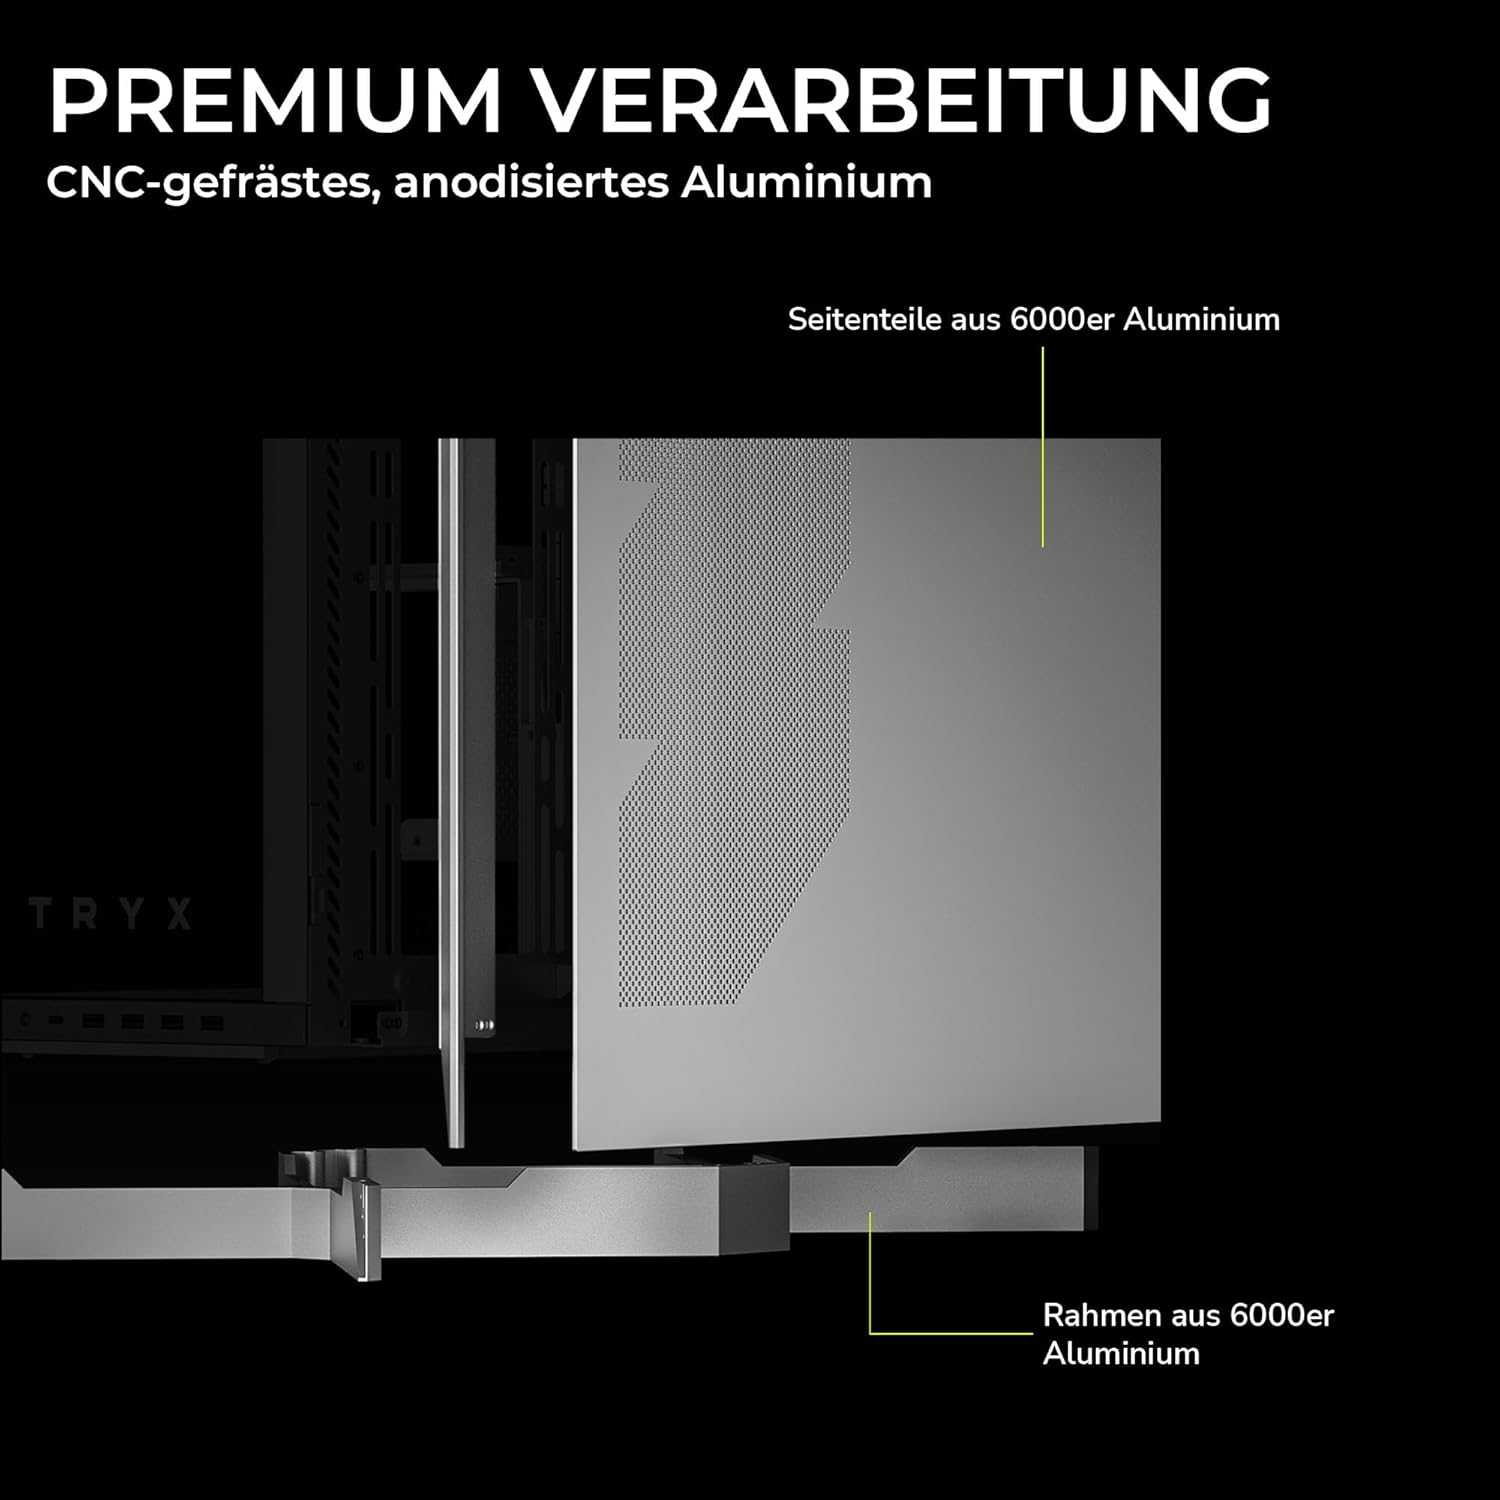
Figure 2: Premium Craftsmanship. This image details the construction materials, specifically highlighting the side panel made from 6000 series aluminum and the frame also constructed from 6000 series aluminum, emphasizing the case's durable and high-quality build.

Figure 3: Effortless Access with Swivel Front Panel. This image demonstrates the swing-out front panel feature, which allows for easy access to the front fan mounts and radiator space, simplifying installation and maintenance.

Figure 4: Modular Design. This illustration shows the flexible power supply unit (PSU) positioning (top or bottom) and the removable motherboard tray, which facilitates easier component installation and cable management. It also indicates various fan and radiator mounting points.

Figure 5: Extensive Connectivity Options. This image details the front I/O panel, including the microphone and speaker jacks, one USB-C 3.2 Gen 2x2 port (with 30W Power Delivery), and two USB-A 3.2 Gen 1 ports.

Figura 6: Dimensiunile produsului. This image provides a visual representation of the case's approximate dimensions: 26cm (width), 57cm (height), and 54cm (depth). Note that precise dimensions are listed in the specifications section.
4. Configurare și instalare
This section outlines the general steps for installing your PC components into the TRYX LUCA L70 case. Always refer to your individual component manuals for specific installation instructions.
4.1 Pregătirea cazului
- Așezați carcasa pe o suprafață plană și stabilă.
- Carefully remove the tempered glass side panel by unscrewing the thumb screws and gently pulling it away. Set it aside on a soft, non-abrasive surface.
- Remove any other panels or covers as needed for easier access to the interior.
4.2 Instalarea plăcii de bază
- Install the CPU, CPU cooler (if air cooler), and RAM onto your motherboard before placing it in the case.
- Ensure the correct standoffs are installed for your motherboard form factor (E-ATX, ATX, Micro-ATX, Mini-ITX).
- Carefully align your motherboard with the standoffs and the I/O shield opening at the rear of the case.
- Fixați placa de bază cu șuruburile furnizate.
4.3 Instalarea unității de alimentare (PSU).
- Determine your preferred PSU mounting position (top or bottom) based on your modular design preference.
- Slide the PSU into its designated bay from the rear of the case.
- Fixați sursa de alimentare cu șuruburi din spatele carcasei.
- Connect the necessary power cables to your motherboard and other components.
4.4 Instalarea unității de stocare
- Unități de 2.5 inci: Locate the 2.5-inch drive mounts (up to 9 available). Secure SSDs or 2.5-inch HDDs using the provided screws or tool-less mechanisms.
- Unități de 3.5 inci: Locate the 3.5-inch drive bays (up to 2 available). Install HDDs into the drive cages, typically using trays or screws.
4.5 Instalarea plăcii grafice (GPU)
- Scoateți capacele sloturilor de expansiune necesare din spatele carcasei.
- Insert your GPU into the appropriate PCIe slot on the motherboard.
- Secure the GPU with screws to the expansion slots.
- If using a vertical GPU mount (riser cable sold separately), follow the instructions provided with your vertical mount kit.
4.6 Instalarea ventilatorului și a radiatorului
The LUCA L70 supports extensive cooling configurations:
- Top: Up to 2x 120mm / 140mm fans or radiators up to 420mm.
- lateral: Up to 3x 120mm / 140mm fans or radiators up to 420mm.
- Fund: Up to 3x 120mm / 140mm fans or radiators up to 360mm.
- Spate: 1x ventilator de 120 mm.
Install fans and radiators using the appropriate screws, ensuring correct airflow direction.
4.7 Managementul cablurilor
Utilizați ample cable routing cutouts and tie-down points behind the motherboard tray to manage cables neatly. This improves airflow and aesthetics. The case offers up to 65mm of space for cable management.
4.8 Front I/O Connections
Connect the front panel cables (USB, audio, power switch, reset switch, LED indicators) to the corresponding headers on your motherboard. Refer to your motherboard manual for header locations.
5. Utilizarea carcasei PC-ului
Once all components are installed and cables are connected, replace all panels, including the tempered glass side panel. Connect your peripherals (monitor, keyboard, mouse) and power cable to the PSU.
- Pornire: Press the power button on the front I/O panel to turn on your PC.
- Oprire: Shut down your operating system normally. You can also press and hold the power button for a few seconds for a forced shutdown (use only when necessary).
- Repornire: Use the reset button on the front I/O panel if available, or restart through your operating system.
6. Întreținere
Întreținerea regulată ajută la asigurarea performanței optime și a longevității componentelor PC-ului.
- Filtre de praf: The top and bottom dust filters should be regularly cleaned. Gently remove them and clean with compressed air or rinse with water (ensure they are completely dry before reinstallation).
- Curatenie exterioara: Wipe the exterior surfaces, including the tempered glass panels, with a soft, damp Evitați utilizarea de produse de curățare abrazive sau solvenți.
- Curatenie interioara: Periodically open the case and use compressed air to remove dust buildup from fans, heatsinks, and other components. Ensure the PC is powered off and unplugged before cleaning the interior.
7. Depanare
Dacă întâmpinați probleme, luați în considerare următorii pași comuni de depanare:
- PC-ul nu pornește:
- Verificați dacă sursa de alimentare este pornită în spate.
- Asigurați-vă că toate cablurile de alimentare (ATX cu 24 de pini, CPU cu 8 pini, GPU) sunt conectate corect.
- Verificați dacă cablul comutatorului de alimentare de pe panoul frontal este conectat corect la conectorul plăcii de bază.
- Fără ieșire de afișare:
- Ensure your monitor is connected to the graphics card (not the motherboard I/O, unless using integrated graphics).
- Reinstalați placa grafică și modulele RAM.
- Supraîncălzire:
- Check fan connections and ensure they are spinning.
- Curățați filtrele de praf și componentele interne.
- Verify proper airflow direction within the case.
- Porturile USB nu funcționează:
- Ensure the front panel USB cables are correctly connected to the motherboard headers.
- Check your motherboard's BIOS/UEFI settings for USB port configuration.
For more complex issues, consult your motherboard or component manuals, or seek professional assistance.
8. Specificații
| Caracteristică | Caietul de sarcini |
|---|---|
| Marca | TRYX |
| Numele modelului | LUCA L70 |
| Numărul de model | C-L700N-NN0H-G0W |
| Tipul cazului | Turnul Mijlociu |
| Culoare | Alb |
| Compatibilitate cu placa de baza | E-ATX, ATX, Micro-ATX, Mini-ITX |
| Dimensiuni (latime x inaltime x adancime) | 261.8mm x 540.4mm x 571.85mm (Approx. 10.3 x 21.3 x 22.5 inches) |
| Greutate | Aproximativ. 16.2 kg (35.7 lbs) |
| Materiale | Aluminum Alloy, SGCC Steel, Tempered Glass |
| Sloturi de expansiune | 7 |
| Lungimea maximă a GPU | 460mm |
| Înălțimea maximă a răcitorului CPU | 170mm |
| Lungimea maximă a PSU | 190mm (ATX) |
| Drive Bays | 9x 2.5-inch, 2x 3.5-inch |
| Suport ventilator (sus) | 2x 120mm / 140mm |
| Suport ventilator (lateral) | 3x 120mm / 140mm |
| Suport ventilator (partea de jos) | 3x 120mm / 140mm |
| Suport ventilator (spate) | 1x 120 mm |
| Suport radiator (sus) | Până la 420 mm |
| Suport radiator (lateral) | Până la 420 mm |
| Radiator Support (Bottom) | Până la 360 mm |
| Porturi I / O frontale | 1x USB 3.2 Gen2x2 Type-C (20Gbps, 30W PD), 2x USB 3.0 Type-A, 1x 3.5mm 4-pole TRRS Jack |
| Filtre de praf | Sus, Jos |
| Caracteristici speciale | 270° Tempered Glass, Modular Design, Vertical GPU Mount Ready |
| GTIN | 06977029650209 |
9. Garanție și asistență
9.1 Informații despre garanție
The TRYX LUCA L70 PC Case comes with a 2 an garanție from the date of purchase. This warranty covers defects in materials and workmanship under normal use. It does not cover damage caused by misuse, accident, modification, unauthorized repair, or improper installation. Please retain your proof of purchase for warranty claims.
9.2 Suport tehnic
For technical assistance, troubleshooting, or warranty inquiries, please contact TRYX customer support. Refer to the official TRYX website or your retailer's support channels for the most up-to-date contact information. When contacting support, please have your product model (LUCA L70) and proof of purchase ready.