
Introducere
Thank you for choosing the WELLFOR 10" Shower Faucet System. This manual provides detailed instructions for the proper installation, operation, and maintenance of your new shower system. Please read this manual thoroughly before installation and retain it for future reference. Proper installation and care will ensure optimal performance and longevity of your product.
Componentele produsului
The WELLFOR 10" Shower Faucet System includes the following main components:
- 10-inch Square Rain Shower Head
- Wall-mounted Shower Arm
- Handheld Shower Spray with 3 Modes
- Shower Hose (1.5m / 59 inches)
- Handheld Shower Holder
- Rough-in Valve with Diverter
- Control Handle and Trim Plate
A explodat view of WELLFOR 10-inch Shower Faucet System components, including the rain shower head, handheld shower, hose, and rough-in valve.

Installed WELLFOR 10-inch Shower Faucet System, showcasing the rain shower head, handheld shower, and control valve.
Specificații
| Caracteristică | Detaliu |
|---|---|
| Marca | WELLFOR |
| Model | 10" Shower Faucet System |
| Rain Shower Head Size | 10 inches (250mm) Square |
| Lungimea brațului de duș | 14.09 inchi (358 mm) |
| Handheld Shower Length | 10.51 inchi (267 mm) |
| Lungimea furtunului de duș | 59 inchi (1.5 m) |
| Diverter Type | 2-in-1 (Rain Shower Head / Handheld) |
| Handheld Spray Modes | 3 moduri |
| Rough-in Valve Connection | 1 / 2-14 NPT |
| Termina | Chrome |
| UPC | 769047274941 |
Configurare și instalare
Professional installation is recommended for this shower system. Ensure all local plumbing codes are followed. Turn off the main water supply before beginning installation.
Instrumente necesare (nu sunt incluse):
- Cheie reglabilă
- Pipe Thread Sealant Tape
- Şurubelniţă
- Burghiu
- Nivel
- Bandă de măsurare
Pașii de instalare:
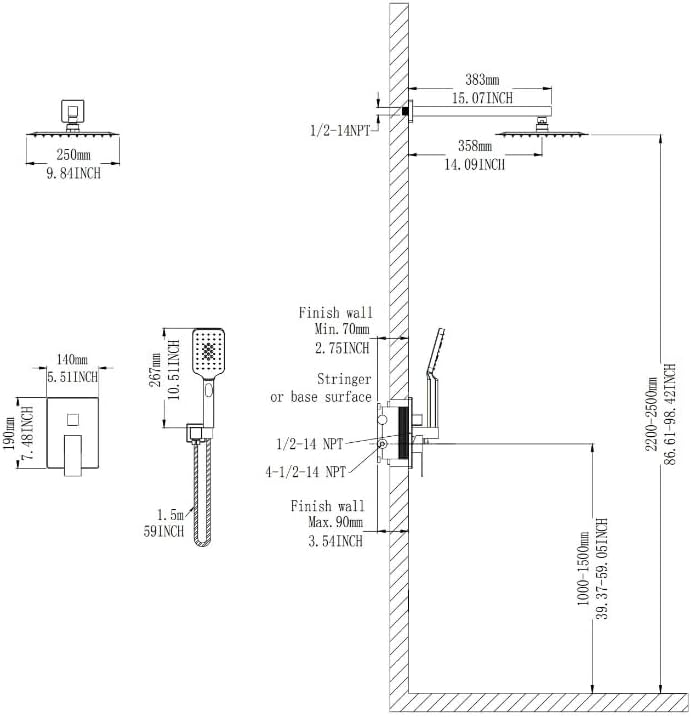
- Pregătiți peretele: Ensure the wall cavity is clear and ready for the rough-in valve installation. Refer to the technical drawing for recommended dimensions and pipe connections.
- Instalarea supapei de introducere brută: Connect the hot and cold water lines to the designated inlets on the rough-in valve. Secure the valve to a stringer or base surface within the wall. Ensure the valve is level and the rough-in depth (70mm-90mm / 2.75-3.54 inches from finish wall) is correct.
- Install Shower Arm and Rain Head: Thread the shower arm into the wall outlet. Apply pipe thread sealant tape to all threaded connections. Attach the 10-inch rain shower head to the shower arm.
- Install Handheld Shower Holder: Mount the handheld shower holder to the wall at the desired height (recommended 1000-1500mm / 39.37-59.05 inches from floor).
- Connect Shower Hose and Handheld: Connect one end of the shower hose to the rough-in valve outlet and the other end to the handheld shower spray. Place the handheld shower into its holder.
- Instalați placa de finisare și mânerul: Once all plumbing connections are secure and tested for leaks, install the decorative trim plate and control handle onto the rough-in valve.
- Sistem de testare: Turn on the main water supply and check all connections for leaks. Test the functionality of the control handle and diverter.

Technical drawing with installation dimensions for the WELLFOR 10-inch Shower Faucet System. Dimensions are in millimeters and inches.

The rough-in valve component of the WELLFOR shower system, showing water inlets and outlets.
Instrucțiuni de operare
The WELLFOR 10" Shower Faucet System features a single control handle for water temperature and flow, and a 2-in-1 diverter to switch between the rain shower head and the handheld spray.
Controlul debitului și temperaturii apei:
- Pornire/Oprire: Rotate the main handle to turn the water flow on or off.
- Reglați temperatura: Rotate the handle left for hotter water and right for colder water.
- Ajustați fluxul: Pull the handle outwards to increase water flow and push inwards to decrease it.
Diverter Function (2-in-1):
- The diverter knob, typically located on the trim plate, allows you to switch the water flow between the rain shower head and the handheld shower.
- Rotate the diverter knob to select your desired water outlet.
Handheld Shower Spray Modes (3-Mode):
The handheld shower features three distinct spray modes for varied showering experiences.
- To change the spray mode, gently rotate the spray face of the handheld shower head or press the button on the handheld unit, depending on the specific design.
- Experiment with the modes to find your preferred setting.
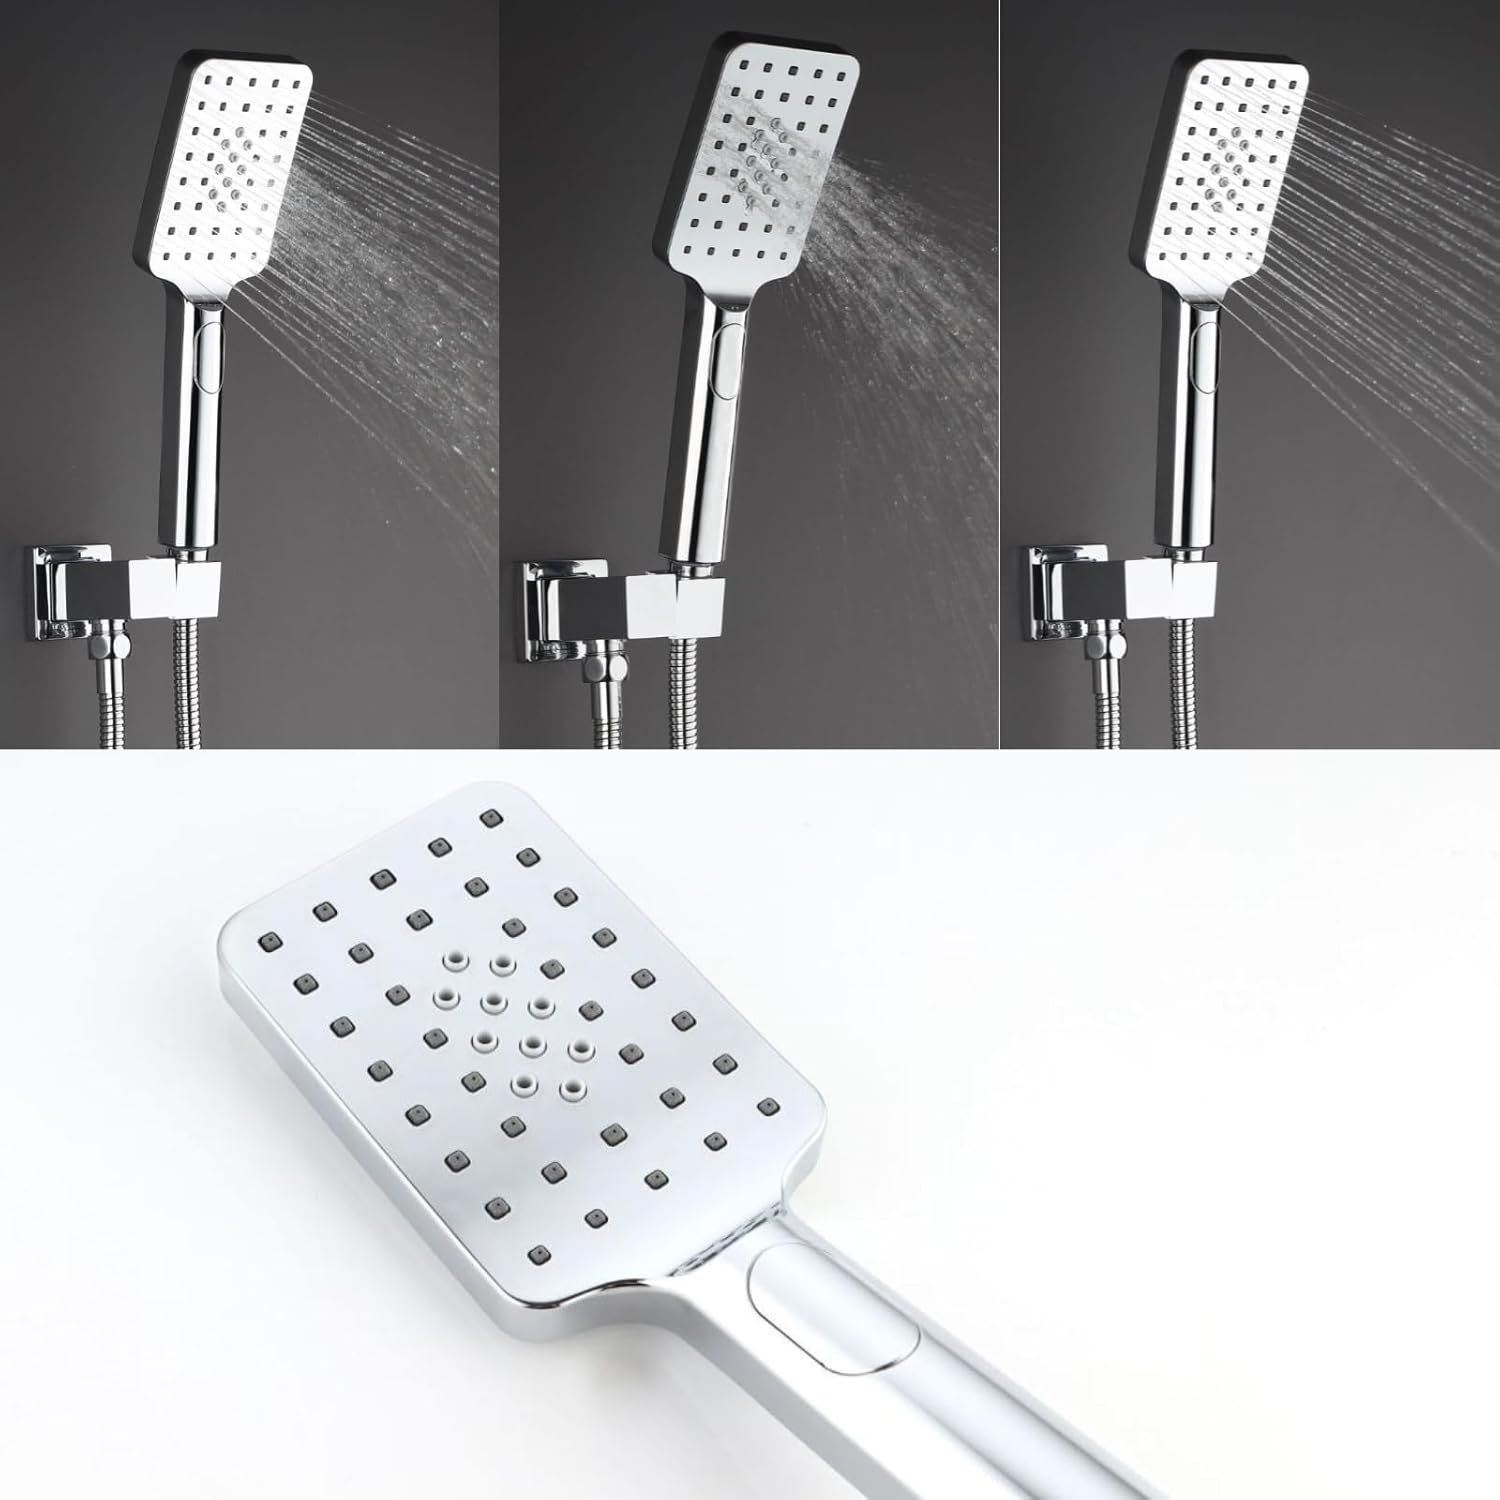
Three spray modes of the WELLFOR handheld shower, demonstrating different water patterns.

The 10-inch rain shower head in operation, providing a wide water coverage.
Întreţinere
Regular cleaning and maintenance will help preserve the finish and functionality of your WELLFOR shower system.
Curățarea finisajului:
- Curățați finisajul cromat cu o lavetă moale,amp cârpă și săpun blând.
- Evitați produsele de curățare abrazive, substanțele chimice dure sau bureții abrazivi, deoarece acestea pot deteriora finisajul.
- Clătiți bine cu apă curată și uscați cu o cârpă moale pentru a preveni petele de apă.
Prevenirea acumulării de minerale:
- For areas with hard water, regularly wipe down the shower head nozzles and handheld spray nozzles to prevent mineral buildup.
- Flexible silicone nozzles can often be cleaned by gently rubbing them with your finger to dislodge mineral deposits.
- For stubborn deposits, a solution of white vinegar and water can be used, but ensure it does not remain on the chrome finish for extended periods. Rinse thoroughly.
Depanare
If you encounter issues with your WELLFOR shower system, refer to the following common problems and solutions:
| Problemă | Cauza posibila | Soluţie |
|---|---|---|
| Presiune scăzută a apei | Clogged shower head/handheld nozzles; partially closed shut-off valve; low household water pressure. | Clean nozzles of mineral buildup. Ensure shut-off valves are fully open. Consult a plumber if household pressure is consistently low. |
| Scurgeri din conexiuni | Loose connections; insufficient pipe thread sealant tape; damaged O-rings/gaskets. | Tighten connections. Reapply pipe thread sealant tape. Inspect and replace O-rings/gaskets if damaged. |
| Deviatorul nu comută corect | Mineral buildup in diverter mechanism; worn diverter cartridge. | Flush the system to clear debris. If problem persists, the diverter cartridge may need replacement by a qualified professional. |
| Fluctuațiile temperaturii apei | Issues with water heater; pressure balance valve malfunction. | Check water heater settings. If other fixtures are stable, the pressure balance valve in the rough-in may require inspection by a plumber. |
If these solutions do not resolve the issue, please contact WELLFOR customer support or a qualified plumber.
Garanție și suport
WELLFOR products are manufactured to high-quality standards. For warranty information or technical assistance, please refer to the warranty card included with your purchase or visit the official WELLFOR website. Când contactați serviciul de asistență, vă rugăm să aveți la îndemână numărul modelului produsului și data achiziției.
For further assistance, you may visit the WELLFOR store on Amazon: WELLFOR Store