1. Produs terminatview
The Riokko YM119 OBD2 Scanner is a diagnostic tool designed for car owners to easily read and clear engine fault codes. It provides real-time data, freeze frame information, and supports various diagnostic functions for OBDII/EOBD compliant vehicles manufactured since 1996. Its intuitive interface and compact design make it suitable for both professional technicians and home users.

Figure 1.1: Riokko YM119 OBD2 Scanner. This image shows the main diagnostic tool with its color screen, control buttons, and the attached OBDII connector cable.
2. Configurare și utilizare inițială
2.1 Conținutul pachetului
- Riokko YM119 OBD2 Scanner Unit
- Manual de utilizare (acest document)
2.2 Conectarea scanerului
- Localizați conectorul de legătură de date (DLC) al vehiculului. Acesta se află de obicei sub bordul de bord, pe partea șoferului.
- Ensure the vehicle's ignition is turned ON (engine can be off or running, depending on the test).
- Plug the OBDII connector of the YM119 scanner firmly into the vehicle's DLC. The scanner will power on automatically.
2.3 Selectarea limbii
The YM119 supports 13 national languages. To change the language:
- From the main menu, navigate to "Setting" using the arrow keys.
- Apăsați tasta OK button to enter the Setting menu.
- Select "Language" and choose your preferred language from the list.
- Presa OK pentru a confirma selecția dvs.
3. Utilizarea scanerului
3.1 butoane de navigare
- IEȘIRE: Returns to the previous screen or main menu.
- Săgeți SUS/JOS: Navigați prin opțiunile de meniu.
- Săgeți STÂNGA/DREAPTA: Navigate through data screens or adjust settings.
- OK: Confirmă selecția sau accesează un submeniu.
- BĂŢ: Initiates the battery voltage test.

Figure 3.1: Main Menu and Professional Functions. This image illustrates the scanner's main menu interface and highlights its key diagnostic capabilities such as Engine Fault Diagnostics, Quick Clear Fault Code, Real-time Data Stream, and Battery Life Test.
3.2 Funcții de diagnosticare
From the main menu, select "Diagnosis" to access the primary diagnostic functions.

Figure 3.2: OBD II Diagnostic Test Items. This image shows the comprehensive list of diagnostic tests available on the scanner, from reading and erasing codes to advanced sensor and component tests.
3.2.1 Citiți codurile
This function retrieves Diagnostic Trouble Codes (DTCs) from the vehicle's computer. These codes indicate specific issues detected by the vehicle's onboard diagnostic system.
- Select "Read Codes" from the Diagnosis menu.
- The scanner will display any stored, pending, or permanent DTCs.
- Utilizați SUS/JOS arrows to scroll through the codes.
- For detailed information on a specific code, use the "DTC Lib" function or refer to a reliable automotive repair database.
3.2.2 Ștergerea codurilor
This function erases DTCs from the vehicle's computer and turns off the Malfunction Indicator Lamp (MIL), cunoscută și sub denumirea de martorul luminos de verificare a motorului. Note: Clearing codes does not fix the underlying problem. The MIL will illuminate again if the fault persists.

Figure 3.3: Check and Turn Off Engine Light. This image demonstrates the scanner's ability to diagnose and clear engine fault codes, effectively turning off the Check Engine Light on the vehicle's dashboard.
- Select "Erase Codes" from the Diagnosis menu.
- Confirmați acțiunea când vi se solicită.
- The MIL should turn off.
3.2.3 Real-time Data (Live Data Stream)
View real-time sensor data from the vehicle's engine control unit (ECU). This data can be displayed in text or graphical format, allowing for dynamic monitoring of vehicle performance.
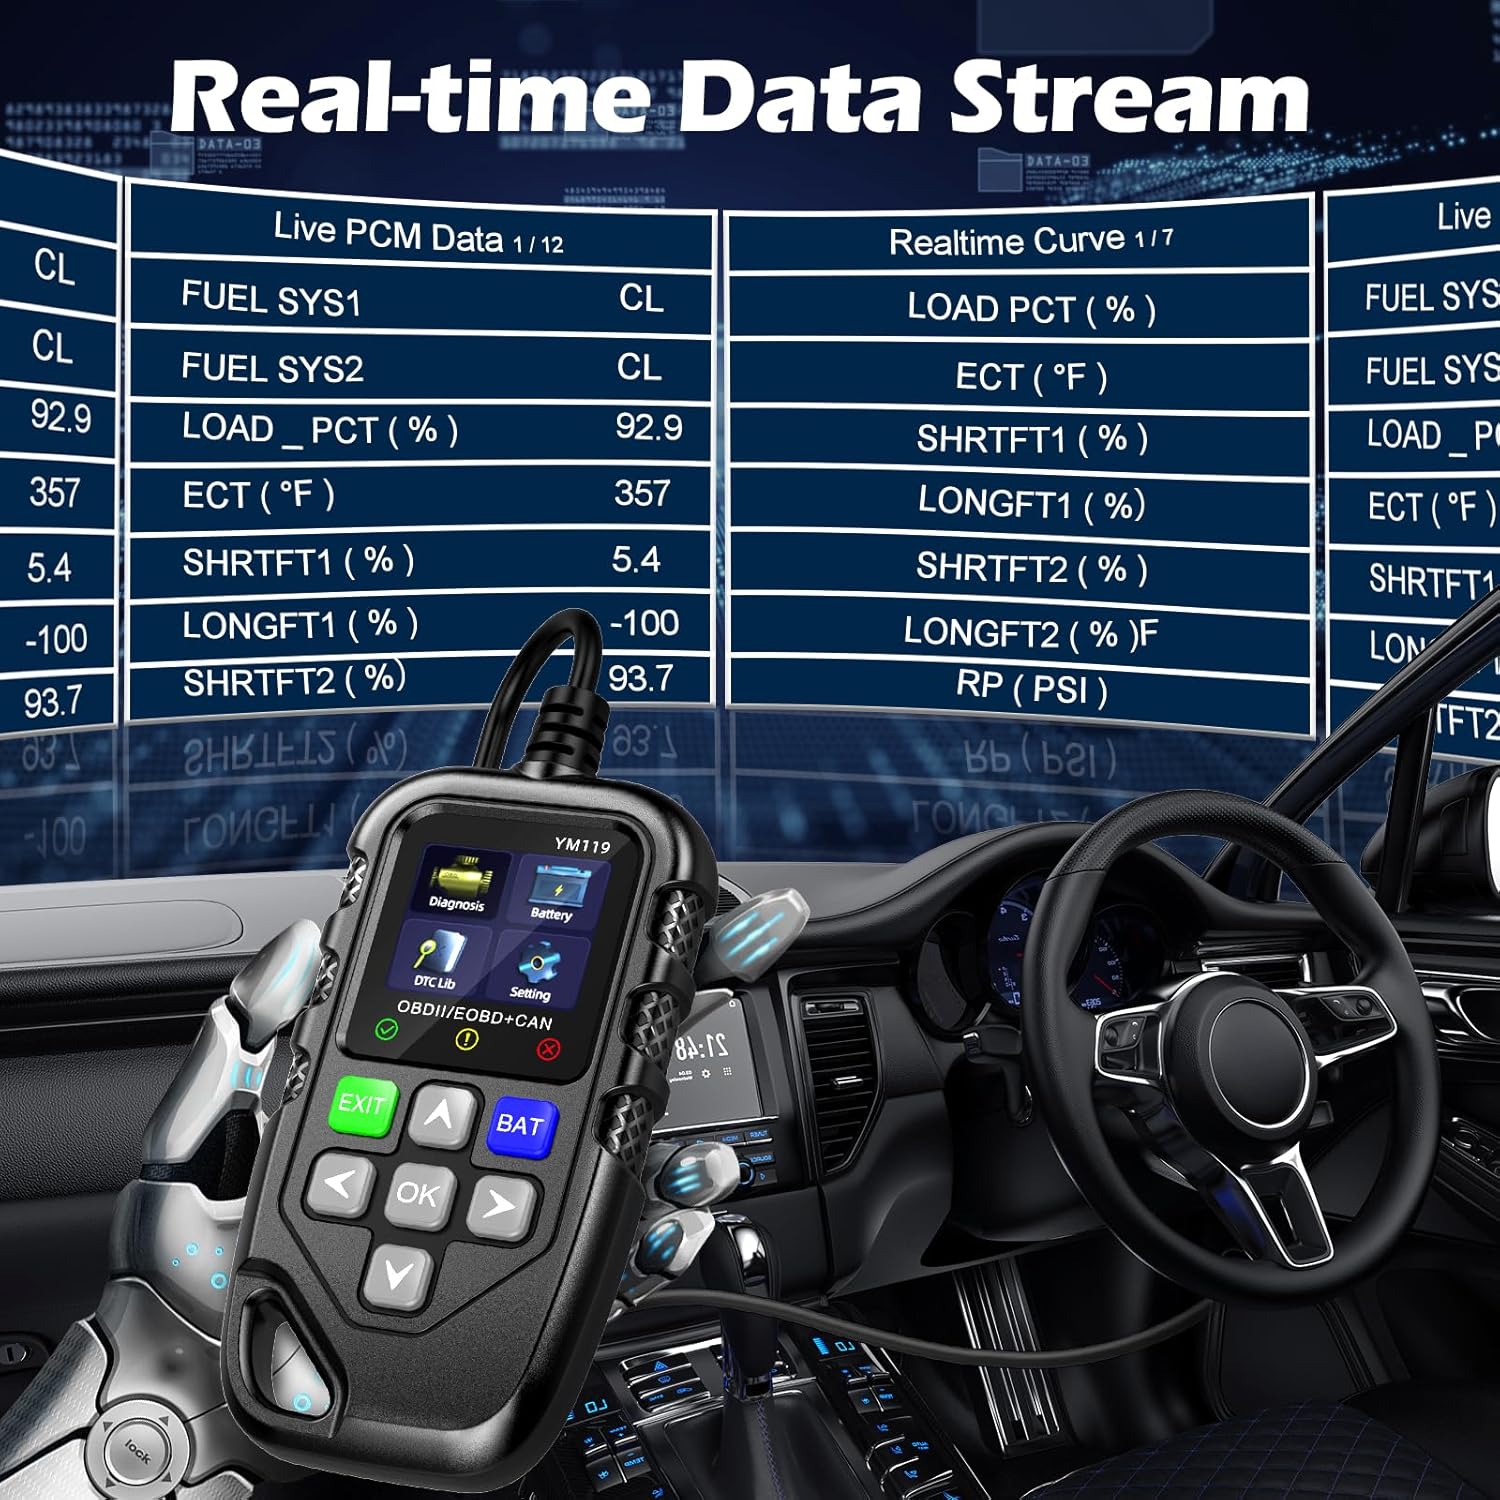
Figure 3.4: Real-time Data Stream. This image shows the scanner's capability to display live engine data, including various sensor readings and their corresponding real-time curves, aiding in dynamic vehicle diagnostics.
- Select "Live Data" or "Realtime Curve" from the Diagnosis menu.
- Utilizați SUS/JOS arrows to scroll through different data parameters.
- Utilizați STÂNGA/DREAPTA arrows to switch between text and graph views (if available for the parameter).
3.2.4 Date înghețate în cadru
When an emission-related fault occurs, the vehicle's computer records a snapshot of operating conditions at the time of the fault. This "freeze frame" data helps in diagnosing intermittent problems.
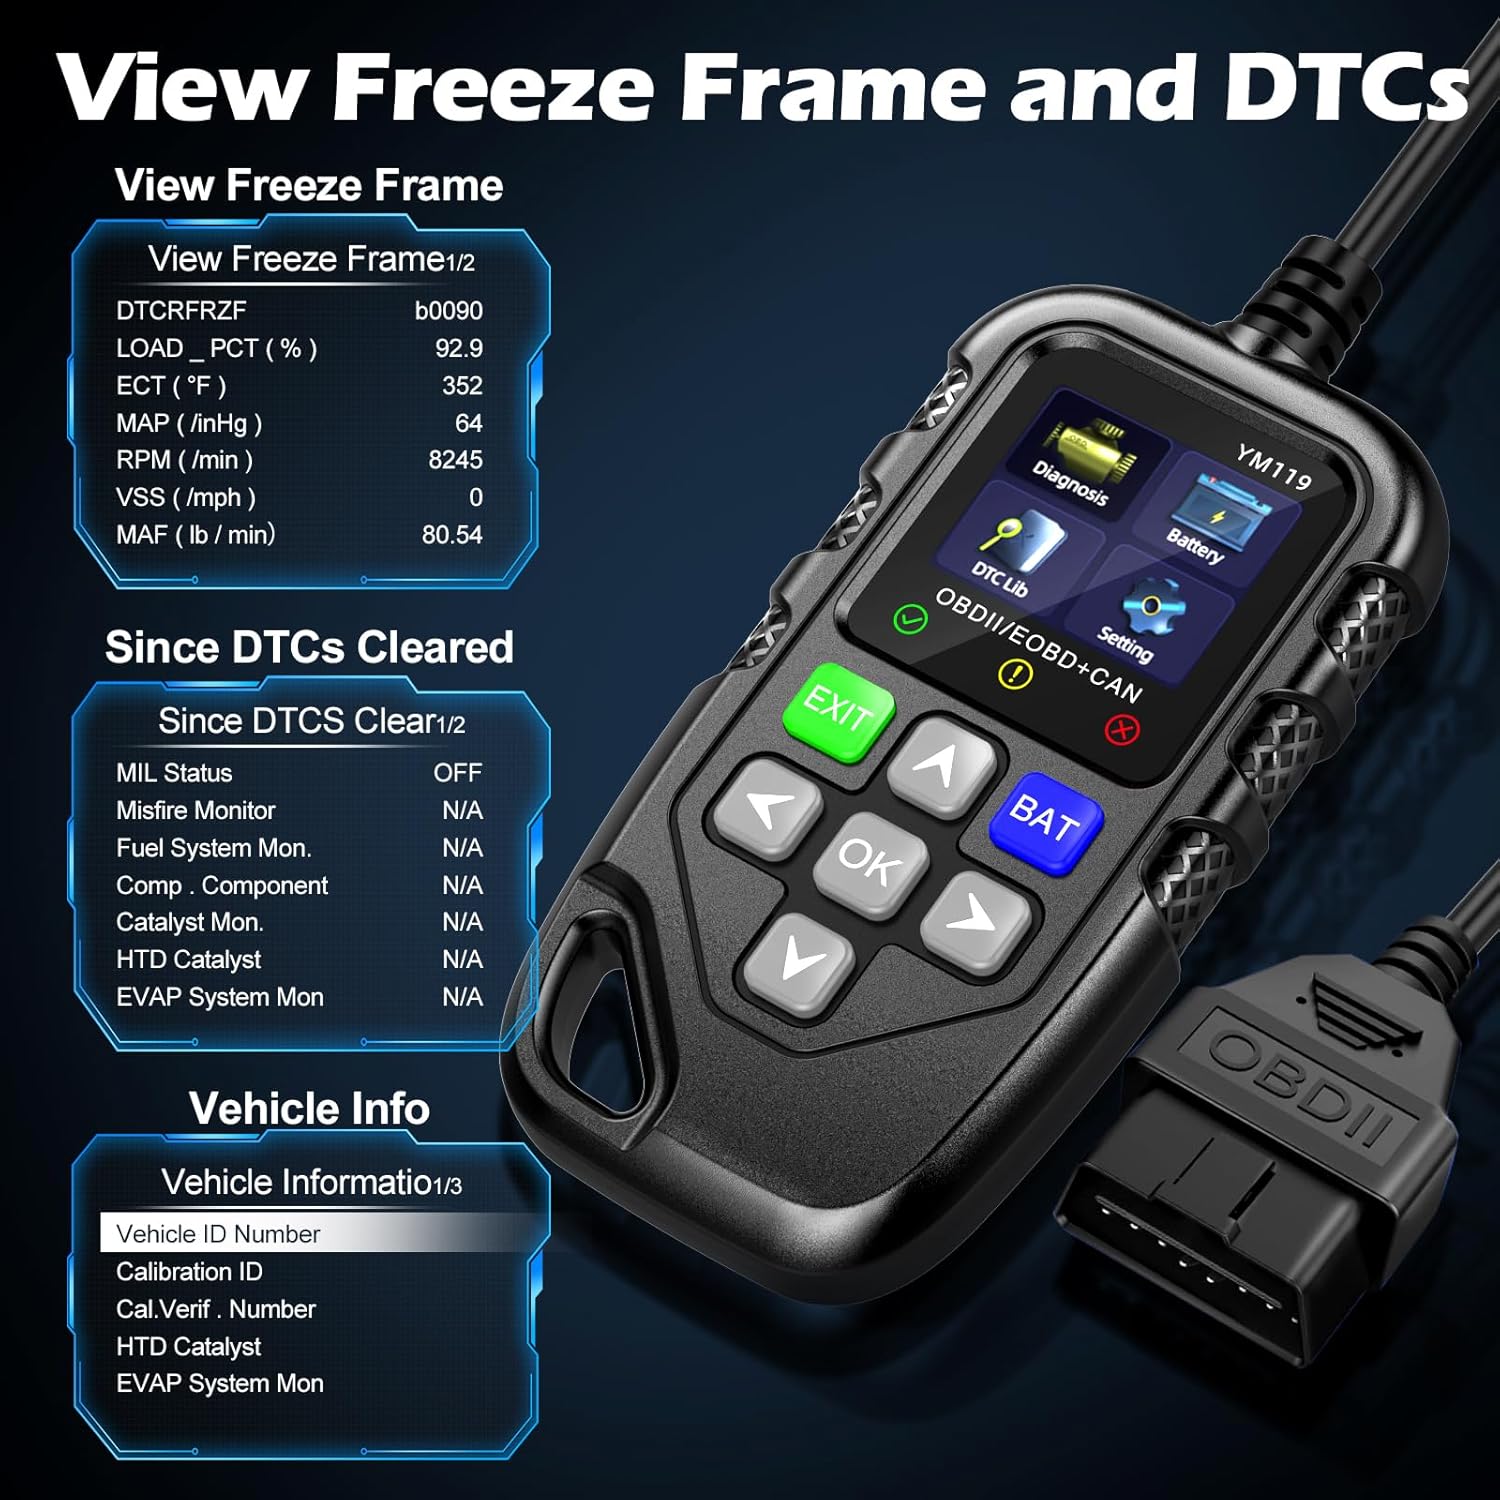
Figura 3.5: View Freeze Frame and DTCs. This image displays the scanner's ability to capture and show freeze frame data, which provides a snapshot of engine conditions at the moment a fault code was set, aiding in diagnosis.
- Selectați „View Freeze Frame" from the Diagnosis menu.
- Review the recorded parameters.
3.2.5 DTC Query (DTC Lib)
The built-in DTC Library allows you to look up definitions for generic (P0, P2, P34, B0, C0, U0) and manufacturer-specific (P1, P30-P33, B1, C1, U1) codes.
- Din meniul principal, selectați „DTC Library”.
- Enter the DTC code using the arrow keys and OK buton.
- The scanner will display the definition of the code.
3.2.6 Pregătirea I / M
This function checks the readiness of the emission-related monitoring systems on the vehicle. It's useful for determining if the vehicle is ready for an emissions test.
- Select "I/M Readiness" from the Diagnosis menu.
- The scanner will display the status of various monitors (e.g., Misfire Monitor, Fuel System Monitor). "OK" indicates the monitor has completed its test, "INC" indicates incomplete, and "N/A" indicates not applicable.
3.2.7 Vol. baterietage Test
The YM119 can perform a basic battery voltage test to assess the vehicle's battery health.

Figure 3.6: Estimate Battery Life Test. This image shows the scanner's dedicated function for monitoring and assessing the vehicle's battery voltage and overall health.
- From the main menu, select "Battery" or press the BĂŢ buton.
- Scanerul va afișa nivelul curent al baterieitage.
3.2.8 Informații despre vehicul
Această funcție preia numărul de identificare al vehiculului (VIN), ID-ul de calibrare (CALID) și numărul de verificare a calibrării (CVN) ale vehiculului.
- Select "Vehicle Info" from the Diagnosis menu.
- The scanner will display the available vehicle information.
4. Întreținere
4.1 Curăţarea dispozitivului
To maintain the scanner's performance and appearance:
- Ștergeți unitatea cu un dispozitiv moale, damp pânză.
- Nu utilizați agenți de curățare abrazivi sau solvenți.
- Ensure the device is dry before storage.
4.2 Depozitare
Store the scanner in a clean, dry environment away from extreme temperatures and direct sunlight. Keep the OBDII connector free from dust and debris.
5. Depanare
| Problemă | Cauza posibila | Soluţie |
|---|---|---|
| Scanerul nu pornește. |
|
|
| Mesajul „Eroare de legătură” sau „Eroare de comunicare”. |
|
|
| Engine light reappears after clearing codes. | Underlying fault has not been repaired. | Clearing codes only turns off the light; it does not fix the problem. Diagnose and repair the underlying issue before clearing codes again. |
| Inaccurate or missing data readings. |
|
|
6. Specificații
| Caracteristică | Detaliu |
|---|---|
| Numărul de model | AE0004L (YM119) |
| Marca | Riokko |
| Dimensiunea ecranului | 2.8 inchi |
| Protocoale acceptate | Nine standard OBDII/EOBD protocols |
| Limbi acceptate | 13 de limbi naționale |
| Greutatea articolului | 7.8 uncii (aproximativ 221 grame) |
| Dimensiuni pachet | 8.11 x 5.35 x 1.14 inci (aprox. 20.6 x 13.6 x 2.9 cm) |
| Prima dată disponibilă | 16 octombrie 2024 |
7. Garanție și asistență
7.1 Informații despre garanție
The Riokko YM119 OBD2 Scanner comes with a 3 an garanție de la data achiziției. Această garanție acoperă defectele de materiale și de fabricație în condiții normale de utilizare.
7.2 Politica de returnare
A Politică de returnare de 30 de zile fără întrebări is offered for your purchase. Please refer to your retailer's specific return instructions.
7.3 Asistență pentru clienți
For technical assistance, warranty claims, or any other inquiries, please contact Riokko customer service. Serviciu clienți 24/7 is available to assist you.
Please visit the official Riokko website or refer to your product packaging for the most current contact information.