
1. Introducere
Thank you for choosing the Polti Smart 110 Eco steam cleaner. This manual provides essential information for the safe and efficient use, maintenance, and troubleshooting of your appliance. Please read these instructions carefully before first use and keep them for future reference.

Figure 1: Polti Smart 110 Eco Steam Cleaner. This image shows the complete steam cleaner unit with its hose and floor brush attachment.
2. Instrucțiuni de siguranță
Respectați întotdeauna măsurile de siguranță de bază atunci când utilizați aparate electrice pentru a reduce riscul de incendiu, electrocutare și vătămare corporală.
- Nu îndreptați aburul spre oameni, animale sau aparate electrice. Aburul este foarte fierbinte și poate provoca arsuri.
- Ensure the power cord is not damaged and do not operate the appliance if the cord or plug is compromised.
- Nu scufundați niciodată aparatul în apă sau alte lichide.
- Do not open the boiler cap while the appliance is under pressure or hot.
- Keep the appliance out of reach of children and supervise children to ensure they do not play with the appliance.
- Use only tap water. Do not add detergents, perfumes, or other chemicals to the water tank.
- Always unplug the appliance before filling, cleaning, or performing maintenance.
3. Produs terminatview
3.1 Componente și accesorii
Your Polti Smart 110 Eco comes with the following components and accessories:
- Unitate principală de curățare cu abur
- Flexible Steam Hose with Gun
- Tuburi de extensie (2)
- VaporForce Brush (rectangular floor brush)
- Brush Storage Insert
- Perie mică
- Duza concentratorului
- Window Tool
- Small Round Brushes (various sizes)
- Cloth for Floor Brush
- Pâlnie
- Urcior de măsurat

Figure 2: All included accessories for the Polti Smart 110 Eco. This image displays the steam cleaner unit alongside all its attachments, including various brushes, nozzles, and cloths.
3.2 Controale și indicatori
- Buton de alimentare: Pornește și oprește aparatul.
- Steam Adjustment Dial: Regulates the steam output (Min, Eco, Standard, Max).
- Steam Ready Indicator Light: Illuminates when the appliance has reached operating temperature.
- Capac rezervor apă: Pentru umplerea rezervorului de apă.
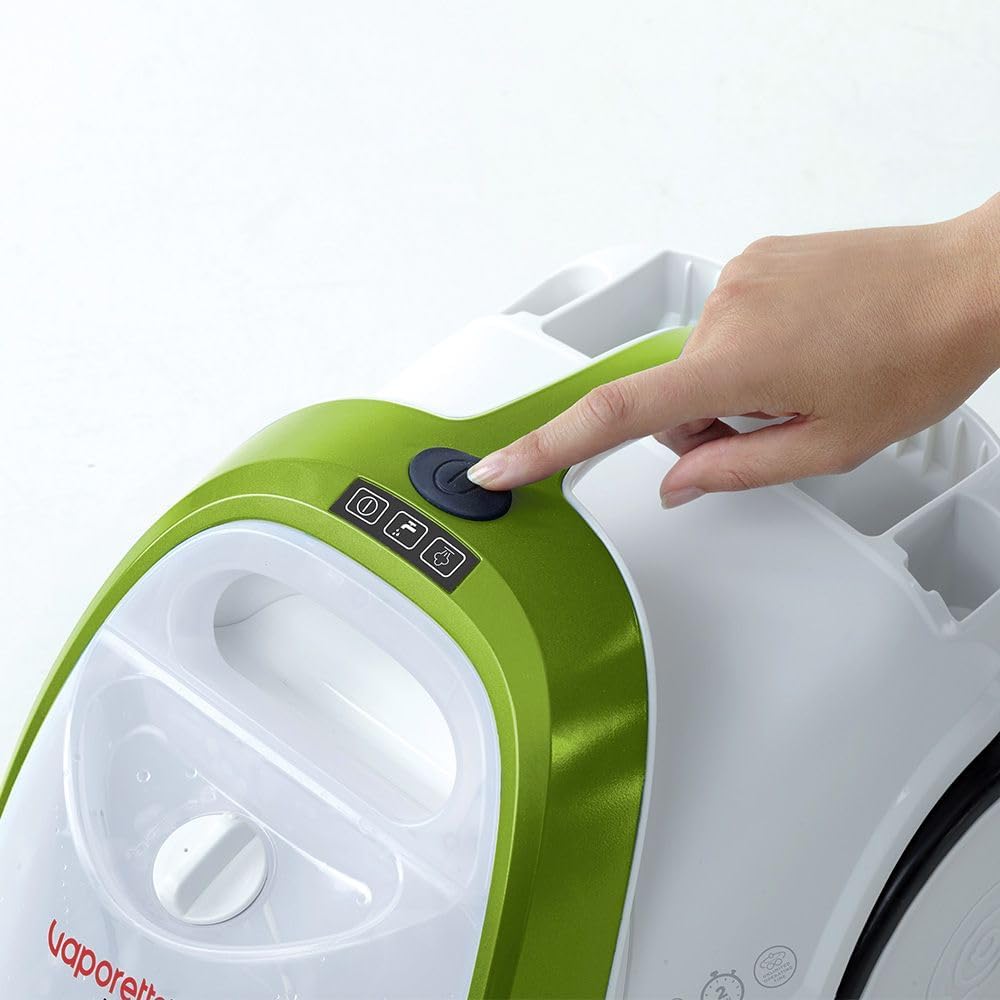
Figure 3: Power button location. A hand is shown pressing the main power button located on the top of the steam cleaner unit.
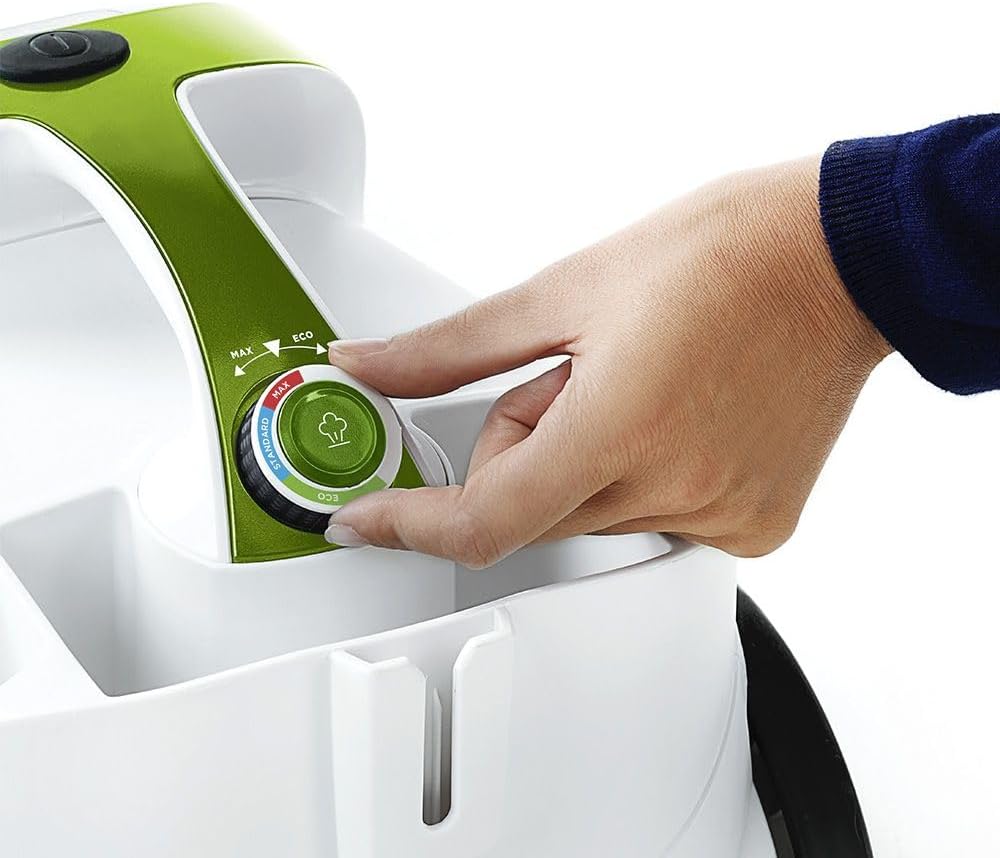
Figure 4: Steam adjustment dial. A hand is shown rotating the dial to select the desired steam intensity.
4. Configurare
4.1 Despachetarea
Carefully remove all components from the packaging. Retain the packaging for future storage or transport if needed. Ensure all accessories listed in Section 3.1 are present.
4.2 Umplerea rezervorului de apă
- Asigurați-vă că aparatul este deconectat de la priză și s-a răcit.
- Deșurubați capacul rezervorului de apă.
- Using the provided measuring jug and funnel, carefully pour up to 1.5 liters of tap water into the tank. Do not overfill.
- Securely screw the water tank cap back on.

Figure 5: Filling the water tank. A hand is shown pouring water from a jug into the transparent water tank of the steam cleaner.
4.3 Atașarea accesoriilor
Connect the flexible steam hose to the main unit by aligning the connectors and pushing firmly until it clicks into place. Attach desired accessories (e.g., extension tubes, VaporForce brush) to the steam gun or to each other as needed for your cleaning task. For the VaporForce brush, ensure the cloth is securely attached.

Figure 6: VaporForce brush attachment. A close-up view of the rectangular VaporForce brush connected to the steam cleaner's handle.
5. Instrucțiuni de utilizare
5.1 Pornirea și încălzirea
- Conectați aparatul la o priză electrică adecvată.
- Press the power button (refer to Figure 3). The indicator light will illuminate.
- The appliance will begin to heat up. This process takes approximately 2 minutes. The steam ready indicator light will turn on when the optimal operating temperature is reached.
5.2 Adjusting Steam Output
Use the steam adjustment dial (refer to Figure 4) to select the appropriate steam intensity for your cleaning task:
- Min: For delicate surfaces or light cleaning.
- Eco: Energy-saving mode for general cleaning.
- Standard: Pentru sarcinile de curățenie zilnice.
- Max: For stubborn dirt and heavily soiled surfaces.
5.3 Curățarea diferitelor suprafețe
The Polti Smart 110 Eco is suitable for cleaning glass, hard floors, laminate, and tiles. Always test on a small, inconspicuous area first.
- Hard Floors/Tiles: Attach the extension tubes and VaporForce brush with a cloth. Move the brush slowly over the surface to allow the steam to work.
- Laminat: Use the Eco or Min steam setting and move the brush quickly to avoid excessive moisture.
- Sticlă/Oglinzi: Use the window tool. Apply steam to loosen dirt, then use the squeegee to remove moisture and dirt.
- Grout/Small Areas: Use the concentrator nozzle or small round brushes for targeted cleaning.
6. Întreținere și curățare
6.1 După fiecare utilizare
- Deconectați aparatul și lăsați-l să se răcească complet.
- Carefully unscrew the water tank cap and empty any remaining water.
- Clean accessories with water and mild soap if necessary. Allow them to dry completely before storing.
- Store the appliance and accessories in a dry, safe place. The unit has an integrated accessory storage compartment.

Figure 7: Accessory storage. The steam cleaner is shown with its various small accessories neatly stored in the integrated compartment on the unit.
6.2 Detartraj
Depending on the hardness of your water, descaling may be required periodically to maintain optimal performance. Refer to the specific descaling instructions provided in the full product manual or Polti's official website. Do not use harsh chemical descalers not approved for steam cleaners.

Figure 8: Anti-calc filter/cap. A hand is shown interacting with the cap on the side of the unit, likely for maintenance or descaling.
7. Depanare
| Problemă | Cauza posibila | Soluţie |
|---|---|---|
| Fara iesire de abur | No water in tank; appliance not heated; steam lock engaged. | Fill water tank; wait for steam ready light; disengage steam lock. |
| Presiune scăzută a aburului | Low water level; steam adjustment set to Min/Eco; limescale buildup. | Refill water tank; adjust steam dial to Standard/Max; descale the appliance. |
| Apa care picură din duză | Appliance not fully heated; condensation. | Wait for steam ready light; direct first bursts of steam into a cloth. |
If you encounter problems not listed here or if the suggested solutions do not resolve the issue, please contact Polti customer support.
8. Specificații
- Model: PTEU0317
- Putere: 1500 wați
- Presiunea aburului: 4 bari
- Timp de încălzire: 2 minute
- Material cazan: Oţel inoxidabil
- Dimensiuni produs (L x l x H): 40 x 27 x 29 cm
- Greutatea articolului: 1 kilogram
- Suprafețe recomandate: Glass, hard floor, laminate, tile
- Culoare: Black, Green, White
9. Garanție și asistență
Pentru informații privind garanția produsului, vă rugăm să consultați cardul de garanție inclus odată cu achiziția sau să vizitați site-ul oficial Polti. website. For technical assistance, spare parts, or further inquiries, please contact Polti customer support through their official channels.
Puteți găsi mai multe informații și asistență pe Polti Brand Store.