
UNITOPSCI CPU-F133
UNITOPSCI Double Din Car Stereo User Manual
Model: CPU-F133 (113266)
1. Introducere
This user manual provides detailed instructions for the installation, operation, and maintenance of your UNITOPSCI Double Din Wireless Apple CarPlay Android Auto Car Stereo. Please read this manual thoroughly before using the product to ensure proper function and safety.

Figure 1.1: UNITOPSCI Double Din Car Stereo and Accessories
This image displays the main car stereo unit, a backup camera, a steering wheel remote control, an external microphone, and graphical representations of Wireless Apple CarPlay, Android Auto, and Mirror Link functionalities.
2. Informații de siguranță
- Instalare profesională recomandată: Datorită complexității sistemelor electrice auto, instalarea profesională este foarte recomandată pentru a preveni deteriorarea unității sau a vehiculului.
- Alimentare electrică: Ensure the power supply is DC 12V and the negative terminal is grounded.
- Cablaj: Connect all wires correctly according to the wiring diagram before powering on the unit. Incorrect wiring can cause damage.
- Siguranța la conducere: Nu utilizați unitatea într-un mod care vă distrage atenția de la condus. Acordați întotdeauna prioritate siguranței rutiere.
- Temperatură: The operating temperature range is -10°C to 60°C. Avoid extreme temperatures.
- curatenie: Utilizați o cârpă moale și uscată pentru curățare. Nu utilizați agenți de curățare abrazivi sau solvenți.
3. Conținutul pachetului
Vă rugăm să verificați conținutul coletului în raport cu lista de mai jos:
- 1 x Player MP5 auto (unitate principală)
- 1 x cablu de alimentare
- 1 x cablu difuzor
- 1 x microfon extern
- 1 x Steering Wheel Control Remote (Battery Not Included)
- 1 x Manual de utilizare
- 1 x suport de montare
- 4 x șuruburi
- 1 x Cameră de mers înapoi cu 12 LED-uri

Figure 3.1: Packing List and Product Dimensions
This image provides a visual overview of the product's physical dimensions, the layout of its rear panel connections, a detailed wiring diagram for both power and speaker connections, and a clear depiction of all items included in the product package.
4. Configurare și instalare
4.1 Verificări înainte de instalare
- Verify your car's dashboard opening size matches the stereo's dimensions (approx. 180mm x 104mm).
- Disconnect the car battery's negative terminal before starting any wiring.
- Asigurați-vă că toate instrumentele necesare sunt disponibile.
4.2 Schema electrică
Refer to the detailed wiring diagram below for correct connections. Incorrect wiring can damage the unit or your vehicle's electrical system.
Figura 4.1: Conexiuni cablaj principal
This diagram illustrates the electrical connections for the car stereo, including power (Red: ACC, Yellow: Battery+), ground (Black: GND), illumination (Blue: ILL), antenna (Green: ANT), steering wheel control (Brown: KEY), reverse camera (Pink: REVERSE, Orange: BRAKE), and speaker outputs (White/Gray/Green/Purple pairs for Front/Rear Left/Right speakers).
- Cablu de alimentare:
- Red (ACC): Connect to car ignition switch (12V).
- Yellow (Battery+): Connect to car battery positive (constant 12V).
- Black (GND): Connect to car chassis ground.
- Cabluri difuzoare: Connect to corresponding car speakers (Front Left, Front Right, Rear Left, Rear Right). Ensure correct polarity.
- Intrare cameră inversă: Connect the camera's video output to the unit's "CVBS" input. Connect the camera's power to the car's reverse light circuit.
- Controlul volanului (SWC): Connect the SWC wires to your vehicle's steering wheel control wires. Refer to your vehicle's manual for specific wiring.
- Microfon extern: Plug the external microphone into the dedicated MIC input port.
4.3 Testul inițial
Before fully installing the unit into the dashboard, perform a quick test:
- Connect the Red (ACC), Yellow (Battery+), and Black (GND) wires to a 12V power source (e.g., car battery or test bench).
- Power on the unit. If it powers on correctly, proceed with full installation.
- If it does not power on, recheck all connections.
5. Instrucțiuni de utilizare
5.1 Operare de bază
- Pornire/Oprire: Press the power button (usually the central knob) to turn the unit on or off.
- Controlul volumului: Rotiți butonul central pentru a regla volumul.
- Touch screen: The 6.86-inch HD capacitive touchscreen provides smooth and responsive interaction.
- 7 Color Backlight: The unit features a 7-color LED backlight. You can select and fix a favorite color or allow it to switch automatically in the settings.

Figure 5.1: HD Touch Screen and 7 Color Backlight
This image highlights the high-definition 6.86-inch touchscreen with its 1280x480 resolution, showing its responsiveness to touch. It also demonstrates the customizable 7-color LED backlight feature, allowing users to personalize the unit's appearance.
Apple CarPlay și Android Auto fără fir 5.2
Connect your smartphone wirelessly via Bluetooth to access Apple CarPlay or Android Auto. This allows you to use navigation, make calls, send messages, and listen to music directly from the stereo's display.
- Asigurați-vă că Bluetooth este activat pe telefon și pe sistemul stereo al mașinii.
- Asociați telefonul cu sistemul stereo al mașinii prin Bluetooth.
- Once paired, CarPlay or Android Auto will automatically launch.
- Use voice commands (Siri/Google Assistant) for hands-free operation.

Figura 5.2: Interfața Wireless CarPlay și Android Auto
This image illustrates the user interfaces for both Wireless Apple CarPlay and Android Auto as displayed on the car stereo. It shows various application icons and demonstrates the integration of voice commands for hands-free control.
5.3 Bluetooth 5.0 (Hands-free Calling & Music)
The unit features Bluetooth 5.0 for stable and high-quality wireless connections.
- Apeluri fără mâini: Pair your phone to make and receive calls directly through the stereo. The built-in microphone and external microphone ensure clear audio.
- Streaming audio prin Bluetooth: Play music wirelessly from your phone or other Bluetooth-enabled devices.
- Phone Book Sync: Sincronizează contactele telefonului pentru acces facil.

Figure 5.3: Voice Control and Bluetooth Hands-free Calling
This image demonstrates the voice control capabilities and hands-free calling features of the car stereo. It shows the interface during music playback and a phone call, along with examples of voice commands and a visual of the included external microphone.
5.4 Legătură în oglindă
The Mirror Link function allows you to project your smartphone's screen onto the car stereo display. This is useful for viewing maps, videos, or other content from your phone.
- Connect your phone via USB cable for Mirror Link.
- Urmați instrucțiunile de pe ecran pentru a stabili conexiunea.
- Supported for iOS up to version 13.4 and Android up to version 10.1. (Note: May not work with some Samsung phones).
5.5 FM Radio & DSP/EQ Audio Setting
Enjoy your favorite radio stations and customize your audio experience.
- Radio FM: Tune into FM stations (87.5-108MHz). You can save up to 18 preset stations.
- DSP/EQ Audio Setting: Adjust sound quality with the built-in Digital Sound Processor (DSP) and Equalizer (EQ). Choose from preset styles (Pop, Rock, Classic, Jazz, Flat) or customize your own.

Figure 5.4: FM Radio and Sound Quality DSP/EQ
This image displays the car stereo's FM radio interface and the detailed EQ setup screen. It illustrates how users can adjust sound frequencies and select from various audio presets to customize their listening experience.
5.6 Auxiliary Audio Input, USB/TF Card Playback, Type-C Charging
The unit offers multiple options for media playback and device charging.
- Intrare USB: Connect USB drives for audio/video playback and charging.
- Slot pentru carduri TF: Insert a TF (microSD) card for media playback.
- Intrare AUX: Connect external audio devices via the 3.5mm AUX jack.
- Încărcare de tip C: A dedicated Type-C port is available for fast charging compatible devices.

Figure 5.5: Video & Audio Playback and DVR Support
This image illustrates the various media input options available on the car stereo, including USB, TF Card, AUX, and Type-C charging. It also highlights the unit's capability to support an external DVR (driving recorder) via its rear USB port.
5.7 Controlul volanului (SWC)
Control basic functions of the stereo directly from your vehicle's steering wheel for added convenience and safety.
- Connect the SWC wires during installation (refer to Section 4.2).
- Program the steering wheel buttons through the unit's settings menu.
- Functions typically include volume up/down, track next/previous, mode, and call answer/end.
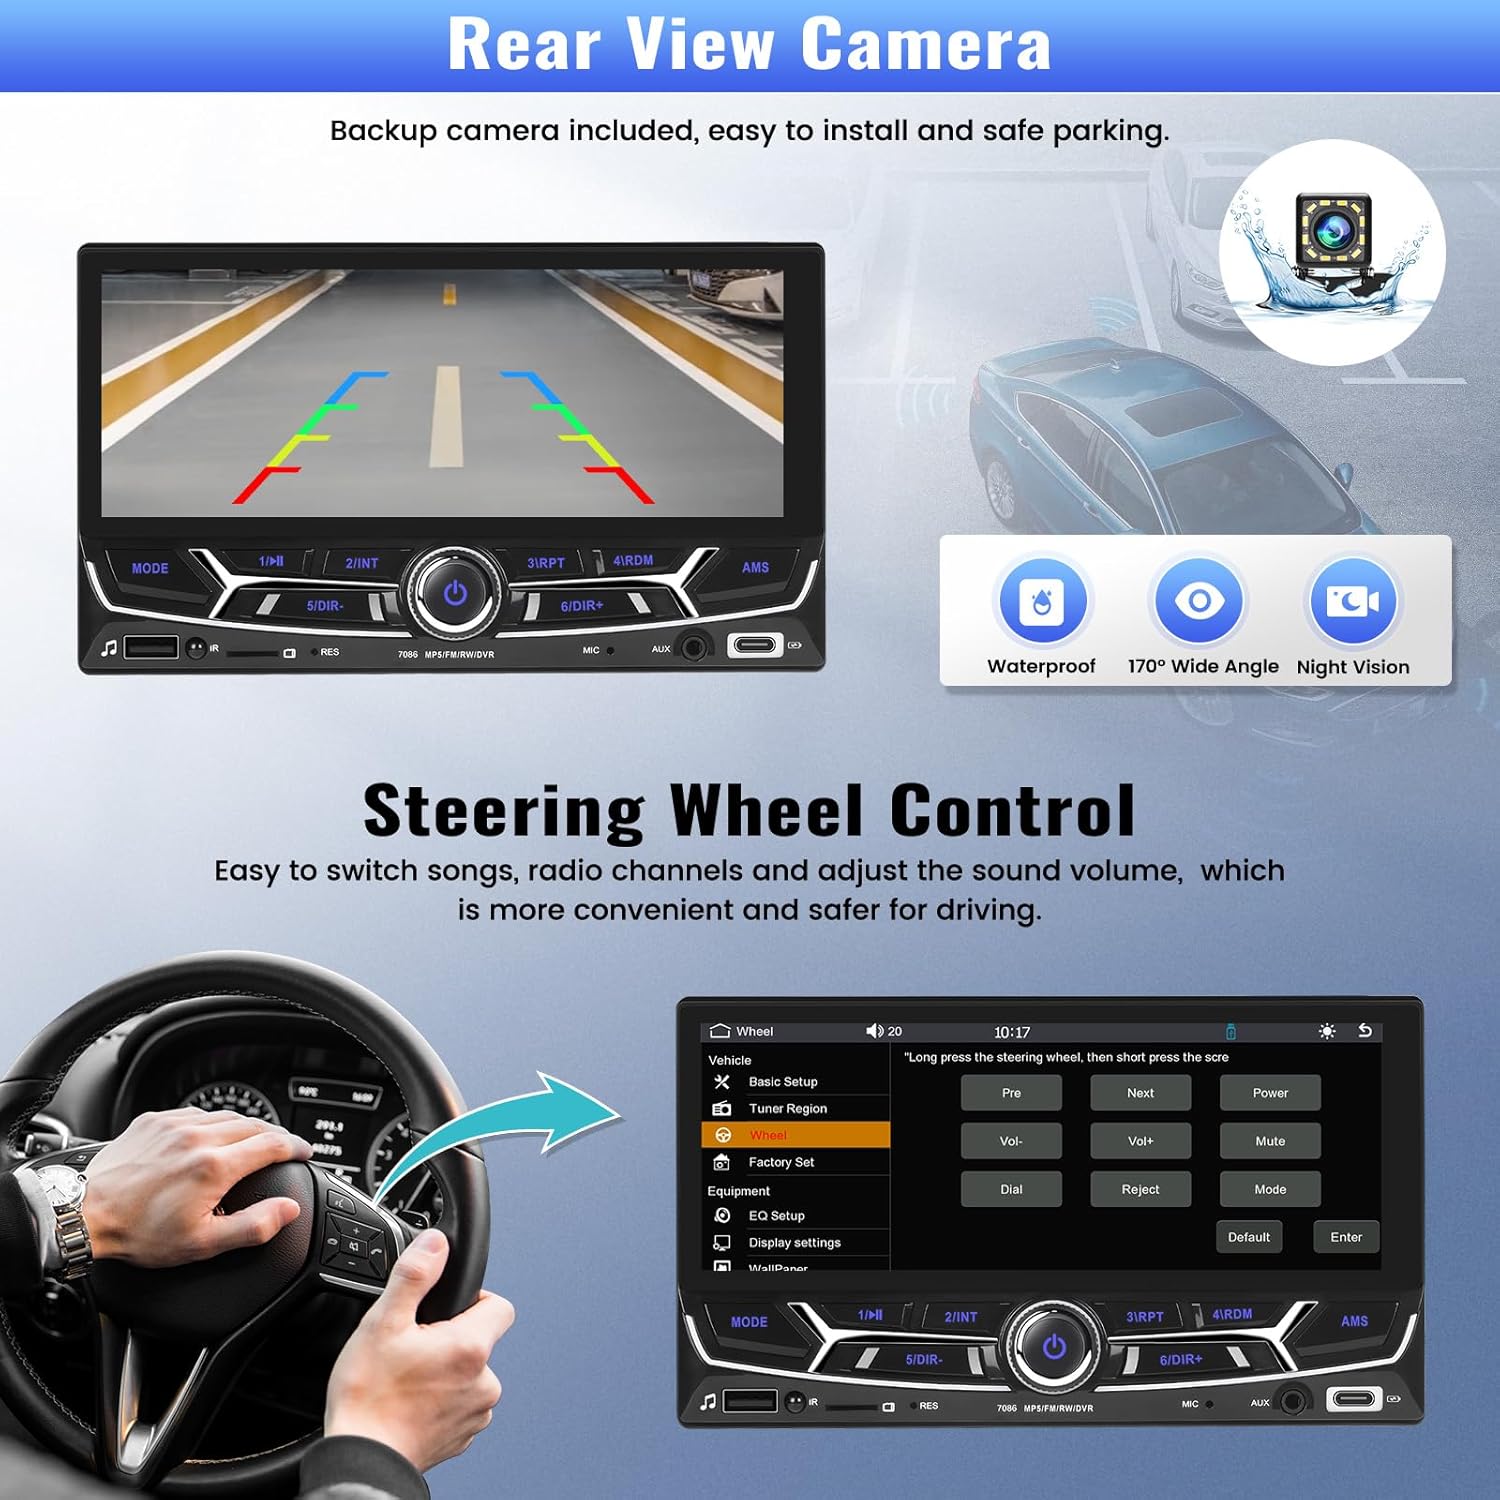
Figura 5.6: Spate View Cameră și control al volanului
This image showcases two key features: the automatic display of the rear view camera feed with parking guidelines when reversing, and the integration of steering wheel controls for convenient operation of the stereo while driving.
5.8 Spate View Camera & DVR Input
- Camera de rezervă: The included 12-LED backup camera provides a clear view behind your vehicle. The display automatically switches to the camera feed when the car is put into reverse gear. Parking guidelines assist with safe maneuvering.
- Intrare DVR: The unit supports connecting an external car driving recorder (DVR) via the rear USB port. This allows you to view and save driving footage directly on the stereo. (DVR not included).
6. Depanare
| Problemă | Cauza posibila | Soluţie |
|---|---|---|
| Unitatea nu pornește. | Incorrect wiring (ACC, Battery+, GND). Blown fuse. | Check all power connections. Ensure Red (ACC) and Yellow (Battery+) have 12V, and Black (GND) is properly grounded. Check vehicle's fuse box and the unit's fuse. |
| Nici un sunet. | Speaker wires incorrectly connected. Volume too low. Mute function active. | Verify speaker wire connections and polarity. Increase volume. Check if mute is enabled. |
| Conexiune Bluetooth instabilă. | Interference. Phone too far. Outdated phone software. | Ensure phone is close to the unit. Restart both phone and stereo. Update phone's operating system. |
| CarPlay/Android Auto nu se conectează. | Incorrect phone settings. Incompatible phone version. | Ensure CarPlay/Android Auto is enabled on your phone. Check phone's OS version compatibility (iOS up to 13.4, Android up to 10.1). Try restarting the phone and stereo. |
| Imaginea de pe camera din spate nu se afișează. | Camera not powered. Reverse trigger wire not connected. Faulty camera. | Check camera power supply. Ensure the reverse trigger wire (Pink) is connected to the car's reverse light circuit. Test camera functionality. |
| Comenzile de pe volan nu funcționează. | SWC wires incorrectly connected. Not programmed. | Verify SWC wire connections. Go to the unit's settings to program the steering wheel buttons. |
7. Specificații
| Model | CPU-F133 (113266) |
| Dimensiunea ecranului | 6.86 inci |
| Rezoluția ecranului | 1280 x 480 pixeli |
| Cip CPU | F133 |
| Versiune Bluetooth | 5.1 |
| Putere de ieșire | 45W x 4 |
| Frecventa radio | FM 87.5-108MHz |
| Temperatura de lucru | -10°C până la 60°C |
| Dimensiunile produsului | 4.37"A x 7"L x 4.01"Î (111 mm x 180 mm x 104 mm) |
| Greutatea articolului | 2.64 lire sterline |
| Formate audio acceptate | MP3 / WMA / WAV / APE / FLAC |
| Formate video acceptate | RM/RMVB/AVI/MP4/MKV/3GP |
| Formate de imagine acceptate | JPG / BMP / PNG |
| Conectivitate | Bluetooth, Auxiliary, USB, TF Card, Type-C |
| Caracteristici speciale | Wireless Apple CarPlay, Android Auto, Mirror Link, FM Tuner, DSP/EQ, Backup Camera Input, DVR Input, SWC |
8. Întreținere
- Curățarea ecranului: Folosiți o lavetă moale, fără scame, pentru a șterge ușor ecranul tactil. Pentru petele persistente, ștergeți ușor.ampen the cloth with water or a screen cleaner designed for electronics. Do not spray cleaner directly onto the screen.
- Curatenie generala: Păstrați unitatea curată de praf și resturi. Folosiți o cârpă moale și uscată pentru a șterge exteriorul.
- Evitați lichidele: Nu expuneți unitatea la umiditate excesivă sau lichide.
- Temperatură: Avoid leaving the unit in direct sunlight or extreme temperatures for prolonged periods, as this can affect performance and lifespan.
9. Garanție și asistență
UNITOPSCI is committed to providing high-quality products and satisfactory services.
- Garantie: The product typically comes with a warranty period. Please refer to your purchase documentation for specific warranty terms and conditions.
- Returnări: 60-days No Worry to Return policy.
- Înlocuire: Replacement available within 24 months.
- Suport tehnic: For any technical assistance, troubleshooting, or inquiries, please contact UNITOPSCI customer support.
- Informații de contact:
- E-mail: UNITOPSCI@126.com
- Response Time: Quick Response in 16 Hours.
- Support Type: Lifetime After-Sales Consult and Technical Support.

Figure 9.1: UNITOPSCI Brand Commitment
This image displays the UNITOPSCI brand logo and slogan "DRIVING WISELY," emphasizing the company's dedication to providing high-quality products and satisfactory customer service globally, with online support available via email.
Ask a question about this manual
Ask about setup, troubleshooting, compatibility, parts, safety, or missing instructions. Manuals+ will review the question and use this page’s manual context to help answer it.