
Introducere
Mulțumesc pentru achizițieasing the mooas Wooden Frame LED Silent Wall Clock. This manual provides detailed instructions for setting up, operating, and maintaining your new clock. Please read this manual thoroughly before use to ensure proper functionality and to maximize your product experience.
Informații de siguranță
- Ensure the clock is powered by the provided adapter only.
- Nu expuneți dispozitivul la apă sau umiditate excesivă.
- Avoid placing the clock in direct sunlight or near heat sources.
- A nu se lăsa la îndemâna copiilor.
- Nu încercați să dezasamblați sau să reparați singur dispozitivul. Contactați asistența pentru clienți pentru asistență.
Conținutul pachetului
Verificați dacă toate articolele sunt prezente în colet:
- mooas Wooden Frame LED Silent Wall Clock
- Telecomanda
- Cablu de alimentare USB-C
- US (110V) Power Adapter
- Wooden Desk Stand
- Wall Mounting Accessories (Wall mount pin, Art wall hook, Cable clip, Screw anchor, Wall mount screw)
- Manual de utilizare

Figura 1: Conținutul pachetuluiview
Înființat
1. Conexiune la alimentare
Connect the provided USB-C power cable to the clock and plug the US (110V) power adapter into a wall outlet. The clock requires continuous power via the adapter to function. The built-in CR2032 battery is for time memory only and does not power the clock.

Figure 2: Updated US Power Adapter
2. Remote Control Activation
Before first use, remove the protective film from the back of the remote control. If the remote control does not respond, separate both the battery and cable from the clock and remote control, then reconnect them. This will reset the time, which you will need to set again.
3. Opțiuni de montare
The clock offers two display options: wall mounting or desk standing.
- Montare pe perete: Use the hanging hole on the back of the clock and the provided wall mounting accessories (wall mount pin, art wall hook, screw anchor, wall mount screw) to securely hang the clock on a wall.
- Desk Standing: Insert the clock into the included wooden desk stand for stable placement on any flat surface.

Figure 3: Wall Mounting and Desk Standing Options
4. Gestionarea cablurilor
The clock features a thin cable (0.043 inch) designed for neat installation, making it less visible when the clock is set up.

Figure 4: Thin Cable for Discreet Installation
Instrucțiuni de operare
1. Basic Display
The LED display shows the time, date, and day of the week. The day of the week can be set in 8 languages: English, German, Italian, French, Dutch, Spanish, Danish, and Russian.

Figure 5: Display Elements
2. Moduri de operare
The clock features three operating modes:
- Mod ceas: Afișează ora, data și ziua.
- Mod lumină de noapte: Activates the backlight nightlight only.
- Nightlight & Clock Mode: Displays time, date, day with the backlight nightlight active.

Figure 6: Three Operating Modes
3. Nightlight Features
The backlight nightlight offers three color options to suit your preference:
- Yellow (Warm White): 2700K
- White (Daylight): 4000K
- Blue (Cool White): 5500K
You can also set a nightlight timer for automatic shut-off, with a maximum setting of 120 minutes and a default of 30 minutes.

Figure 7: Nightlight Color Options
4. Reglare luminozitate
The LED display and mood light brightness can be adjusted to 5 levels. The clock also features an automatic brightness adjustment function controlled by an illuminance sensor. To activate auto-brightness, long-press the display brightness button on the remote; the display will blink twice to confirm activation.
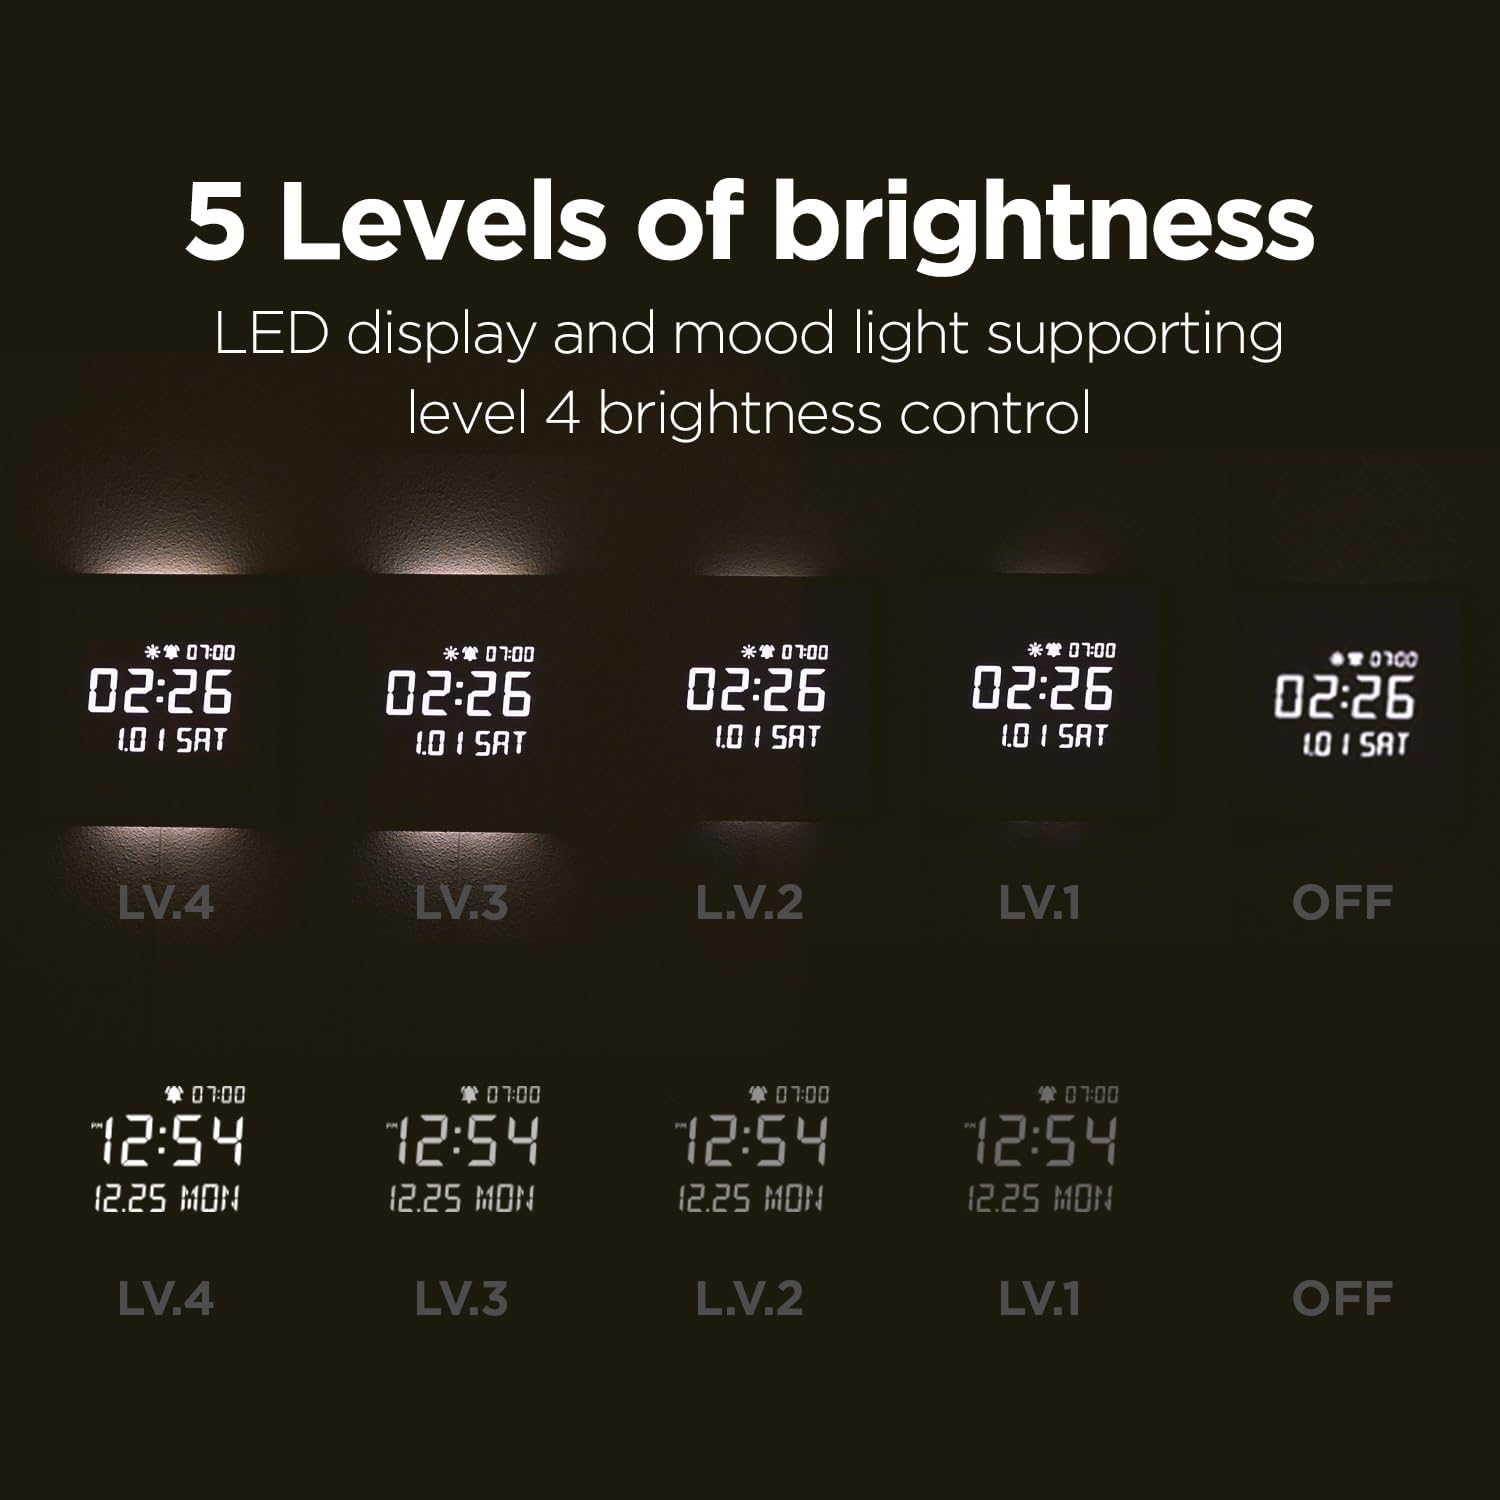
Figure 8: 5 Levels of Brightness

Figure 9: Auto Brightness Control
5. Funcții de alarmă
- Alarmă de răsărit: Set a 10, 20, or 30-minute sunrise mode where the backlight gradually brightens before the alarm time, providing a gentle wake-up experience.
- Alarmă pentru ziua săptămânii: Configure alarms to activate only on weekdays, allowing for uninterrupted rest on weekends.
- Melodii: Choose from 5 available melodies, including bird sounds, rain sounds, and a standard beep.
- Controlul volumului alarmei: Adjust the alarm volume to High (03), Mid (02), Low (01), or Off. The sequence for adjustment is High (03) → Off → Low (01) → Mid (02).

Figure 10: Melody Alarm Feature

Figure 11: Alarm Volume Control
6. Control de la distanță pesteview
The remote control provides easy access to all clock functions. Refer to the diagram below for button functions:
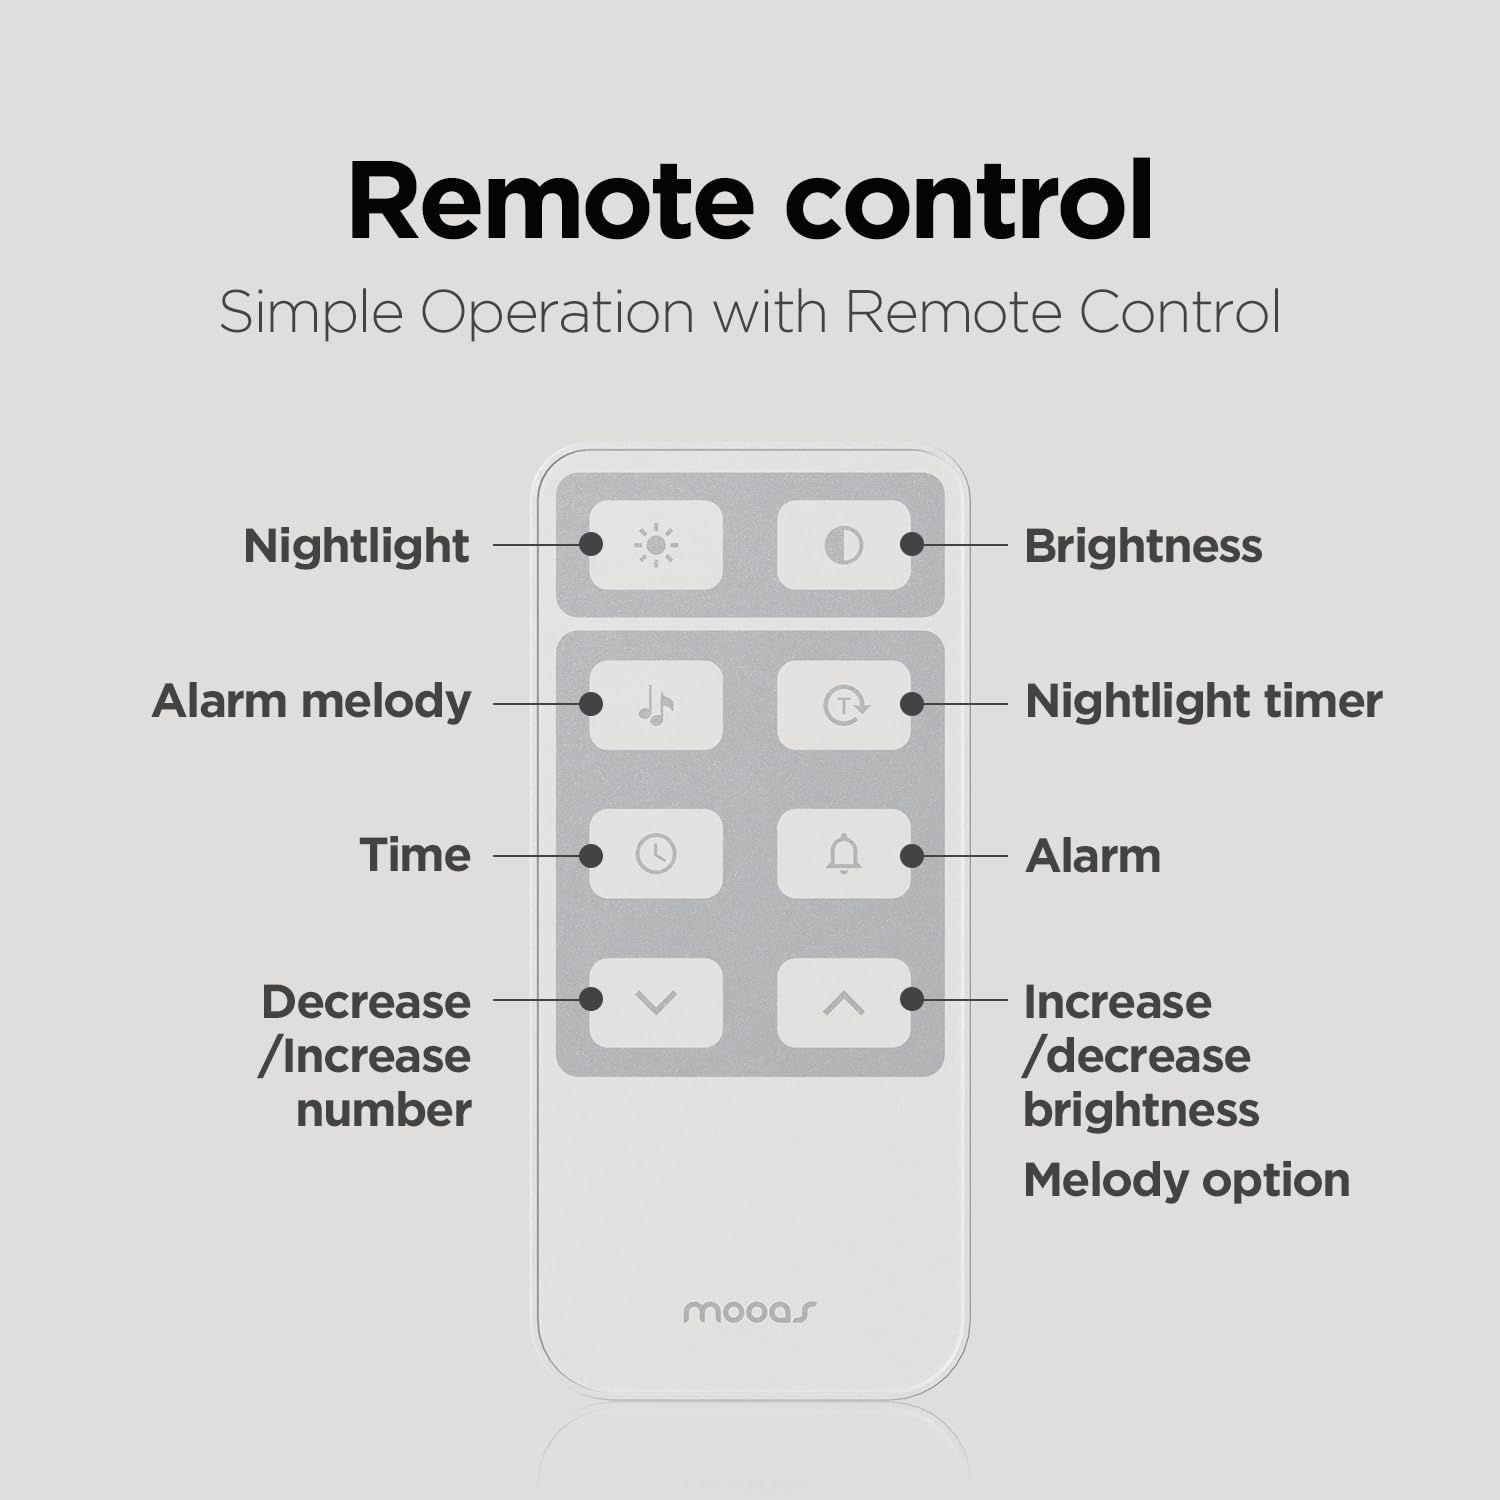
Figura 12: Funcții de telecomandă
7. Temperature Display (Celsius/Fahrenheit)
To switch between Celsius (C) and Fahrenheit (F) temperature display, short press the UP butonul de pe telecomandă.
Întreţinere
To maintain your mooas clock, gently wipe the surface with a soft, dry cloth. Avoid using abrasive cleaners or solvents, as these may damage the wooden frame or LED display. Ensure the clock is unplugged before cleaning.
Depanare
- Ceasul nu pornește: Ensure the power adapter is securely connected to both the clock and a working power outlet.
- Telecomanda nu răspunde: Remove the protective film from the remote. If issues persist, disconnect and reconnect the battery and cable from both the clock and remote to reset.
- Display too bright: Adjust the brightness manually using the remote control or activate the auto-brightness function.
- Ora/data incorectă: Reset the time and date using the remote control. The internal CR2032 battery helps retain settings during brief power outages.
Specificații
| Caracteristică | Caietul de sarcini |
|---|---|
| Marca | mooas |
| Numărul de model | MC-L8 |
| Dimensiunile produsului | 11.4 cm lățime x 11.4 cm înălțime |
| Tip material | Lemn |
| Tip de afișare | LED digital |
| Sursa de alimentare | Corded Electric (5V 2A adapter) |
| Caracteristici speciale | Alarm, Backlit Nightlight, Remote Control, Auto Brightness Adjustment, Sunrise Alarm, Nightlight Timer |
| Tip de montare | Wall Mount, Desk Stand |
Produs terminatview Video
Urmăriți acest videoclip oficial pentru o imagine de ansambluview of the mooas Wooden Frame LED Silent Wall Clock's features and design.
Video 1: mooas Wooden Frame LED Clock Overview
Garanție și suport
For warranty information or technical support, please refer to the product packaging or contact mooas customer service directly. Keep your purchase receipt for warranty claims.