
VENLAB VM500A
Manual de utilizare multimetru digital VENLAB VM500A
Model: VM500A
1. Introducere și Pesteview
The VENLAB VM500A is a versatile 6000-count True RMS digital multimeter designed for accurate and reliable electrical measurements. It is suitable for a wide range of applications, from household use to industrial settings, including automotive circuit troubleshooting and testing electronics. This manual provides detailed instructions for safe and effective operation of your multimeter.

Figure 1.1: VENLAB VM500A Digital Multimeter and accessories.
Caracteristici cheie:
- Measures AC/DC Current & Voltage, Frequency, Battery, Resistance, Continuity, Diode, Capacitance, and Temperature.
- CAT III 600V safety rating with CE and RoHS certification.
- Equipped with double fuses for anti-burning and overload protection.
- Vol. Fără contacttage (NCV) function for enhanced safety.
- Features data hold, hanging magnet, rubber sleeve support stand, continuity buzzer, auto power-off.
- Built-in backlight LCD display and flashlight for clear readings in low-light conditions.

Figure 1.2: Key features of the VM500A Multimeter.
2. Informații de siguranță
WARNING: To avoid possible electric shock, fire, or personal injury, please read all safety information before you use the product. Improper use of this meter can cause damage, shock, injury or death. Always follow all safety precautions.
- Do not exceed the maximum input value specified for each range.
- Aveți grijă când lucrați cu voltagpeste 30V AC RMS, 42V peak sau 60V DC. Astfel de tensiunitagreprezintă un pericol de șoc.
- Before measuring current, ensure the meter's fuses are intact and the test leads are connected to the correct input jacks.
- Deconectați întotdeauna sondele de testare de la circuit înainte de a schimba funcțiile.
- Inspect the test leads for damaged insulation or exposed metal before use. Replace if damaged.
- Nu utilizați contorul dacă pare deteriorat sau dacă nu funcționează corect.
- Asigurați-vă că capacul bateriei este închis corect înainte de utilizare.
3. Identificarea componentelor și pieselor produsului
Familiarize yourself with the components of your VENLAB VM500A Digital Multimeter:

Figura 3.1: Față view of the VM500A Multimeter with labeled parts.
- Display LCD: Afișează valorile măsurate, unitățile de măsură și indicatorii de funcție.
- Senzor NCV: Detects non-contact voltage.
- Lanternă: Iluminează zona de lucru.
- Indicator luminos NCV: Illuminates when NCV is detected.
- Țineți butonul apasat: Îngheață citirea curentă a afișajului.
- Function Choose Button (FUNC): Cycles through sub-functions within a rotary switch position.
- Buton iluminare de fundal/lanterna: Activates the display backlight and flashlight.
- Gear Rotary Switch: Selectează funcția de măsurare dorită.
- Common Port (COM): Negative input terminal for all measurements.
- 10A Port: Input terminal for high current (up to 10A) measurements.
- Input Port (VΩmA): Terminal de intrare pozitiv pentru voltage, resistance, capacitance, diode, continuity, frequency, and low current (mA) measurements.
- Built-in Dual Ceramic Fuse: Provides anti-burning and overload protection.
4. Configurare
4.1 Despachetarea și inspecția
Upon receiving your VENLAB VM500A Digital Multimeter, carefully unpack all contents and inspect for any damage. The package should include:
- 1 x VENLAB VM500A Digital Multimeter
- 1 x Pereche de cabluri de testare (roșu și negru)
- 1 x Termocuplu (pentru măsurarea temperaturii)
- Baterii (AAA)
- Siguranțe de rezervă
- Manual de utilizare
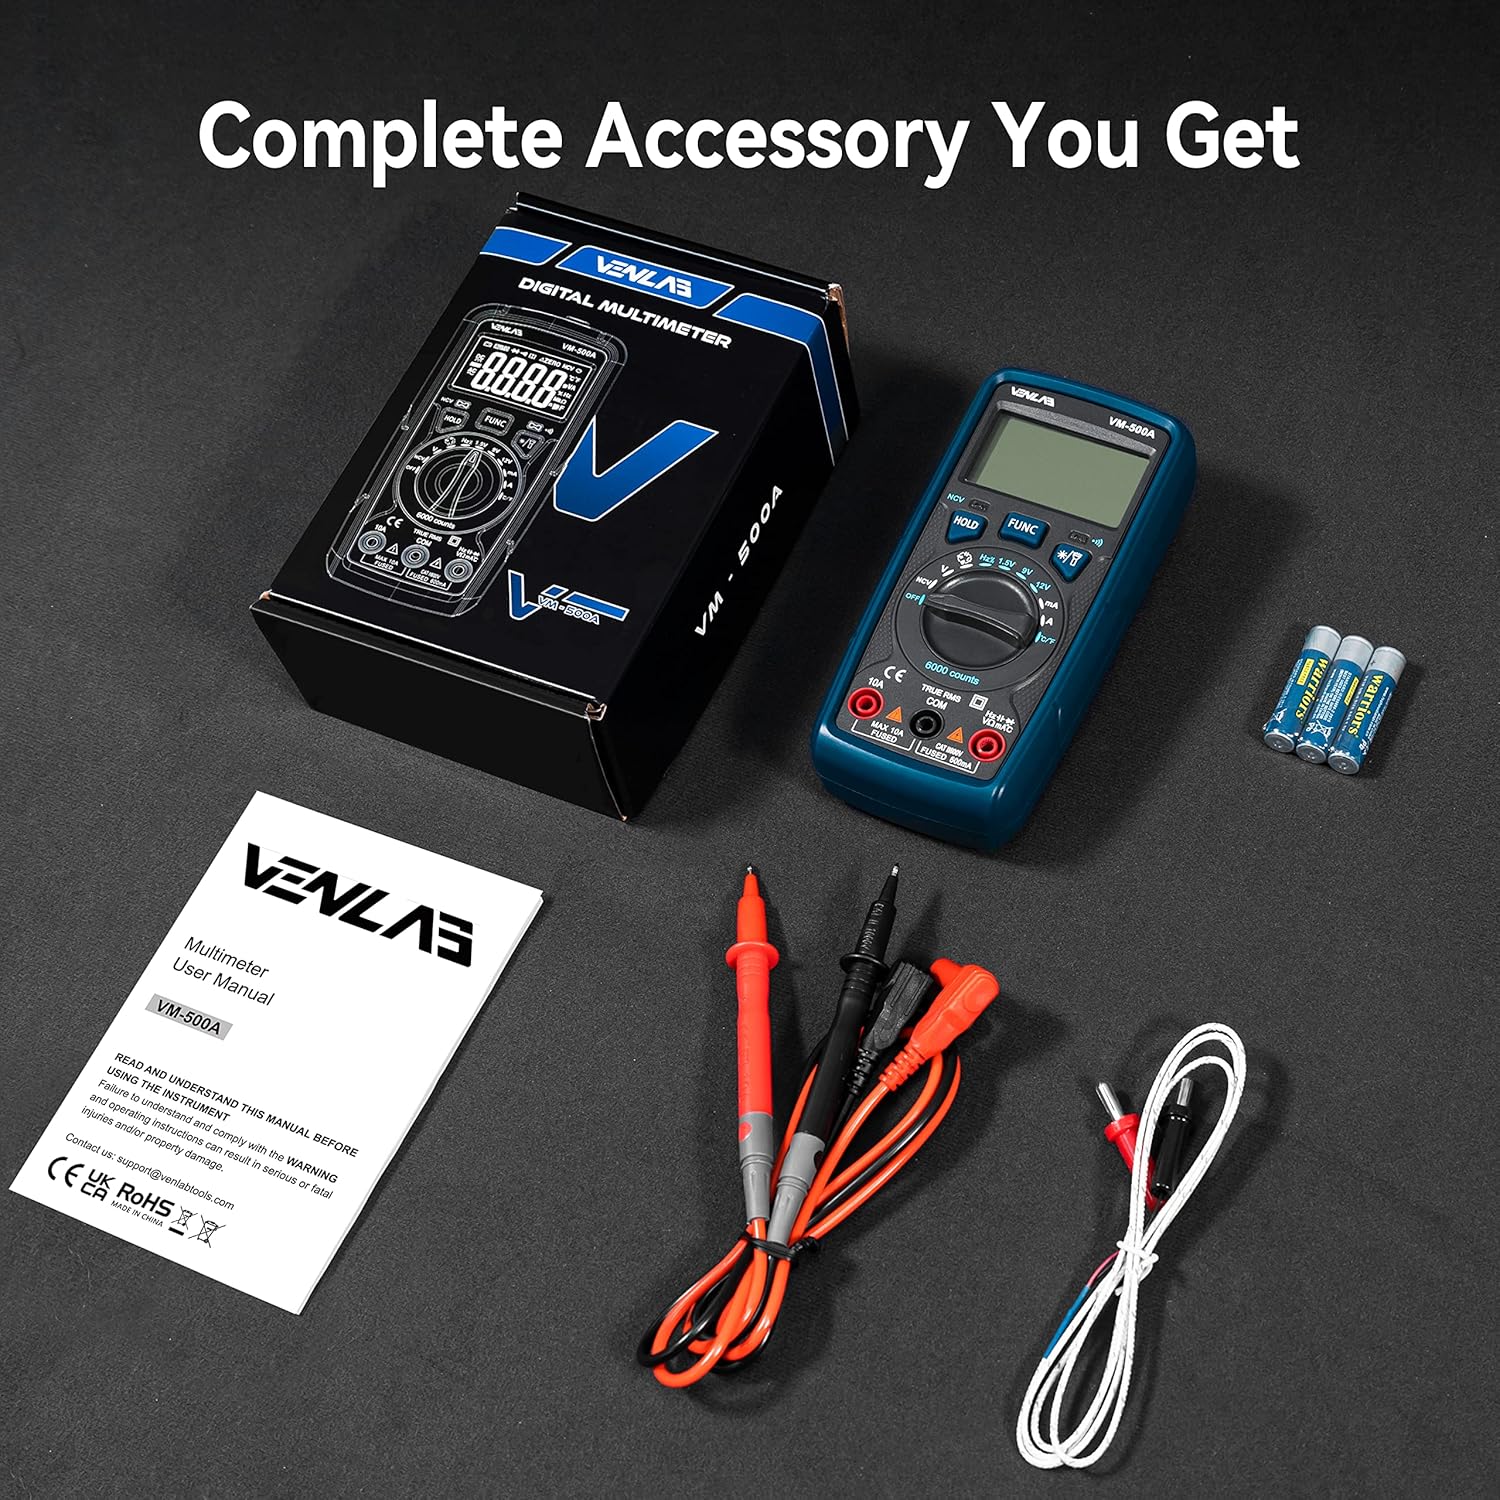
Figure 4.1: Complete accessories included with the VM500A Multimeter.
4.2 Instalarea bateriei
The VM500A multimeter requires 3 AAA batteries for operation. To install or replace batteries:
- Asigurați-vă că multimetrul este oprit.
- Localizați compartimentul bateriei pe spatele multimetrului.
- Folosiți o șurubelniță pentru a slăbi șurubul care fixează capacul bateriei.
- Scoateți capacul bateriei.
- Introduceți cele 3 baterii AAA, respectând polaritatea corectă (+/-) așa cum este indicată în interiorul compartimentului.
- Puneți la loc capacul bateriei și strângeți bine șurubul.
Video 4.1: Demonstrates battery installation and fuse inspection for the VENLAB VM500A Digital Multimeter.
5. Instrucțiuni de utilizare
This section details how to use the various measurement functions of your VM500A Digital Multimeter.
5.1 Sfaturi generale de utilizare
- Always select the appropriate function and range before connecting the test leads to the circuit.
- Conectați cablul de test negru la mufa COM.
- Connect the red test lead to the VΩmA jack for voltage, resistance, capacitance, diode, continuity, frequency, and low current measurements.
- Connect the red test lead to the 10A jack for high current measurements (up to 10A).
- Use the 'HOLD' button to freeze the display reading.
- Press the 'Backlight/Flashlight' button to activate the display backlight or flashlight.
5.2 AC/DC Voltage Măsurare
Pentru a măsura volul AC sau DCtage:
- Turn the rotary switch to the 'V' position (AC or DC, auto-ranging).
- Conectați sonda neagră la mufa COM și sonda roșie la mufa VΩmA.
- Conectați sondele de testare la circuitul sau componenta care urmează să fie măsurată.
- Afișajul va afișa volumultagcitirea.

Figure 5.1: Performing AC/DC VoltagTestul electronic.
5.3 Măsurarea curentului AC/DC
Pentru a măsura curentul alternativ sau continuu:
- Turn the rotary switch to the 'A' or 'mA' position (AC or DC, auto-ranging).
- For currents up to 600mA, connect the red test lead to the VΩmA jack. For currents up to 10A, connect the red test lead to the 10A jack. Always connect the black test lead to the COM jack.
- Deschideți circuitul unde urmează să se măsoare curentul și conectați multimetrul în serie cu circuitul.
- Afișajul va afișa citirea curentă.

Figure 5.2: Performing AC/DC Current Test.
5.4 Măsurarea rezistenței
Pentru a măsura rezistența:
- Turn the rotary switch to the 'Ω' position.
- Conectați sonda neagră la mufa COM și sonda roșie la mufa VΩmA.
- Connect the test probes across the component to be measured. Ensure the circuit is de-energized before measuring resistance.
- Afișajul va afișa valoarea rezistenței.

Figure 5.3: Demonstrating Resistance, Continuity, Diode, Capacitance, Temperature, and NCV Tests.
5.5 Test de continuitate
Pentru a testa continuitatea:
- Turn the rotary switch to the 'Ω' position and press 'FUNC' until the continuity symbol (speaker icon) appears.
- Conectați sonda neagră la mufa COM și sonda roșie la mufa VΩmA.
- Conectați sondele de testare la circuit sau la componentă.
- If continuity exists (resistance below approximately 50Ω), the buzzer will sound.
5.6 Testarea diodei
Pentru a testa o diodă:
- Turn the rotary switch to the 'Ω' position and press 'FUNC' until the diode symbol appears.
- Conectați sonda neagră la mufa COM și sonda roșie la mufa VΩmA.
- Conectați sonda roșie la anod și sonda neagră la catodul diodei. Afișajul va afișa tensiunea directă.tage picătură.
- Reverse the probes. The display should show 'OL' (Overload) for a good diode.
5.7 Măsurarea capacității
Pentru a măsura capacitatea:
- Turn the rotary switch to the 'Capacitance' position.
- Conectați sonda neagră la mufa COM și sonda roșie la mufa VΩmA.
- Connect the test probes across the capacitor. Ensure the capacitor is fully discharged before testing.
- Afișajul va afișa citirea capacității.
5.8 Măsurarea temperaturii
Pentru a măsura temperatura:
- Turn the rotary switch to the 'Temp' position.
- Connect the thermocouple to the VΩmA and COM jacks, observing polarity.
- Place the thermocouple sensor at the location where temperature is to be measured.
- The display will show the temperature reading in Celsius (°C) or Fahrenheit (°F). Press 'FUNC' to switch between units.
Video 5.4: Demonstrates temperature measurement using the included thermocouple.
5.9 fără contact voltagTestul e (NCV)
Pentru a efectua un test NCV:
- Turn the rotary switch to the 'NCV' position.
- Move the NCV sensor (top of the meter) close to the conductor or outlet you want to test.
- The NCV indicator light will illuminate and the buzzer will sound, with increasing frequency as the voltagputerea crește.

Figura 5.5: Efectuarea măsurării volumului fără contacttage (NCV) Test.
5.10 Măsurarea frecvenței
Pentru a măsura frecvența:
- Rotiți comutatorul rotativ în poziția „Hz”.
- Conectați sonda neagră la mufa COM și sonda roșie la mufa VΩmA.
- Conectați sondele de testare la circuitul unde urmează să fie măsurată frecvența.
- The display will show the frequency reading. In AC voltage mode, a long press of the FUNC key can also measure the frequency.

Figure 5.6: Performing Frequency Test.
5.11 Vol. baterietagTest e (1.5V, 9V, 12V)
To test battery voltage:
- Turn the rotary switch to the '1.5V', '9V', or '12V' battery test position.
- Conectați sonda neagră la mufa COM și sonda roșie la mufa VΩmA.
- Conectați sondele de testare la bornele pozitiv și negativ ale bateriei.
- Afișajul va afișa volumul baterieitage. Dacă volumul baterieitage is lower than 20% of the nominal voltage, the battery is considered exhausted.

Figure 5.7: Performing Battery VoltagTestul electronic.

Figura 5.8: Volumul bateriei în timp realtage Test results.
6. Întreținere
6.1 Curățare
Pentru a curăța contorul, ștergeți carcasa cu un prosop de hârtie.amp o lavetă și un detergent blând. Nu utilizați substanțe abrazive sau solvenți. Nu lăsați terminalele de intrare să fie murdare sau umezeală.
6.2 Înlocuirea siguranței
The VM500A is equipped with dual ceramic fuses for protection. If the meter fails to measure current, the fuse may be blown. To replace the fuse:
- Asigurați-vă că multimetrul este oprit (OFF) și că toate sondele de testare sunt deconectate.
- Localizați compartimentul bateriei pe spatele multimetrului.
- Use a screwdriver to loosen the screw securing the battery cover and remove the cover.
- Carefully remove the old fuse(s). Note the fuse ratings.
- Install new fuses of the same type and rating. The VM500A uses two fuses: one for the 10A range and one for the mA range.
- Puneți la loc capacul bateriei și strângeți bine șurubul.
Video 6.1: Demonstrates fuse inspection and replacement for the VENLAB VM500A Digital Multimeter.
6.3 Depozitare
When not in use for extended periods, turn off the multimeter and remove the batteries to prevent leakage and damage to the device.
7. Depanare
If you encounter issues with your VM500A Digital Multimeter, refer to the following common problems and solutions:
| Problemă | Cauza posibila | Soluţie |
|---|---|---|
| Contorul nu pornește. | Baterii descărcate sau instalate incorect. | Check battery polarity, replace batteries. |
| No reading or 'OL' (Overload) displayed in a measurement range. | Incorrect range selected; open circuit; blown fuse (for current). | Select appropriate range; check circuit continuity; check/replace fuses. |
| Citiri inexacte. | Poor test lead connection; external interference; low battery. | Ensure firm connections; move away from strong electromagnetic fields; replace batteries. |
| Buzzer not sounding during continuity test. | Circuit resistance too high; meter not in continuity mode. | Check circuit resistance; ensure rotary switch is in 'Ω' and FUNC button is pressed to select continuity. |
8. Specificații
| Caietul de sarcini | Valoare |
|---|---|
| Numărul de model | VM500A |
| Afişa | 6000 de numere |
| Evaluare de siguranță | CAT III 600V |
| Sursa de alimentare | Alimentat cu baterii (3 x AAA) |
| Dimensiuni pachet | 6.77 x 4.41 x 2.13 inci |
| Greutatea articolului | 12.63 uncii |
| Min. Vol. operativtage | 3 volți |
9. Garanție și asistență
VENLAB provides a lifetime after-sale service and technical support for the VM500A Digital Multimeter. For any inquiries, technical assistance, or warranty claims, please contact VENLAB customer service through the official channels provided at the time of purchase or visit the VENLAB store on Amazon.
Your satisfaction is our priority. Please retain your purchase receipt as proof of purchase for warranty purposes.
Ask a question about this manual
Ask about setup, troubleshooting, compatibility, parts, safety, or missing instructions. Manuals+ will review the question and use this page’s manual context to help answer it.