
1. Introducere
This manual provides detailed instructions for the assembly, installation, operation, and maintenance of your AMANSON H07 ATX Mid Tower PC Case. Please read this manual thoroughly before beginning installation to ensure proper setup and safe operation. Keep this manual for future reference.

Figure 1.1: AMANSON H07 ATX Mid Tower PC Case with illuminated internal components.
2. Informații de siguranță
- Always disconnect the power supply from the wall outlet before performing any installation or maintenance inside the PC case.
- Manipulați toate componentele cu grijă pentru a preveni deteriorarea.
- Wear an anti-static wrist strap to prevent electrostatic discharge (ESD) damage to sensitive electronic components.
- A nu se lăsa la îndemâna copiilor piesele mici și materialele de ambalare.
- Asigurați o ventilație adecvată în jurul carcasei PC-ului pentru a preveni supraîncălzirea.
3. Conținutul pachetului
Verificați dacă toate articolele sunt prezente în colet:
- AMANSON H07 ATX Mid Tower PC Case
- Cutie de accesorii (șuruburi, distanțiere, coliere de cablu etc.)
- Manual de utilizare (acest document)
4. Componenta pesteview
The AMANSON H07 PC case features a panoramic design with tempered glass panels for full visibility of your internal components. It supports various motherboard sizes and extensive cooling configurations.

Figure 4.1: Top I/O Panel with power button, USB 3.0, USB 2.0, and audio ports.
Panoul superior I/O include:
- Buton de alimentare
- Butonul de resetare
- 2x porturi USB 2.0
- 1x port USB 3.0
- Mufe audio de intrare/ieșire
5. Configurare și instalare
5.1. Pregătirea cazului
The AMANSON H07 features tool-less hinged tempered glass side panels for easy access. Gently open the side panel by pulling it from the rear edge. The panels can also be removed by lifting them off their hinges for full access during installation.

Figure 5.1: Hinged tempered glass side panel for easy access.
5.2. Instalarea plăcii de bază
The H07 supports E-ATX, ATX, Micro-ATX, and ITX motherboards. Install the necessary standoffs for your motherboard form factor. Carefully align your motherboard with the standoffs and I/O shield, then secure it with screws.
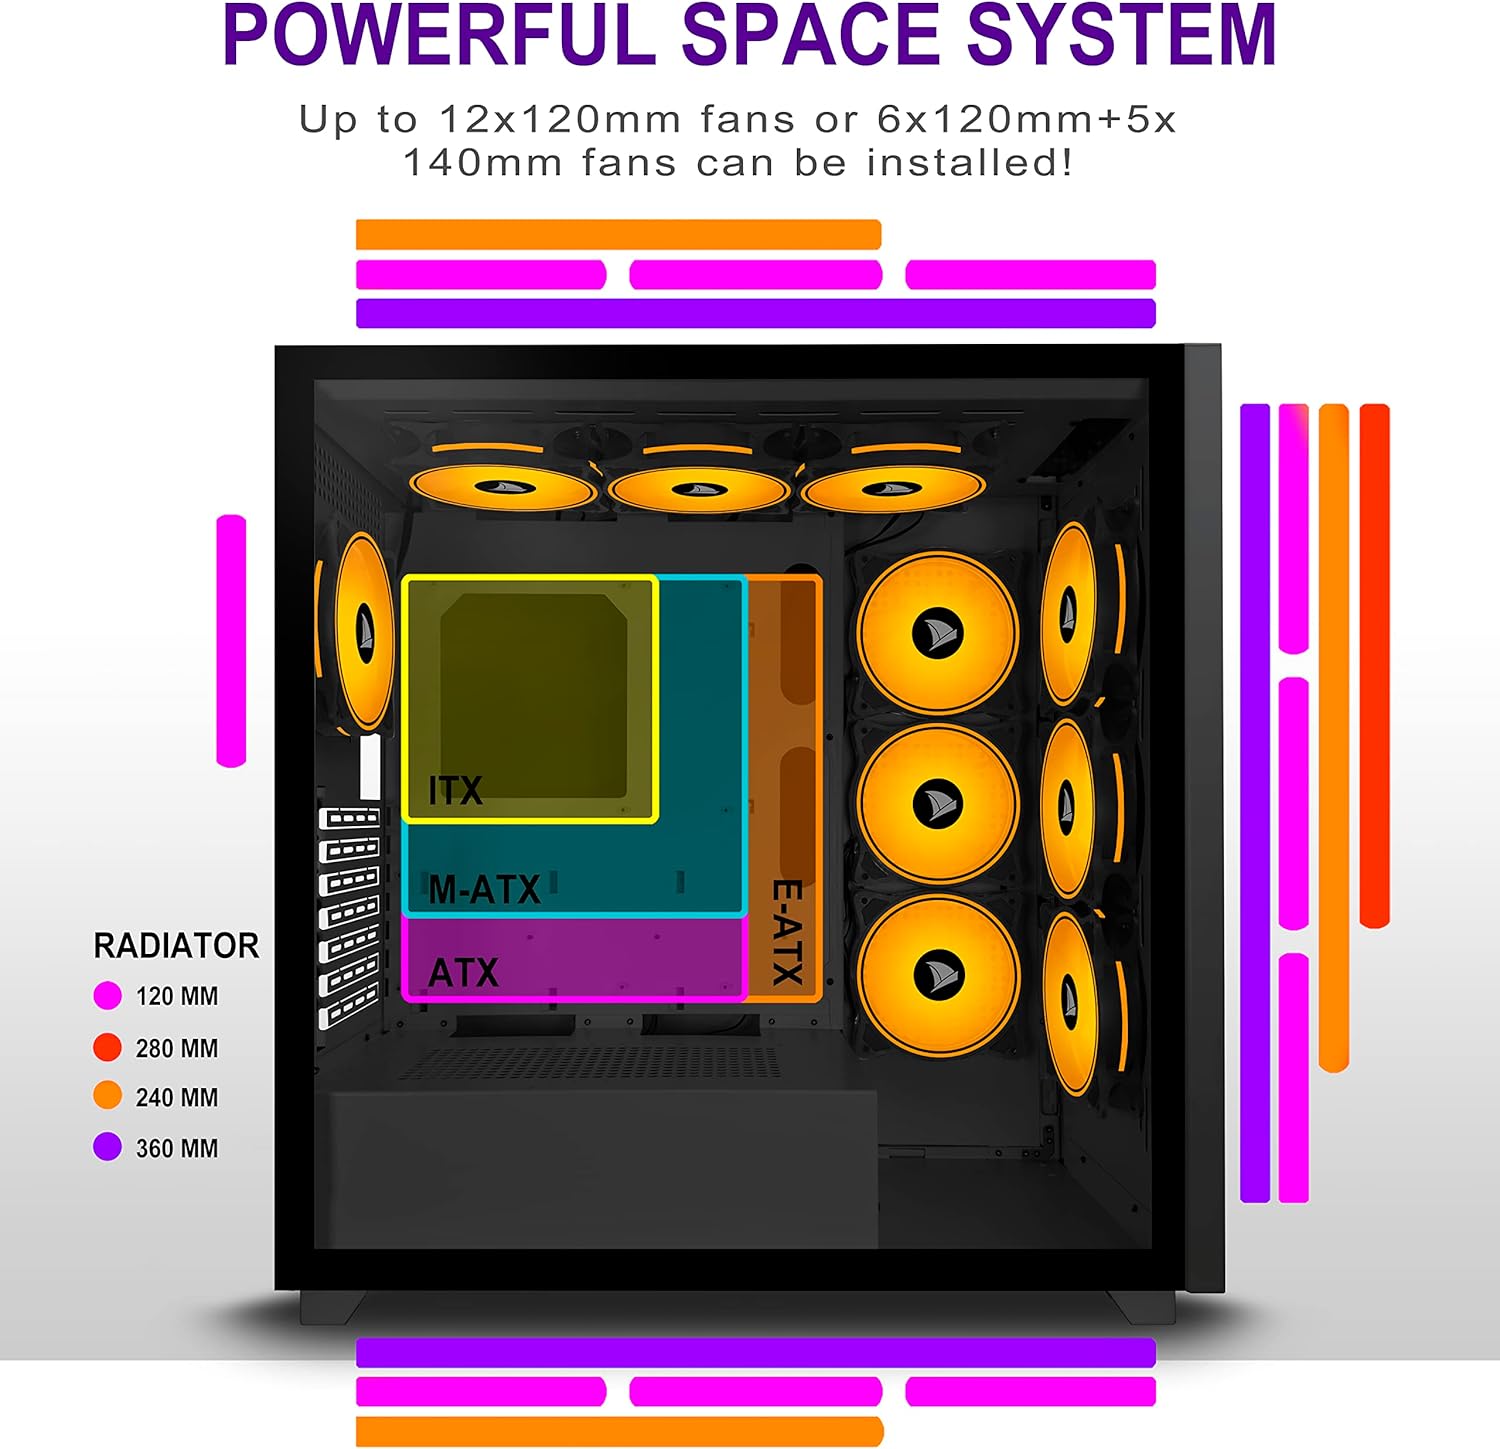
Figure 5.2: Motherboard and cooling component placement options.
5.3. Instalarea sursei de alimentare
Install your power supply unit (PSU) into the dedicated compartment at the bottom rear of the case. Secure it with screws from the rear of the case.
5.4. Instalarea dispozitivului de stocare
The case provides multiple mounting points for storage devices. Install your 3.5" HDDs and 2.5" SSDs into the designated trays and mounting locations. Refer to the case diagram for specific locations.

Figure 5.3: Storage drive mounting options for HDDs and SSDs.
5.5. Expansion Card (GPU) Installation
Remove the necessary PCI-E slot covers from the rear of the case. Insert your graphics card or other expansion cards into the motherboard's PCI-E slots and secure them with screws.
5.6. Gestionarea cablurilor
Utilize the cable routing cutouts and tie-down points behind the motherboard tray to manage cables. This improves airflow and maintains a clean aesthetic.
6. Instrucțiuni de utilizare
6.1. Pornire/Oprire
Press the power button located on the top I/O panel to turn on your PC. To shut down, use the operating system's shutdown function or press and hold the power button for several seconds.
6.2. Using Front I/O Ports
Connect USB devices to the USB 2.0 or USB 3.0 ports. Use the audio jacks for headphones, microphones, or speakers.
7. Întreținere
7.1. Curatenie
Curățați regulat exteriorul carcasei cu o lavetă moale șiamp cloth. For internal cleaning, use compressed air to remove dust from fans and components. Ensure the PC is powered off and unplugged before cleaning.
7.2. Filtre de praf
The AMANSON H07 may include removable dust filters. Clean these filters periodically to maintain optimal airflow and cooling performance.
8. Depanare
- PC-ul nu pornește: Check all power connections, including the PSU to the wall, the PSU to the motherboard, and the front panel power switch cable to the motherboard.
- Overheating issues: Ensure all fans are properly installed and functioning. Verify that dust filters are clean and not obstructing airflow. Check thermal paste application on CPU cooler.
- Porturile USB nu funcționează: Confirm that the front panel USB cables are correctly connected to the motherboard headers.
- Audio jacks not working: Verify that the front panel audio cable is correctly connected to the motherboard's audio header.
9. Specificații
Below are the technical specifications for the AMANSON H07 PC Case:
| Caracteristică | Detaliu |
|---|---|
| Model | H07 |
| Tipul cazului | Mid Tower |
| Compatibilitate cu placa de baza | E-ATX, ATX, Micro ATX, ITX |
| Material | Sticla securizata |
| Dimensiunile produsului (Lxlxh) | 19.69 x 13.78 x 19.69 inchi (500 x 350 x 500 mm) |
| Greutatea articolului | 24.2 lire sterline |
| Număr de porturi USB 2.0 | 2 |
| Număr de porturi USB 3.0 | 1 |
| Number of Expansion Slots | 8 |
| Metoda de răcire | Aer |
| Tip de montare a sursei de alimentare | Montare de jos |

Figure 9.1: AMANSON H07 PC Case dimensions (520mm height, 510mm length, 250mm width).
10. Informații despre garanție
Please refer to the product packaging or the official AMANSON webConsultați site-ul pentru termenii și condițiile specifice ale garanției. Păstrați dovada achiziției pentru solicitările de garanție.
11. Suport
For technical assistance or customer support, please visit the official AMANSON website or contact their customer service department. Contact details can typically be found on the product packaging or the brand's website-ul.