
1. Introducere
This manual provides detailed instructions for the installation, operation, and maintenance of your Fractal Design Define 7 Nano Black Solid Mini ITX PC Case. Please read this manual thoroughly before beginning assembly to ensure proper installation and to maximize the performance and longevity of your system.
The Define 7 Nano is a compact Mini ITX case designed for silent operation and flexible component support, offering a balance of size and functionality for small form factor builds.

Figura 1: Partea frontală view of the Fractal Design Define 7 Nano Black Solid Mini ITX PC Case.
2. Informații de siguranță
Respectați următoarele măsuri de siguranță în timpul instalării și utilizării:
- Deconectați întotdeauna sursa de alimentare de la priza de perete înainte de a instala sau demonta orice componente.
- Purtați o curea antistatică la încheietura mâinii pentru a preveni deteriorarea componentelor sensibile prin descărcare electrostatică (ESD).
- Manipulați componentele cu grijă pentru a evita deteriorarea fizică.
- Asigurați o ventilație adecvată în jurul carcasei PC-ului pentru a preveni supraîncălzirea.
- Țineți carcasa departe de lichide și umiditate excesivă.
- Do not attempt to modify the case structure, as this may void your warranty and pose safety risks.
3. Conținutul pachetului
Verificați dacă toate componentele sunt prezente în pachet:
- Fractal Design Define 7 Nano PC Case
- Accessory Box (screws, zip ties, standoffs, cleaning cloth)
- Manual de utilizare (acest document)
- Pre-installed fans (Dynamic X2 GP-12/GP-14, quantity may vary)

Figura 2: Explodat view showing the various removable components of the Define 7 Nano case.
4. Configurarea și instalarea componentelor
4.1. Pregătire
- Despachetați carcasa: Scoateți cu grijă carcasa din ambalaj.
- Scoateți panourile laterale: The side panels are secured with captive thumbscrews. Loosen the thumbscrews and slide the panels backward to remove them.
- Remove Top Panel (Optional): The top panel can be removed for easier access during installation or for enhanced airflow. Press the release button at the rear of the top panel and lift it off.
- Remove Front Panel (Optional): The front panel can be carefully pulled off from the bottom for access to front fan mounts and dust filters.
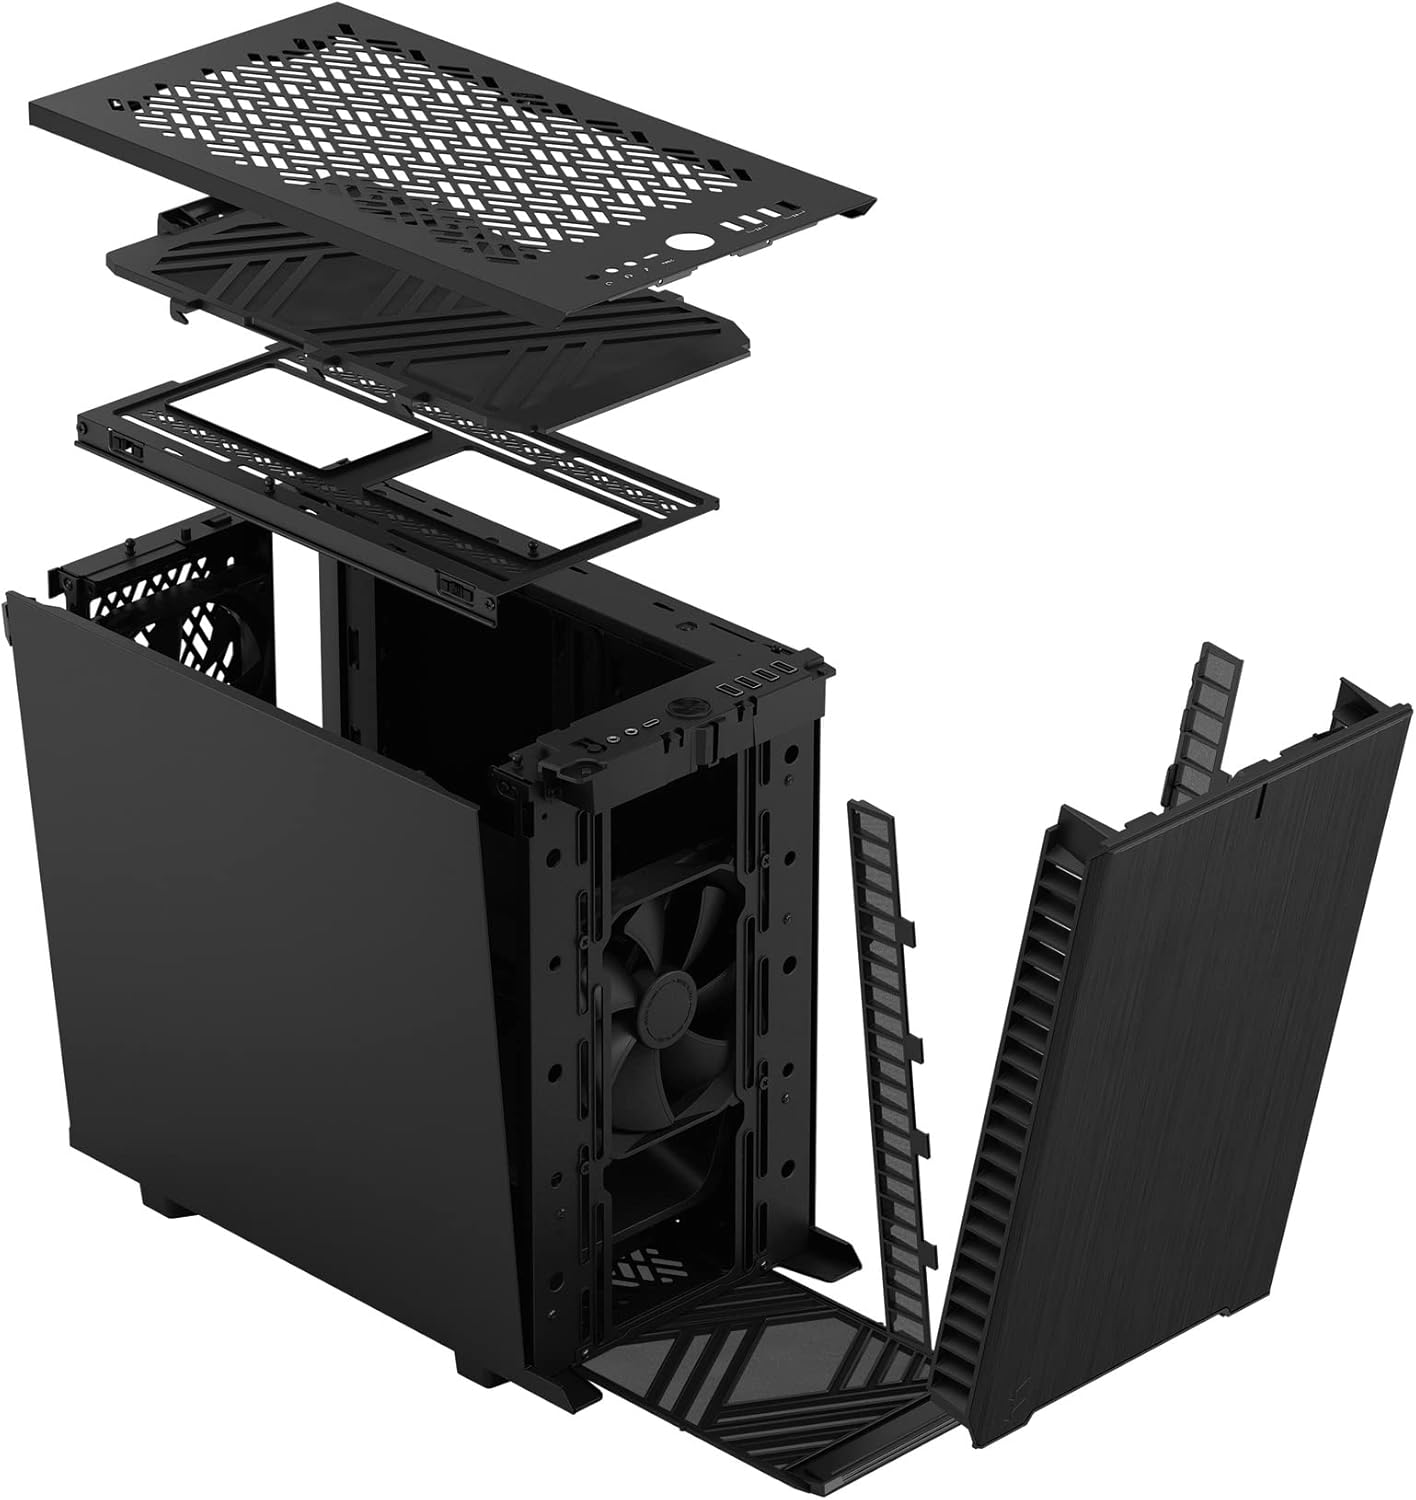
Figura 3: Explodat view illustrating the removal process for the front and top panels.
4.2. Instalarea plăcii de bază
The Define 7 Nano supports Mini ITX motherboards.
- Instalați scutul I/O: If your motherboard requires an I/O shield, install it into the rear opening of the case before mounting the motherboard.
- Poziția plăcii de bază: Align your Mini ITX motherboard with the pre-installed standoffs inside the case.
- Placă de bază securizată: Use the provided screws from the accessory box to secure the motherboard to the standoffs.
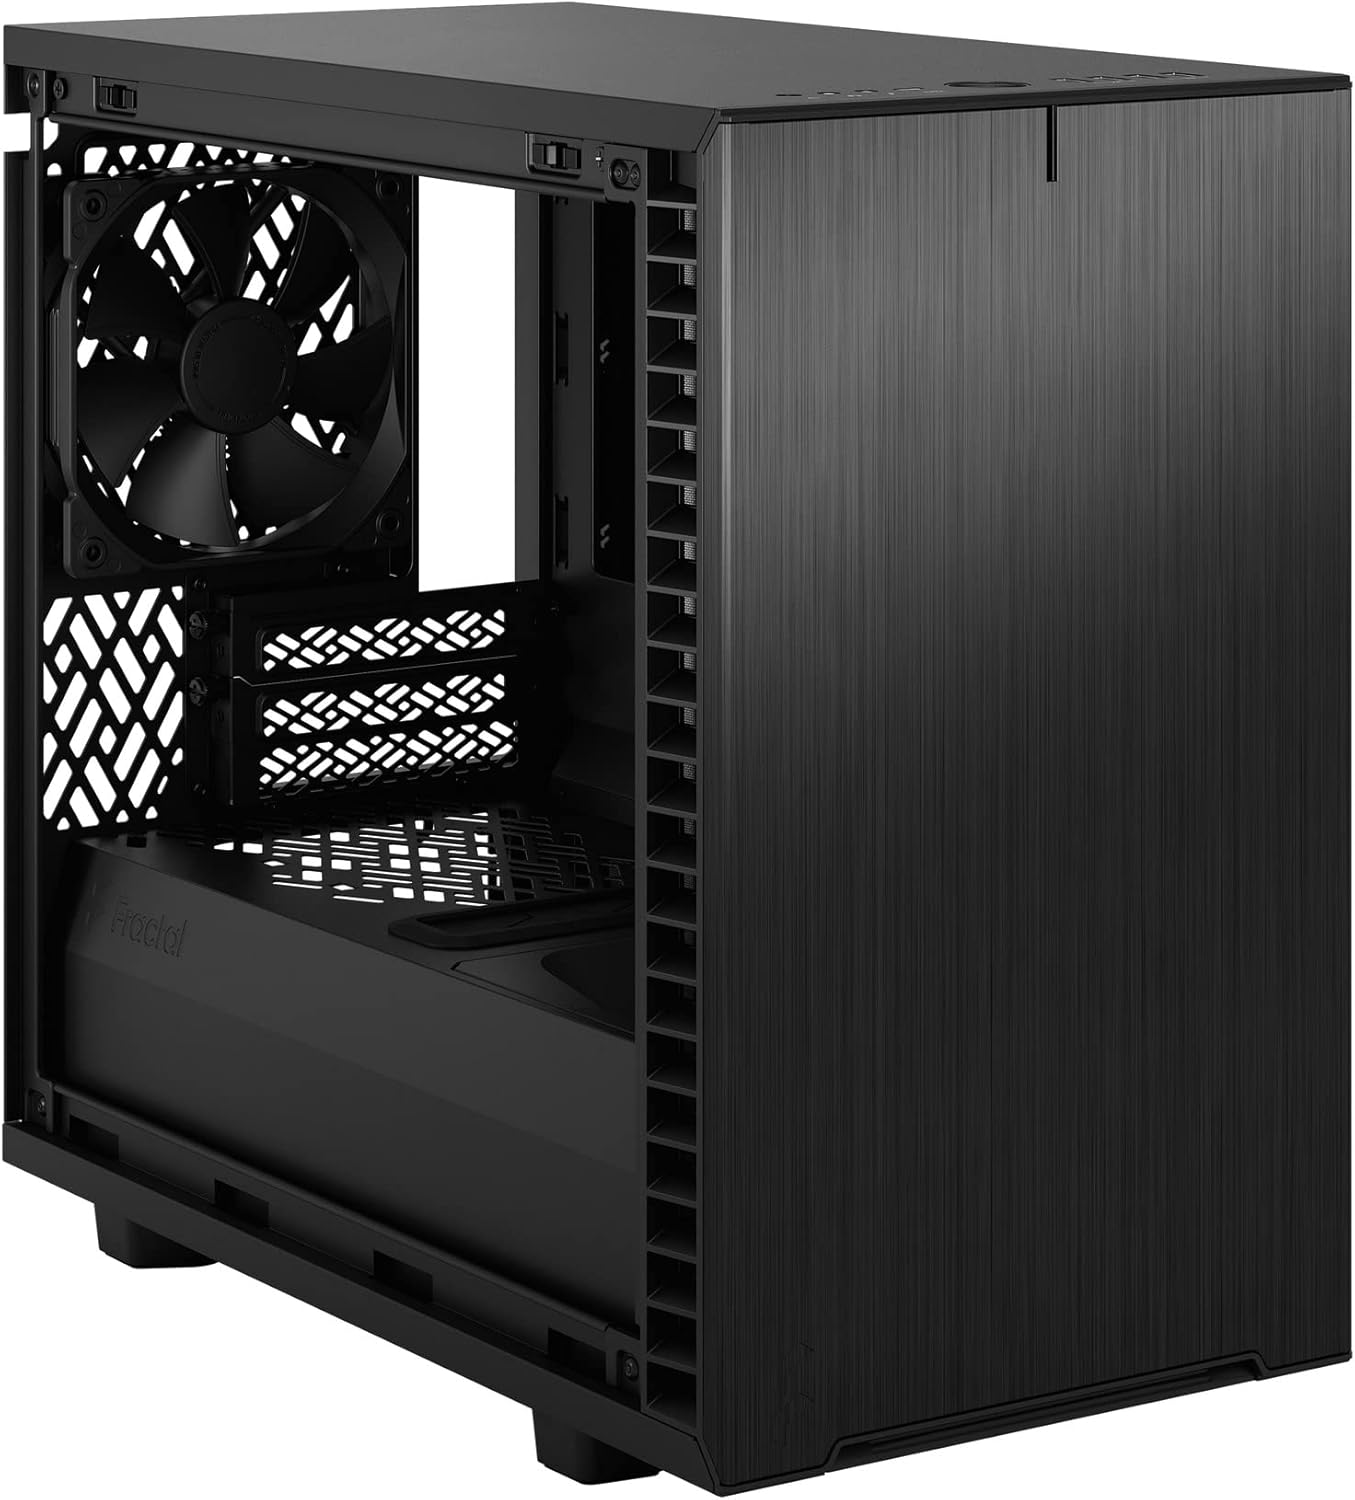
Figura 4: Interior view of the case, highlighting the motherboard mounting area and fan locations.
4.3. Instalarea unității de alimentare (PSU)
The Define 7 Nano supports ATX PSUs.
- Mount PSU Bracket: Attach the PSU mounting bracket to your power supply using the screws provided with the PSU.
- Slide PSU into Case: Slide the PSU with the attached bracket into the rear of the case.
- Sursă de alimentare securizată: Secure the PSU bracket to the case using the thumbscrews.
4.4. Instalarea unității de stocare
The case supports 2.5" SSDs and 3.5" HDDs.
- Unități de 2.5": Mount 2.5" drives to the dedicated SSD brackets located behind the motherboard tray or on the PSU shroud. Secure with screws.
- Unități de 3.5": Install 3.5" drives into the drive cage located beneath the PSU shroud. Secure with screws.
4.5. Instalarea plăcii grafice (GPU)
- Scoateți capacele sloturilor PCIe: Scoateți capacele sloturilor PCIe necesare din spatele carcasei.
- Introduceți GPU-ul: Carefully insert your graphics card into the primary PCIe slot on the motherboard.
- GPU securizat: Secure the graphics card to the case using the thumbscrews or standard screws.
4.6. Cooling System Installation (Fans/Radiators)
The Define 7 Nano offers flexible cooling options.
- Ventilatoare frontale: Up to two 120/140mm fans or a 240/280mm radiator can be installed at the front.
- Fani de top: Up to two 120/140mm fans or a 240mm radiator can be installed at the top (requires removing the solid top panel and installing the ventilated top panel).
- Ventilator spate: One 120mm fan can be installed at the rear.
- Bottom Fan: One 120mm fan can be installed at the bottom.
Ensure fans are oriented correctly for optimal airflow (intake or exhaust).
4.7. Gestionarea cablurilor
The case features routing channels and Velcro straps behind the motherboard tray for organized cable management.
- Traseul cablurilor: Pass power and data cables through the rubber grommets to the back of the motherboard tray.
- Cabluri sigure: Use the pre-installed Velcro straps and included zip ties to bundle and secure cables.

Figura 5: Interiorul spate view demonstrating the cable management system with Velcro straps.
4.8. Conexiuni panou frontal
Connect the front panel cables to the corresponding headers on your motherboard:
- Power Button (PWR SW)
- Reset Button (RESET SW)
- Power LED (PWR LED)
- HDD Activity LED (HDD LED)
- Antet USB 3.0
- USB Type-C Header (if applicable)
- Antet audio HD
Refer to your motherboard manual for exact header locations.
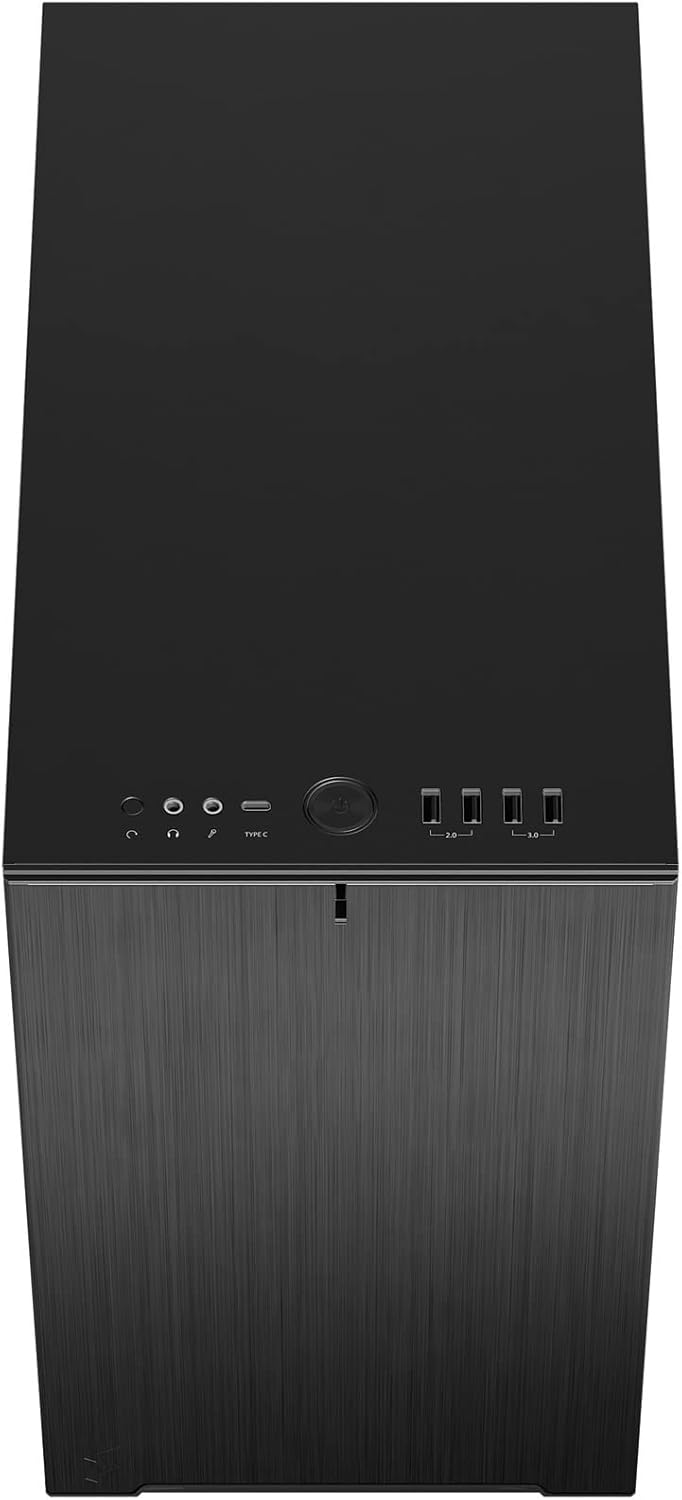
Figura 6: Partea frontală superioară view displaying the front I/O panel with USB ports, audio jacks, and power button.
5. Instrucțiuni de utilizare
5.1. Pornire/Oprire
- Pornire: Apăsați butonul de alimentare situat pe panoul frontal I/O.
- Oprire: Initiate a shutdown from your operating system. Alternatively, press and hold the power button for 5 seconds for a forced shutdown.
5.2. Using Front Panel Ports
The front I/O panel provides convenient access to:
- Porturi USB: 3.0 Pentru transfer de date de mare viteză cu dispozitive compatibile.
- Port USB tip C: For modern devices requiring a Type-C connection.
- Mufe audio: Pentru conectarea căștilor și microfoanelor.
6. Întreținere
Întreținerea regulată ajută la asigurarea performanței optime și a longevității componentelor PC-ului.
6.1. Curățarea filtrului de praf
The Define 7 Nano is equipped with easily removable dust filters to prevent dust buildup inside the case.
- Filtru frontal: Can be accessed by removing the front panel.
- Filtrul superior: Located beneath the ventilated top panel (if installed).
- Filtrul inferior: Slides out from the front of the case.
Clean filters regularly (e.g., monthly) by rinsing them with water and allowing them to dry completely, or by using a soft brush or compressed air.
6.2. Curățenie generală
- Folosiți un moale, damp cloth to wipe down the exterior surfaces of the case.
- Evitați utilizarea substanțelor chimice dure sau a materialelor abrazive care ar putea deteriora finisajul.
- For interior cleaning, use compressed air to remove dust from components. Ensure the system is powered off and unplugged.
7. Depanare
Această secțiune abordează problemele frecvente pe care le-ați putea întâmpina.
7.1. Fără alimentare / Sistemul nu pornește
- Verificați conexiunile de alimentare: Ensure the PSU is properly connected to the wall outlet and the power switch on the PSU is in the 'ON' position. Verify all internal power cables (24-pin ATX, 8-pin CPU, PCIe, SATA) are securely connected.
- Anteturi panou frontal: Double-check that the power button header (PWR SW) is correctly connected to the motherboard.
- Motherboard/CPU: Asigurați-vă că procesorul și memoria RAM sunt instalate corect.
7.2. Zgomot excesiv
- Zgomot ventilator: Check if any fan cables are obstructing fan blades. Ensure fans are securely mounted. Consider adjusting fan speeds in your motherboard's BIOS/UEFI or operating system.
- Vibrație: Ensure all components (PSU, drives, GPU) are securely fastened to prevent rattling.
7.3. Supraîncălzire
- Flux de aer: Verify that fans are oriented correctly (intake/exhaust) and that there is adequate airflow.
- Filtre de praf: Clean dust filters regularly to prevent restricted airflow.
- Pastă termică: Ensure CPU cooler has proper thermal paste application.
8. Specificații
| Caracteristică | Caietul de sarcini |
|---|---|
| Numele modelului | Define 7 Nano |
| Numărul de model | FD-C-DEF7N-01 |
| Tipul cazului | Mini-turn |
| Compatibilitate cu placa de baza | Mini ITX |
| Dimensiuni (L x l x H) | Aprox. 18.74 x 11.38 x 17.91 cm (pachet) |
| Greutate | Aproximativ 18.37 livre |
| Material | Aluminiu |
| Culoare | Solid negru |
| Porturi I / O frontale | 5x USB 3.0, Audio In/Out, Power Button |
| Drive Bays | 2.5" SSD, 3.5" HDD (specific quantities vary by configuration) |
| Metoda de răcire | Aer |
| Ventilatoare preinstalate | Dynamic X2 GP-12 (rear), Dynamic X2 GP-14 (front) |
9. Garanție și asistență
Fractal Design products are manufactured to the highest quality standards and come with a limited warranty. For detailed warranty information, please refer to the official Fractal Design website-ul sau cardul de garanție inclus împreună cu produsul.
For technical support, troubleshooting assistance, or to inquire about replacement parts, please visit the official Fractal Design support page:
www.fractal-design.com/support/
Please have your product model number (FD-C-DEF7N-01) and proof of purchase ready when contacting support.