
GWH12QC-K3DNA5G, GWH12QC-K3DNB2G, GWH09QB-K3DNA1G, GWH09QB-K3DNA5G, GWH09QB-K3DNB2G, GWH09QB-K3DNB4G, GWH09QB-K3DNB6G, G
Instruction Manual for SZHKHXD Remote Control
Compatible with GREE AC Air Conditioner Models
1. Produs terminatview
This manual provides instructions for the SZHKHXD replacement remote control designed for various GREE AC Air Conditioner models. This remote offers essential functions for controlling your air conditioning unit.

Figura 1: Față view of the SZHKHXD remote control, showing the LCD screen and various function buttons.

Figura 2: Spate view of the SZHKHXD remote control, displaying battery type information and a QC Pass sticker.
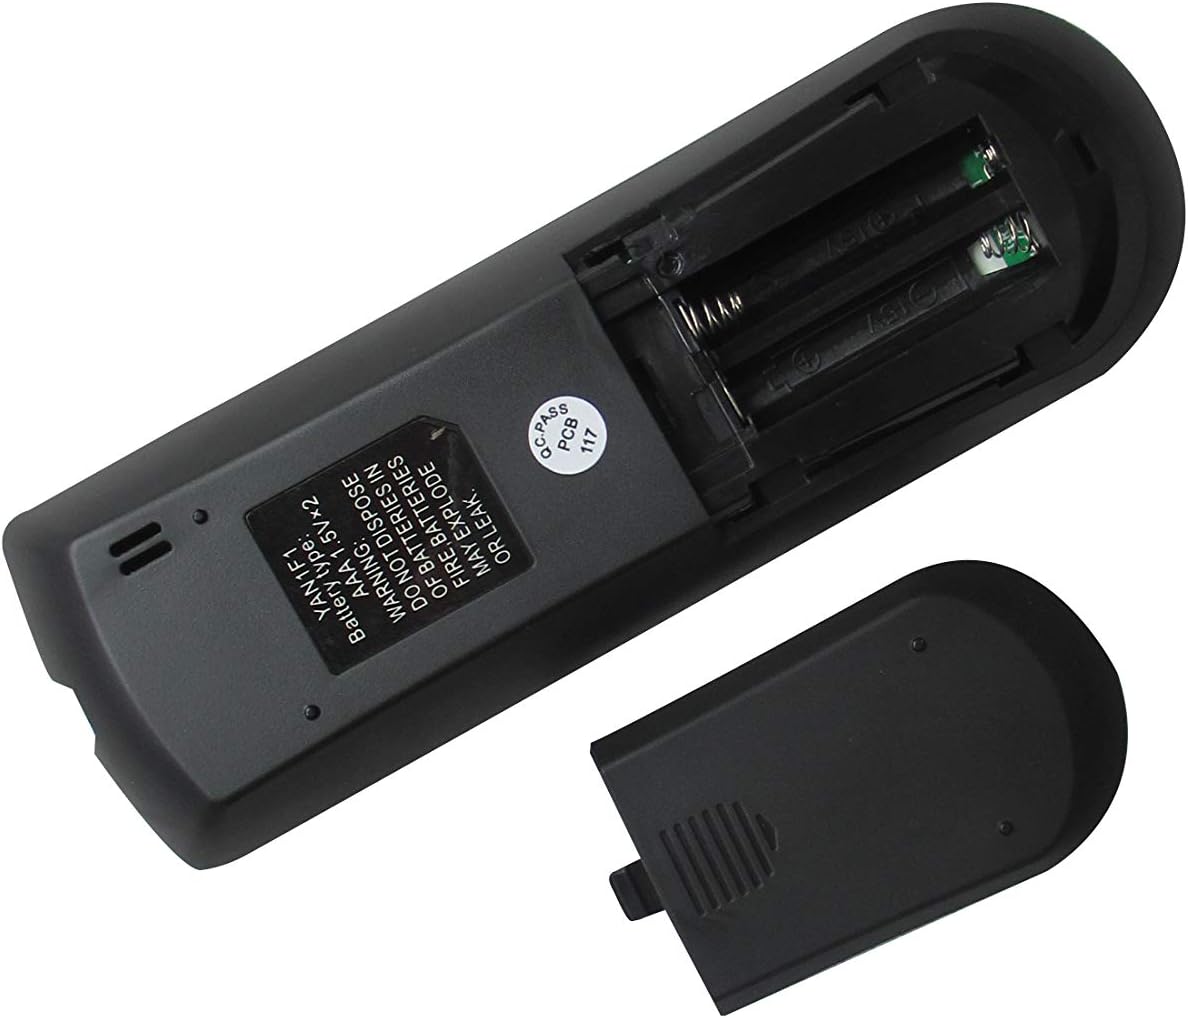
Figure 3: The remote control with its battery compartment open, revealing slots for two AAA batteries.

Figura 4: Spate view a telecomenzii cu capacul bateriilor fixat în siguranță.
Modele compatibile:
- GREE GWH12QC-K3DNA5G
- GREE GWH12QC-K3DNB2G
- GREE GWH09QB-K3DNA1G
- GREE GWH09QB-K3DNA5G
- GREE GWH09QB-K3DNB2G
- GREE GWH09QB-K3DNB4G
- GREE GWH09QB-K3DNB6G
- GREE GWH12QC-K3DNA1G
- GREE GWH12QC-K3DNA2G
2. Configurare
Instalarea bateriei
The remote control requires two (2) AAA 1.5V batteries (not included). Follow these steps to install them:
- Localizați compartimentul bateriei de pe spatele telecomenzii.
- Slide the battery cover downwards to open it (refer to Figure 3).
- Introduceți două baterii AAA, asigurându-vă că bornele pozitive (+) și negative (-) se aliniază corect cu marcajele din interiorul compartimentului.
- Slide the battery cover back into place until it clicks securely (refer to Figure 4).
Warning: Do not dispose of batteries in fire. Batteries may explode or leak if mishandled.
3. Instrucțiuni de utilizare
Familiarize yourself with the buttons on your remote control to operate your GREE AC unit effectively.
Funcții butoane:
| Buton | Funcţie |
|---|---|
| MOD | Comută între modurile de funcționare (de exemplu, Răcire, Încălzire, Ventilator, Uscare, Auto). |
| Putere (⏻) | Turns the AC unit On or Off. |
| FAN | Reglează viteza ventilatorului (de exemplu, Mică, Medie, Mare, Automat). |
| SWING | Activates or deactivates the vertical louver swing function. |
| Săgeată în sus (▲) | Increases temperature setting or navigates menu options. |
| Săgeată în jos (▼) | Decreases temperature setting or navigates menu options. |
| TURBO | Activează răcirea sau încălzirea rapidă pentru schimbări bruște de temperatură. |
| DORMI | Engages sleep mode, which adjusts temperature and fan speed for comfortable sleep. |
| TEMP | Displays or cycles through temperature settings. |
| CEAS | Sets or displays the current time. |
| SIMT | Activates the iFeel function, which senses the temperature at the remote's location. |
| APRINDE | Turns the display light on or off on the indoor unit. |
| TIMER PORNIT | Sets a timer for the AC unit to turn on automatically. |
| TIMER OPRIT | Sets a timer for the AC unit to turn off automatically. |
Operație de bază:
- Pornire/Oprire: Press the red Power button (⏻) pentru a porni sau opri unitatea.
- Selectați modul: Apăsați tasta MOD button repeatedly to cycle through available operating modes (e.g., Cool, Heat, Fan, Dry, Auto). The selected mode will typically be displayed on the remote's LCD screen.
- Reglați temperatura: Use the Up (▲) and Down (▼) arrow buttons to set your desired temperature.
- Reglați viteza ventilatorului: Apăsați tasta FAN button to cycle through different fan speeds (e.g., Auto, Low, Medium, High).
4. Întreținere
Curățarea telecomenzii:
- Ștergeți suprafața telecomenzii cu o lavetă moale și uscată.
- Do not use liquid cleaners, abrasive cleaners, or chemical sprays, as these may damage the remote.
Înlocuire baterie:
- Replace batteries when the remote's display becomes dim or the remote no longer responds to commands.
- Always replace both batteries at the same time with new AAA 1.5V batteries.
- Ensure correct polarity (+/-) when inserting new batteries.
- Scoateți bateriile dacă telecomanda nu va fi utilizată pentru o perioadă lungă de timp, pentru a preveni scurgerile.
5. Depanare
Dacă întâmpinați probleme cu telecomanda, consultați următoarele probleme și soluții frecvente:
- Telecomanda nu răspunde:
- Verificați dacă bateriile sunt introduse corect, respectând polaritatea.
- Înlocuiți bateriile vechi cu altele noi.
- Ensure there are no obstructions between the remote control and the AC unit's receiver.
- Confirm you are within the effective operating range of the AC unit.
- Display shows Celsius instead of Fahrenheit (or vice-versa):
- Some replacement remotes may default to Celsius. To switch, try pressing and holding the TEMP button for 3-5 seconds. If this does not work, try holding the MOD button or a combination of TEMP and an arrow key. Refer to your specific AC unit's manual for remote control temperature unit conversion if this remote does not have a direct function for it.
- Certain functions do not work:
- This is a replacement remote. While designed to be compatible, some advanced or specific functions present on your original remote may not be supported by this universal replacement. Refer to the "Special Feature" note in the product specifications.
6. Specificații
| Caracteristică | Detaliu |
|---|---|
| Dimensiunile produsului | 6.3 x 3.15 x 1.18 inci |
| Greutatea articolului | 3.52 uncii |
| Bateriile necesare | 2 baterii AAA (nu sunt incluse) |
| Tehnologia de conectivitate | Infraroşu |
| Dispozitive compatibile | AC Air Conditioner (Specific GREE models listed in Product Overview) |
| Numărul maxim de dispozitive acceptate | 1 |
| Producător | SZHKHXD |
| Țara de origine | China |
| Special Feature Note | Replacement item may not work with all functions as original. |
7. Garanție și asistență
This product is manufactured by SZHKHXD. For specific warranty information or technical support, please contact the seller directly through the platform where the purchase was made. As this is a replacement remote, specific warranty details are typically handled by the seller rather than the original equipment manufacturer (GREE).
Please note that the product description indicates "Selling without batteries or instruction, No configuration." This manual serves as the primary instruction guide for basic operation and troubleshooting.
Ask a question about this manual
Ask about setup, troubleshooting, compatibility, parts, safety, or missing instructions. Manuals+ will review the question and use this page’s manual context to help answer it.