
1. Produs terminatview
The AZZA CSAZ-280B Spectra Black is an ATX Mid Tower gaming case designed to house various computer components. It features a tempered glass side panel and a steel right panel. This manual provides instructions for the proper installation and maintenance of your computer components within this case.

Imaginea 1.1: Față-stânga view of the AZZA CSAZ-280B Spectra Black case, showcasing the tempered glass side panel and the front panel design with integrated RGB lighting.
Caracteristici cheie:
- Left Panel: Tempered glass with rubber mounts for secure installation.
- Right Panel: Solid steel panel.
- Motherboard Compatibility: Supports ATX, Micro-ATX, and ITX motherboards.
- Drive Bays: Up to three 2.5" drive bays and up to two 3.5" drive bays.
- Maximum CPU Cooler Height: Up to 170 mm.
- Maximum Video Card Length: Up to 290 mm.
2. Configurarea și instalarea componentelor
Follow these steps for proper installation of your computer components into the AZZA CSAZ-280B case. Ensure the system is powered off and unplugged before beginning any installation.
2.1 Conexiuni panou frontal I/O
The top panel of the case features various input/output ports and controls for convenient access.

Imaginea 2.1: De sus în jos view of the case's front I/O panel, indicating the Power button, LED control button, Audio jacks (Mic and Headphone), two USB 2.0 ports, and one USB 3.0 port.
- Buton de alimentare: Press to power on or off the system.
- Buton LED: Controls the RGB lighting effects of the case.
- Mufe audio: Separate ports for microphone and headphones.
- Porturi USB: 2.0 Two ports for connecting USB 2.0 devices.
- Port USB 3.0: One port for connecting USB 3.0 devices, offering faster data transfer speeds.
2.2 Instalarea unității
The case supports both 3.5" HDDs and 2.5" SSDs. Refer to the images below for drive bay locations.

Imaginea 2.2: Intern view showing the lower drive cage, capable of holding one 3.5" HDD or one 2.5" SSD, and an additional dedicated 3.5" HDD bay.

Imaginea 2.3: Intern view showing two dedicated 2.5" SSD mounting brackets located behind the motherboard tray.
- For 3.5" HDDs: Install drives into the designated 3.5" drive cage located at the bottom front of the case. Secure with screws.
- For 2.5" SSDs: Install drives into the dedicated 2.5" mounting brackets behind the motherboard tray or in the lower drive cage. Secure with screws.
2.3 Instalarea plăcii grafice
Carcasa suportă plăci grafice cu o lungime de până la 290 mm.

Imaginea 2.4: Intern view illustrating the maximum supported length for a video card, which is 290mm.
- Scoateți capacele sloturilor PCI-E necesare din spatele carcasei.
- Carefully insert the graphics card into the PCI-E slot on your motherboard.
- Fixați placa grafică pe carcasă cu șuruburi.
2.4 Fan Installation and Airflow
Proper fan placement ensures optimal cooling performance. The case supports various fan configurations:
- Faţă: Supports 3 x 120mm fans or 2 x 140mm fans.
- Top: Suportă 2 ventilatoare de 120 mm.
- Spate: Suportă 1 ventilator de 120 mm.
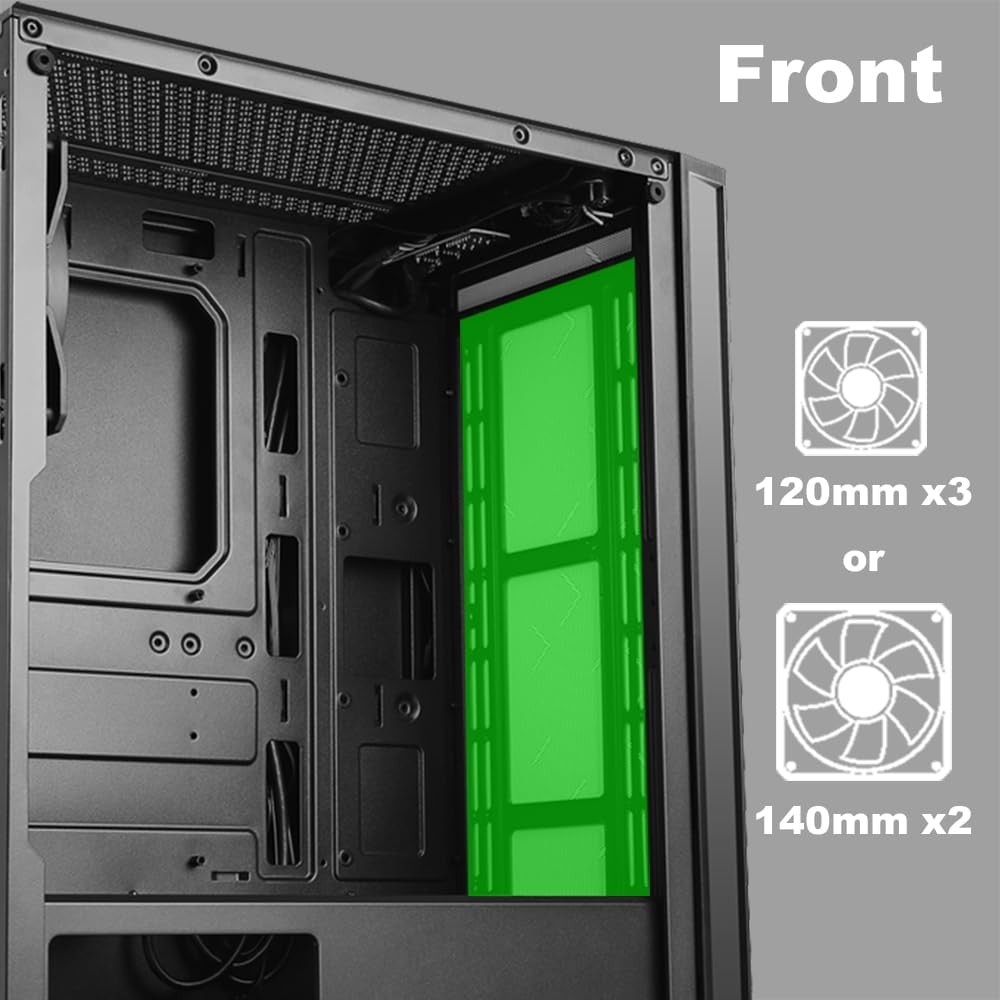
Imaginea 2.5: Intern view of the front panel, highlighting the mounting locations for up to three 120mm fans or two 140mm fans.

Imaginea 2.6: Intern view of the top panel, showing the mounting locations for up to two 120mm fans.

Imaginea 2.7: Intern view of the rear panel, indicating the mounting location for one 120mm fan.
- Identify the desired fan mounting locations (front, top, rear).
- Secure fans to the case using appropriate fan screws.
- Connect fan power cables to the motherboard or a fan controller.
2.5 Instalarea sursei de alimentare
The power supply unit (PSU) mounts at the bottom of the case.
- Slide the PSU into the designated compartment at the bottom rear of the case.
- Fixați sursa de alimentare pe carcasă folosind șuruburi din spate.
- Route power cables through the cable management cutouts to reach your components.
3. Instrucțiuni de utilizare
3.1 Pornire/Oprire
To power on your system, press the power button located on the top I/O panel. To power off, either shut down through your operating system or press and hold the power button for several seconds.
3.2 Control LED
Use the dedicated LED button on the top I/O panel to cycle through various lighting modes and colors for the integrated RGB elements of the case.
4. Întreținere
Întreținerea regulată ajută la asigurarea performanței optime și a longevității componentelor PC-ului.
- Curățare de praf: Curățați periodic filtrele de praf și componentele interne folosind aer comprimat. Asigurați-vă că sistemul este oprit și deconectat de la priză înainte de curățare.
- Organizare de cabluri: Ensure cables are neatly routed to prevent obstruction of airflow and to maintain a clean interior.
- Îngrijirea panoului: Clean the tempered glass panel with a soft, lint-free cloth and a mild glass cleaner. Avoid abrasive materials.
5. Depanare
Această secțiune abordează problemele frecvente pe care le-ați putea întâmpina.
- Sistemul nu pornește:
- Verificați dacă toate cablurile de alimentare (ATX cu 24 de pini, CPU cu 8 pini, GPU) sunt conectate în siguranță la placa de bază și la componente.
- Asigurați-vă că întrerupătorul de alimentare este în poziția „ON”.
- Verificați dacă cablul butonului de alimentare de pe panoul frontal este conectat corect la conectorul panoului frontal al plăcii de bază.
- Fans Not Spinning / LEDs Not Lighting Up:
- Confirm fan power cables are properly connected to the motherboard or fan controller.
- Ensure LED cables are correctly connected to the motherboard's RGB header or the case's LED controller.
- Press the LED button on the top I/O panel to cycle through modes or turn on the lighting.
- Porturile USB nu funcționează:
- Check that the USB 2.0 and USB 3.0 headers from the front panel are correctly plugged into the corresponding ports on your motherboard.
- Mufele audio nu funcționează:
- Ensure the HD Audio cable from the front panel is securely connected to the HD Audio header on your motherboard.
6. Specificații
Detailed technical specifications for the AZZA CSAZ-280B Spectra Black case.
| Caracteristică | Caietul de sarcini |
|---|---|
| Numele modelului | CSAZ-280B SPECTRA BLACK |
| Tipul cazului | Mid Tower |
| Compatibilitate cu placa de baza | ATX, Micro-ATX, ITX |
| Material | Plastic, sticlă securizată |
| Culoare | Negru |
| Dimensiuni (L x l x H) | 19.69 x 17.32 x 9.84 inci |
| Greutatea articolului | 11 lire sterline |
| Compartimente pentru unități de 2.5" | Până la 3 |
| Compartimente pentru unități de 3.5" | Până la 2 |
| Înălțimea maximă a răcitorului CPU | 170 mm |
| Lungimea maximă a plăcii video | 290 mm |
| Porturi I / O frontale | 2 x USB 2.0, 1 x USB 3.0, Audio, Mic, Power, LED Control |
| Suport ventilator frontal | 3 x 120 mm sau 2 x 140 mm |
| Suport de top pentru fani | 2 x 120 mm |
| Suport ventilator spate | 1 x 120 mm |
| Montarea sursei de alimentare | Montare de jos |
7. Garanție și asistență
7.1 Politica de returnare
Acest produs este supus unei politici de returnare de 30 de zile pentru rambursare sau înlocuire, conform termenilor și condițiilor comerciantului.
7.2 Suport tehnic
For technical assistance or inquiries regarding your AZZA product, please visit the official AZZA website or contact their customer support channels. You can find more information and contact details by visiting the AZZA Store on Amazon.