
1. Introducere
Mulțumesc pentru achizițieasing the IRRADIO VDP-4600HDW LCD/LED Projector. This manual provides essential information for the safe and efficient operation of your device. Please read it thoroughly before use and retain it for future reference.
2. Instrucțiuni de siguranță
- Nu blocați orificiile de ventilație. Asigurați o circulație adecvată a aerului în jurul proiectorului pentru a preveni supraîncălzirea.
- Nu priviți direct în lentila proiectorului atunci cândamp este pornit, deoarece lumina puternică poate provoca leziuni oculare.
- Nu lăsați proiectorul să intre în contact cu apă sau alte lichide. Nu îl utilizați în condiții de luminozitate scăzută.amp sau condiții umede.
- Folosiți doar adaptorul de alimentare furnizat împreună cu proiectorul.
- Nu încercați să reparați singur proiectorul. Apelați la personal calificat pentru orice service.
- Așezați proiectorul pe o suprafață stabilă și plană pentru a-l împiedica să cadă.
3. Conținutul pachetului
Vă rugăm să verificați dacă toate articolele sunt prezente în coletul dumneavoastră:
- IRRADIO VDP-4600HDW Projector
- Telecomanda
- Cablu de alimentare
- Cablu HDMI
- Cablu AV
- Manual de utilizare
4. Produs terminatview
4.1. Componentele proiectorului

Figura 4.1: În general view of the IRRADIO VDP-4600HDW Projector. This image displays the projector from an angled perspective, highlighting its compact design and the lens on the front left side, with ventilation grilles and control buttons visible on the top and sides.

Figura 4.2: Faţă view of the projector. This image focuses on the large projection lens on the left, with the IRRADIO logo and ventilation grilles on the right side of the front panel.

Figura 4.3: Spate view of the projector. This image shows the VGA port, focus adjustment knob, and keystone correction knob on the rear panel, along with additional ventilation.
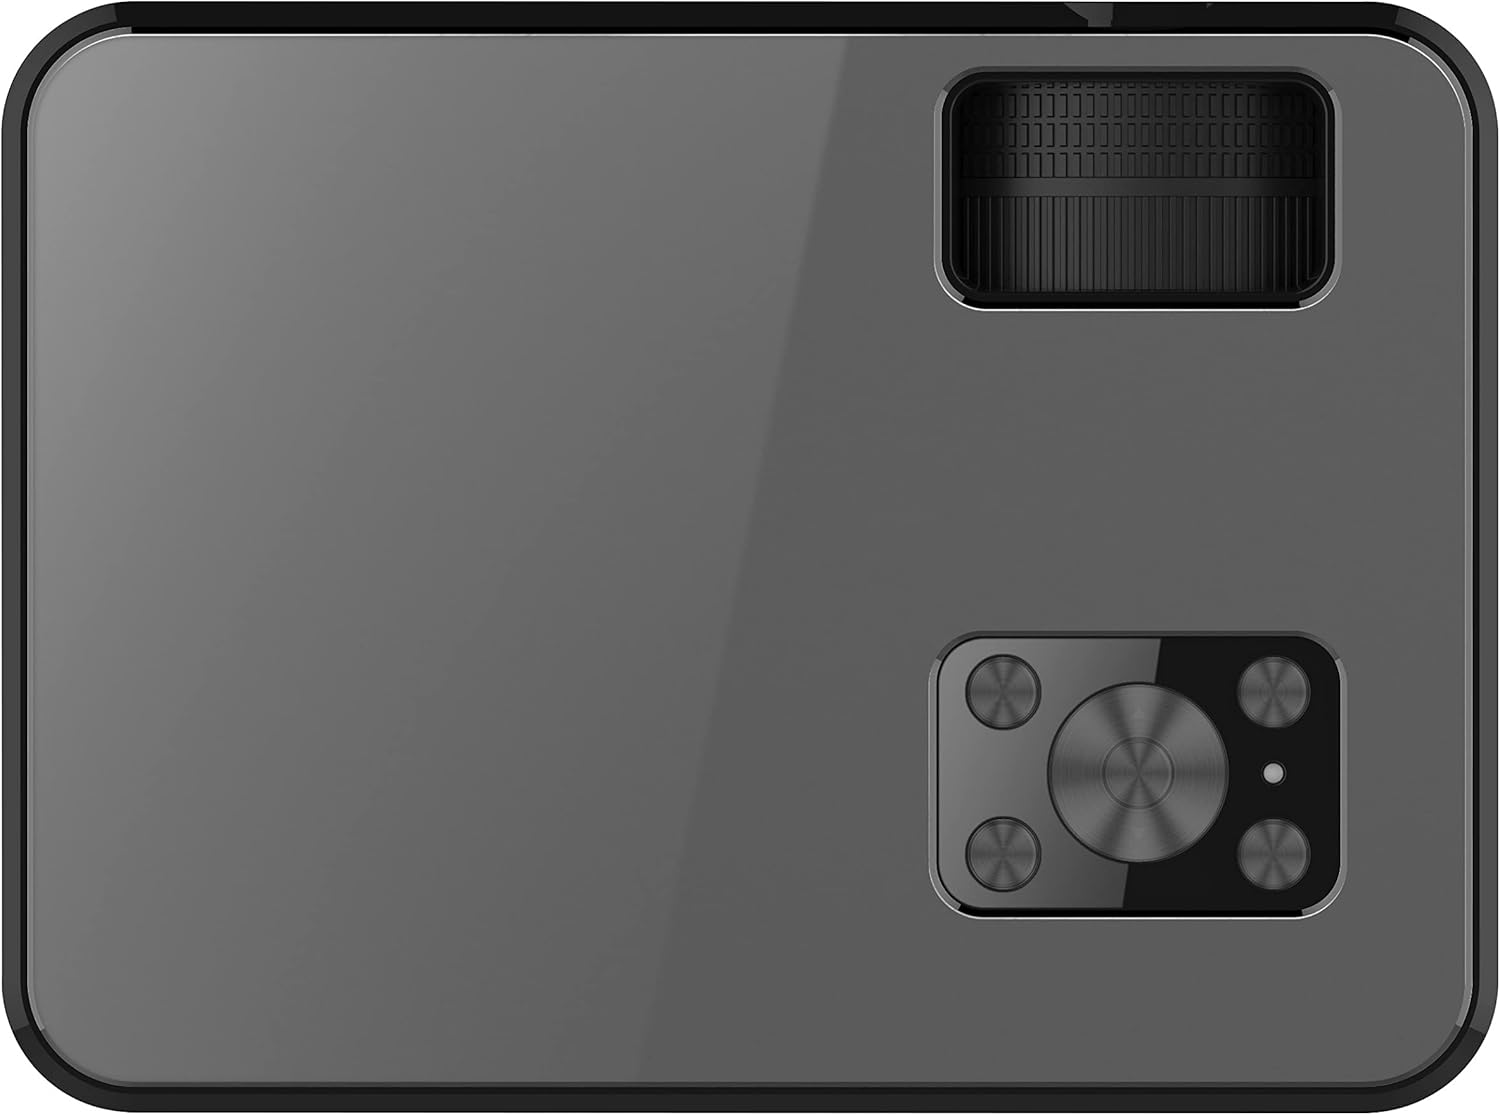
Figura 4.4: Top view of the projector. This image displays the control panel with navigation buttons (up, down, left, right, OK), source, menu, and exit buttons, along with the power button and volume controls.

Figura 4.5: Latura view of the projector showing input/output ports. This image highlights two HDMI ports, AV input, two USB ports, and a 3.5mm headphone jack (audio out).

Figura 4.6: Partea opusă view of the projector. This image shows the power input port and additional ventilation grilles.

Figura 4.7: Fund view of the projector. This image displays the mounting points for ceiling installation and rubber feet for stable placement on a flat surface.
4.2. Telecomanda
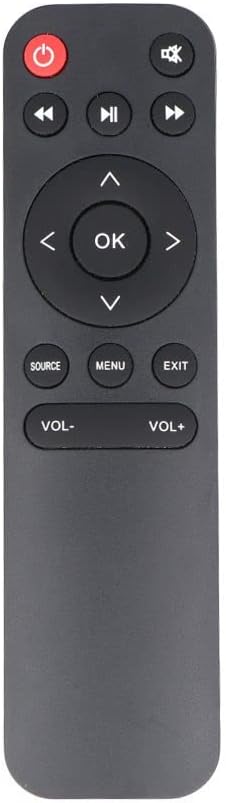
Figura 4.8: The remote control for the IRRADIO VDP-4600HDW Projector. It features buttons for power, mute, navigation (up, down, left, right, OK), source selection, menu, exit, and volume control.
4.3. Ports and Controls Overview
- Buton de alimentare: Pornește/oprește proiectorul.
- Obiectiv: Proiectează imaginea.
- Inel de focalizare: Reglează claritatea imaginii.
- Corecție trapezoială: Ajustează distorsiunea imaginii.
- Porturi HDMI (x2): Connect to HDMI-enabled devices (laptops, gaming consoles, Blu-ray players).
- Porturi USB (x2): Conectați unități USB pentru redarea fișierelor media.
- Port VGA: Connect to computers with VGA output.
- Port AV: Connect to older devices using composite video.
- Ieșire audio de 3.5 mm: Conectați difuzoare externe sau căști.
- Receptor IR: Pentru semnale de telecomandă.
5. Configurare
5.1. Plasare
Place the projector on a stable, flat surface or mount it to the ceiling. Ensure the projector is positioned directly in front of the projection screen or wall. The optimal projection distance ranges from 1.52 meters to 3.48 meters, yielding a screen size between 50 and 120 inches.
- Proiecție frontală: Așezați proiectorul în fața ecranului.
- Proiecție posterioară: Așezați proiectorul în spatele unui ecran translucid.
- Montare pe tavan: The projector can be inverted and mounted to the ceiling. Adjust settings in the OSD menu for inverted projection.
5.2. Conexiune la alimentare
- Conectați cablul de alimentare la portul de intrare al proiectorului.
- Plug the other end of the power cable into a standard electrical outlet (220V AC, 50Hz).
- Apăsați butonul de alimentare de pe proiector sau de pe telecomandă pentru a-l porni.
5.3. Focalizarea și reglarea trapezului
- Porniți proiectorul și afișați o imagine.
- Rotiți Inel de focalizare (located near the lens) until the image appears sharp and clear.
- Reglați Corecție corecție knob (located on the rear panel) to correct any trapezoidal distortion, making the image rectangular.
6. Operare
6.1. Pornire/Oprire
Apăsați butonul de alimentare de pe proiector sau de pe telecomandă pentru a porni sau opri unitatea.
6.2. Selectarea sursei de intrare
După pornire, apăsați butonul SURSĂ button on the remote control or the projector's control panel to cycle through available input sources (HDMI1, HDMI2, USB1, USB2, VGA, AV).
6.3. Conectarea dispozitivelor externe
- HDMI: Connect an HDMI cable from your device (e.g., laptop, game console) to one of the projector's HDMI ports. Select the corresponding HDMI input.
- VGA: Connect a VGA cable from your computer to the projector's VGA port. Select the VGA input.
- DE: Use the provided AV cable to connect to devices with composite video output. Select the AV input.
- USB: Insert a USB flash drive into a USB port. The projector's media player interface will appear automatically or can be accessed via the source menu.
6.4. Redare media (USB)
The integrated media player supports various formats:
- Formate de imagine: JPEG, BMP, PNG, MPO
- Formate video: MPEG1, MPEG2, H.263, H.264, AVS, MJPEG, RV30, RV40, HEVC
- Formate audio: MPEG1, MPEG2, LPCM, MP3
Navigați prin files using the remote control's arrow keys and press OK pentru a selecta.
6.5. Wireless Audio Connection
The projector features an integrated wireless audio function for connecting to external audio devices. Refer to the on-screen display (OSD) menu for specific pairing instructions. Typically, you will need to enable the wireless audio feature in the projector's settings and then pair it with your desired external speaker or headphone.
7. Întreținere
7.1. Curățarea lentilelor
Use a soft, lint-free cloth and a specialized lens cleaning solution to gently wipe the lens. Avoid abrasive materials or excessive pressure.
7.2. Curățarea filtrului de praf
Regularly check and clean the dust filters to ensure optimal airflow and prevent overheating. Use a soft brush or a vacuum cleaner with a brush attachment to remove dust from the ventilation grilles.
7.3. Depozitare
When not in use for extended periods, store the projector in a cool, dry place, protected from dust and direct sunlight. Use the original packaging or a protective case.
8. Depanare
- Fără putere: Asigurați-vă că cablul de alimentare este conectat corect și că priza funcționează.
- Nicio imagine: Check the input source selection. Ensure the connected device is powered on and sending a signal. Verify cable connections.
- Imagine neclară: Adjust the focus ring. Ensure the projection distance is within the optimal range.
- Imagine distorsionată: Reglați corecția keystone.
- Fără sunet: Check the volume settings on both the projector and the connected device. If using external speakers, ensure they are properly connected or paired via wireless audio.
- Telecomanda nu funcționează: Replace the batteries. Ensure there are no obstructions between the remote and the projector's IR receiver.
9. Specificații
| Caracteristică | Caietul de sarcini |
|---|---|
| Sistem de proiecție | LCD panel with LED light source |
| Rezoluție nativă | 1920x1080 (Full HD 1080p) |
| Raportul de contrast dinamic | 2000:1 |
| Light Source Brightness | 3000 lumeni |
| LED Lamp Viaţă | 50,000 de ore |
| Obiectiv | Focalizare manuală |
| Funcție audio wireless | Integrat |
| Conectivitate | 2x HDMI, 2x USB, VGA, AV Composite, 3.5mm Headphone Jack (output) |
| Raportul de aspect | 16:9 Native / 4:3 Compatible |
| Dimensiunea optimă de proiecție | 50" - 120" |
| Distanța optimă de proiecție | 1.52 m până la 3.48 m |
| Moduri de proiecție | Front, Rear, Ceiling (Front/Rear) |
| Audio | 1x 3W Hi-Fi Speaker |
| Sistem de racire | Sistem dublu de racire |
| Limbaj OSD | 23 limbi |
| Alimentare electrică | 220V AC 50Hz (single phase) |
| Greutate | 1.4 kg |
| Dimensiuni (L x A x A) | 222 x 91 x 173 mm |
10. Garanție și asistență
Information regarding specific warranty terms and support contacts is not available in the provided product data. Please refer to the product packaging or the retailer's website-ul pentru detalii despre garanție și informații de asistență pentru clienți.