
1. Introducere
Thank you for choosing the USX MOUNT TV Wall Mount. This manual provides essential information for the safe and correct installation, operation, and maintenance of your new TV wall mount. Please read these instructions thoroughly before installation and retain them for future reference.
2. Informații de siguranță
AVERTIZARE: Failure to read and follow these instructions may result in serious personal injury, property damage, or voiding of your warranty. If you have any questions, please contact customer service.
- Asigurați-vă că suprafața de montare poate susține în siguranță greutatea combinată a suportului și a televizorului.
- Nu depășiți capacitatea maximă de încărcare de 35 kg (77 lbs).
- This product is designed for installation on wood studs or solid concrete walls only. Do not install on drywall alone.
- Folosiți întotdeauna un detector de grinzi pentru a localiza cu precizie grinzile de lemn.
- Use appropriate safety gear during installation, including eye protection.
- Two people are recommended for installation to ensure safety.
3. Conținutul pachetului
Verificați dacă toate componentele sunt prezente și nedeteriorate înainte de a începe instalarea. Dacă lipsesc sau sunt defecte piesele, contactați serviciul clienți.
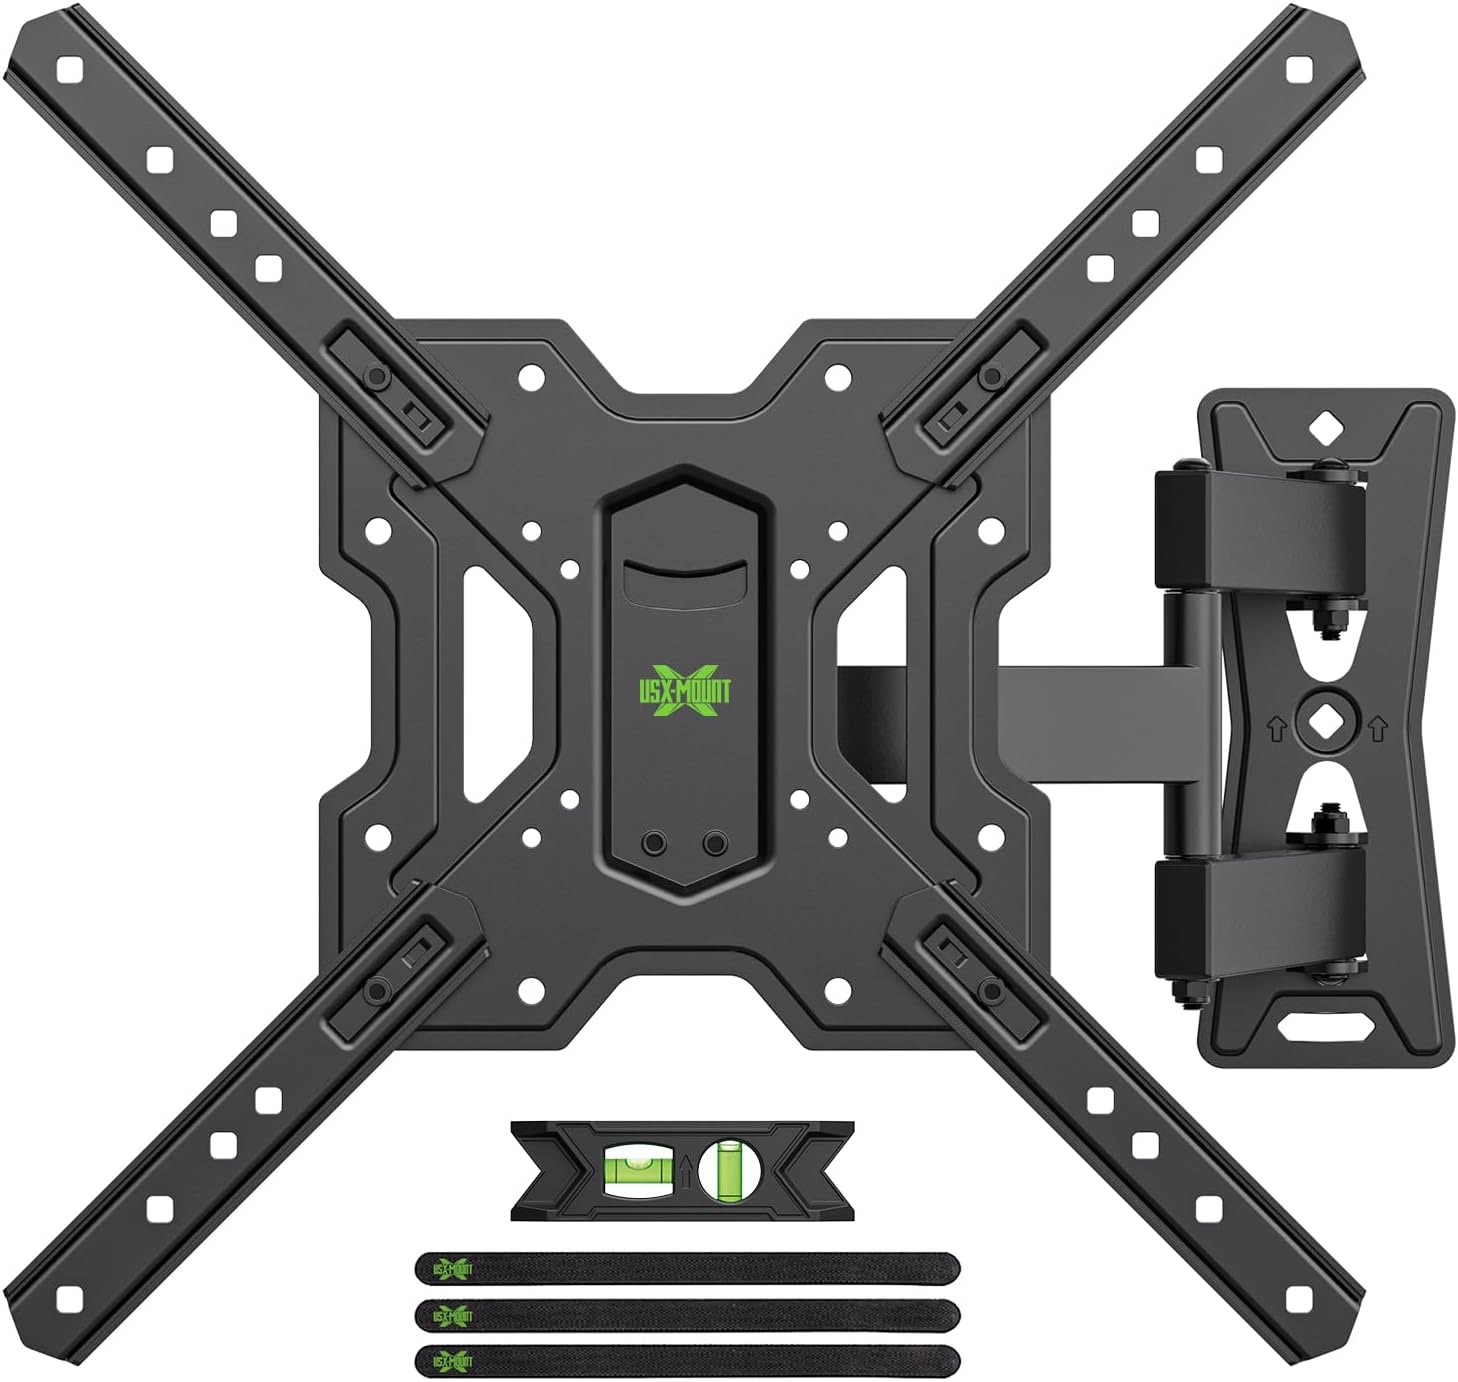
Figura 3.1: Pesteview of the USX MOUNT TV Wall Mount and all included accessories, such as the main mount assembly, VESA extension arms, bubble level, and cable ties.
Hardware inclus:
- Ansamblu placă de perete
- TV Plate (VESA Adapter)
- Various screws, washers, and spacers for TV attachment
- Lag bolts and concrete anchors for wall attachment
- Nivel cu bule
- Legături pentru cabluri
- Cheie hexagonală
4. Specificații
| Caracteristică | Caietul de sarcini |
|---|---|
| Dimensiuni TV compatibile | 26-55 inci |
| Capacitate maximă de încărcare | 35 kg (77 lbs) |
| Compatibilitate VESA | 75x75mm, 100x100mm, 100x200mm, 200x100mm, 200x200mm, 150x150mm, 200x300mm, 200x400mm, 300x200mm, 300x300mm, 400x200mm, 400x300mm, 400x400mm |
| Unghi de înclinare | +5° până la -15° |
| Unghi pivotant | ±90° (depending on TV size) |
| Reglarea nivelului | ±4° |
| Distanța față de perete | 70 mm (min) până la 480 mm (max) |
| Material | Oţel |
| Culoare | Negru |

Figura 4.1: VESA compatibility chart and maximum load capacity for the mount. Always check your TV's VESA pattern before installation.

Figura 4.2: Visual representation of various VESA mounting patterns supported by the mount, indicating horizontal and vertical screw hole distances.
5. Instrucțiuni de instalare
Step 1: Attach TV Plate to TV
- Așezați cu grijă televizorul cu fața în jos pe o suprafață moale și curată pentru a preveni deteriorarea ecranului.
- Identificați găurile de montare VESA de pe spatele televizorului.
- Select the appropriate screws, washers, and spacers from the provided hardware kit that fit your TV's mounting holes.
- Attach the TV plate (VESA adapter) to the back of your TV using the selected hardware. Ensure it is securely fastened but do not overtighten.
Pasul 2: Atașați placa de perete pe perete
IMPORTANT: Determine your wall type before proceeding. This mount is suitable for wood stud walls and solid concrete walls.

Figura 5.1: Illustration of compatible wall types for installation: wood stud and solid concrete. Ensure your wall matches one of these types.
Pentru pereți cu grinzi de lemn:
- Use a stud finder to locate the edges and center of the wood stud. Mark the center of the stud.
- Position the wall plate at your desired height and use the integrated bubble level to ensure it is perfectly horizontal. Mark the pilot hole locations.
- Drill pilot holes into the center of the stud at the marked locations. The drill bit size should be 5/32" (4 mm) and the depth approximately 2.36" (60 mm).
- Attach the wall plate to the wall using the provided lag bolts. Tighten securely with a wrench.
For Solid Concrete Walls:
- Position the wall plate at your desired height and use the integrated bubble level to ensure it is perfectly horizontal. Mark the pilot hole locations.
- Drill pilot holes into the concrete at the marked locations. The drill bit size should be 3/8" (10 mm) and the depth approximately 2.36" (60 mm).
- Insert the concrete anchors into the drilled holes. Tap them gently with a hammer until they are flush with the wall surface.
- Attach the wall plate to the wall using the provided lag bolts. Tighten securely with a wrench.
Step 3: Hang and Secure TV to Wall Plate
- With assistance, carefully lift the TV (with the TV plate attached) and hook it onto the wall plate.
- Ensure the TV is properly seated and centered on the wall plate.
- Secure the TV to the wall plate using the safety screws or locking mechanisms provided. This prevents accidental dislodgement.
Video 5.1: A short demonstration of the installation process, including attaching the TV plate, mounting the wall plate, and hanging the TV. This video also briefly shows the leveling and tilting adjustments.
6. Instrucțiuni de utilizare (Reglări)
Your USX MOUNT TV Wall Mount offers various adjustments for optimal viewing.
Reglarea înclinării:
The mount allows for a tilt range of +5° to -15°. To adjust the tilt:
- Locate the tilt adjustment knobs on the TV plate.
- Loosen the knobs to allow the TV to tilt freely.
- Adjust the TV to your desired vertical angle.
- Tighten the knobs to secure the TV in place.
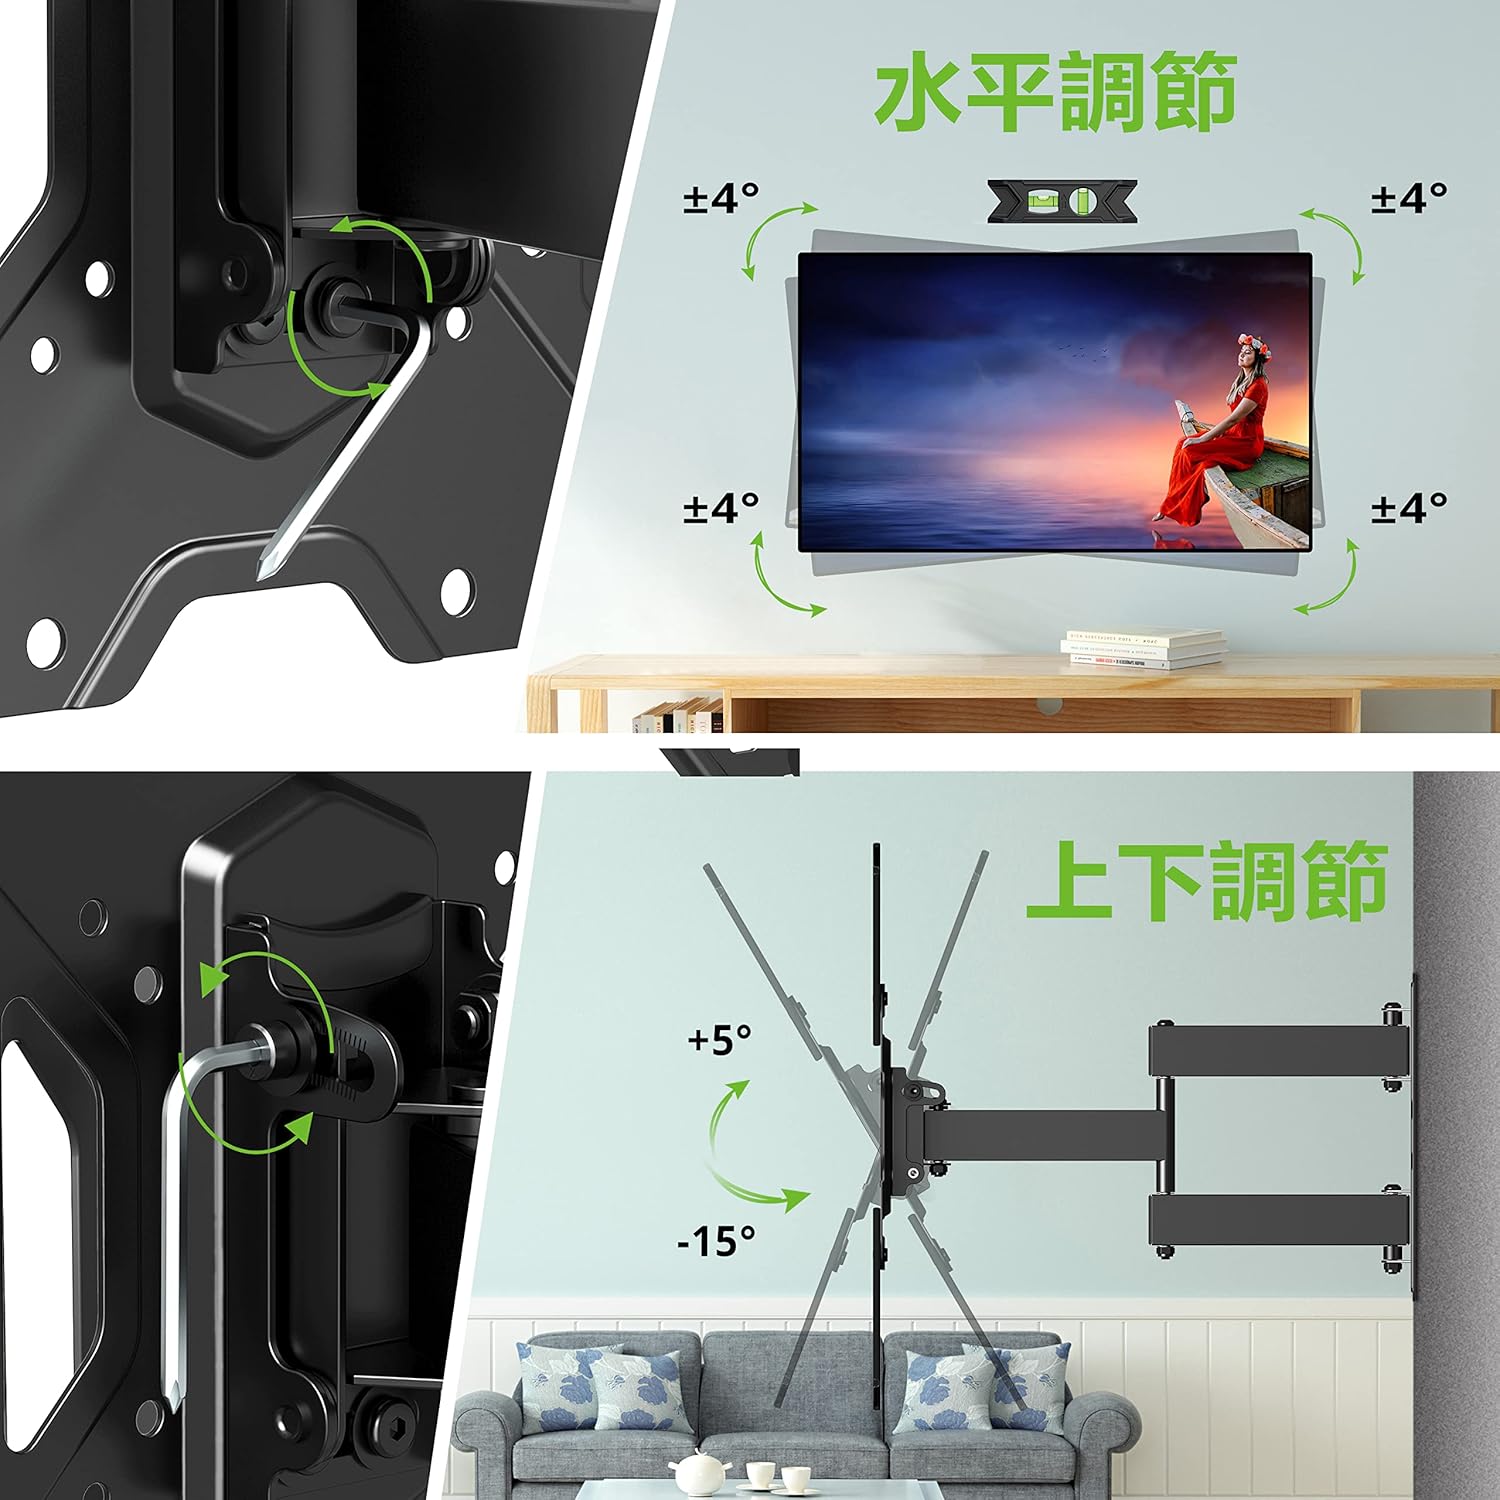
Figura 6.1: Visual guide for adjusting the horizontal level and vertical tilt of the TV. The top panel shows ±4° leveling, and the bottom panel shows +5° to -15° tilt.

Figura 6.2: This image illustrates the adjustable distance from the wall (70mm to 426mm) and the tilt angles (+5° backward, -15° forward) of the TV mount.
Ajustare pivotare:
The mount allows for a swivel of up to ±90° (left/right), depending on the size of your TV. To adjust the swivel:
- Gently push or pull the TV to the desired left or right angle.
- The friction joints will hold the TV in position.

Figura 6.3: This diagram demonstrates the ±90° swivel capability of the TV mount, allowing for flexible viewing angles from various positions in a room.
Reglare nivel:
The mount allows for a level adjustment of ±4° after installation. To adjust the level:
- Use the provided hex key to loosen the leveling screws on the TV plate.
- Adjust the TV until it is perfectly level using the bubble level.
- Tighten the leveling screws to secure the TV in the desired horizontal position.
7. Întreținere
- Verificați periodic toate șuruburile și bolțurile pentru a vă asigura că rămân strânse. Strângeți-le din nou dacă este necesar.
- Curățați suportul cu o cârpă moale și uscată. Evitați utilizarea de produse de curățare abrazive sau solvenți.
- Ensure cables are managed neatly using the provided cable ties to prevent strain or damage.
8. Depanare
Dacă întâmpinați probleme în timpul sau după instalare, vă rugăm să consultați următoarele soluții comune:
- Televizorul nu este la nivel: Use the level adjustment feature as described in Section 6.
- Montura se simte slăbită: Recheck all wall and TV attachment points and tighten any loose fasteners. Ensure the wall type is appropriate for installation.
- Dificultate la reglarea înclinării/rotației: Ensure all adjustment knobs/screws are sufficiently loosened before attempting to move the TV.
If the problem persists, contact USX MOUNT customer support.
9. Garanție și asistență
USX MOUNT provides a 10-year quality guarantee from the date of purchase. This warranty covers manufacturing defects and ensures the product's structural integrity under normal use.
For any questions, missing parts, or support needs, please contact USX MOUNT customer service. Our team is dedicated to providing assistance and ensuring your satisfaction.
Informații de contact: Please refer to the contact details provided with your purchase or visit the official USX MOUNT website-ul.