
1. Introducere
The Raspberry Pi 4 Model B (2GB) is a powerful, compact single-board computer designed for a wide range of applications, from desktop computing to embedded projects. It offers enhanced processing power, improved multimedia capabilities, and expanded connectivity compared to previous models. This manual provides essential information for setting up, operating, and maintaining your Raspberry Pi 4 Model B.

Image 1.1: The Raspberry Pi 4 Model B (2GB) single-board computer, showcasindatorită designului său compact și a numeroaselor porturi.
2. Conținutul pachetului
Upon opening your Raspberry Pi 4 Model B package, you should find the following:
- Raspberry Pi 4 Model B (2GB) board
Note: Additional accessories such as a power supply, microSD card, HDMI cables, and a case are typically sold separately.
3. Caracteristicile produsului
The Raspberry Pi 4 Model B (2GB) includes several key features:
- Procesor: Broadcom BCM2711, Quad Core Cortex-A72 (ARM v8) SoC pe 64 de biți la 1.5 GHz
- RAM: 2 GB LPDDR4-3200 SDRAM
- Conectivitate wireless: 2.4 GHz and 5.0 GHz IEEE 802.11ac wireless, Bluetooth 5.0, BLE
- Ethernet: Gigabit Ethernet
- Porturi USB: 2 USB 3.0 ports; 2 USB 2.0 ports
- GPIO: Standard 40-pin GPIO header (fully backwards compatible with previous boards)
- Video și audio: 2 micro-HDMI ports (up to 4Kp60 supported), 2-lane MIPI DSI display port, 2-lane MIPI CSI camera port, 4-pole stereo audio and composite video port
- Depozitare: Slot pentru card MicroSD pentru sistemul de operare și stocarea datelor
4. Ghid de instalare
4.1. Componente necesare (nu sunt incluse)
- USB-C Power Supply (5V/3A recommended)
- MicroSD Card (minimum 8GB, Class 10 recommended)
- HDMI Cable(s) (micro-HDMI to standard HDMI)
- Tastatură USB și mouse
- Monitor sau televizor cu intrare HDMI
4.2. Instalarea sistemului de operare
- Download the Raspberry Pi Imager software from the official Raspberry Pi website (www.raspberrypi.com/software/).
- Insert your microSD card into your computer's card reader.
- Open Raspberry Pi Imager, select your desired operating system (e.g., Raspberry Pi OS), and choose your microSD card as the destination.
- Click "Write" and wait for the process to complete.
- Safely eject the microSD card from your computer.
4.3. Conexiune hardware
- Insert the prepared microSD card into the card slot on the underside of the Raspberry Pi.
- Connect your USB keyboard and mouse to the USB ports on the Raspberry Pi.
- Connect your monitor(s) to the micro-HDMI ports using appropriate cables. The Raspberry Pi 4 supports up to two displays.
- (Optional) Connect an Ethernet cable for wired network access.
- Finally, connect the USB-C power supply to the Raspberry Pi. The device will power on automatically.
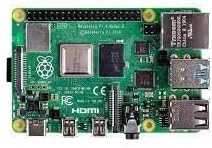
Imaginea 4.3.1: Un prim-plan view of the Raspberry Pi 4 Model B's various ports, including USB, Ethernet, and micro-HDMI.
5. Instrucțiuni de utilizare
5.1. First Boot and Initial Configuration
On the first boot, the Raspberry Pi OS will guide you through an initial setup wizard. This includes setting your country, language, timezone, creating a user password, connecting to Wi-Fi, and updating the software. Follow the on-screen prompts to complete these steps.
5.2. Desktop Environment
Once configured, you will be presented with the Raspberry Pi OS desktop environment. This is similar to other desktop operating systems, allowing you to launch applications, browse the web, administra files, și multe altele.
5.3. Oprirea
To safely shut down your Raspberry Pi, click the Raspberry Pi icon in the top-left corner of the screen, then select Închidere. Always shut down the system properly before disconnecting power to prevent data corruption on the microSD card.
6. Întreținere
- Actualizări de software: Regularly update your operating system and installed software to ensure optimal performance and security. This can typically be done via the terminal using commands like
sudo apt updateşisudo apt full-upgrade. - Răcire: The Raspberry Pi 4 can generate heat under heavy load. Consider using a heatsink or a fan case to ensure proper cooling and prevent thermal throttling, especially for demanding applications.
- Alimentare electrică: Use a high-quality 5V/3A USB-C power supply to ensure stable operation. Insufficient power can lead to instability.
- Îngrijirea cardului MicroSD: Avoid frequently writing large amounts of data to the microSD card to prolong its lifespan. Consider using a USB SSD for heavy data operations.
7. Depanare
- Fără ieșire de afișare: Ensure micro-HDMI cables are securely connected and your monitor is set to the correct input. Try a different micro-HDMI port or cable.
- LED-ul de alimentare intermitent: This often indicates an insufficient power supply. Ensure you are using a 5V/3A USB-C power supply.
- Wi-Fi/Bluetooth Issues: Check your network settings in the Raspberry Pi OS. Ensure the device is within range of your Wi-Fi router.
- Instabilitate/Blocaje ale sistemului: This could be due to overheating (ensure proper cooling), a corrupted microSD card (try re-flashing the OS), or an inadequate power supply.
- Probleme generale: The Raspberry Pi community forums and documentation are excellent resources for troubleshooting specific problems.
8. Specificații
| Caracteristică | Detaliu |
|---|---|
| Procesor | Broadcom BCM2711, Quad Core Cortex-A72 (ARM v8) SoC pe 64 de biți la 1.5 GHz |
| RAM | 2 GB LPDDR4-3200 SDRAM |
| Tip fără fir | 802.11ac, Bluetooth 5.0, BLE |
| Ethernet | Gigabit Ethernet |
| Porturi USB | 2 USB 3.0 ports, 2 USB 2.0 ports |
| Ieșire video | 2 micro-HDMI ports (up to 4Kp60) |
| Ieșire audio | Port audio stereo și video compozit cu 4 poli |
| Antet GPIO | Standard 40-pin GPIO header |
| Depozitare | Slot pentru card MicroSD |
| Sistem de operare | Linux (e.g., Raspberry Pi OS) |
| Greutatea articolului | 2.11 uncii |
9. Garanție și asistență
Pentru informații despre garanție și asistență tehnică, vă rugăm să consultați manualul oficial Raspberry Pi. website or contact your retailer. The Raspberry Pi community also provides extensive resources, forums, and documentation for assistance with projects and troubleshooting.
Oficial Website: www.raspberrypi.com