
1. Introducere
Thank you for choosing the Xigmatek Lux M Micro-ATX Mini Tower PC Case. This manual provides detailed instructions for the installation, operation, and maintenance of your new PC chassis. Please read this manual carefully before beginning the assembly process to ensure proper installation and to maximize the performance and longevity of your system.
The Lux M case is designed to offer a robust and aesthetically pleasing housing for your computer components, featuring a tempered glass side panel, a metallic front panel with a unique cut-out pattern, and pre-installed fixed RGB fans for optimal cooling and visual appeal. It supports Micro-ATX and Mini-ITX motherboards and is compatible with various cooling solutions, including water cooling.
2. Informații de siguranță
Vă rugăm să respectați următoarele măsuri de siguranță în timpul instalării și utilizării:
- Always disconnect the power supply from the wall outlet before installing or removing any components to prevent electric shock.
- Handle all components with care. Avoid touching circuit boards directly; hold them by their edges.
- Wear an anti-static wrist strap when handling sensitive electronic components to prevent electrostatic discharge (ESD) damage.
- Keep the case and components away from liquids, excessive heat, and direct sunlight.
- Asigurați o ventilație adecvată în jurul carcasei PC-ului pentru a preveni supraîncălzirea.
- Keep small parts and screws out of reach of children.
3. Conținutul pachetului
Verificați dacă toate articolele sunt prezente în colet. Dacă lipsesc sau sunt deteriorate articole, vă rugăm să contactați distribuitorul.
- Xigmatek Lux M Micro-ATX Mini Tower PC Case
- Cutie de accesorii (care conține șuruburi, distanțiere, coliere de cablu etc.)
- Manual de utilizare (acest document)
4. Produs terminatview
Familiarize yourself with the various parts of your Xigmatek Lux M PC case.
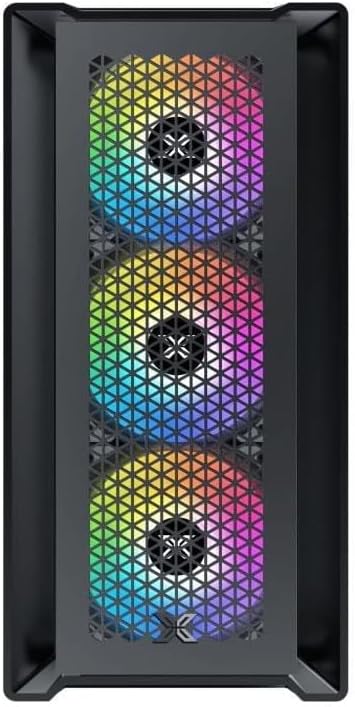
Figura 4.1: Față View. This image displays the front of the Xigmatek Lux M case, highlighting the metallic mesh panel with a triangular design and the three pre-installed 120mm fixed RGB fans.

Figure 4.2: Angled Top-Front View. This perspective shows the tempered glass side panel, offering a clear view of the interior, and the top panel with its I/O ports (USB, audio) and power button.
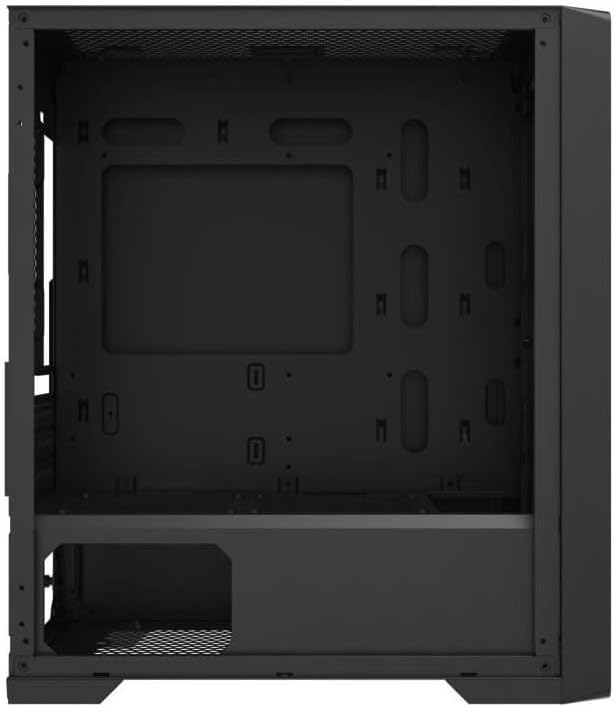
Figura 4.3: Amenajarea interioară. The internal structure of the case, featuring the motherboard mounting tray, cutouts for cable management, and the power supply shroud at the bottom.
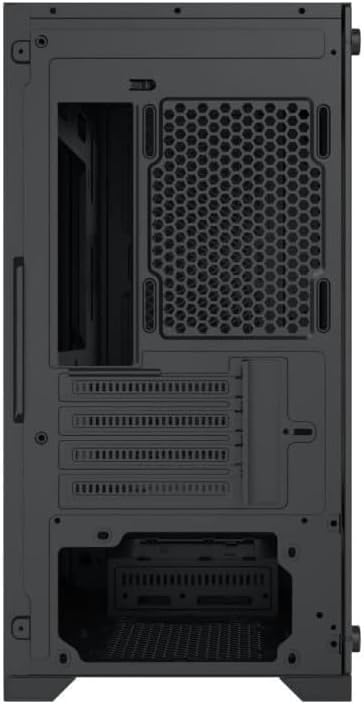
Figura 4.4: Spate View. This image illustrates the rear of the case, including the expansion slots for graphics cards and other add-in cards, the rear fan mounting area, and the power supply mounting bracket.
5. Configurare și instalare
Follow these steps to install your computer components into the Xigmatek Lux M case.
5.1. Pregătirea cazului
- Așezați carcasa pe o suprafață plană și stabilă.
- Remove the tempered glass side panel by unscrewing the thumb screws and carefully lifting it off. Set it aside on a soft, non-abrasive surface.
- Remove the opposite steel side panel by unscrewing the thumb screws and sliding it backward.
5.2. Instalarea plăcii de bază
The Lux M supports Micro-ATX and Mini-ITX motherboards.
- Instalați ecranul I/O (dacă nu este preinstalat pe placa de bază) în deschiderea din spate a carcasei.
- Align the motherboard with the pre-installed standoffs. Ensure all screw holes on the motherboard match the standoffs.
- Secure the motherboard using the provided motherboard screws. Do not overtighten.
5.3. Instalarea unității de alimentare (PSU)
The PSU mounts at the rear bottom of the case.
- Slide the PSU into its designated compartment from the rear of the case.
- Align the PSU's screw holes with the holes on the case's rear panel.
- Secure the PSU with the provided screws.
5.4. Storage Drive Installation (2.5"/3.5" Drives)
The case supports 2x 2.5"/3.5" storage drives.
- Locate the drive cage beneath the PSU shroud or dedicated 2.5" mounting points behind the motherboard tray.
- For 3.5" HDDs, slide the drive into a drive tray (if applicable) and secure it with screws.
- For 2.5" SSDs, secure them directly to the mounting points using the provided screws.
5.5. Graphics Card (VGA) and Expansion Card Installation
Carcasa suportă plăci grafice cu o lungime de până la 320 mm.
- Scoateți capacele sloturilor de expansiune necesare din spatele carcasei.
- Insert your graphics card or other expansion card into the appropriate PCIe slot on your motherboard.
- Secure the card to the case using the expansion slot screws.
5.6. Cooling System Installation (Optional)
The Lux M comes with 4x 120mm X24F fixed RGB fans. It supports additional cooling options.
- Cooler CPU: Max height of 160mm. Install your CPU cooler according to its manufacturer's instructions.
- Suport radiator: The case supports radiators of 360mm, 240mm, or 120mm. Refer to your radiator's manual for installation. Common mounting locations include the front and top panels.
5.7. Gestionarea cablurilor
Folosește decupajele pentru rutarea cablurilor și punctele de fixare din spatele tăvii plăcii de bază pentru a organiza cablurile. Acest lucru îmbunătățește circulația aerului și aspectul estetic.
5.8. Adunarea finală
- Once all components are installed and cables are managed, reattach the steel side panel and secure it with thumb screws.
- Carefully reattach the tempered glass side panel and secure it with thumb screws.
6. Instrucțiuni de utilizare
After completing the installation, connect your peripherals (monitor, keyboard, mouse) and power cable to the PC. Press the power button located on the top panel of the case to start your system.
The pre-installed X24F RGB fans feature fixed RGB lighting, which will illuminate automatically upon system power-on. No additional software or controller is required for their basic operation.
Ensure that the case's ventilation is not obstructed to maintain optimal airflow and cooling performance.
7. Întreținere
Întreținerea regulată ajută la asigurarea longevității și a performanței optime a componentelor PC-ului.
- Curățare de praf: Periodically clean dust filters (if present) and the interior of the case using compressed air or a soft brush. Dust accumulation can hinder airflow and lead to overheating.
- Curatenie exterioara: Ștergeți suprafețele exterioare cu un material moale, damp cloth. Avoid harsh chemicals that may damage the finish or tempered glass.
- Sticla securizata: Clean the tempered glass panel with a glass cleaner and a microfiber cloth to avoid scratches and streaks.
8. Depanare
Dacă întâmpinați probleme în timpul sau după instalare, luați în considerare următorii pași comuni de depanare:
- Fără putere:
- Asigurați-vă că cablul de alimentare este conectat corect atât la sursa de alimentare, cât și la priza de perete.
- Check that the PSU switch is in the 'ON' position.
- Verify that the front panel power switch cable is correctly connected to the motherboard's front panel header.
- Fans Not Spinning / RGB Not Lighting:
- Ensure all fan power cables are securely connected to the motherboard or a fan controller.
- For RGB, confirm that any necessary RGB headers are connected to the motherboard (though the included fans are fixed RGB and should light up with power).
- Fără ieșire de afișare:
- Verify that your monitor cable is connected to the graphics card (if installed) and not the motherboard's integrated graphics port.
- Reinstalați placa grafică în slotul său PCIe.
- Supraîncălzire:
- Ensure all case fans are spinning and oriented correctly for optimal airflow (intake/exhaust).
- Curățați toate filtrele de praf și componentele interne.
- Verify that the CPU cooler is properly seated and making good contact with the CPU.
For more complex issues, consult your component manuals or seek assistance from Xigmatek support or a qualified technician.
9. Specificații
| Caracteristică | Caietul de sarcini |
|---|---|
| Marca | Xigmatek |
| Numele modelului | Lux M |
| Numărul de model | EN48540 |
| Tipul cazului | Turnul Mini |
| Compatibilitate cu placa de baza | Micro-ATX, Mini-ITX |
| Material | Tempered Glass (side panel), Metal (front panel) |
| Culoare | Negru |
| Ventilatoare preinstalate | 4 x 120mm X24F Fixed RGB Fans |
| Suport radiator | 360 mm, 240 mm, 120 mm |
| Înălțimea maximă a răcitorului CPU | 160mm |
| Lungime maximă VGA | 320mm |
| Lungimea maximă a PSU | 165mm |
| Locuri de stocare | 2x 2.5"/3.5" |
| Caracteristici speciale | RGB Lighting, Triangular Mesh Front Design |
10. Garanție și asistență
Xigmatek products are manufactured to the highest quality standards. For warranty information and technical support, please refer to the warranty card included with your product or visit the official Xigmatek website. Vă rugăm să păstrați dovada achiziției pentru reclamații în garanție.
For further assistance, you may contact Xigmatek customer support through their official channels.