
1. Introducere
The Raspberry Pi 4 Model B is a powerful, credit-card sized computer designed for a wide range of applications, from desktop computing to embedded projects. This 8GB RAM version offers enhanced performance for demanding tasks. It features a quad-core Cortex-A72 (ARM v8) 64-bit SoC, dual display support up to 4K@60Hz, true Gigabit Ethernet, 2.4 GHz and 5.0 GHz wireless LAN, Bluetooth 5.0, and upgraded USB 3.0 ports.
This manual provides essential information for setting up, operating, maintaining, and troubleshooting your Raspberry Pi 4 Model B.

Imaginea 1: De sus în jos view of the Raspberry Pi 4 Model B (8GB) board, showing the main components and ports.
2. Configurare
2.1 Componente necesare
- Raspberry Pi 4 Model B (8GB) board
- Official Raspberry Pi USB-C Power Supply (5.1V, 3A) or equivalent
- MicroSD card (minimum 8GB, Class 10 recommended) with Raspberry Pi OS installed
- Micro HDMI to HDMI cable (x2 for dual display)
- Tastatură și mouse USB
- Monitor sau televizor cu intrare HDMI
- (Optional) Ethernet cable for wired network connection
2.2 Pregătirea cardului MicroSD
- Download the Raspberry Pi Imager software from the official Raspberry Pi website-ul.
- Insert your MicroSD card into a card reader connected to your computer.
- Open Raspberry Pi Imager, select your desired operating system (e.g., Raspberry Pi OS Full), and choose your MicroSD card.
- Click "Write" to install the operating system onto the MicroSD card. This process will erase all existing data on the card.
- Once the writing process is complete, safely eject the MicroSD card from your computer.
2.3 Conectarea perifericelor
Before applying power, connect all necessary peripherals:
- Card MicroSD: Insert the prepared MicroSD card into the card slot on the underside of the Raspberry Pi.
- Afişa: Connect one or two Micro HDMI to HDMI cables from the Raspberry Pi's Micro HDMI ports to your monitor(s).
- Tastatură și mouse: Connect your USB keyboard and mouse to the USB 2.0 or USB 3.0 ports.
- Rețea (opțional): For a wired connection, plug an Ethernet cable into the Ethernet port.
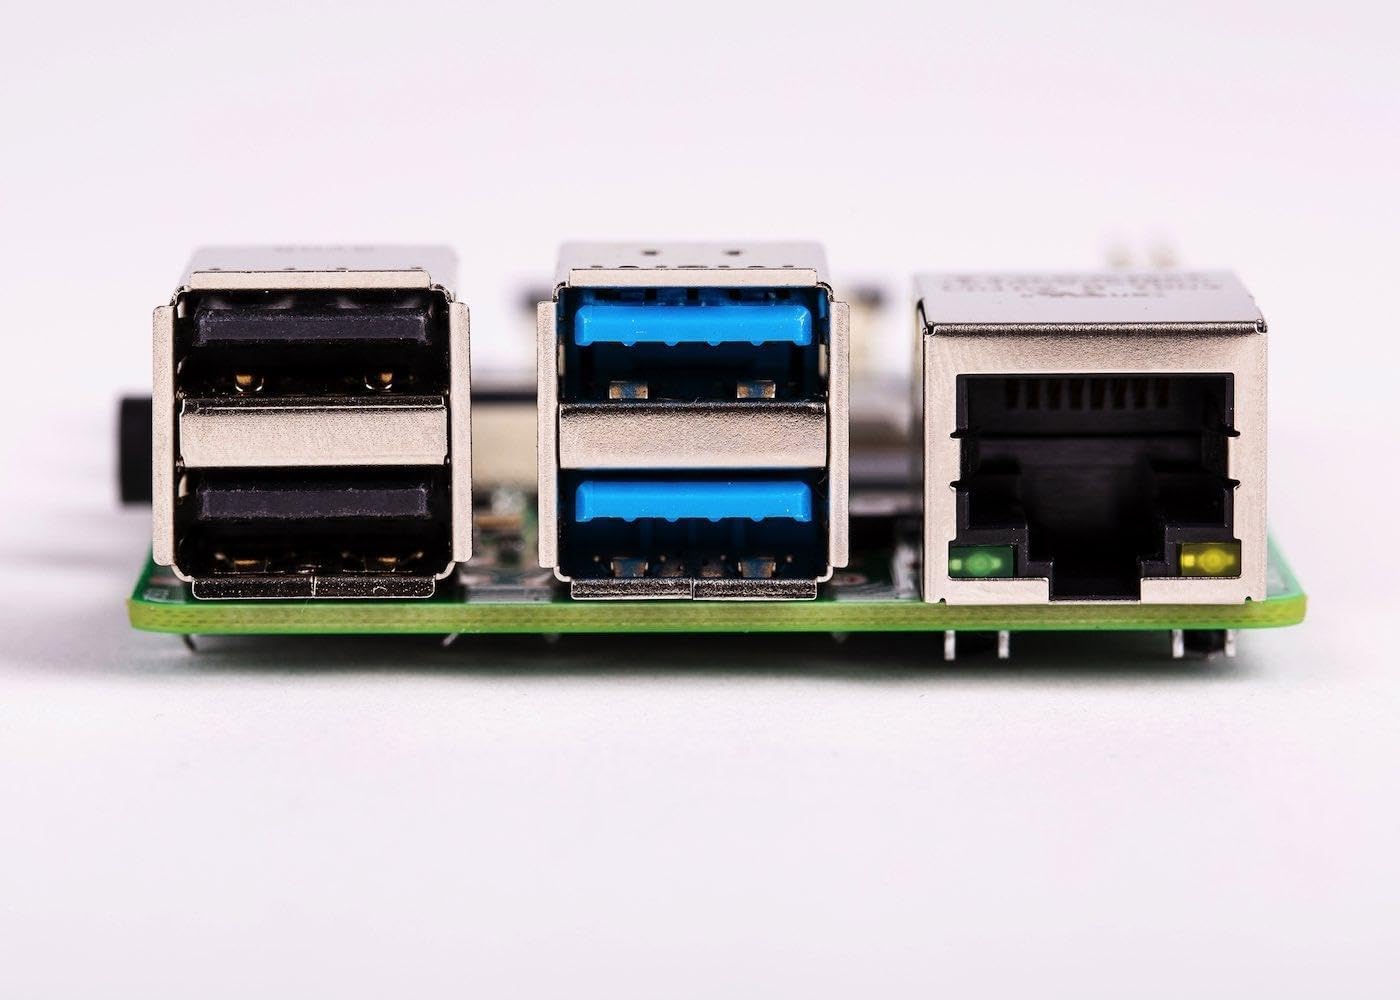
Imaginea 2: Laterală view of the Raspberry Pi 4 Model B, highlighting the USB 2.0, USB 3.0, and Ethernet ports.
2.4 Pornire
Once all peripherals are connected, plug the USB-C power supply into the Raspberry Pi's USB-C power port. The Raspberry Pi will automatically power on and begin the boot process. The red power LED will illuminate, and the green activity LED will flash during boot.
3. Instrucțiuni de utilizare
3.1 First Boot and Initial Configuration
On the first boot, Raspberry Pi OS will guide you through an initial setup wizard. This includes setting your country, language, timezone, creating a new password, connecting to Wi-Fi, and updating software. Follow the on-screen prompts to complete the setup.
3.2 Desktop Environment
After initial setup, you will be presented with the Raspberry Pi OS desktop environment. This functions similarly to other desktop operating systems, allowing you to browse the web, edit documents, program, and more.
3.3 Conectivitate
- Wifi: Connect to a wireless network using the network icon in the top-right corner of the desktop.
- Bluetooth: Pair Bluetooth devices via the Bluetooth icon in the top-right corner.
- Ethernet: If an Ethernet cable is connected, the Raspberry Pi will automatically establish a wired network connection.
3.4 Antet GPIO
The 40-pin GPIO (General Purpose Input/Output) header allows you to connect and control various electronic components and sensors. Refer to the official Raspberry Pi documentation for detailed information on GPIO programming and usage.

Imaginea 3: Sus view of the Raspberry Pi 4 Model B, showing the 40-pin GPIO header on the left side.
4. Întreținere
4.1 Actualizări de software
Regularly update your Raspberry Pi OS to ensure optimal performance, security, and access to the latest features. Open a terminal and run the following commands:
sudo apt update
sudo apt full-upgrade -y
sudo reboot
4.2 Răcire
The Raspberry Pi 4 can generate significant heat under heavy load. For sustained performance, especially in enclosed spaces or demanding applications, consider using a heatsink or an active cooling solution (e.g., a fan) to prevent thermal throttling.

Imaginea 4: Prim-plan view of the main processor chip on the Raspberry Pi 4 Model B, which can benefit from cooling solutions.
4.3 Safe Shutdown
Always shut down your Raspberry Pi properly to prevent data corruption on the MicroSD card. You can do this via the desktop menu (Menu > Shutdown > Shutdown) or by opening a terminal and typing:
sudo shutdown -h nowWait for the green activity LED to stop flashing before disconnecting power.
5. Depanare
- Fără ieșire de afișare:
- Ensure Micro HDMI cables are securely connected to both the Raspberry Pi and the monitor.
- Verificați dacă monitorul este setat la sursa de intrare corectă.
- Try a different Micro HDMI cable or monitor.
- Ensure the MicroSD card has a valid operating system installed.
- Power Issues (No LEDs, No Boot):
- Confirm you are using a compatible 5.1V 3A USB-C power supply.
- Check the power cable and connection.
- Try a different power supply if available.
- Probleme de conectivitate Wi-Fi/Bluetooth:
- Ensure the Wi-Fi/Bluetooth module is enabled in the Raspberry Pi OS settings.
- Check for correct network credentials.
- Move the Raspberry Pi closer to the wireless access point.
- Asigurați-vă că niciun obstacol fizic nu blochează semnalul.
- Performanță lentă:
- Check for excessive heat and consider adding a cooling solution.
- Ensure your MicroSD card is a high-speed (Class 10 or higher) card.
- Închideți aplicațiile inutile.
- Efectuați o actualizare de software.
For more detailed troubleshooting, visit the official Raspberry Pi documentation and community forums.
6. Specificații
| Caracteristică | Detaliu |
|---|---|
| Procesor | Broadcom BCM2711, Quad-core Cortex-A72 (ARM v8) SoC pe 64 de biți la 1.5 GHz |
| RAM | 8 GB LPDDR4-2400 SDRAM |
| Conectivitate | 2.4 GHz and 5.0 GHz IEEE 802.11b/g/n/ac wireless LAN, Bluetooth 5.0, BLE, Gigabit Ethernet |
| Porturi USB | 2 × porturi USB 3.0, 2 × porturi USB 2.0 |
| Video & Sound | 2 × porturi micro-HDMI (acceptate până la 4Kp60), port de afișare MIPI DSI cu 2 benzi, port de cameră MIPI CSI cu 2 benzi, port audio stereo cu 4 poli și port video compozit |
| GPIO | Antet standard GPIO cu 40 de pini (complet compatibil înapoi cu plăcile anterioare) |
| Putere | 5V DC via USB-C connector (minimum 3A), 5V DC via GPIO header, Power over Ethernet (PoE) enabled (requires separate PoE HAT) |
| Dimensiuni | 2.76 x 1.97 x 0.39 inchi (70 x 50 x 10 mm) |
| Sistem de operare | Raspberry Pi OS (formerly Raspbian) |

Imaginea 5: Prim-plan view of the dual Micro HDMI ports and the MIPI CSI camera port on the Raspberry Pi 4 Model B.
7. Garanție și asistență
Pentru informații despre garanție și asistență tehnică, vă rugăm să consultați manualul oficial Raspberry Pi. website-ul web sau contactați punctul de vânzare. Păstrați dovada achiziției pentru solicitări de garanție.
Raspberry Pi oficial Website: www.raspberrypi.org